SSD is gaining popularity nowadays since it offers more outstanding performance than HDD and its price keeps falling. However, to get the best performance of SSD, there are some tips and tricks. This post shows how to optimize SSD Windows 10 and introduce some SSD optimization tools.
Why Solid State Drive Is Popular
A solid state drive (SSD) is a data storage device which uses integrated circuit assemblies as memory to store data persistently.
Unlike mechanical hard drives (HDD) which require track seeking time and latency time to read data, SSD is capable of retrieving and reading data directly from any location of the flash memory. In other words, there is almost no random access time to read data on SSD (it is typically under 0.1ms), which saves a lot of time. Therefore, SSD is preferred by lots of computer users who are seeking for speed.
However, SSD performance is easy to be affected by various kinds of factors, so users had better take some basic operations in case of performance loss.
In this post we are going to show users some tips on getting the most out of SSD as well as methods for SSD optimization in Windows 10, Windows 8.1/8, and Windows 7. At the same time, an SSD optimization tool will be introduced.
To Get Best Performance from SSD – Use It as System Disk
We had better use SSD as the boot or system disk (the disk installing Windows OS), because SSD will tweak your Windows 10 as well as any other version of Windows OS via reducing computer’s boot time, increasing system running speed, and boosting data stabilization.
In addition, we highly suggest installing Windows 7 or more recent Windows operating systems on SSD, because these systems have a lot of features which are useful to optimize SSD performance, including the TRIM command, auto partition alignment, the feature of disabling defragmentation/Superfetch/Prefectch, and so on.
Of course, you can also install programs like games, PhotoShop, and other apps requiring speed on SSD, which will also bring you wonderful experience.
Quickly Migrate OS to SSD
Migrate OS to SSD/HD Wizard feature of MiniTool Partition Wizard can be used to transfer your Windows from HDD to SSD. Its Free Edition can’t support OS migration from MBR to GPT, but the Professional and more advanced editions support it. Just get MiniTool Partition Wizard Pro from the following button.
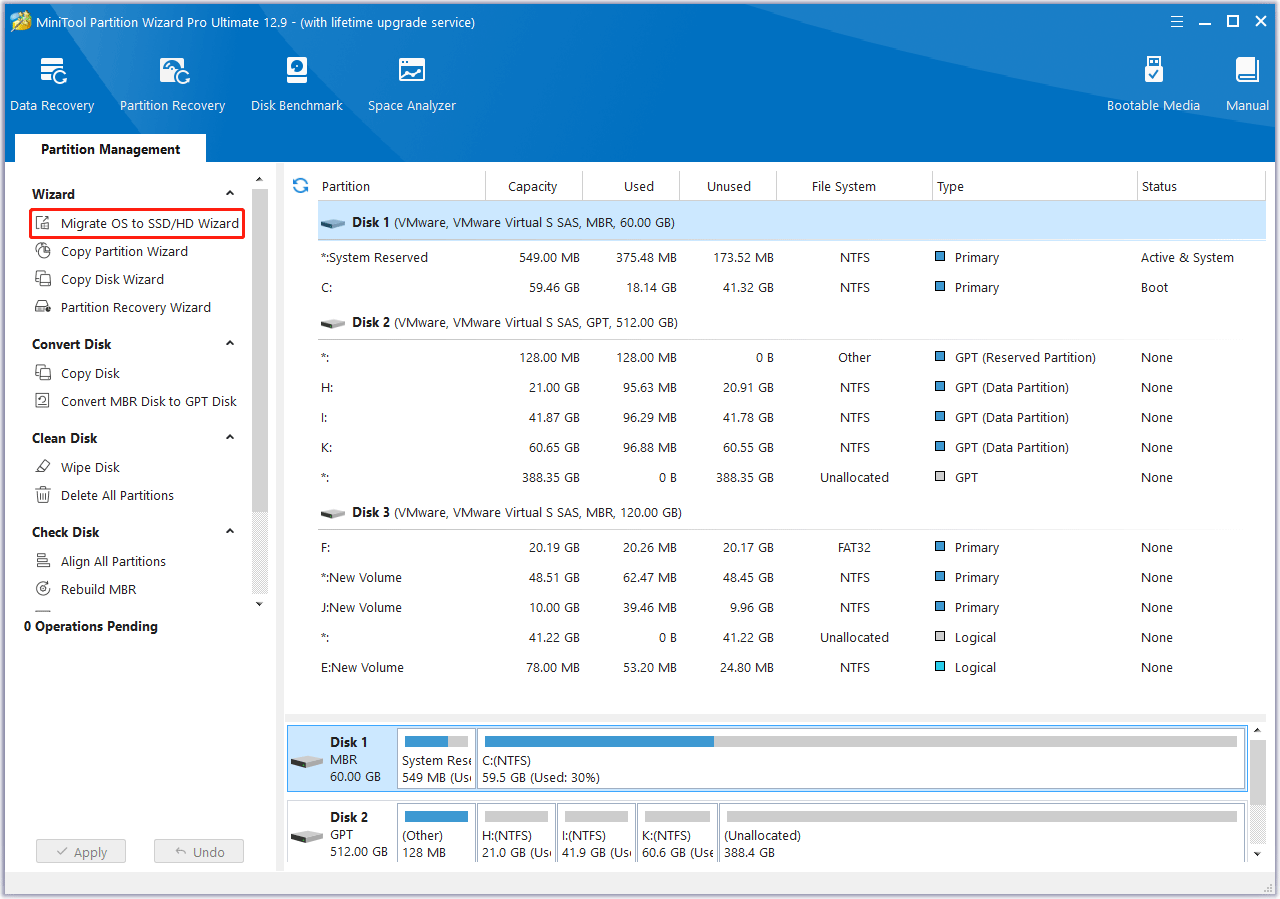
Step 1. Choose Migrate OS to SSD/HD.
- Run MiniTool Partition Wizard to get the main interface.
- Click Migrate OS to SSD/HD Wizard.
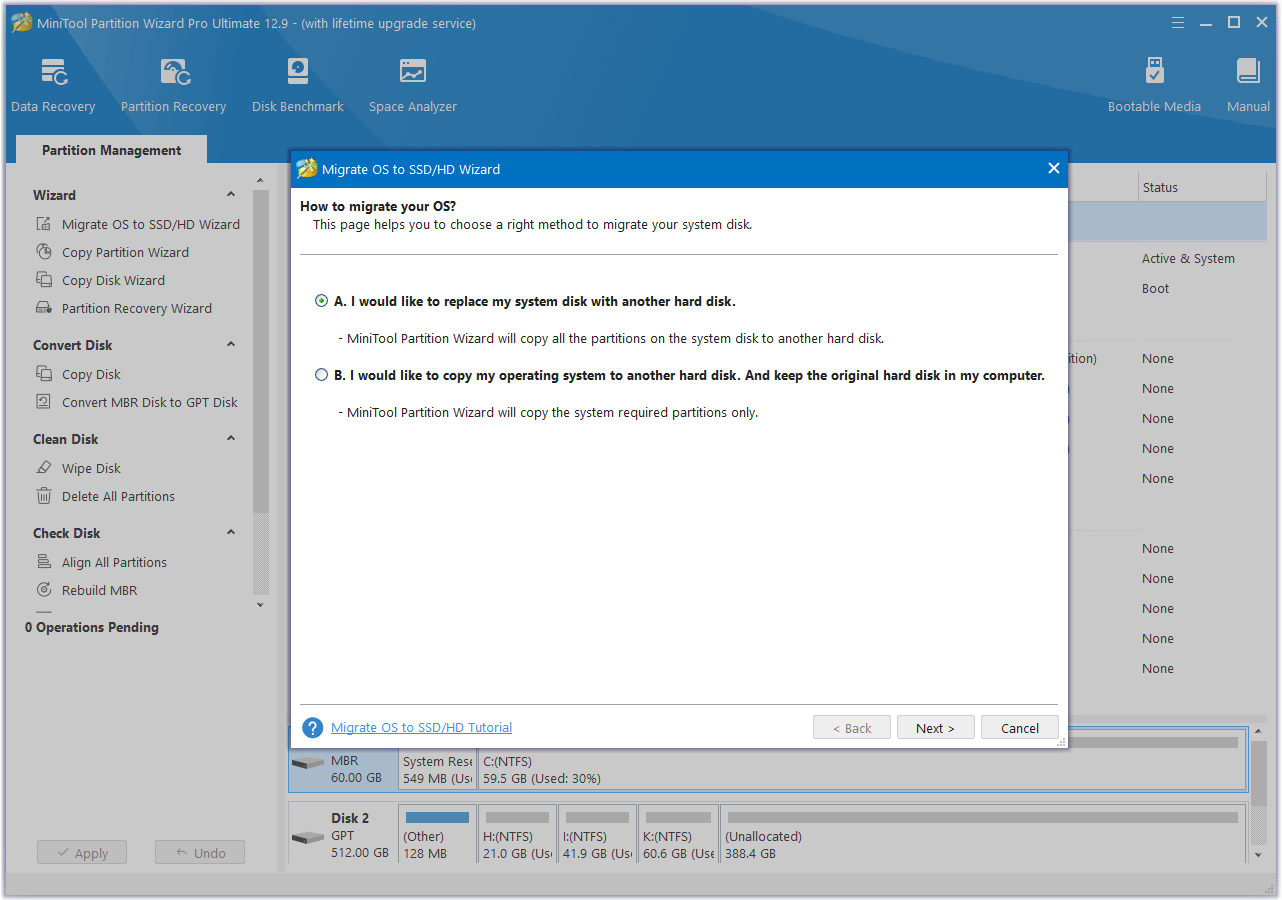
Step 2. Choose a way to migrate OS.
- only to migrtae the OS.
- migrate all partitions on the system disk.
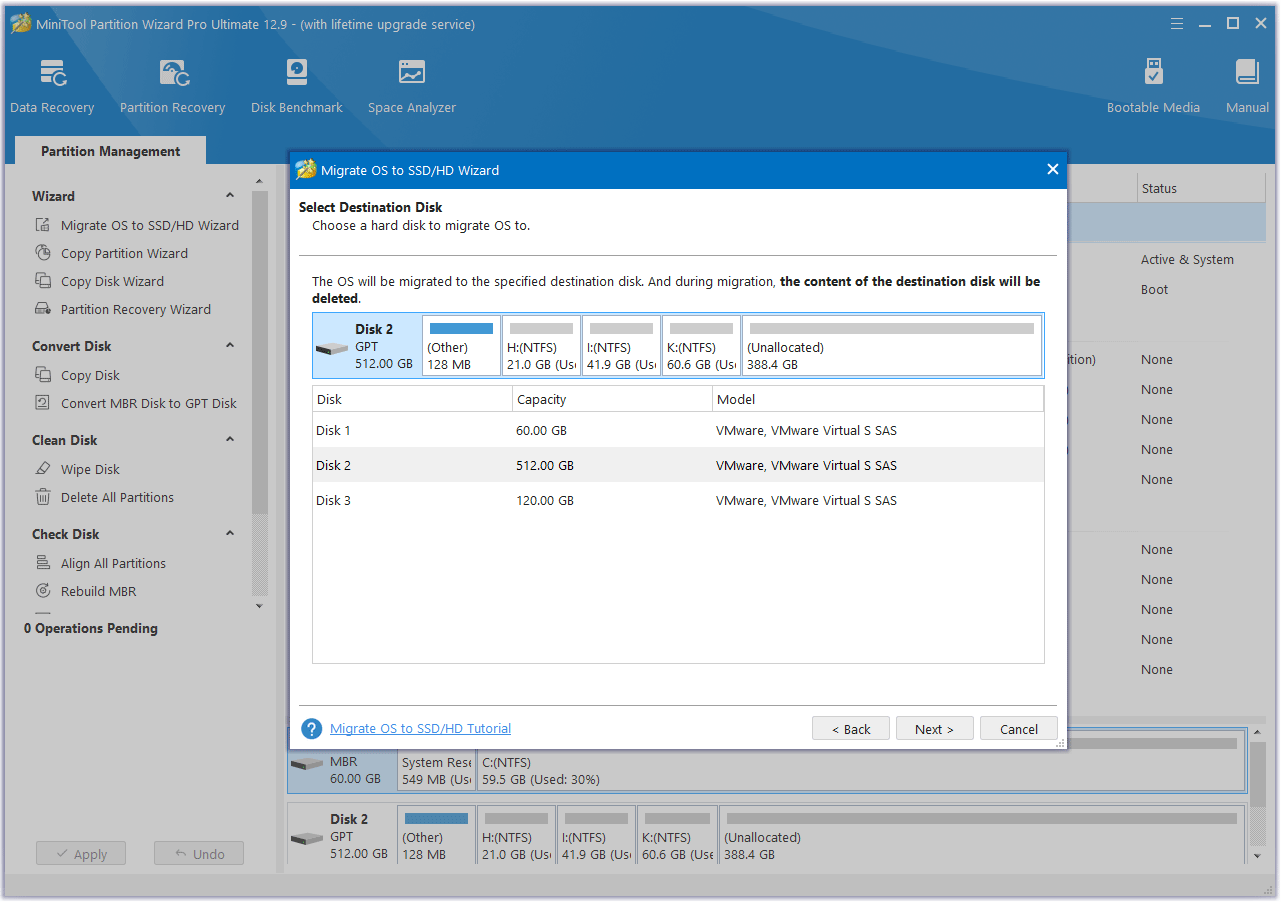
Step 3. Choose a destination disk to hold the system.
Now you need to choose a disk as the destination to hold all content from the source disk. Note that all content on the destination disk (must be basic disk) will be erased, a data transafer should be necessary if there are key files saved on the drive.
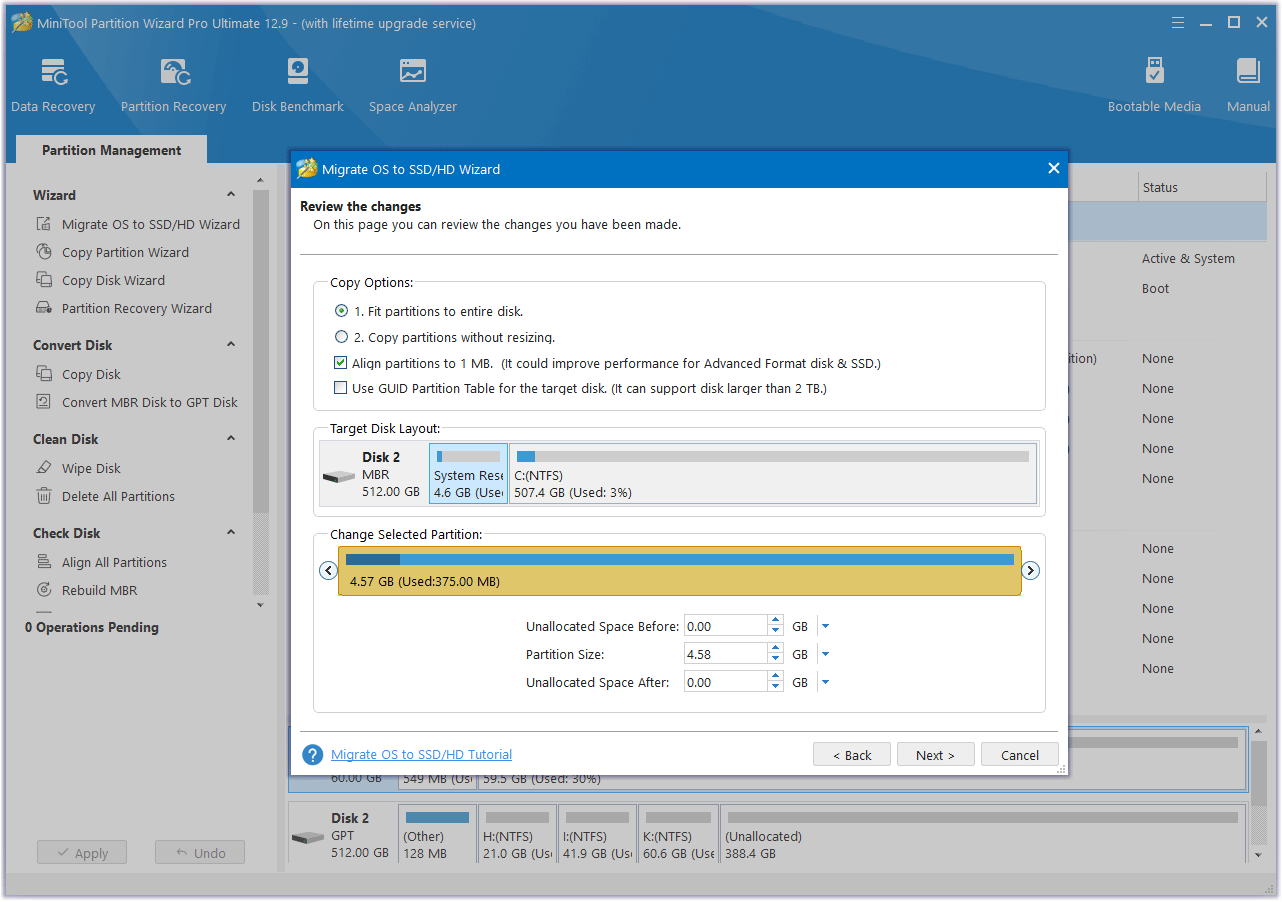
Step 4. Choose the copy options.
- If you want the whold destination disk to be occupied, choose the 1st one.
- To keep the original partition size, choose the 2nd one.
- The 3rd option is better to keep checked so as to enhace the performace of the SSD.
- And the 4st option helps migrate OS from MBR disk to GPT disk, which is a paid function.
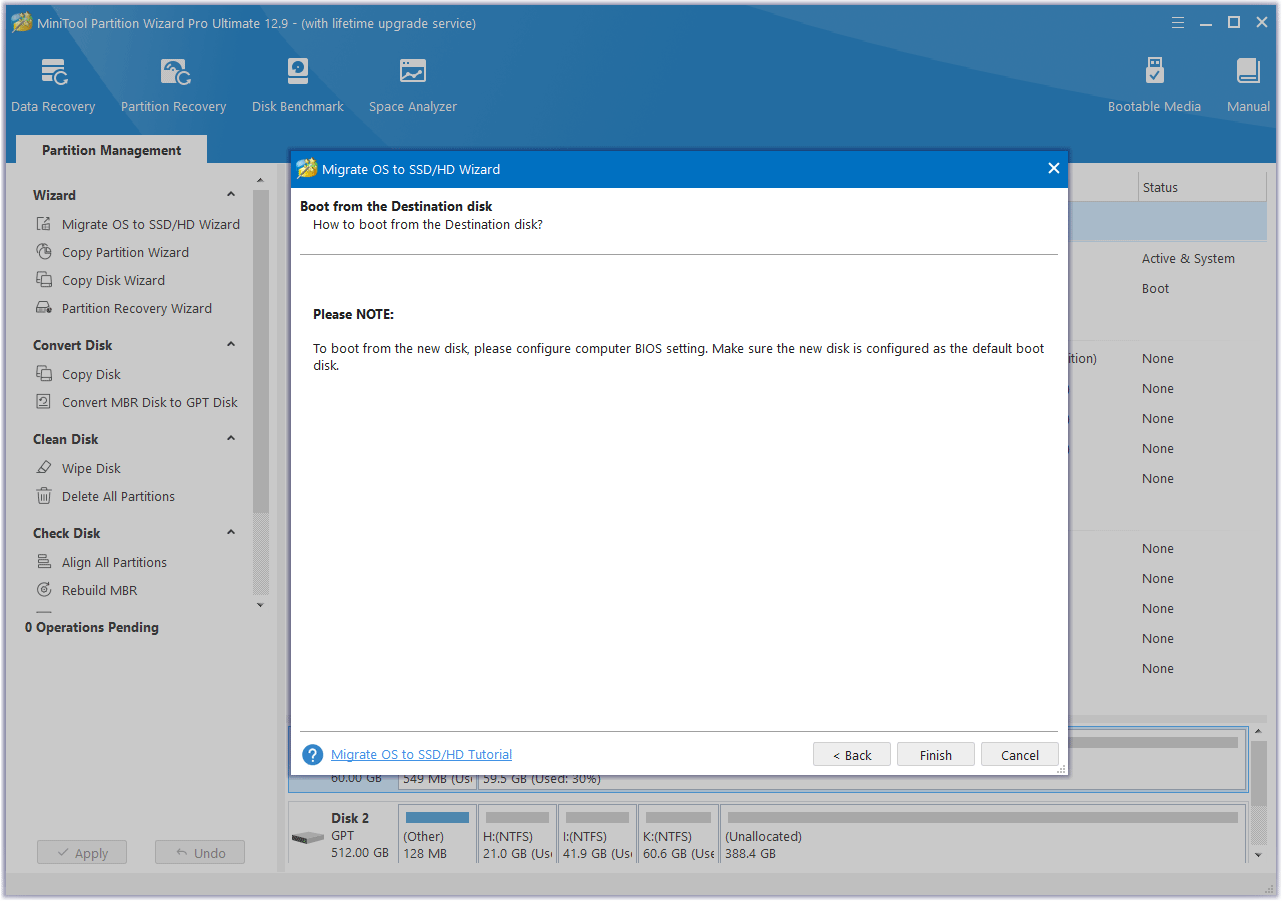
Step 5. Read the information which focus on how to boot from the destination disk.
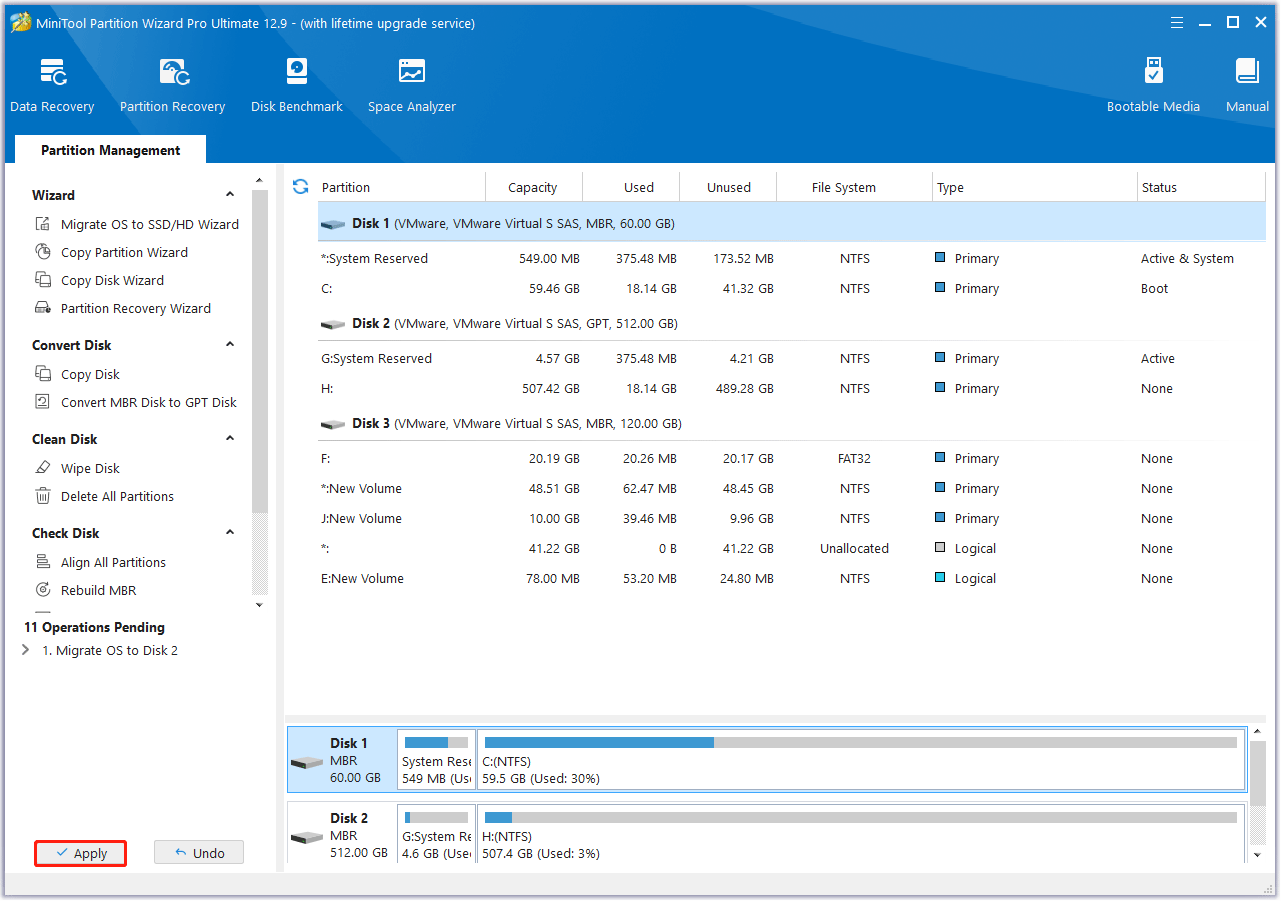
Step 6. Click Apply to execute the operation.
5 Methods to Optimize SSD Windows 10/8/8.1/7
Here, we provide users with 5 ways to optimize SSD performance. Now, let’s explain them one by one.
Method 1: Align Partitions with SSD Optimization Tool
4K alignment is a quite important issue for SSD since it largely affects SSD performance.
As we know, 512-byte sector is the most widely used standard for hard disk. However, with the increase of hard disk capacity, employing 512-byte sector is no longer as reasonable as before. Therefore, many manufacturers have set their hard disk to 4096-byte (4k) sector.
But considering compatibility with operating system, manufacturers emulate a 4k physical sector to 8 512-byte sectors to read/write data, which is the so called 512e. Due to this change, the physical 4K sector may be misaligned with the 4K cluster ( the default cluster size for NTFS).
As a result, reading data in 1 cluster will read 2 physical 4K sectors so that data read and write speed will be reduced. Therefore, if we want to get best performance from SSD, it is very necessary to make them aligned, and to align partition can help us achieve this goal.
In Windows 7 and more recent OS, all newly created partitions will be aligned automatically. However, if you migrated Windows from HDD or SSD to SSD or once changed partition size and location on SSD, your partitions might be misaligned. Well, how can we know whether our partitions are aligned or not?
How to Quickly Check and Align Misaligned Partitions in Windows 10/8.1/8/7
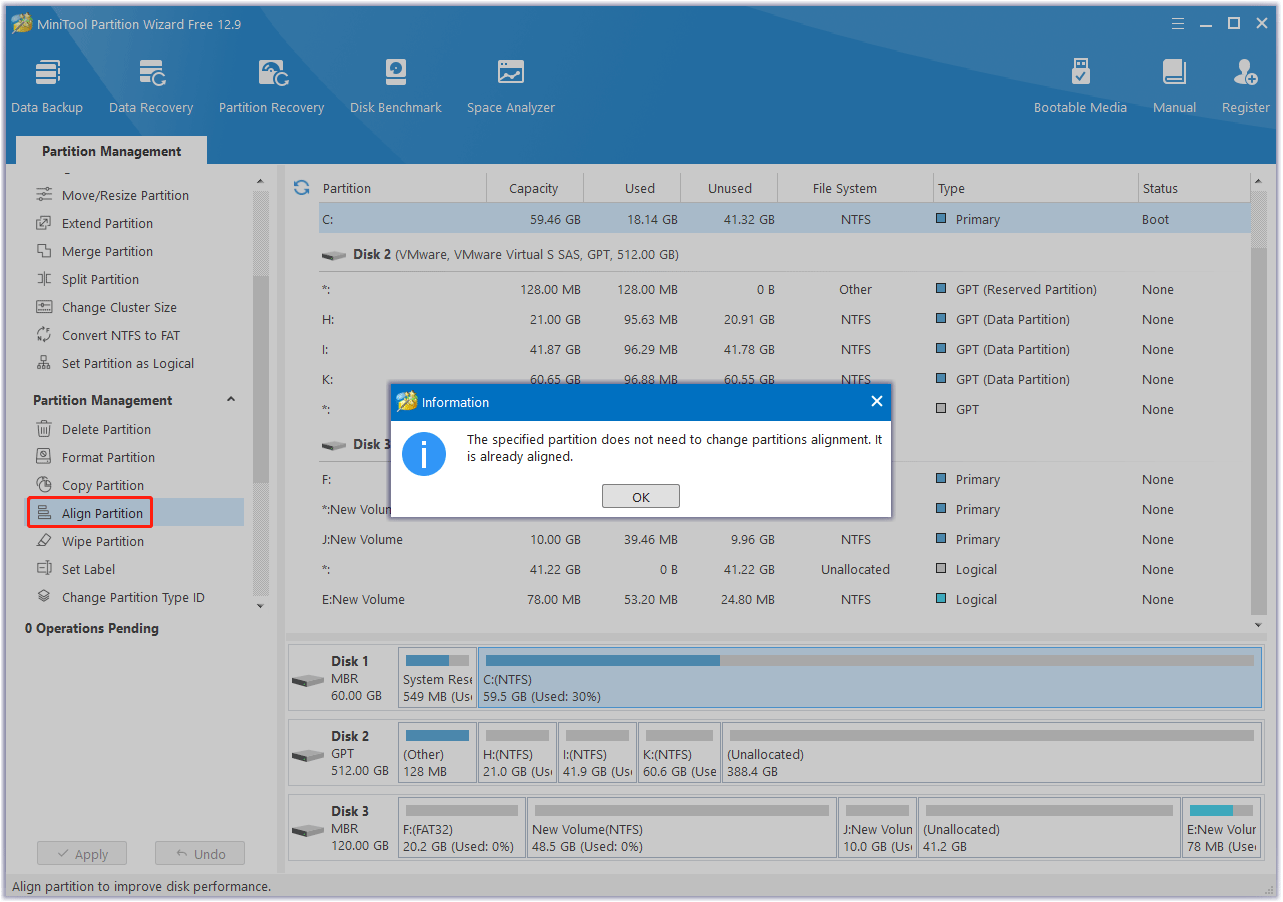
As a professional SSD optimization tool, MiniTool Partition Wizard can also be used to align partition. Before you do, please download its Free Edition and install it on your computer.
MiniTool Partition Wizard FreeClick to Download100%Clean & Safe
Launch the program to get its main interface. Here, as long as we select a partition and choose “Align Partition” feature from the left side, MiniTool Partition Wizard will tell you whether this partition is aligned. If it is already aligned, you’ll receive the following message:
However, if it is misaligned, there will be a pending operation shown in the action panel and you need to click Apply to perform SSD partition alignment.
Instead of aligning one partition, you can select the whole disk and choose “Align All Partitions” if there is more than one partition on your SSD, which could detect and align all misaligned partitions on the SSD.
Method 2: Leave Enough Free Space on Drive C
If C drive of SSD is running in low disk space, Windows will run slow, and data read/write speed might be influenced, too. Therefore, we’d better let C drive have 10% of free space at least.
If your C drive is running out of space or in little free space, now use the free SSD optimization tool MiniTool Partition Wizard and use its “Extend Partition” feature to enlarge it to get best performance from SSD.
for detailed information, read 3 Ways to Help You Get out of Low Disk Space Warning in Windows 7/8.1/10
Method 3: Enable AHCI Mode
1.Why Do We Need to Enable AHCI Mode for SSD
AHCI (Advanced Host Controller Interface) is a technical standard defined by Intel that specifies the operation of Serial ATA (SATA) host bus adapters in a non-implementation-specific manner. Well then, why do we need to enable AHCI mode for using SSD to optimize SSD Windows 10/8/7? Here we mainly introduce 2 reasons:
NCQ will be supported after we enable AHCI, which contributes a lot to SSD performance optimization. NCQ (short for Native Command Queuing) is an extension of the SATA protocol that allows hard disk drives to internally optimize the order in which received read and write commands are executed. With this feature, the amount of unnecessary drive head movement can be reduced, thus increasing performance largely for workloads.
Nevertheless, since SSD does not have head and head arm, many users think it useless to enable NCQ. Actually, though solid state drive does not have those mechanical parts, it has multiple channels. After NCQ is enabled, SSD host controller will analyze data request and NAND data distribution to make full use of the bandwidth of host controller channel so as to enhance performance.
AHCI enjoys faster data transfer rate than IDE (also called ATA). Due to technology limitation, data transfer rate of IDE is slower than that of IDE most of the time. For example, theoretically the maximum transfer rate of IDE133 is 133MB while AHCI enjoys 300MB/s speed.
Therefore, it is very necessary to make AHCI enabled when you are going to use or have used SSD in Windows 10 or other Windows OS. Next, we will introduce detailed steps to turn this feature on.
2. How to Enable AHCI
Before enabling this feature, we should confirm AHCI driver has been installed. Fortunately, there is built-in AHCI driver in recent Windows operating systems like Windows 10 and Windows 8, so users just need to enable AHCI in BIOS. However, if you are running older Windows, you may need to download one manually at first, and then enable it in BIOS.
- Please press a specified key to go to BIOS when computer is booting. Different computers and motherboards require pressing different keys to enter BIOS, so users had better find the exact key via searching the internet or consulting computer manufacturers.
- Then, find the SATA Configuration or Type or Mode.
- Next, enable AHCI and finally press on F10 to save changes and exit from BIOS.
Now, the AHCI mode has been enabled. However, many users may get a Blue Screen of Death (BSOD) after changing the disk mode to AHCI. What’s the reason and how to solve this problem?
3. How to Fix Windows Blue Screen after Enabling AHCI
Some operating systems, especially Windows Vista, Windows 7, and Windows 8, do not configure themselves to load the AHCI driver upon boot (though they have) if the SATA-drive controller was not in AHCI mode at the time of installation. Since AHCI driver is not loaded, Windows will crash. Therefore, users should change disk mode to AHCI before installing Windows.
But fortunately, even if Windows Blue Screen of Death has appeared, users still have a chance fix the error without reinstalling system. Detailed steps are as follows:
Step 1: change AHCI back to the original mode (like IDE) in BIOS so as to make Windows bootable.
Step 2: start regedit.exe after Windows starts successfully. If you are prompted for an administrator password or confirmation, type the password or provide confirmation.
Step 3: go to HKEY_LOCAL_MACHINESystemCurrentControlSetServicesmsahci (if you are running Windows 10, please change msahci to storachi) to get the following interface:
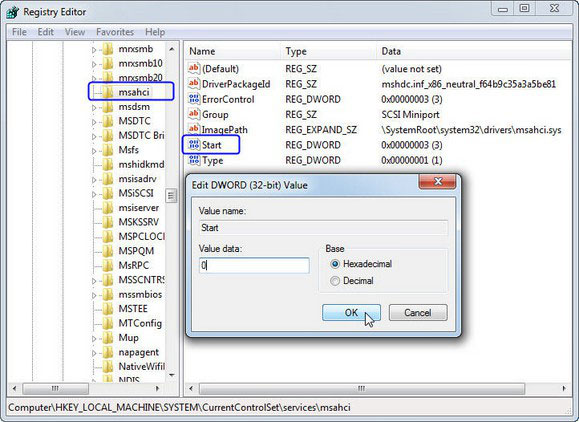
Step 4: double click “Start” on the right pane, change the value data to 0, click “OK”, and finally quit from the program.
Step 5: reboot computer and enter BIOS. Then, change the mode from IDE to AHCI.
After these 5 steps, your Windows should be bootable.
Method 4: Enable TRIM
In the post how to erase private data permanently I have said deleting a file in FAT32 partition just operates root directory and FAT, and deleting a file in NTFS partition operates MFT (mater file table) only. That is to say the real data is still saved in the original place until it is overwritten by new data.
To make use of space occupied by deleted files, the SSD has to find the space in data area, note and modify the contents, and finally write new data to overwrite the original data. These will take much time.
However, if we enable TRIM, operating system will inform the SSD which blocks of data are no longer in use and then erase these blocks internally and immediately. As a result, writing to those blocks in the future will be just as fast as when the drive was new, which can optimize SSD performance largely.
Since Windows 7, the TRIM is enabled by default but might be disabled due to some reasons. Therefore, users still need to check whether the feature is enabled: run CMD as administrator and type fsutil behavior query DisableDeleteNotify.
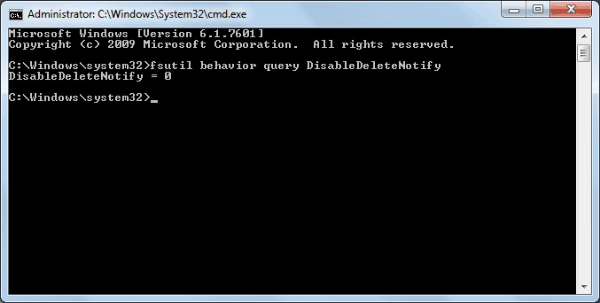
If you get the result DisableDeleteNotify = 0, TRIM has been turned on. However, if the number is 1, you need to enable it manually by typing the command: fsutil behavior query | set DisableDeleteNotify = 0.
Method 5: Turn off Page File or Transfer it to Another Drive
The pagefile.sys file is always located in the partition where Windows is installed, and it may take up several GB hard disk space. If your SSD is small like 120GB or less, we highly suggest turning this feature OFF for SSD optimization in Windows 7/8/10, which is in long term good for SSD longevity.
How to Turn Page File off
Here we take Windows 7 for example.
Step 1: right click the “Computer” icon on the desktop and choose “Properties” from the popup menu.
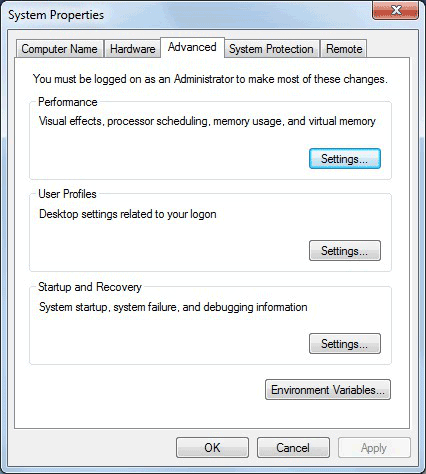
Step 2: choose “Advanced system settings” from the left pane.
Step 3: under “Advanced” tab choose “Settings” of Performance.
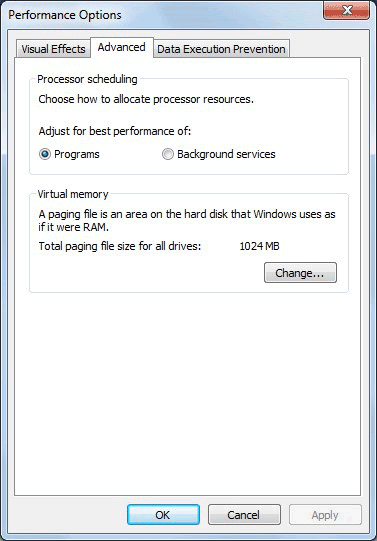
Step 4: choose “Change…” of Virtual memory under “Advanced” tab.
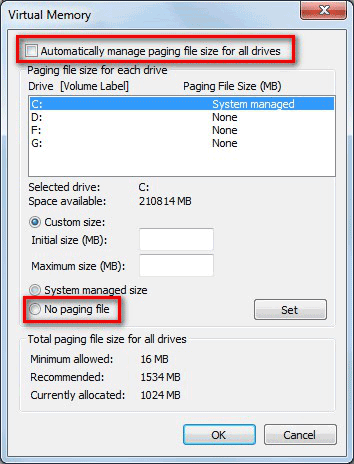
Step 5: uncheck “Automatically manage paging file size for all drives“, select partition C, choose “No paging file“, and click “OK” to turn off the page file feature.
Method 6. Don’t Defragment SSD
Generally speaking, disk defragmentation only works for mechanical hard drives, and defragmenting your SSD won’t help you get SSD maintenance. On the contrary, defragmenting your SSD won’t make it run faster, and may even shorten its lifespan.
Method 7. Disable Hibernation Mode
The computer has hibernation enabled by default. But enabling hibernation reserves some disk space for its files, which is about 75% of your computer’s installed RAM. Therefore, disabling SSD hibernation allows you to do SSD maintenance by reducing disk writes.
Step 1: Press the Win + R key to open the Run window.
Step 2: Type cmd and press Ctrl + Shift + Enter to run the Command Prompt as an administrator.
Step 3: Type powercfg.exe /hibernate off and press Enter.
Bottom Line
Actually, there are many other ways to help you get best performance from SSD or do best SSD optimization in Windows 10, Windows 8.1/8, and Windows 7, like use Hibernation instead of Sleep, disable indexing, enable write caching, and move temporary files, but here we just introduce the above 5 since they play much more important roles.
Now, take or some of these measures to optimize your SSD and system performance. If you have any suggestion on SSD optimization Windows 7/8/10, leave us comments below.
About The Author

Position: Columnist
Vega enjoys helping people with computer problems, including disk management, data recovery, data backup, and more. She is constantly expanding her knowledge in related fields. And she will continue to bring more easy-to-understand professional articles to help people solve various problems on the PC.
User Comments :