Do you like to customize your computer? Do you know how to customize your computer? MiniTool shows you how to customize Windows 10 with software and built-in utilities. With these tools, you can modify the way Windows 10 looks and acts.
You may spend a lot of time on your computer, playing games, working, watching movie, listening music, etc. In a word, you do everything on your computer. However, after a long time of use, have you ever been dissatisfied with the relatively fixed appearance and the behavior of computer for a moment?
If you don’t want to endure your computer’s default appearance and behavior anymore, you should read this post and start to customize Windows 10.
Back up Data Before Customize Windows 10
To customize your computer better, you may need to use some Windows 10 tweakers. However, these Windows 10 customization tools will modify system files. To avoid deleting a vital part of the UI and making a mess of your computer, you should make a backup of your computer before you beautify Windows 10 to get yourself a better browsing experience.
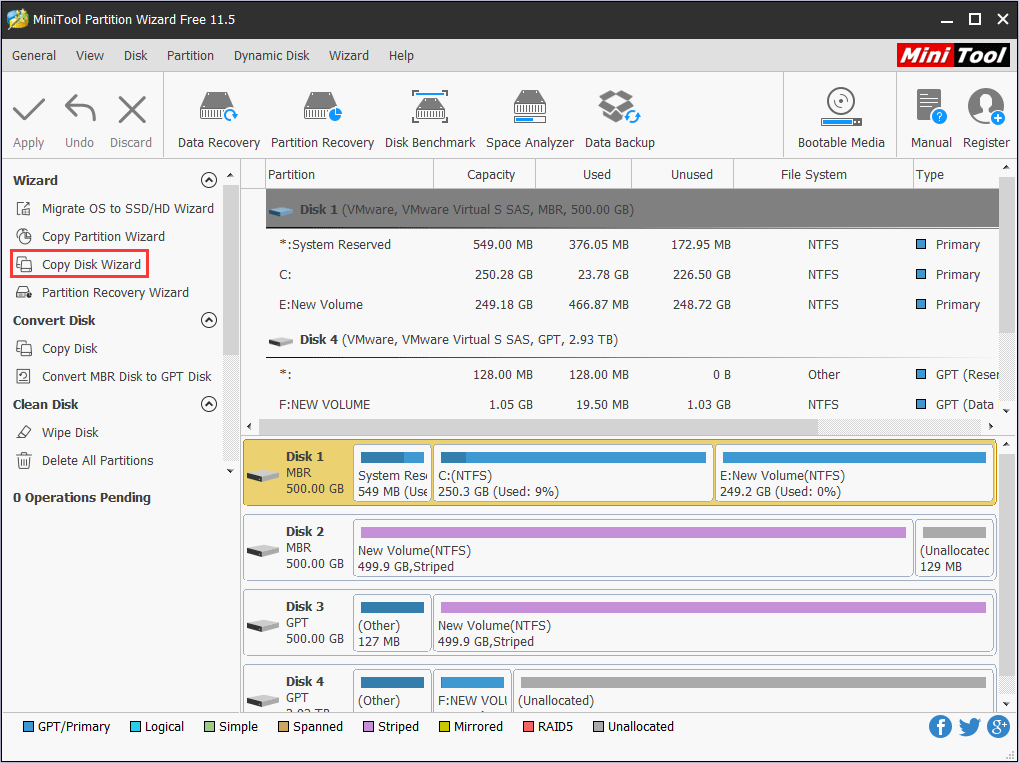
To back up your computer, you can use Clone Disk Wizard of MiniTool Partition Wizard.
MiniTool Partition Wizard FreeClick to Download100%Clean & Safe
In addition, if you are dissatisfied with the default layout of partition in your computer, you can also modify it with MiniTool Partition Wizard. You can refer to the following post:
After backing up the computer, you can customize Windows 10 without worries. Then, please read on to get Windows 10 tweakers and learn how to use them.
How to Customize Windows 10 Themes
A Windows theme includes styles, desktop wallpapers, screensavers, mouse pointers, system sound events, icons, etc. Among them, except that the style is a must, other parts are optional. What the style can define is everything that everyone can see in Windows, for example, the appearance of the window, the font, the color, and the appearance of the button.
By switching themes, you can complete Windows 10 UI customization quickly and easily. To download and install themes for Windows 10, I offer you two methods: one is official, while the other is not.
Install Themes Through Microsoft Store
Microsoft hosts several Windows 10 themes for free within the Microsoft Store. You can download and install themes through it. This method is the official one. Please refer to the following steps:
Step 1: Right-click on your desktop and choose Personalize.
Step 2: Select Themes in the left panel and scroll down the right panel to find Get more themes in the Store. Then, click this button and you can see many Windows themes in the Store.
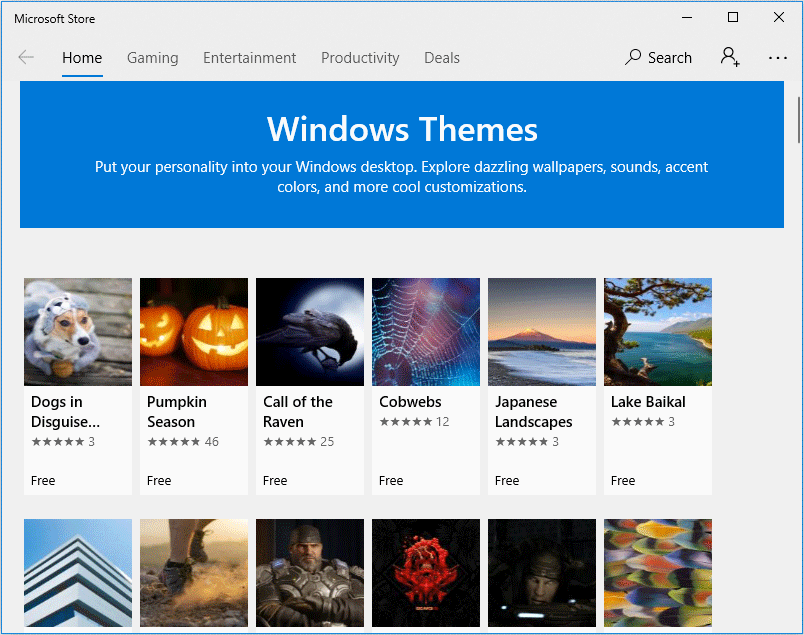
Step 3: Click the theme you want and click Get button. Then, after a while, you will be informed that “this product is installed“. Then, click Apply button to return Themes settings.
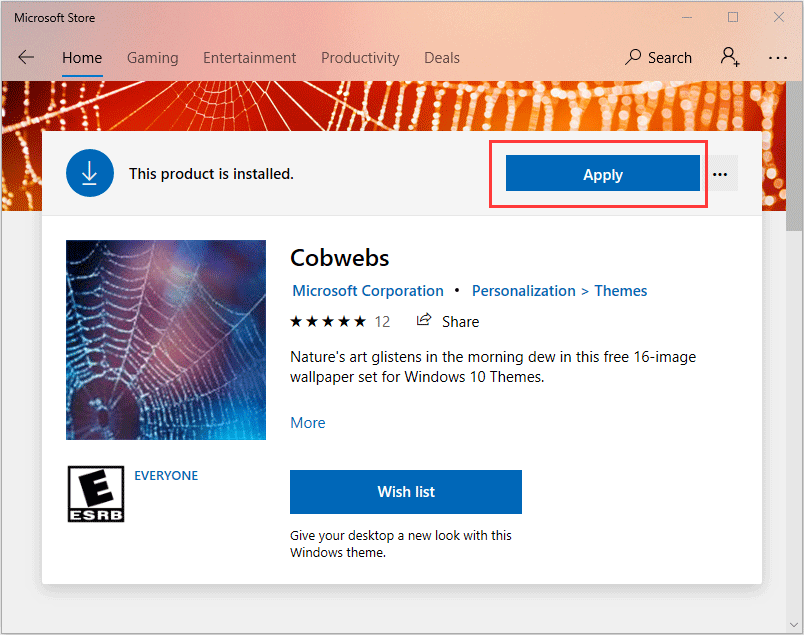
Step 4: Under Apply a theme section, click the newly-installed theme to apply it.
Install a Third-party Theme with UltraUXThemePatcher
UltraUXThemePatcher is a program that allows you to install a third-party Windows 10 theme. How to customize Windows 10 themes with it? Please refer to the following steps:
Step 1: Download and install UltraUXThemePatcher. After installing it, you will be asked to restart your computer. Please do as required.
Step 2: Find a theme you want in a third-party website like DeviantArt. Then, download this theme and you will get a ZIP file.
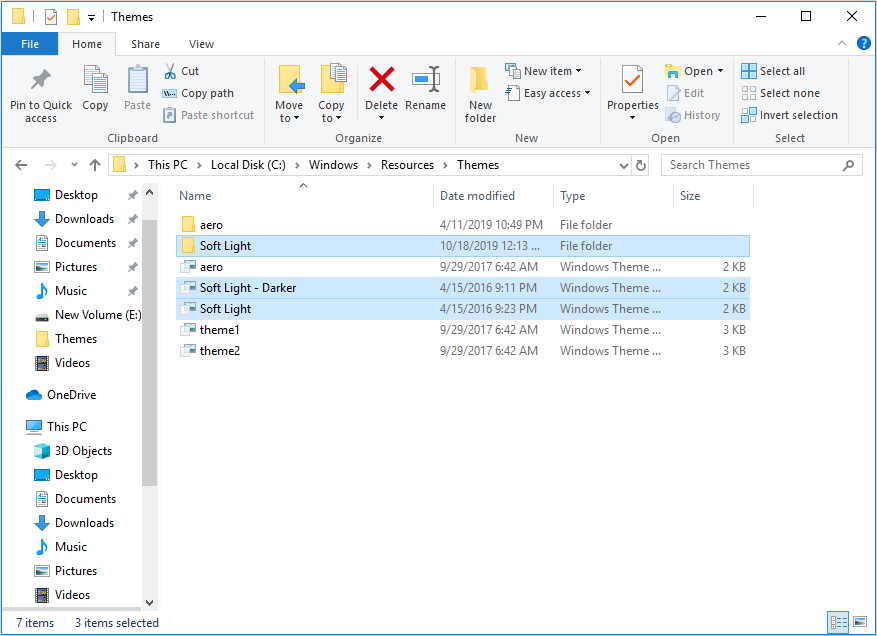
Step 3: Extract the theme ZIP file and move the contents of the folder to C:WindowsResourcesThemes.
Step 4: Apply the new theme through double-clicking the theme file or apply in Windows Theme settings.
How to Customize Windows 10 Desktop
Windows 10 offers you few desktop customization tools. It only allows you to change desktop background and hide all the desktop icons (right-click on the blank space on the desktop and uncheck Show desktop icon in View). This is the easiest way to create a simple and beautiful desktop. However, Rainmeter and Fence offer you more options.
Customize Skins with Rainmeter
Rainmeter is an open-source program that allows you to display customizable skins on your desktop, from hardware usage meters to fully functional audio visualizers.
With Rainmeter, you can create an interactive, parallax 3D wallpaper; display your favorite images and GIFs directly on your desktop, like one would picture on a desk; and re-skin a few widely used media players. In Rainmeter, you are only limited by your imagination and creativity.
How to customize desktop Windows 10 with Rainmeter? Please refer to the following steps:
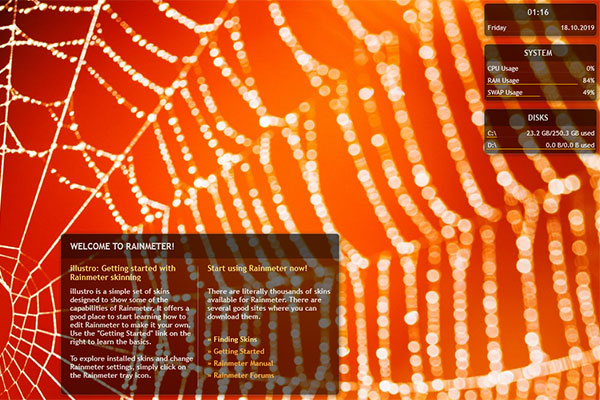
Step 1: Download and install Rainmeter. If you install it successfully, your computer will display several black windows just like the following picture:
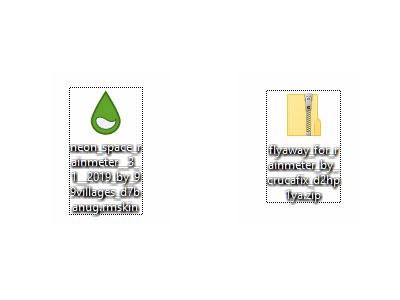
Step 2: Download Rainmeter skins from a third-party website like DeviantArt. The downloaded Rainmeter skin files can be divided into two types: rmskin files marked by a green water droplet, and ZIP or RAR files.
Step 3: Apply skins. According to different skin file types, there are different installation steps that you should adhere to.
- To install a rmskin file, you just need to double-click it and choose Install from the pop-up window.
- To install a ZIP or RAR file, you should follow the steps below:
- Extract the ZIP or RAR file and check whether there are files whose file extensions are “.ini“. If there is no INI file, this skin can’t be installed by Rainmeter. To check file extension, read this post: How to Show File Extensions in Windows 10?
- Find Rainmeter (on Taskbar or in hidden system tray) and right-click on this icon. Move the cursor onto Skins in the shortcut menu and then choose Open folder.
- Move the skin file to the folder opened in the last step. The location of the folder may be C:UsersusernameDocumentsRainmeterSkins.
- Right-click the Rainmeter icon again to choose Refresh all.
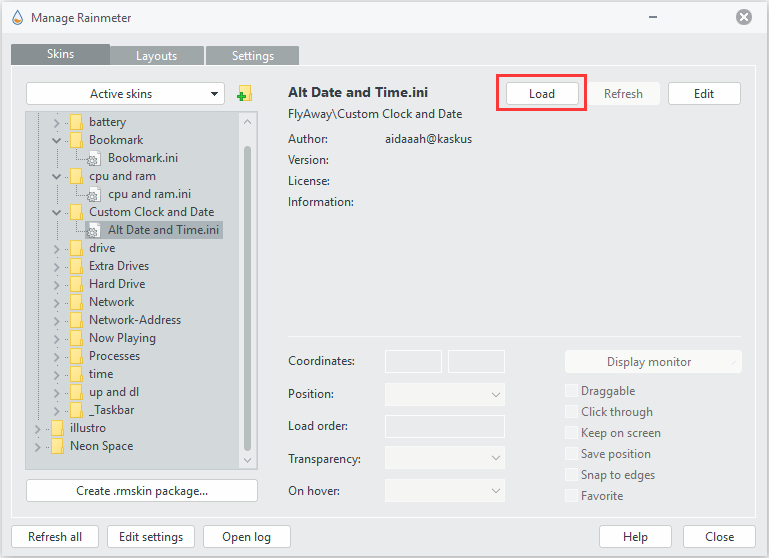
- Click the Rainmeter icon to open it. Expand the new skin directory that consists of many secondary directories (many small widgets) until you find INI files. Then, click the files and load
With Rainmeter, you can combine two skins into one so that you can make a unique skin. That’s one of the Rainmeter’s charms. However, it doesn’t change any visual styling in Windows like the Start Menu or taskbar or window frames. All it does is allow you to add “skins”, which are like widgets, to your desktop.
Manage Desktop with Fences
To beautify desktop, many users would like to hide desktop icon or pin them to taskbar. However, that may be inconvenient if there are many desktop icons. If so, Fences can help you manage desktop better.
How to use Fences? Here is a brief tutorial.
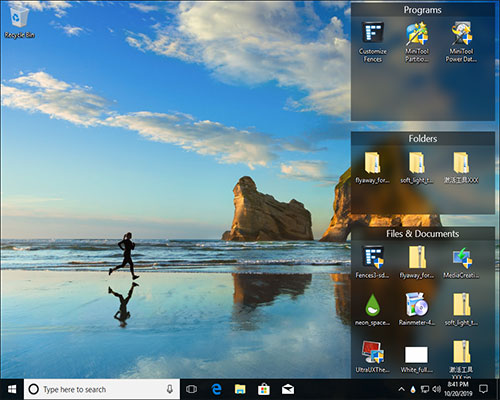
Step 1: Download and install Fences. Once it is launched, you can create fences by yourself or allow it to create fences automatically. The effect is shown as follows:
Step 2: Create and remove a fence manually.
- To create a fence, you just need to left-click your desktop and drag. Then, choose Create Fence here option and name the fence. Finally, you can drag and drop a program into this fence.
- To remove a fence, you just need to click the cross icon appearing on the fence when you move the cursor onto it, and then click Remove Fence.
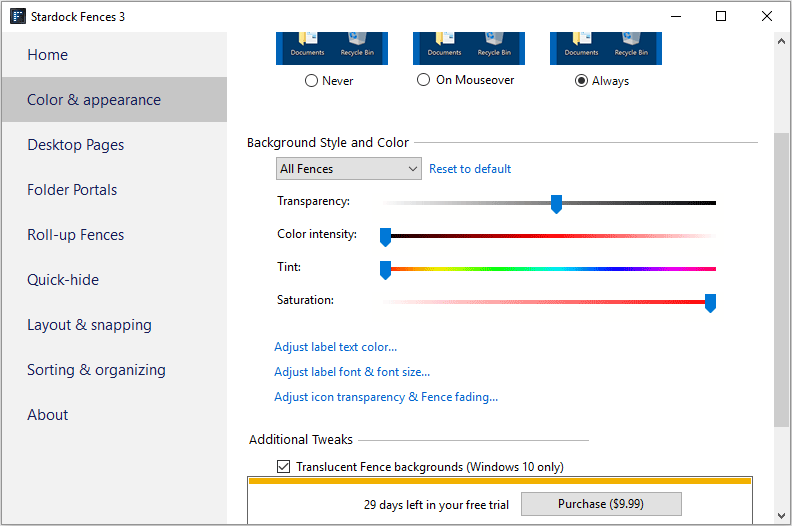
Step 3: Right-click desktop and choose Configure Fences. You can get the following window, in which you can customize the look of Fences very easily and enact rules in Fences, which not only automatically organizes your files but downloads particular files into your fence automatically.
How to Customize Windows 10 Start Menu
The Start menu is an essential feature of Windows 10. You can find your apps, settings, and files there. If you don’t like the default Start menu, you can customize it through Windows built-in utilities or third-party software like Start 10.
Customize Start Menu in Windows 10 Settings
There are a number of ways to customize the Start menu in Windows 10 Settings. Please refer to the following steps:
Step 1: Change Start menu’s color.
- Right-click on your desktop and choose Personalize.
- Skip to Colors in the left panel and scroll down the right panel to check Start, taskbar, and action center under Show accent color on the following surfaces
Step 2: Define apps showing on the Start menu. If you want to choose which apps and folders can appear on Start menu, do as follows:
- Right-click on your desktop and choose Personalize.
- Skip to Start in the left panel to choose what kind of apps and folders can appear on Start menu.
Step 3: Resize Start menu and tiles on it.
- To resize the Start menu, you should use your mouse pointer to drag from any edge in the Start menu.
- To resize tiles on the Start menu, you should right-click on them and move the cursor onto Resize. Then, you can choose Small, Medium, Wide, or Large from the pop-up window.
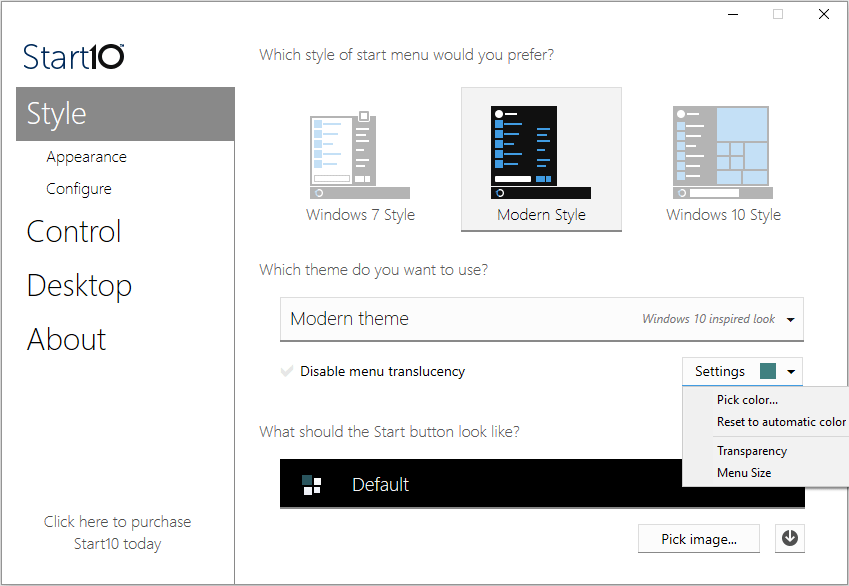
Customize Windows 10 Start Menu with Start 10
Start 10 is produced by Stardock who develops Fences. It not only allows you to choose Start menu style from Windows 7 style, Modern Style, and Windows 10 Style, but also allows you to choose your background and color and use different Start menu themes.
How to Customize Windows 10 Taskbar
Taskbar can be also customized in Windows 10 Settings or by third-party software. In Windows 10, the Taskbar customization options are integrated on Personalize > Taskbar panel. You can hide taskbar, use small taskbar buttons, change taskbar location, etc. To know how to do that, please read this post: 3 Ways to Change the Taskbar Button Width in Windows 10.
As for third-party Taskbar customization software, RocketDock is a good choice. It allows you to change icons and pin shortcuts anywhere on the desktop. In addition, it can make Windows 10 have a Mac OS Dock look. Of course, some tricks can also create a Mac OS Dock look on Windows 10 without third-party software (this will be demonstrated later).
2 Tricks Help You Customize Windows 10 Better
Simulate Mac OS Dock
With this trick, you can make Windows 10 have a Mac OS Dock look without third-party software.
Step 1: Create an empty folder.
Step 2: Right-click on the blank space in the taskbar and uncheck Lock the taskbar. Then, move the cursor onto Toolbars and choose New toolbar from the pop-up menu.
Step 3: In the pop-up window, choose the newly-created empty folder.
Step 4: Drag the newly-created toolbar to the left until the application icons are “squeezed” to the right. Then, right-click on the new toolbar and uncheck Show Text and Show title properties. Finally, drag the app bar to your preferred location and check Lock the taskbar again.

In this way, you can simulate a Mac OS Dock look on Windows 10.
![[Solved] How to Make Taskbar Transparent on Windows 10?](https://images.minitool.com/partitionwizard.com/images/uploads/2019/10/win10-transparent-taskbar-thumbnail.jpg)
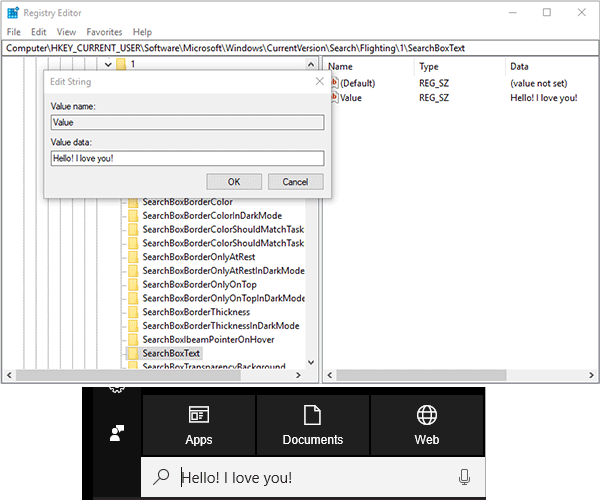
Modify the Display Text of the Cortana Search Box
If you still have Cortana search box on your taskbar, you can modify its display text to make it more personal.
Step 1: Press “Windows + R” keys and type “regedit” into the Run box. Then, hit Enter key to open Registry Editor.
Step 2: Navigate to ComputerHKEY_CURRENT_USERSoftwareMicrosoftWindowsCurrentVersionSearchFlighting. Then, double-click Current and RotateFlight to change their values to “0” one by one.
Step 3: Navigate to the following two locations and double-click their Value options to change their content to the text you want Cortana to display, respectively.
- ComputerHKEY_CURRENT_USERSoftwareMicrosoftWindowsCurrentVersionSearchFlighting�SearchBoxText
- ComputerHKEY_CURRENT_USERSoftwareMicrosoftWindowsCurrentVersionSearchFlighting1SearchBoxText

Bottom Line
If you still have some doubts about how to customize Windows 10 with the above methods, or you have any other ideas on Windows 10 customization, please leave a comment below. If you have problems in backing up data, you can email us at [email protected]. We will reply to you as soon as possible.
About The Author

Position: Columnist
Linda has been an editor at MiniTool for seven years. She continuously learns about computers and puts her knowledge into practice. Moreover, she is particularly knowledgeable in disk management, data recovery, system installation, and PDF editing. Her articles typically reference multiple examples or are based on her own experience, providing users with the most suitable solutions.
User Comments :