If you often use RAID, you may learn that there are several types of RAID. What are advantages and disadvantages of different RAID types? How to manage them efficiently? Today, MiniTool will talk about the main RAID types and RAID management.
Main RAID Types
What does RAID stand for? Actually, it is short for Redundant Arrays of Independent Disks. RAID is a setup consisting of multiple disks, which is used to improve the performance and reliability of data storage.
This technology employs techniques of striping, mirroring or parity so that the data on the RAID arrays can be protected. RAID can be divided into 2 categories (software RAID and hardware RAID).
Hardware RAID
In a hardware RAID, there is a specialized controller and processor within the disks on the purpose of memory management. The hardware RAID can help you boot system performance for backups and restorations.
Besides, it adds RAID configuration options that can be a complementary for the unavailable motherboard. The hardware RAID can provide protection against data corruption due to power failure during the backup process. More importantly, it adds system compatibility with enterprise SAS HDDs.
Software RAID
The memory architecture in software RAID is managed by the operation system. Generally speaking, the software-based RAID delivers RAID service from the host. The software RAID has 2 forms.
The first one is the pure software defined from the operating system, while the second one is the hybrid software containing a hardware component to reduce the load on CPU.
The above introduces the basic information of hardware RAID and software RAID. If you would like to pick one from them, this guide can be helpful: Hardware VS Software RAID: How to Make a Wise Choice
Main RAID Levels
After experiencing a long time, RAID has developed several RAID levels. Each of them has its own characteristics, advantages and disadvantages. This section will introduce several main RAID levels.
RAID 0
The RAID 0 is also considered as disk striping, which indicates it can divide data evenly across 2 or more storage devices. It is used to improve performance when organizing data. To be specific, you will enjoy a faster file reading and writing speed with RAID 0.
RAID 0 is the cheapest redundant disk organization type. In addition, it can be built easily. You can create one with 2 disks. However, RAID 0 is not fault-tolerant or error-free. Hence, you’d better not use it for storing critical data because you can encounter data loss when something wrong happens to any of disks.
According to summarization, RAID 0 has the following pros and cons.
Pros
- Boost read and write speed
- Full capacity use, no overhead
- Easy to implement
Con
Not fault-tolerance
RAID 1:
Data will be stored twice on RAID 1 that means the data is written to both the data drive and the mirror drive. Therefore, if one drive fails, you can utilize another drive for recovering data and continue to operate on it. To create a RAID 1, you are required to prepare 2 drives.
RAID1 also has its pros and cons. They are summarized as follows.
Pros
- Compared with a single drive, RAID 1 has a high read and write speed
- The data on the failed drive will be copied to the replacement drive so that you won’t suffer from data loss.
- It is easy to set up.
Cons
- The available storage capacity is only half of the total amount because all the data are written twice.
- It doesn’t always allow a hot swap for the failed hard drive. And the corrupted drive can only be replaced after switching off the computer.
Recommended reading: RAID 0 VS RAID 1: What’s the Difference and Which Is Better?
RAID 2
RAID 2 employs a striping technology, but it stripes at the bit level rather than the block level. It utilizes a complicated error correcting code to replace the parity. It often serves single requests. Given to that fact, it is rarely used today.
RAID 3
RAD 3 utilizes byte-level striping and parity. It stores parity calculation on the dedicated disk. It cannot multiple requests simultaneously neither. Though it has little impact on large sequential read and write speed, it slows down random-access workloads indeed. It is seldomly utilized at present.
RAID 4
RAID 4 stripes block level data and dedicates a disk to parity. And the striping offers high performance for random reads. However, as RAID 4 needs to write all the parity data to one disk, random write performance will be affected.
Pros
- It has high data redundancy on the aspect of cost per unit memory.
- Thanks to data striping, it improves data read performance.
Con
- The write speed is slow.
- When the dedicated parity disk fails, you will lose data.
RAID 5:
RAID 5 is made from block-level striping with distributed parity. It uses disk striping and parity, which generates the most popular organizing independent disks choice. Like RAID 4, RAID 5 also stripes block level data. Differently, RAID 5 distributes the parity information across all the disks instead of storing it on one dedicated disk.
Pro
It boasts the advantages of RAID 4, increased write speed, as well as better data redundancy.
Con
- It can only support one disk failure.
- If you want to partition RAID 5 safely, you can refer to this post: Look Here! The Best Way to Partition RAID 5 without Losing Data
RAID 6:
Compared with RAID 5, RAID 6 has better data redundancy with the double parity blocks. It adds fault tolerance and grants two disk drive failures for the RAID 6 array. Additionally, each disk has two parity blocks that are stored on different disks in the array.
In a word, RAID 6 is a practical infrastructure for keeping high availability systems.
Pros
- It has better data redundancy.
- It can support up to 2 hard drive failures.
Con
It has large parity overhead.
Top recommendation: RAID 5 VS RAID 6 on Benefits, Performance, and Application
RAID 10
RAID 10 combines RAID 1 and RAID 0 by layering them in opposite order. Therefore, RAID 10 sometimes is also referred to as nested or hybrid RAID. It has the high performance of RAID 0 and the redundancy of RAID 1.
Within this setup, multiple RAID 1 blocks are connected with each other to make it like RAID 0. RAID 10 usually is applied to places that require extra high disk performance and redundancy.
Pros
- It has a high performance.
- It has great data redundancy and fault tolerance.
Cons
The cost per unit memory is high as the data is mirrored.
How to Manage RAID
After reading the above content, you may have a further understanding of RAID types and RAID levels. How do you manage RAID? For instance, how to create a RAID or how to resize RAID. To do that, you need to use a professional partition manager.
MiniTool Partition Wizard is what you need. It enables you to create volume (includes striped volume, spanned volume, mirrored volume), delete volume, move/resize volume, format volume, and convert dynamic disk to basic disk, etc.
How to manage RAIDs with MiniTool Partition Wizard? You can start the operation after downloading and installing the software by clicking the button below.
The tutorial for creating volume
Step 1: Convert basic disk to dynamic disk via Disk Management.
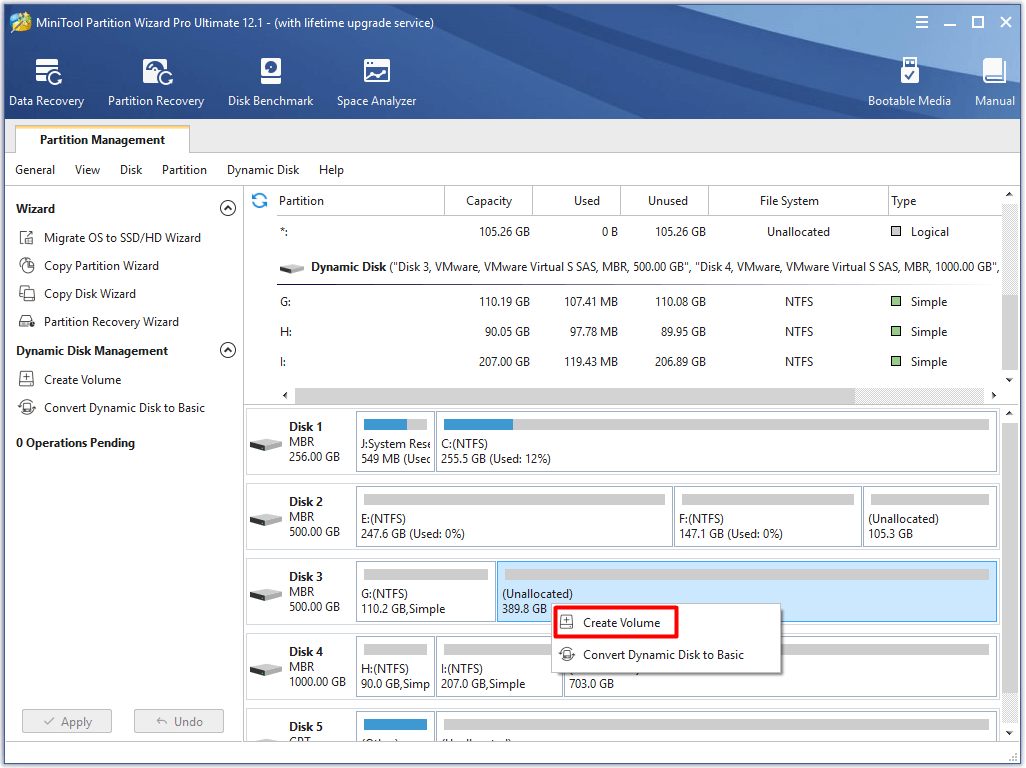
Step 2: Launch MiniTool Partition Wizard to enter its main interface. Then, right click the unallocated space of the dynamic disk and choose Create volume option from the elevated menu.
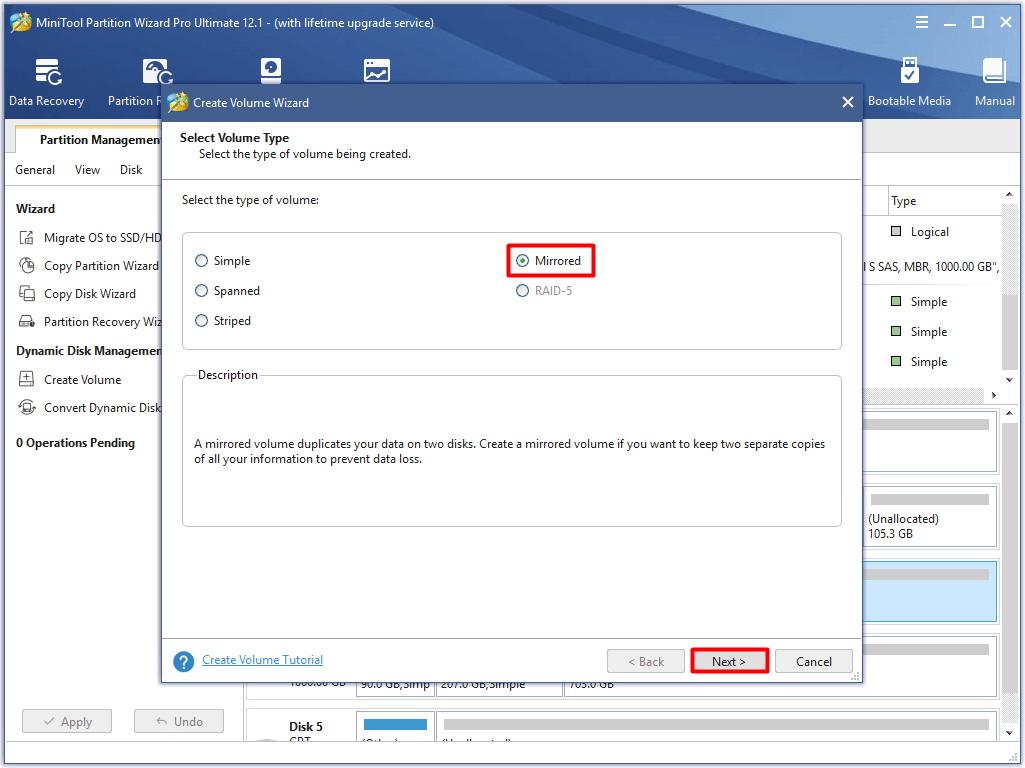
Step 3: In the Create Volume Wizard window, and click Next button to continue the operation.
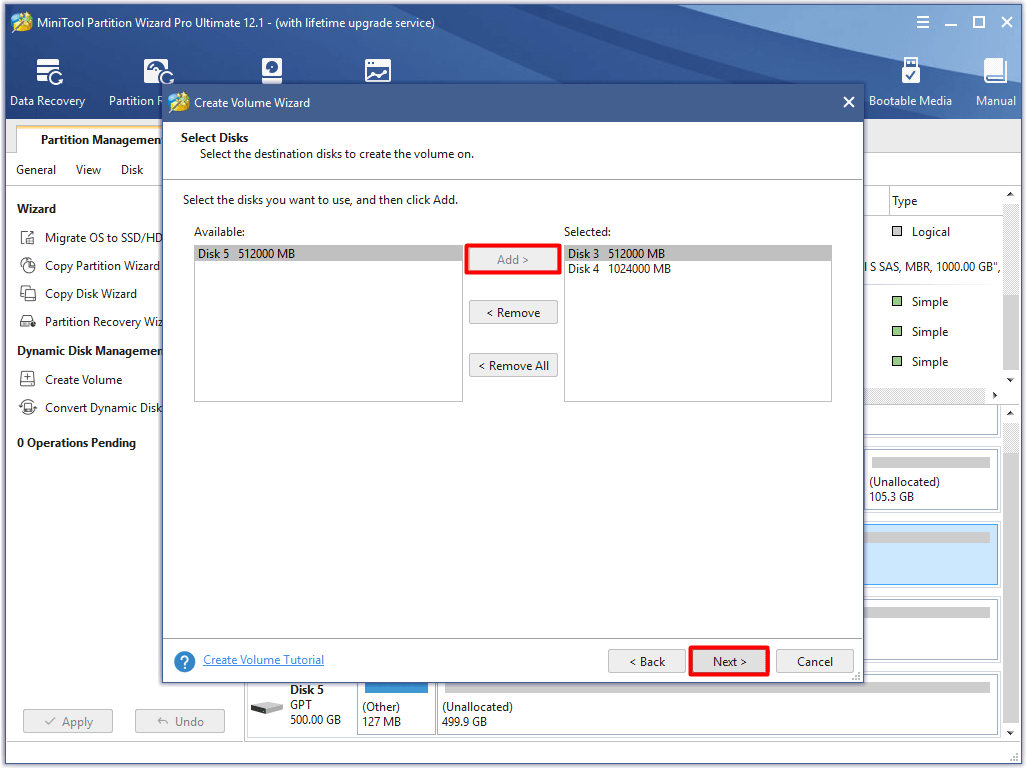
Step 4: In the next window, choose disks in the left window by clicking them and then click the Add button to add them to the right window. After that, click Next.
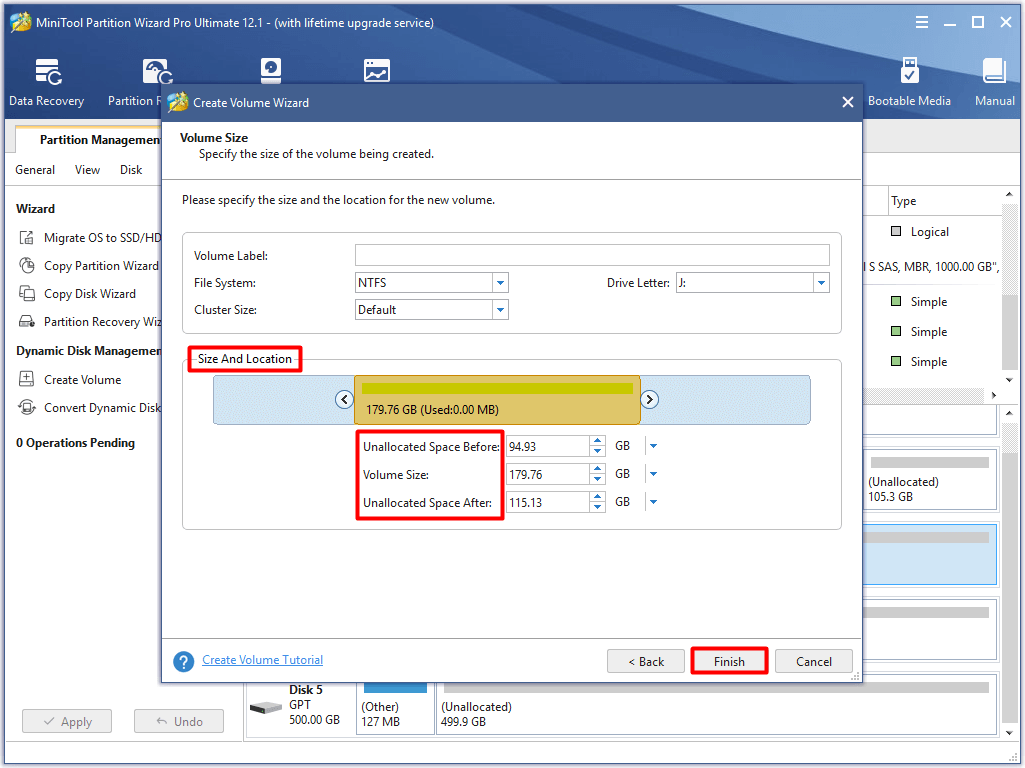
Step 5: You can adjust the size and location in this window by moving the handle bar or typing the exact number in the notice window. Then, click Finish to save the changes and back to the main interface.
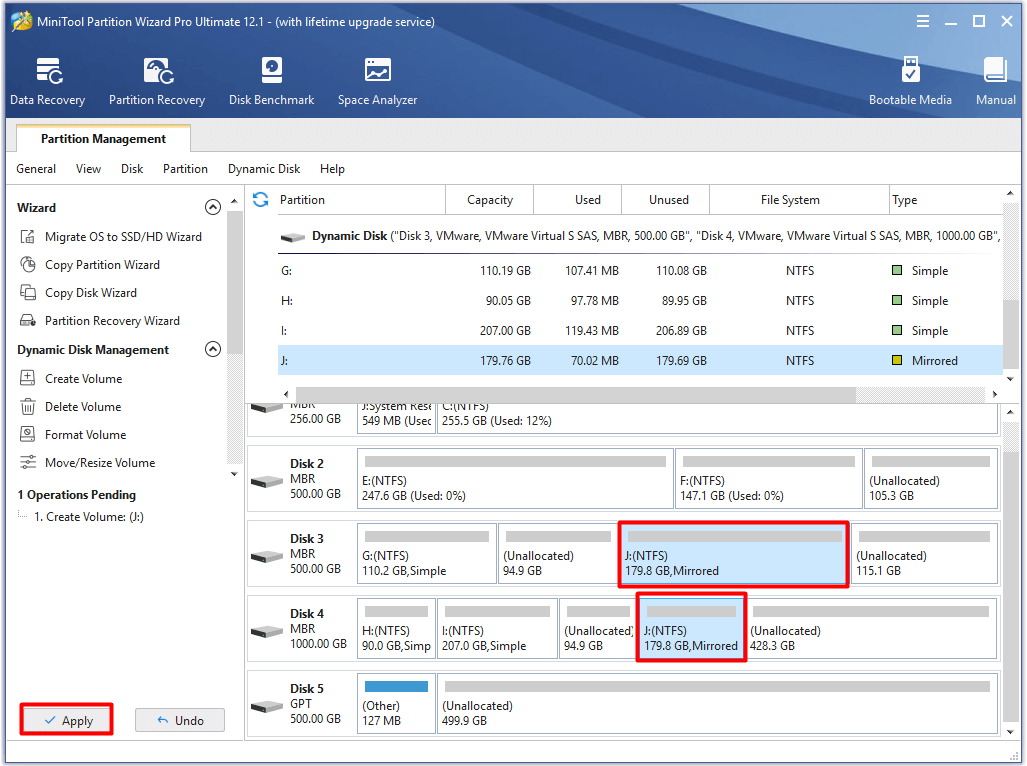
Step 6: After backing to the main interface, you can preview the mirrored volume you created. Click Apply to carry out the pending operartion.
The tutorial for resizing volume
If you want to modify your volume (enlarge or change the location), you can also utilize MiniTool Partition Wizard. It is simple to do that with this software. Here is a guide for you.
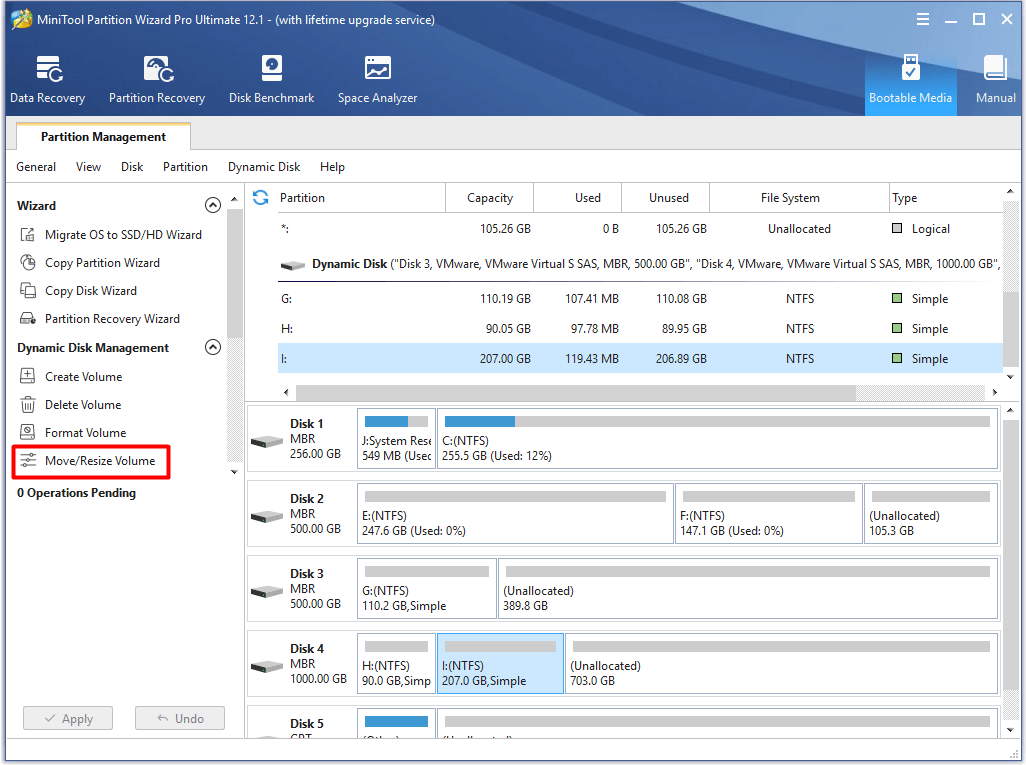
Step 1: Click on the volume that you would like to resize and click Move/Resize Volume option in the left action panel.
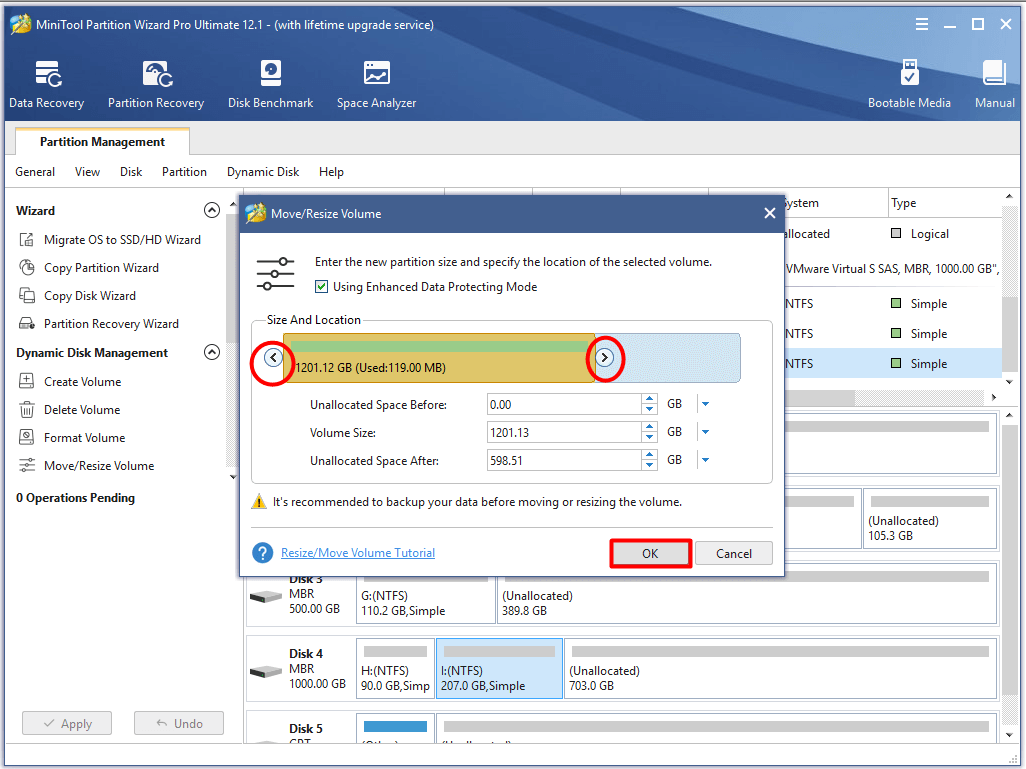
Step 2: In the next window, you can adjust the size and location for your volume by moving the handle leftward or righward arrows. Afternatively, you can enter the exact number in the window. After that, click OK to save the changes.
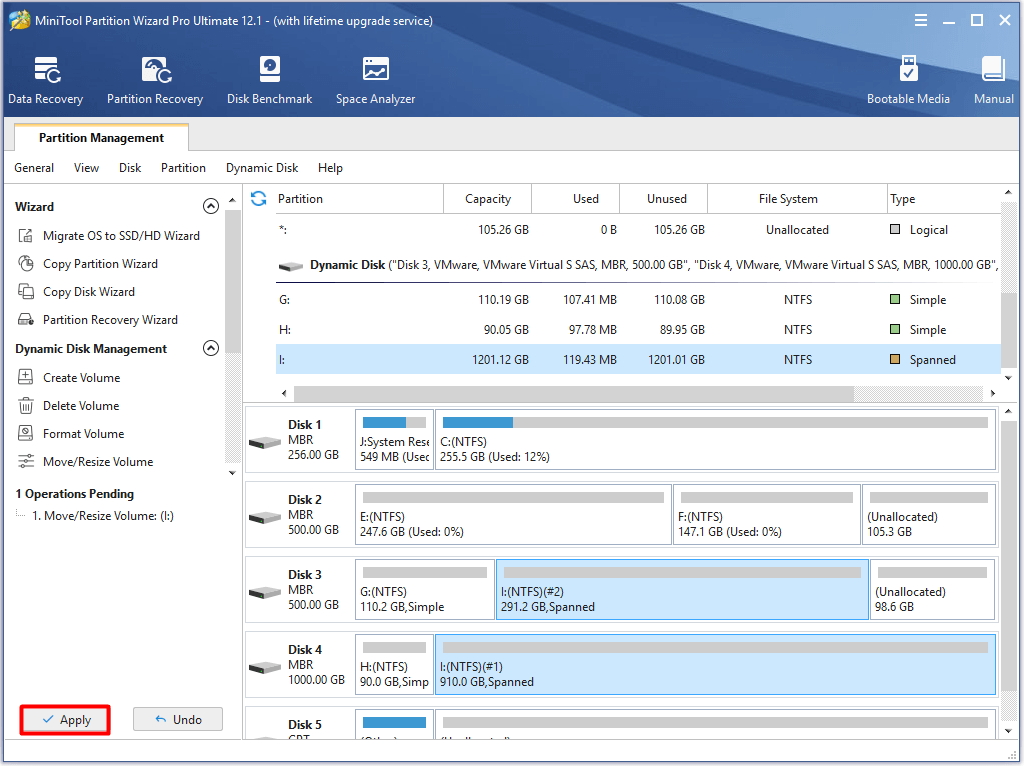
Step 3: Click Apply to execute the operation.
In Conclusion
To sum up, this post introduces you the different RAID array types and levels as well as RAID management methods. Hence, you will have a deep understanding of each RAID type and can manage RAID with ease after reading the post.
If you have any new ideas about RAID types, please leave your words in the comment area. You can send us an email directly when encountering any issues on MiniTool software via [email protected].

User Comments :