A lot of users complain that cloned hard disk shows wrong size on Windows. Why does my hard disk show wrong size after cloning? How to fix and avoid this problem? Now, let’s explore the answers together with MiniTool.
When a hard drive runs out of space or gets corrupted, a great many people may upgrade their hard disk to a larger SSD/HDD using certain clone disk software. However, many users notice that the cloned hard disk shows wrong size on Windows PCs. This issue has been heatedly discussed among different forums like Reddit, Superuser, and answers.microsoft.com. Here is a true example from the Reddit forum:
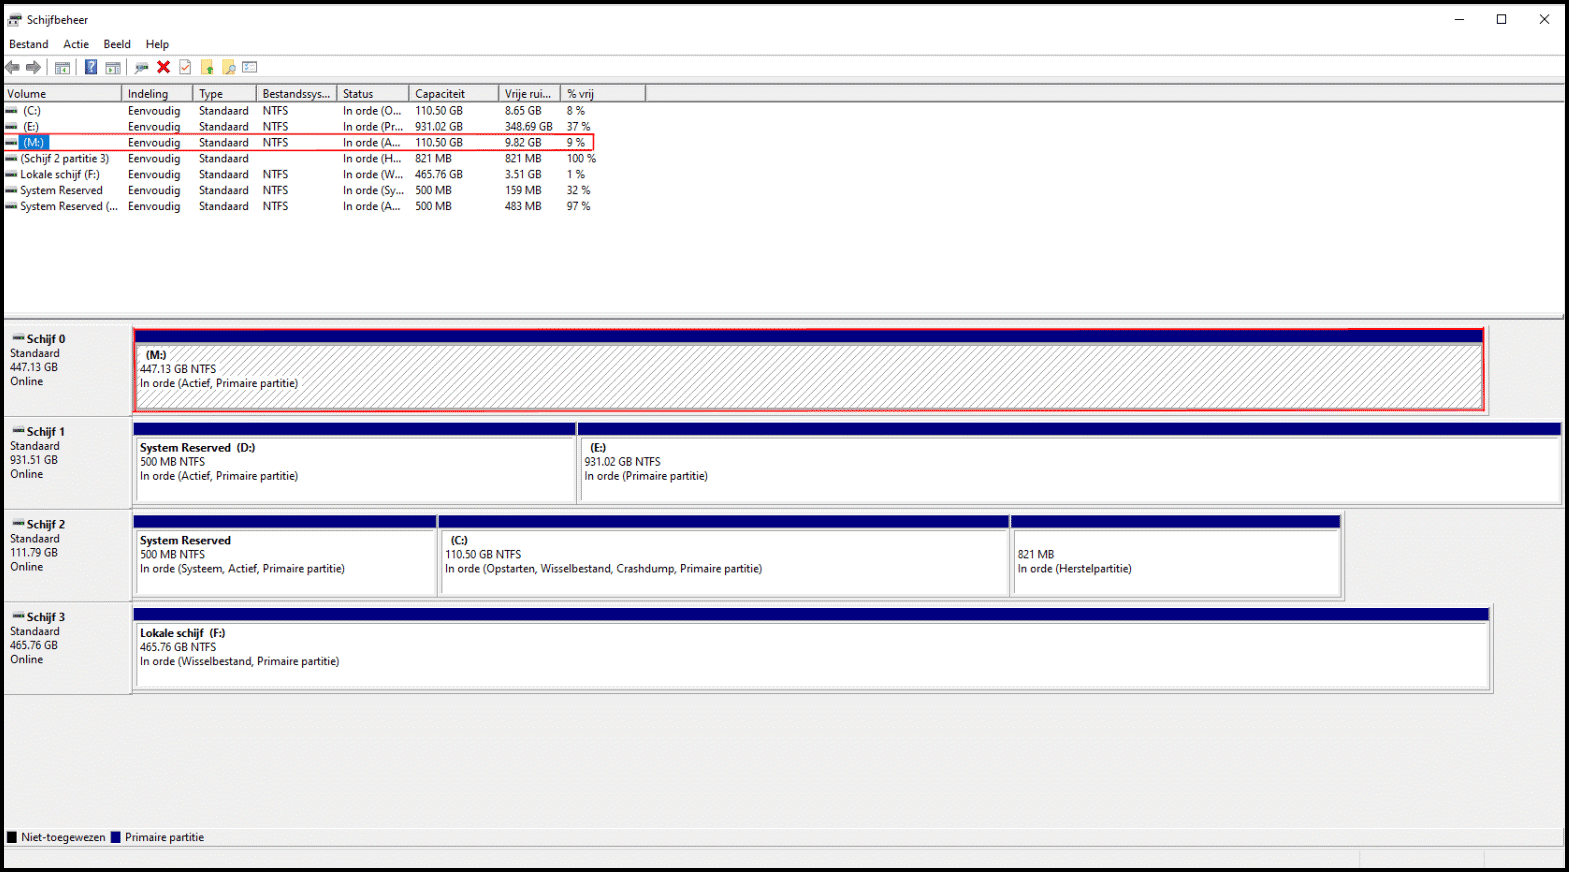
Wrong disk size after cloning. My original OS drive had only 110 GB of space, of which I was running out. Bought a new 500 GB one. I cloned the original drive to the new one, but now it shows me that the new drive is also 110 GB everywhere, except in the Disk Management bottom view part, where you can see the partitions. In the top part that has a list of every disk, it says it's 110 GB as well. I tried shrinking the partition by very little, but no matter what I enter, it says "invalid parameter". Because half of the disk management thinks it is already at max capacity, I can't increase it either. How do I fix this? Here's what my disk management looks like:
https://www.reddit.com/r/pcmasterrace/comments/r55zll/wrong_disk_size_after_cloning/
Why Does My Hard Disk Show Wrong Size After Cloning
When upgrading to a larger SSD/HDD, the partition size of the cloned hard disk remains the same as the old disk. This issue often appears when they open File Explorer to check the disk space. However, the full disk space size only shows in the Disk Management bottom view part.
Why does my hard disk show wrong size after cloning? To answer the question, it’s necessary to figure out the meaning of cloning. Cloning refers to the process of copying all contents including Windows boot records, files, settings, and programs on the previous hard drive to another one.
After cloning, a partition will be created on the new hard drive that is identical to the partition of the original one, including the partition size. That’s to say, an exact same copy of the source disk will be created by the cloning software.
If you clone a hard drive to a larger disk drive using certain cloning software, the extra space that exceeds the size of the original hard drive may be recognized as unallocated. However, the unallocated space is invisible in Windows File Explorer and you can’t access the stored data and write new data.
That’s why the cloned hard drive shows wrong size in File Explorer rather than Disk Management. How to fix the “hard drive shows smaller size after cloning” issue? Let’s keep reading.
How to Fix Cloned Hard Disk Shows Wrong Size on Windows 10/11
As discussed above, the “cloned HDD shows wrong size” issue often occurs after upgrading to a larger hard drive. To show the full capacity of the cloned hard drive in File Explorer, you need to shrink, extend, or move the existing partition on the drive to the unallocated space.
How to extend partitions on Windows 10/11 PCs? You can use Windows built-in tools like Diskpart or Disk Management. If it doesn’t work, a professional partition manager – MiniTool Partition Wizard can help you move/resize/extend partitions easily.
# 1. Use Disk Management
If the cloned hard drive shows wrong size in File Explorer, you can try shrinking the existing partition using Disk Management first to find the “unshown” disk space and then extend it to get the full size. Here’s how to shrink/extend partitions using Disk Management on Windows 10/11.
Step 1. Press the Win + R keys to open the Run dialog box, and then type diskmgmt.msc in it and hit Enter.
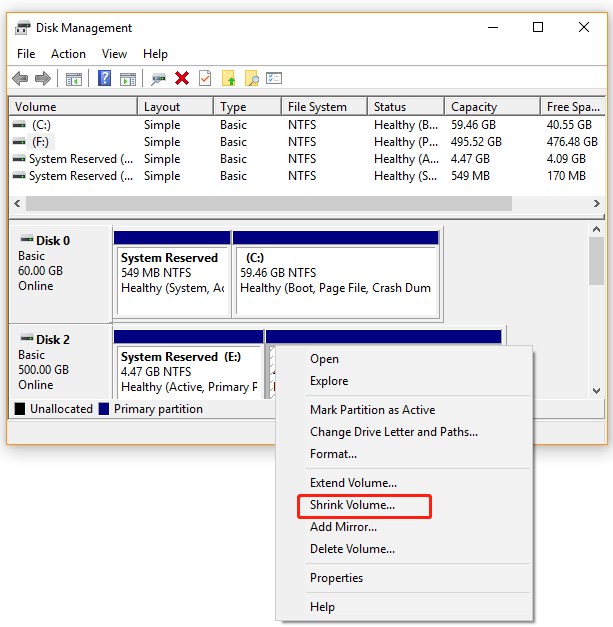
Step 2. In the Disk Management window, right-click the partition that shows the same size as the partition on the original hard disk and select Shrink Volume.
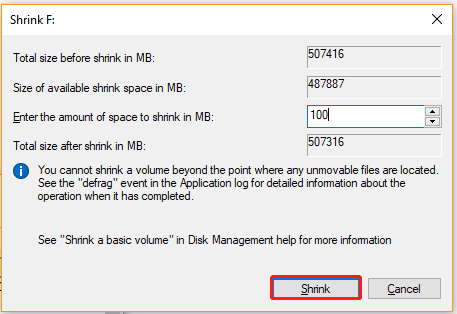
Step 3. Enter a little disk space to shrink in MB like 100 MB and click on Shrink. Then all the remaining space on the cloned hard drive should display in Disk Management.
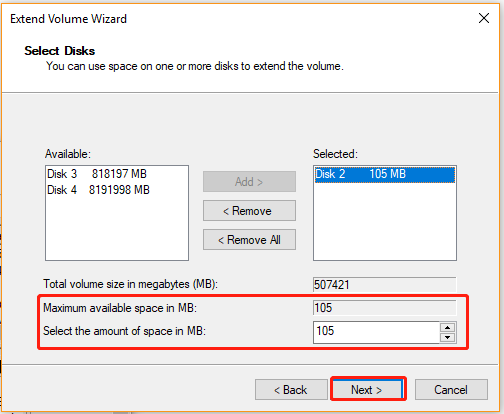
Step 4. Now, you can extend the partition to the unallocated space on the cloned disk. To do so, right-click the partition and select Extend Volume.
Step 5. Click on Next and select the cloned disk, and then enter the maximum available space of the unallocated space in MB and click on Next > Finish. After that, you can open File Explorer and check if the cloned hard drive shows its full capacity.
However, some users complain that they can’t shrink/extend using partition because of the “invalid parameter” or “the extend volume option is greyed out”. In this case, you can move down to the following solutions.
# 2. Use DiskPart
In addition to Disk Management, another Windows built-in tool – Diskpart can be used to shrink/extend partitions as well. It is a command-line tool that allows you to manage disks, partitions, volumes, or virtual hard disks running certain commands. Here’s how to fix the “SSD shows wrong size after cloning” issue using Diskpart.
Step 1. Open the Run dialog box again, and then type diskpart in it and hit Enter. Then click on Yes in the UAC window to confirm it.
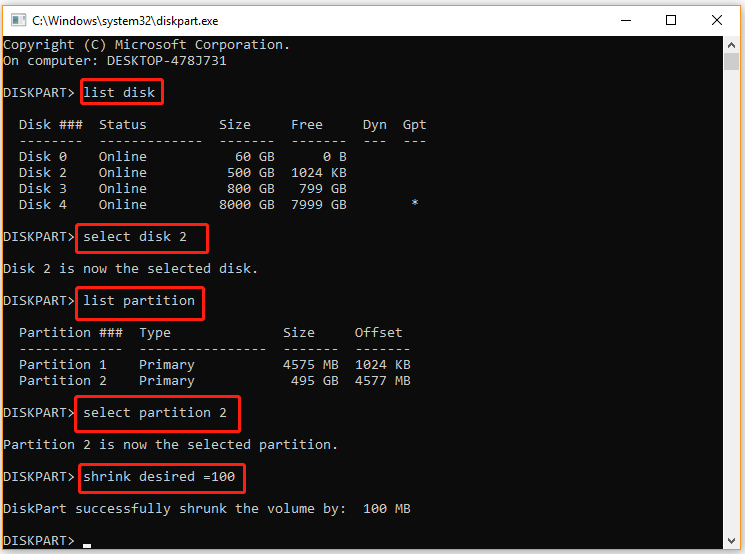
Step 2. In the pop-up diskpart.exe window, type the following command in order and hit Enter after each one. Then all the remaining/allocated space of the cloned disk should appear.
Make sure you select the correct disk number and drive number in which you want to shrink the space.
- list disk
- select disk * (replace * with the cloned hard disk, e.g. select disk 2)
- list partition
- select partition * (replace * with the drive number you want to shrink its volume, e.g. select partition 2)
- shrink desired= * (replace * with the amount of space you want to shrink in MB, e.g., shrink desired = 100)
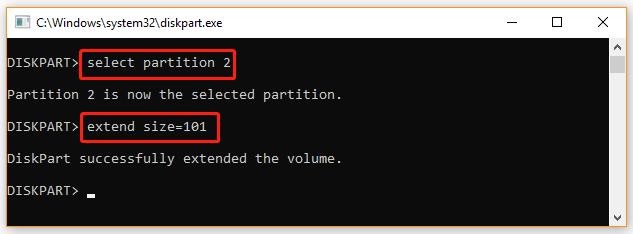
Step 3. Now, you can extend the partition to make full use of the capacity of the cloned hard drive. To do so, you can run the commands below in order.
select partition 2
extend size=* (then enter the maximum available space of the unallocated space in MB)
However, Diskpart does not allow you to extend a non-NTFS partition or volume (except a RAW partition). Otherwise, you will encounter the error “The volume cannot be extended because the file system does not support it”.
# 3. Use MiniTool Partition Wizard
According to the above information, it can be concluded that Windows Disk Management and Diskpart can only fix the “cloned HDD shows wrong size” issue under limited situations. You can encounter various error codes while shrinking/extending partitions with the two tools. In addition, you can’t extend the FAT32 partitions with them.
Is there an effective tool to extend partitions on Windows 10/11? Of course, MiniTool Partition Wizard breaks through the limitations of the Windows tools. It is a trusted and powerful partition manager that can shrink/extend/move/resize partitions easily. Here’s how to fix the “hard drive shows wrong size after cloning” error using the MiniTool software.
MiniTool Partition Wizard DemoClick to Download100%Clean & Safe
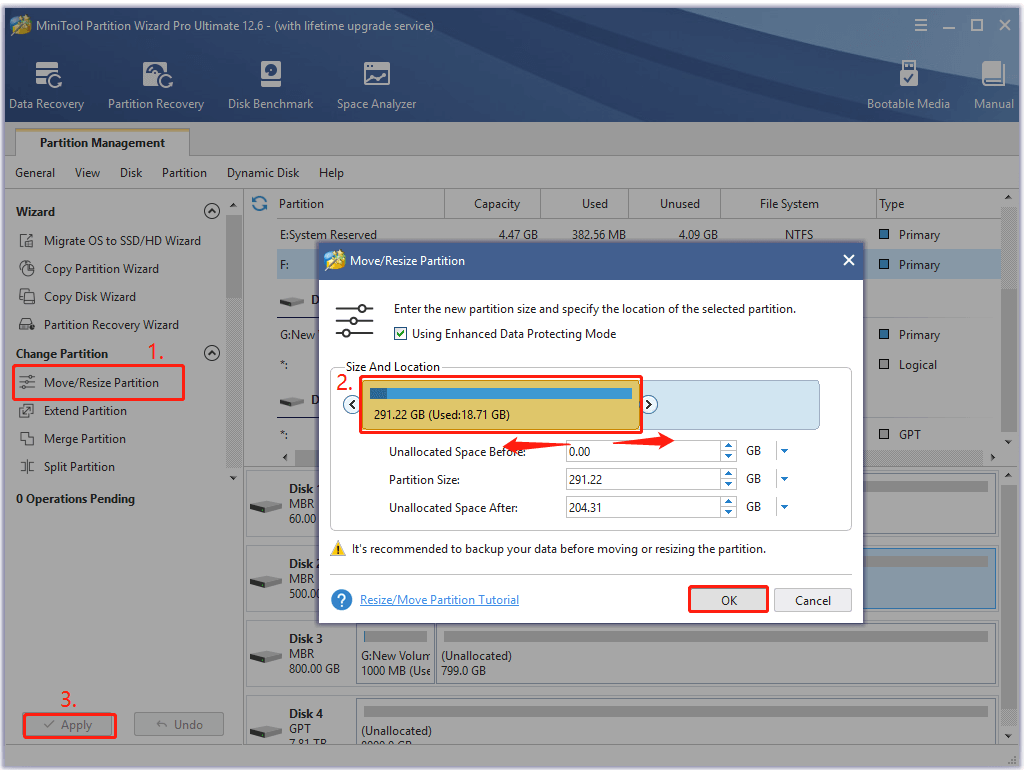
Step 1. Launch the MiniTool program to enter its main interface, and then select the partition that you want to adjust and click on Move/Resize Partition from the left pane.
To extend the C drive without boot issues, we highly recommend you use the bootable MiniTool Partition Wizard Edition. If there is no contiguous unallocated space next to the drive you want to extend, you can use the Extend Partition feature.
Step 2. In the pop-up window, you can drag the slider bar to occupy all the unallocated space or move the whole slider bar to adjust the location of the partition. Then click on OK.
Step 3. Click on Apply to execute the process. Once done, you can open the File Explorer and check if the “hard drive shows wrong size after cloning” issue gets fixed.
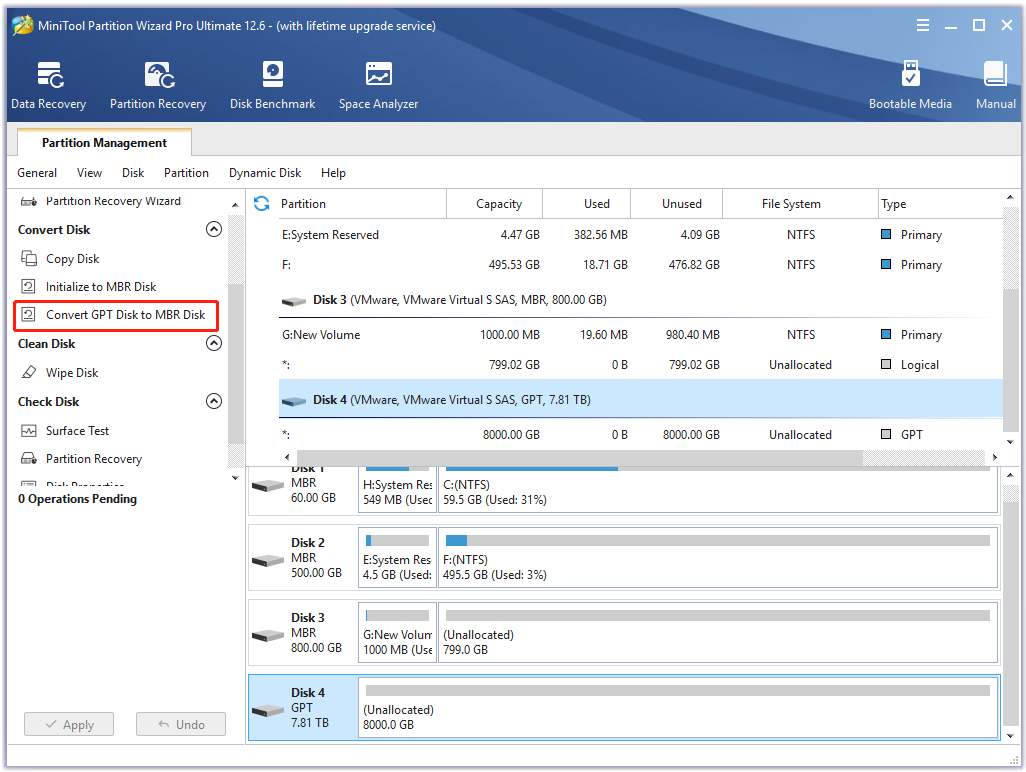
Further reading: If you cloned an MBR hard disk to an SSD/HDD with a capacity larger than 2 TB, Windows won’t recognize the exceeded space. In this case, MiniTool Partition Wizard can help you convert MBR to GPT without data loss first and extend partitions larger than 2 TB.
Best Solution to Avoid Cloned Hard Disk Shows Wrong Size on Windows 10/11
How to avoid the “the “hard drive shows smaller size after cloning” issue later? As discussed above, the problem often occurs after using certain third-party cloning software like CloneZilla. So, it’s highly recommended you use a more effective disk cloning tool – MiniTool Partition Wizard.
The MiniTool software can copy all partitions on the hard drive to a larger SSD/HDD without the wrong disk size problem. This method has been proven by a great many people to be useful. Let’s have a try.
MiniTool Partition Wizard DemoClick to Download100%Clean & Safe
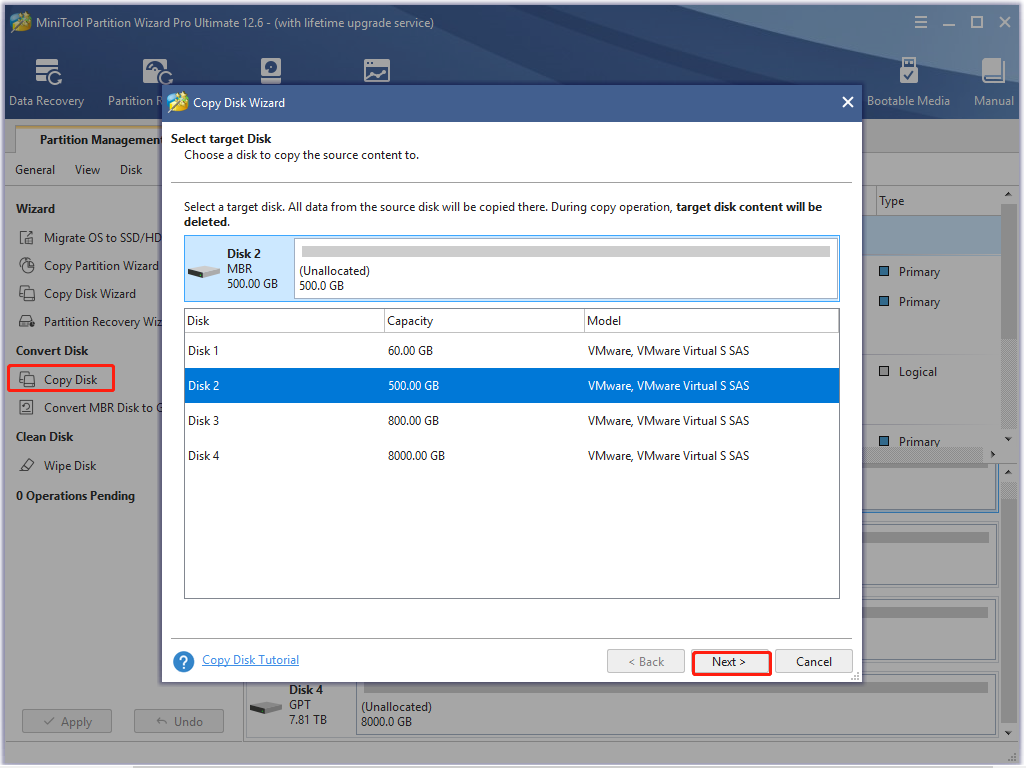
Step 1. In the main interface, select the original hard drive from the disk map and click on Copy Disk from the left action panel.
Alternatively, you can select Migrate OS to SSD/HD Wizard to copy all partitions or only the OS partition on the original hard drive to the target disk.
Step 2. In the pop-up window, select the target disk and click on Next.
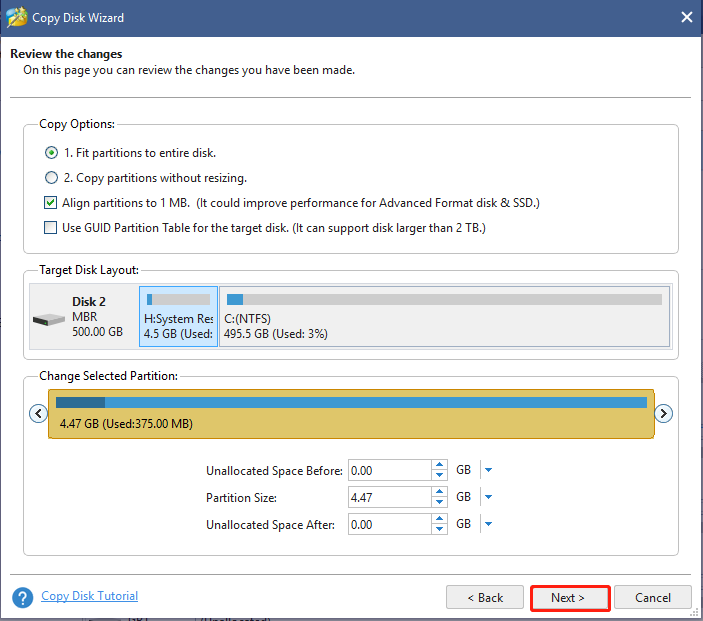
Step 3. Select copy options based on your needs and click on Next to continue. Here you can keep the default options unchanged if you are using an MBR disk.
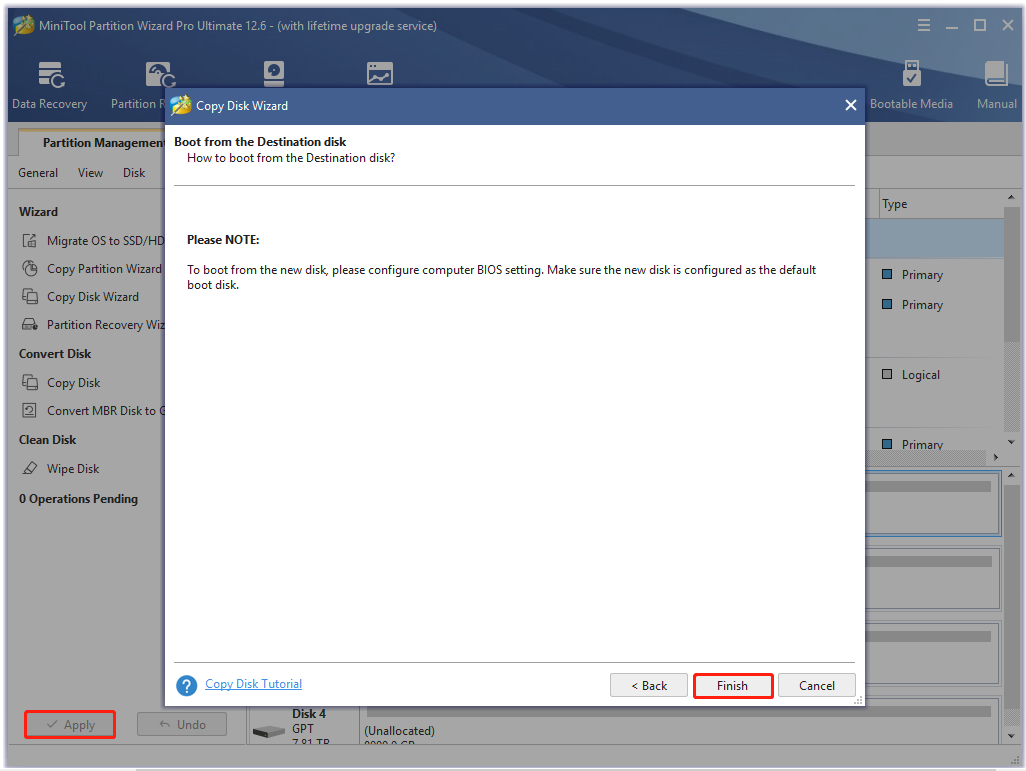
Step 4. Read the information and click the Finish button in the pop-up window. Finally, click on Apply to execute the pending operations.
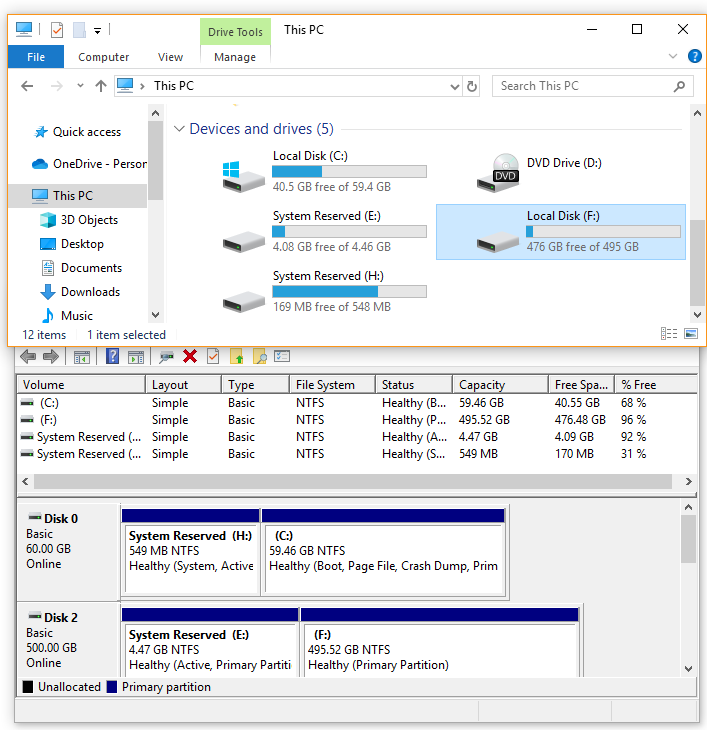
Step 5. Now, you can open File Explorer and Disk Management, and the cloned hard drive should show its full capacity as the screenshot below:
Have a Try Now
How to fix the “SSD shows wrong size after cloning” issue on Windows 10/11? You can fix it by extending the partition to occupy the unallocated space on the cloned hard disk. Alternatively, you can use MiniTool Partition Wizard to copy the hard disk to the target disk.
If you have any other opinions about this topic, please leave them in the following comment zone. Of course, you can send an email to [email protected] when you have difficulty using the MiniTool software.
User Comments :