Have you heard about ScanDisk? What is it? Is it similar to CHKDSK? In this post, MiniTool explains what ScanDisk is and CHKDSK vs ScanDisk. Furthermore, to help you maintain your hard drive in a healthy state, it also introduces some alternatives to ScanDisk.
What Is ScanDisk?
ScanDisk, also known as Scan Disk, is a DOS and Windows utility that is only included in Windows 95/98/ME. This utility first came with DOS 6.2 and featured a character-based menu interface.
When Windows crashes, this utility will run automatically the next time when the computer is booted. During the process, it will detect the errors on hard disk and try to correct some of the detected errors.
Now let’s explore more shines about Microsoft ScanDisk.
1.ScanDisk can identify all versions of the traditional allocation table (FAT) system, like FAT12, FAT16, and FAT 32.
2.ScanDisk can recognize the compressed volumes and long filenames.
With compressed volumes, data is compressed as it is written to disk, saving more space. But it is not recommended that you compress your OS drive.
A long filename refers to the file name that exceeds the short MS-DOS/8.3 style naming convention.
3. ScanDisk can automatically repair cross-linked files and lost clusters.
Cross-linked files are FAT entries. These files are created when the computer is improperly shut down or an application abnormally aborts.
4. ScanDisk can help users perform a full scan of floppy disks to check for damage.
5.The ScanDisk command features a Graphical User Interface that offers a more intuitive interface and easier control.
ScanDisk Commands
To diagnose the problem of hard drive on old versions of Windows, you can run the following Microsoft ScanDisk commands.
Microsoft ScanDisk command is a diagnostic utility in nature. It has been included in MS-DOS and Windows 9X. Here are the common ScanDisk commands and their corresponding functions. All of them can run on Windows 9X and Windows ME.
drive: The drive you want to scan. For example, scandisk c: (this command means that you want to scan your C drive).
/all: The command checks and repairs all the local drives at once.
/checkonly: The command just checks for errors without repairing it.
/custom: The command runs ScanDisk depending on the settings in the [Custom] sections of the scandisk.ini file.
/autofix: This command will activate ScanDisk to fix errors without asking you first. It saves lost clusters by default as files in the drive’s root directory.
/surface: The command automatically checks disk surface.
/fragment: The command checks individual files for fragmentation. Absolutely, to run this command, you must specify a drive (drive letter), path, and file name.
/mono: The command uses a monochrome display, being black or white.
/nosave: The command can delete all lost clusters found by ScanDisk. You can use it with /autofix.
/nosummary: The command prevents display of full-screen summary after each drive repair.
These are common ScanDisk commands. Note that you are not allowed to use /autofix, /custom, or /checkonly with each other. These commands have been deserted and were replaced with the CHKDSK command.
How to Run ScanDisk?
In this part, I focus on How to use ScanDisk. To help you get a relatively complete understanding of this Windows utility, I gather some common questions related to ScanDisk usage from the Internet. After reading, you may learn about this Windows utility better.
Q 1: Will ScanDisk lead to physical problems to the hard drive?
Absolutely, Microsoft ScanDisk won’t cause any physical problems to the hard drive. This Windows utility is designed to verify data integrity. It can make changes to the data on the hard drive if needed.
Q 2: How often should you run ScanDisk?
There is no definite answer because how often users use their computers is different. Generally, for the users who do not use their computer frequently, it is wise to run ScanDisk at least once every 2-3 months. If you frequently run into some issues (like computer crashing when playing games) related to hard drive issues, you can run this DOS utility more frequently.
Q 3: How to run ScanDisk on old versions of Windows, like Windows 95/98/ME?
You should boot your computer into Safe Mode first. After that, follow the steps below.
Step 1: Right-click the Start button and select the Run option.
Step 2: Type ScanDisk in the Run dialogue and hit the Enter key.
Step 3: In the ScanDisk window, select the drive you want to check.
Step 4: Choose Standard or Thorough option in the Type of test section. It is wise to try the Standard option first and then you can switch to the Thorough option when you run into issues.
Step 5: Click Start to begin the scanning.
If you want to run ScanDisk commands, please follow the steps below.
Step 1: Access the MS-DOS prompt by using one of the following methods.
- Press any button when you see Press any button for MS-DOS on the boot screen.
- Click the Start button > Run and then type cmd and click OK.
Step 2: Type c cdwindowscommand and click the Enter key.
Step 3: When c:/windows/command: appears, type one ScanDisk command and hit the Enter key to run it.
Q 4: How long does it take to run ScanDisk?
The time depends on the size of the hard drive you check and how many problems are found. In other words, a larger hard drive and more problems on the disk, more time it takes to run ScanDisk.
Q 5: What to do when ScanDisk finds many errors on hard drive?
In this situation, the worst thing is that hard drive failure happens. To avoid further data loss, it is highly recommended that you back up all the data on this hard drive right now.
ScanDisk vs CHKDSK
How about ScanDisk vs CHKDSK? In a simple word, CHKDSK (short for Check Disk) is the new version of ScanDisk.
Why did ScanDisk give way to CHKDSK? This due to that the file system in the newer versions of Windows has been switched to New Technology File System (NTFS), while ScanDisk only functions with older versions of Windows that utilize FAT. So, Microsoft developed a new disk checking tool that is CHKDSK.
These two utilities can check hard drive for errors, like file system errors and bad sectors, and make it work properly. And the difference between these two utilities is that ScanDisk only works on the versions of Windows that are running on FAT-formatted disks.
Alternatives to ScanDisk
In this part, I would like to introduce some alternatives to ScanDisk. You can use them to check your hard drive for errors on the new versions of Windows, like Windows 10.
Windows Built-in Utility – CHKDSK
The first one is the successor of ScanDisk, called CHKDSK. As I mentioned above, CHKDSK is also designed to check disk file system for errors and then fix them. How to run this utility? There are three methods. Here I would like to show you one of the methods.
Run CHKDSK via Disk Management
Step 1: Open Disk Management.
- Right-click the Start icon on the taskbar and then click Run.
- Type diskmgmt.msc in the Run box and then click the OK button.
Step 2: On the Disk Management window, right-click the drive you want to check and select Properties.
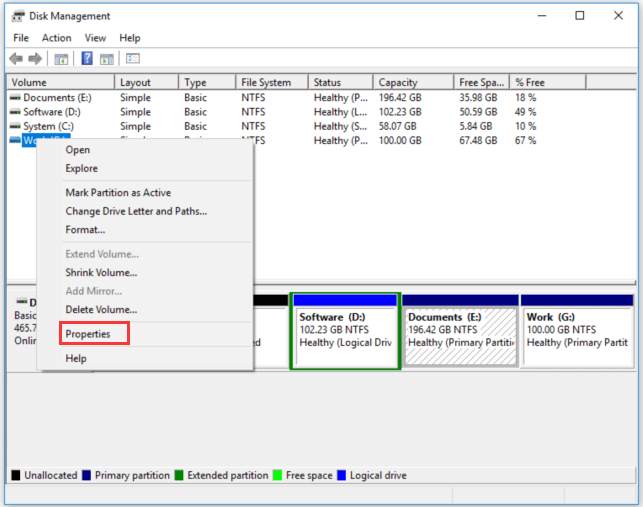
Step 3: On the new Window, navigate to the Tools tab and then click the Check button.
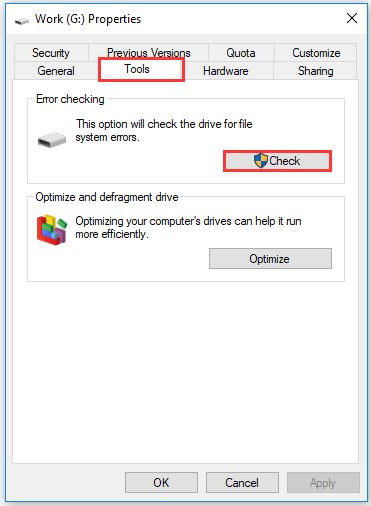
Step 4: Follow the on-screen instructions.
If you want to learn about another two methods to launch CHKDSK, please read the following recommended article.
A Reliable Third-party Software – MiniTool Partition Wizard
The second recommended utility for checking hard drive for errors is MiniTool Partition Wizard. This software is free and 100% clean. With it, you can diagnose the problems of your hard drive, including file system integrity and bad sectors, and you can also upgrade to a new HDD/SSD without reinstalling Windows operating system when your original hard drive fails.
The operation of checking hard drive for errors via MiniTool Partition Wizard is quite easy. Have a try.
Verify the integrity of file system
Step 1: Click the following downloadable button to get the free version of MiniTool Partition Wizard.
MiniTool Partition Wizard FreeClick to Download100%Clean & Safe
Step 2: Install the software and then launch it to get its main interface.
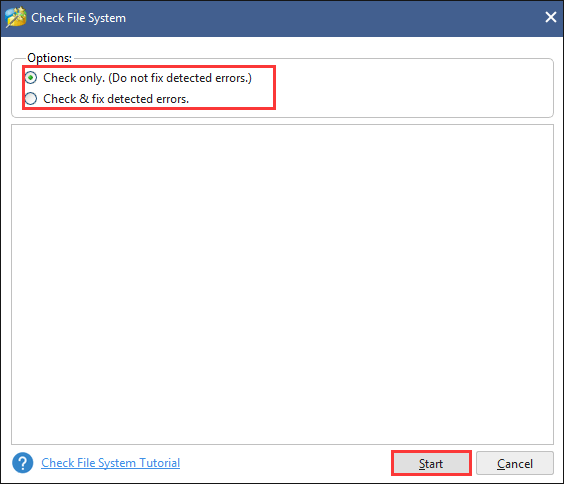
Step 3: Highlight the drive you want to check and then select Check File System from the left panel.
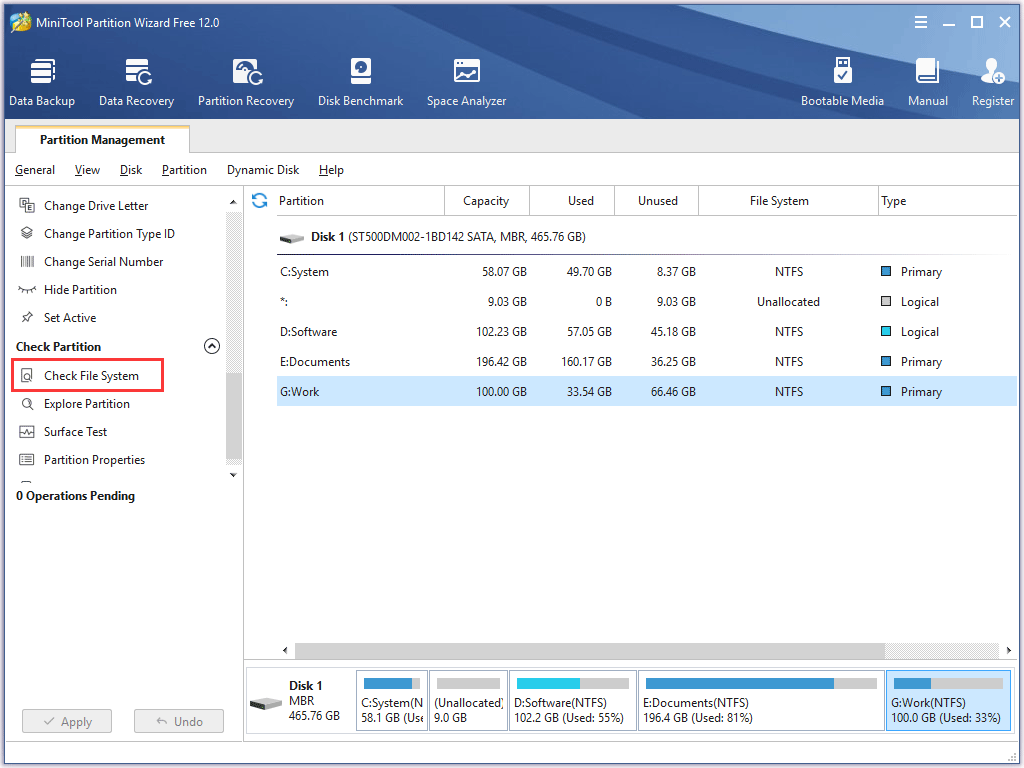
Step 4: On the Check File System window, select one of the offered options and then click the Start button. Here I recommend you to select Check & fix detected errors as its name shows this option can find errors and fix them at once.
Check hard drive for bad sectors
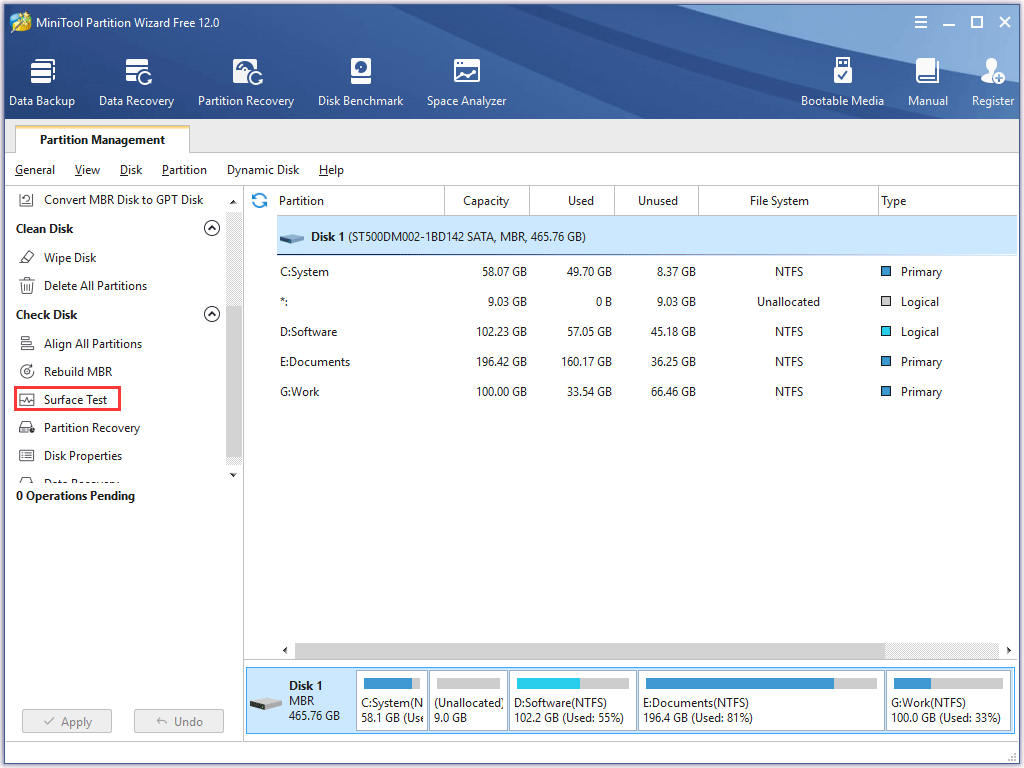
Step 1: Highlight the drive you want to check or the whole disk and then select Surface Test from the left panel.
Step 2: Click the Start Now button on the new window. This software will automatically scan your hard drive. Once it finds bad sectors, it will mark them as red. The sectors marked as green is healthy.
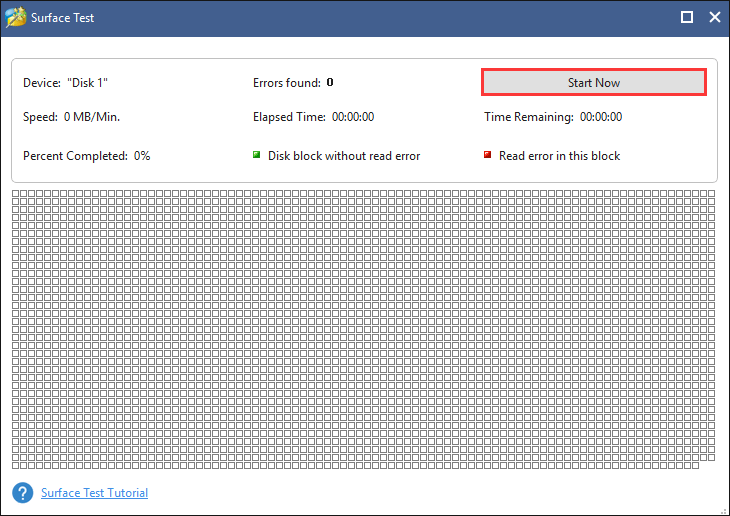
The Surface Test feature just can help you intuitively learn about the state of your hard drive. With regards to bad sector repair, please refer to Can We Remove Bad Sector from Hard Disk Permanently.
I Want Your Voice
This article comes to an end. After reading, have you known about ScanDisk better? If you have any doubts about ScanDisk and CHKDSK, please leave a comment in the following comment zone. If you have any problems with using MiniTool Partition Wizard, do not hesitate to contact us via [email protected].
Please reasonably use hard disk checking tools, like ScanDisk, CHKDSK, and MiniTool Partition Wizard to maintain your hard drive in a healthy state.
ScanDisk FAQ
If you are using old versions of Windows, like Windows 95/98, follow the steps below.
Step 1: Right-click the Start button and select the Run option.
Step 2: Type ScanDisk in the Run dialogue and hit the Enter key.
Step 3: In the ScanDisk window, select the drive you want to check.
Step 4: Choose Standard or Thorough option in the Type of test section. It is wise to try the Standard option first and then you can switch to the Thorough option when you run into issues.
Step 5: Click Start to begin the scanning.
User Comments :