What Is Kingston SSD Manager
What is Kingston SSD Manager? Let’s learn about SSDs first. An SSD (Solid-state drive) is a storage device that functions as secondary storage in a computer. Compared with HDDs (hard disk drive), SSDs run quicker, which makes SSDs quite popular among computer users.
However, as the SSD is used, its performance may degrade gradually. Fortunately, you can use SSD health monitoring and optimization tools to minimize degradation. Kingston SSD Manager is such a tool. As a tool from the SSD manufacture, Kingston SSD Manager is reliable and prevalent.
For detailed features and how to use this tool, you can refer to the following contents.
Kingston SSD Manager System Requirements
Kingston SSD Manager is easy to get. You just need to visit the official website and download it. Then run the downloaded setup file to install this tool.
However, to run this tool properly, your computer needs to meet the following requirements.
- Kingston SSD Manager is supported on operating systems including Windows 8, Windows 8.1, and Windows 10. It is not compatible with Mac OS or Linux distributions.
- Kingston SSD Manager is only available for Kingston SSDs. If you are using an SSD provided by another manufacture, you will encounter Kingston SSD Manager not working issue.
- You must have AHCI mode set in BIOS.
- You must have administrator privileges in Windows.
How to Use Kingston SSD Manager
As mentioned, Kingston SSD Manager is an SSD monitoring and management tool. It is able to:
- Monitor drive health, status, and disk usage.
- View specific drive information, including model name, serial number, firmware version, etc.
- Update drive firmware.
- Utilize S.M.A.R.T (Self-Monitoring, Analysis, and Reporting Technology) and export detailed reports in file format.
- Securely erase data.
- Manage TCG OPAL and IEEE 1667 (standards for SSD encryption).
Now, let’s see how to access and use these features.
When you launch the Kingston SSD Manager application, you can get a quick view of the device information and health status in the main window. If you have more than one Kingston SSD, you can switch between them in the left pane. The bottom panel displays SSD information including:
- Partition and disk usage;
- Health overview;
- SSD wear indicator and spare blocks;
- Temperature and power on hours.

In the right pane, you can see five tabs: Firmware, Operation, Health, Security, and Events. Keep reading to learn them one by one.
The Firmware Tab
Under the Firmware tab, you can check the physical device path, volume information, vendor/model, serial number, and firmware version of your SSD.
If there is an available firmware update, you can click the Firmware Update button to update firmware for your Kinston SSD. When it’s finished, it is recommended to safely shut down your computer, wait for at least 10 seconds, and then turn on your computer.
If there is no update, the button will be grayed out with the message “No Firmware Update Available”.
The Operations Tab
The Operations tab includes any special operations that may be applicable to your Kingston SSD are displayed. If the model of your SSD doesn’t support special operations, this tab will be hidden.
Most SSDs support Overprovisioning feature. Overprovisioning allows the inclusion of extra storage in SSDs. The extra capacity is not accessible to the host as available storage. Overprovisioning is usually used to reduce power consumption, boost SSD performance, and increase SSD lifespan.
If you have a Kingston SSD, you can use Kingston SSD Manager to manage the overprovisioning of the SSD by setting a Host Protected Area (HPA)under the Operations tab. Here are the detailed steps:
Step 1: Back up partitions or files on the target SSD if it is not a new one, as you need to remove all partitions from the SSD later.
Step 2: Press Win + R to invoke the Run window. Then type diskmgmt.msc in the box and click OK to open Disk Management, a built-in tool in Windows used to manage hard drives.
Step 3: Right-click each partition on your Kingston SSD and select Delete Volume. Repeat the operation to delete all partitions on the SSD.

Step 4: Go to Kingston SSD Manager and click the Operations tab. Then enter the desired capacity in gigabytes (GB) and select the Commit button to apply the operation.
Step 5: In the pop-up window, enter the last four digits of the drive serial number and click Continue.
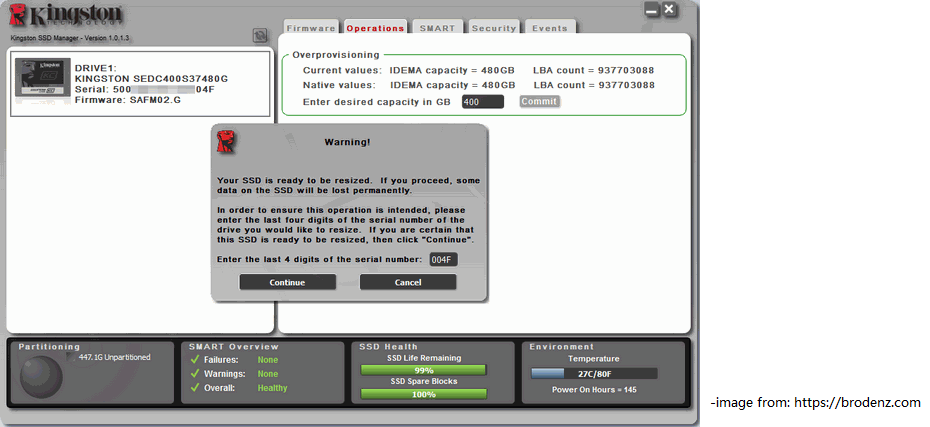
Then you just need to wait until the process is finished. After that, you need to restart your computer in order to detect the new capacity.
The Health Tab
The Kingston SSD Manager application also allows you to monitor various attributes related to SSD health and check the status of your Kingston SSD.
Under the Health tab, you can click the Refresh Data button to renew the current health information. If you want to save the information as a file, click the Export Data button.
The health information includes: Read Error, Rate, Bad Block Count, Power One Hours, Power Cycles, Program Fail Count, Erase Fail Count, Uncorrectable ECC Errors, etc.
Kingston SSD Manager also provides a table listing supported health attributes and their technical details and values under the Heath tab. You can scroll down to find it.
The Security Tab
Under the Security tab of Kingston SSD Manager, there is Vendor/Model information, Serial Number of the SSD, and three security features: ATA Security, TCG OPAL, and IEEE 1667.
What can you do with these features? Let’s see them one by one.
ATA Security
This feature helps you control access and reliably destroy data on your SSD. You can view whether the ATA security is supported and enabled. Under this section, you can find a Secure Erase button. It is used to securely erase all the data on your Kingston SSD.
There are some requirements for Kingston SSD Manager ATA Security Erase:
- NVMe SSDs are not supported and the target SSD needs to be a Kingston SATA SSD.
- The target SSD needs to be connected as a non-system
- The target SSD should contain no partitions.
- The target SSD must not be password protected.
How to securely erase a Kingston SSD in Kingston SSD Manager? You just need to:
- Remove all of them at first if there are partitions on your Kingston SSD.
- Launch Kingston SSD Manager and go to the Security
- Click theSecure Erase button under the ATA Security
- In the pop-up window, read the warning. If you are sure about the operation, type the last four digits of the disk serial number.
- Click the Perform Erase button to start the process.
This will take some time. Once it is finished, a message “the Secure Erase completed successfully”.
As you can see, there are many limitations to erase an SSD with Kingston SSD Manager. If your SSD doesn’t meet the above requirements, you will face the Kingston SSD Manager not working problem. In this case, it’s wise to use an alternative tool to erase data. Here MiniTool Partition Wizard is recommended.
MiniTool Partition Wizard is a professional and reliable tool for disk management and data recovery. It is compatible with Windows operation systems and supports various types of hard drives and it doesn’t matter which manufacturer the disk comes from.
With this tool, you can choose to erase data on a certain partition or erase the whole disk. And you don’t need to delete partitions on the target disk before the operation. After erasing data, it will be unrecoverable with most data recovery software on market.
Now, let’s see how to securely erase a non-system hard drive with this tool.
MiniTool Partition Wizard FreeClick to Download100%Clean & Safe
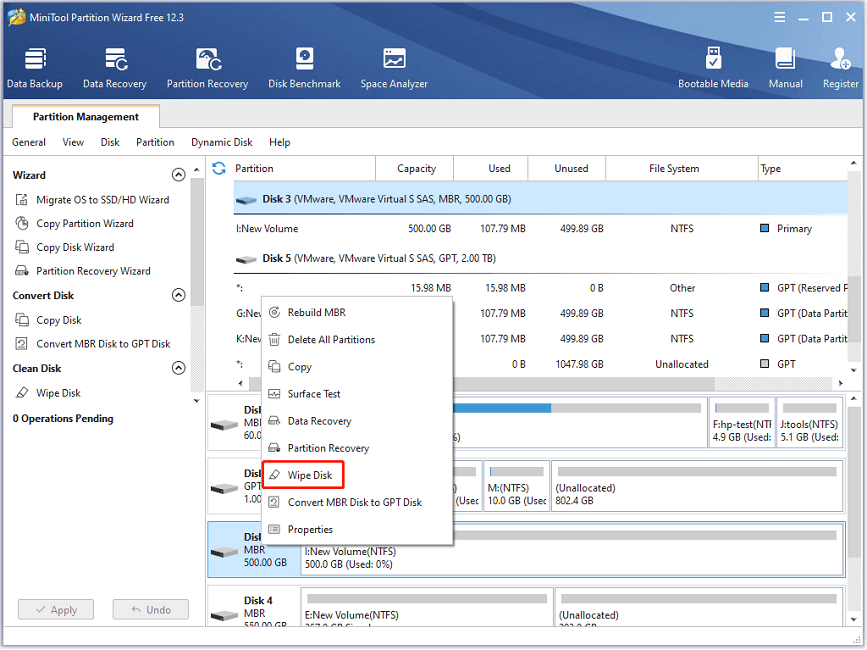
Step 1: Launch MiniTool Partition Wizard.
Step 2: Right-click the target disk and select Wipe Disk.
Step 3: In the pop-up window, select a wiping method according to your needs. The longer the wiping process takes, the harder the data can be recovered. Then click OK to continue.
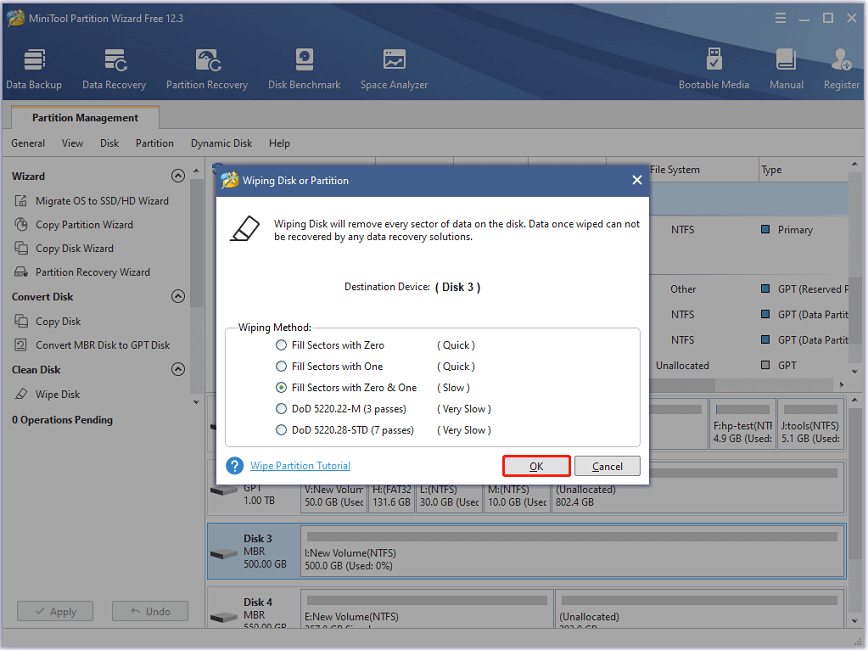
Step 4: When you go back to the main interface, click the Apply button at the bottom left corner to execute the operation.
Then you just wait patiently until the process is finished.
TCG OPAL
TCG OPAL refers to Trusted Computing Group OPAL, a standard for enhancing the security of data storage devices. It allows disk encryption so that an unauthorized person will be unable to access the data on the disk.
The TCG OPAL feature in Kingston SSD Manager is only available for Kingston SSDs that support TCG OPAL. To manage the TCG OPAL status for your Kingston SSD, the SSD needs to be installed as a non-system hard drive.
IEEE 1667
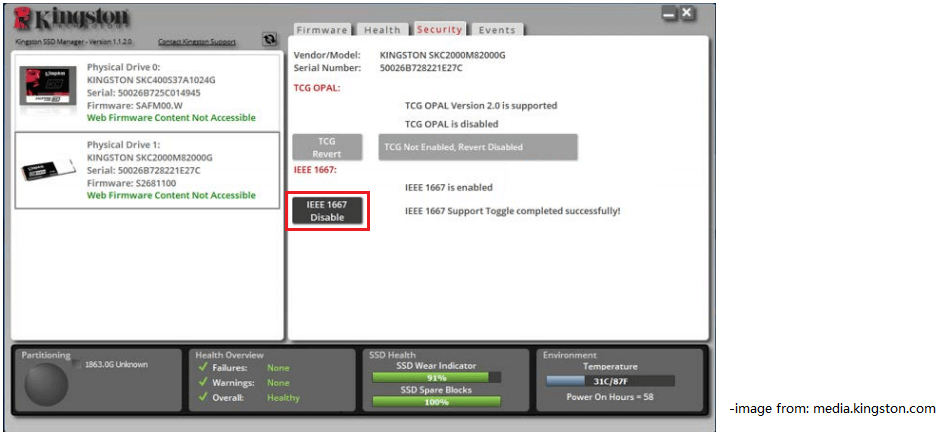
IEEE 1667 is a standard that describes various methods for authenticating storage devices when they are inserted into a computer. In other words, it is also used for hard drive encryption.
To manage IEEE 1667 in Kingston SSD Manager, your SSD needs to support IEEE 1667. You can click the IEEE 1667 Disable/Enable button to disable or enable this feature for your SSD.
The Events Tab
This tab includes the event log that contains all actions since the application was launched. You can scroll down to view more events.
How to use Kingston SSD Manager? Here is the tutorial.Click to Tweet
Bottom Line
Kingston SSD Manager is a useful tool for monitoring and managing a disk if you have a Kingston SSD. If you are using Kingston SSD Manager for the first time, this post can help you.
You can share your experience with us by posting them in the following comment section. If you encounter problems while using MiniTool Partition Wizard, you can contact us via [email protected].
User Comments :