A great many people want to create a portable Linux USB flash drive. How to install Ubuntu on USB? If you are one of them, this post of MiniTool is worth reading. It explains all information related to the Ubuntu flash drive creation in detail.
Important Things to Know Before You Install Ubuntu on USB
A lot of people want to install Linux on USB to make an actual and portable Ubuntu USB drive. Can you do that? What does a portable Ubuntu flash drive mean? What needs to prepare for the installation? Here we will explain these questions orderly for you.
Can You Install Ubuntu on USB
Can you install Ubuntu on USB drive? Of course, the answer is “Positive”. If you have a new portable computer without DVD drivers, you can use a USB flash drive to create a portable operating system. This USB can be used on any computer system like Windows.
What to Mean to Install Ubuntu on USB
Many people think it is a process of creating an Ubuntu bootable USB drive or a live USB. Of course not. A bootable USB is used to reboot or repair your system especially when your computer cannot boot normally, while a live USB is usually used for testing the distribution and installing Linux on the hard disk.
Here it’s neither an Ubuntu bootable USB nor a regular live USB. It is an actual Ubuntu installed on a USB stick. It means that you have a portable Ubuntu Linux drive. You can plug it into any computer, use it, and save your work on the USB, just working as an actual hard disk.
However, this procedure is different from installing Linux on an actual hard disk or dual-booting Windows and Linux. Why? Let’s dig out the answer in the following parts.
Major Difficulty While Installing Ubuntu to USB
There are many online tutorials about how to install Ubuntu on USB stick, but many of them ignore the most important part: the bootloader on UEFI systems. It is the major difficulty in making the portable Ubuntu flash drive. This is because a system can only have one active ESP partition at a time and it causes problems with the bootloader.
When you install Linux on USB, the existing ESP partition is still used for placing the EFI file for the new distribution, even if you choose the USB as the destination for the bootloader. That is to say, the portable Linux USB still doesn’t work if your hard disk already has an active ESP partition.
You may encounter the following difficulties when you install Ubuntu to USB:
- The system used for installing Ubuntu on flash drive may not boot and end up with grub errors if you haven’t plugged in the Ubuntu USB.
- The portable Linux USB drive won’t boot on other systems because the EFI files on the ESP partition of the system were used to install Linux on USB.
However, it is still possible to install Ubuntu to USB without messing up the bootloader of the host Linux system and the system on USB.
What to Prepare Before You Install Ubuntu on USB Drive
To fix the bootloader issue, all things you need to do is to let the installer think there is no active ESP partition on the system. If you are using a desktop PC, removing the hard disk may solve the problem but it’s difficult on a laptop.
Thus, we recommend you try removing the ESP flag from the ESP partition before you install Ubuntu on USB drive and put it back after installation. By doing so, the Ubuntu installer thinks there is no existing ESP partition so that it can create a new ESP partition on the USB. At the same time, it makes sure that the original ESP partition on the hard disk is still intact.
Here are some important things and suggestions you need to note:
- Prepare 2 USB flash drives: Use a 4 GB USB for the live system and a USB of at least 32 GB for the portable Ubuntu USB. To install Ubuntu to USB quickly, it’s highly recommended that you use USB 3.0 for both live USB and the Ubuntu USB.
- Be patient: Even if you use USB 3.0, the installation may be slower than a normal Ubuntu installation on HDD/SSD.
- Compatibility: The portable Linux USB may not be compatible with systems that have secure boot enabled.
Once you have prepared what you need, move down to the “how to install Ubuntu on flash drive” section.
How to Install Ubuntu on USB & Create a Portable Ubuntu USB Drive
To install Ubuntu on USB stick successfully, you need to perform the following 4 parts. They are:
- Create a live USB for the Linux system
- Use the live USB to install Ubuntu on another USB by removing the ESP partition flag before and after the installation
- Use the portable Linux USB on other systems
- Recover the live USB to its normal condition
# 1. Create a Live USB for Ubuntu
To create a live Ubuntu USB drive, you need to write the OS image to the USB. Here you can use Rufus which is available for Linux, Windows, and macOS. Follow the steps below to create a live USB.
Step 1. Click here to download and install Rufus on your computer.
Step 2. Click here to open the official Ubuntu website and download an Ubuntu ISO file.
Step 3. Plug the USB of 4 GB into your computer, and then double click the Rufus.exe file to run it and Rufus will automatically detect the USB and Ubuntu ISO file.
Step 4. Once you selected the correct USB and Ubuntu ISO file, make sure other settings are correct and click on Start.
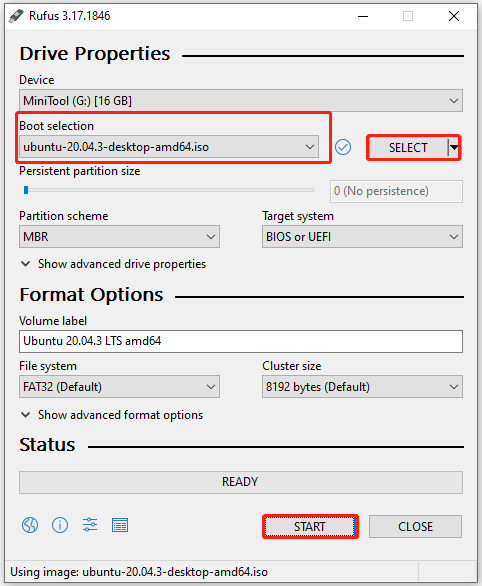
Step 5. Then click on OK in the pop-up confirmation window. After that, you should have a live Ubuntu USB drive.
# 2. Install Ubuntu on USB Stick
Now, it’s time to install Ubuntu to the USB of 32 GB using the live USB. Here’s a full guide for you.
Step 1. Boot your computer from the live Ubuntu USB drive.
1. Plug both the 2 USB drives into your computer and restart it.
2. When the system startup (manufacturer’s logo) screen shows, press the F10 or F12 key repeatedly to access the BIOS settings. Here the BIOS key may vary from different manufacturers.
3. In the BIOS settings, set the live USB drive as the first boot order and save the change, and boot your computer.
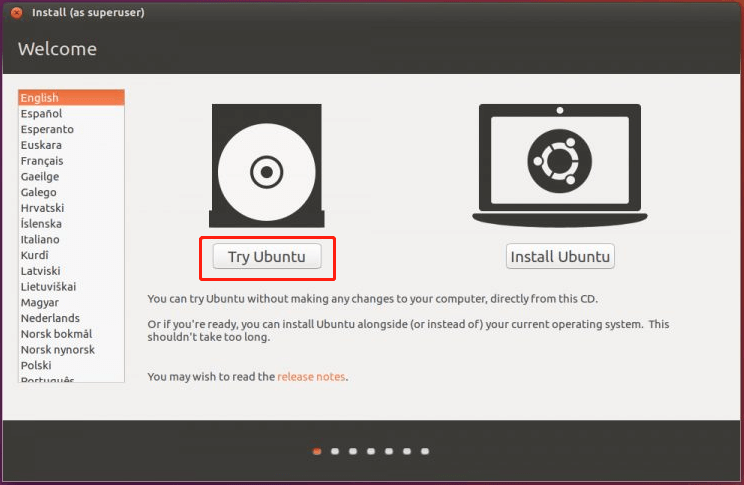
4. After that, you will enter the install session. select the Try Ubuntu
Step 2. Remove the ESP flags from the ESP partition.
1. Press the Win key and type Gparted in the search bar. Then it will open the Gparted partition manager that already has present on the Ubuntu ISO.

2. In the Gparted partition manager window, select the system disk in which the ESP partition is located. Usually, the partition is about 100 to 500 MB in size and flagged as ESP. Right-click it and select Manage Flags.
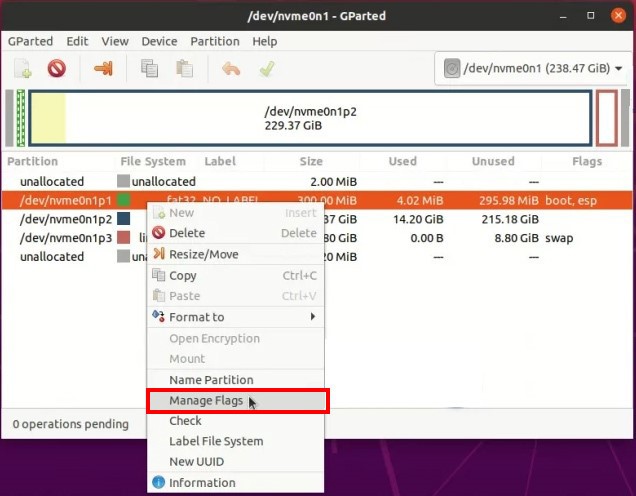
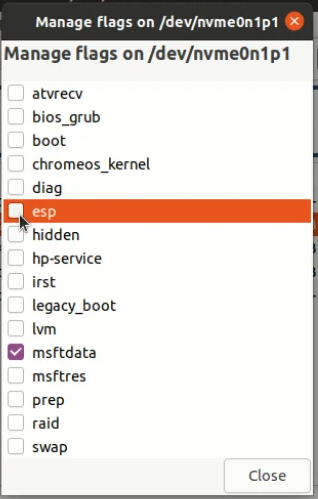
3. Untick the checkbox next to esp and boot in the pop-up window. If there are more flags, take a screenshot so that you can also revert to the same flags set after you complete the installation. Click on Close.
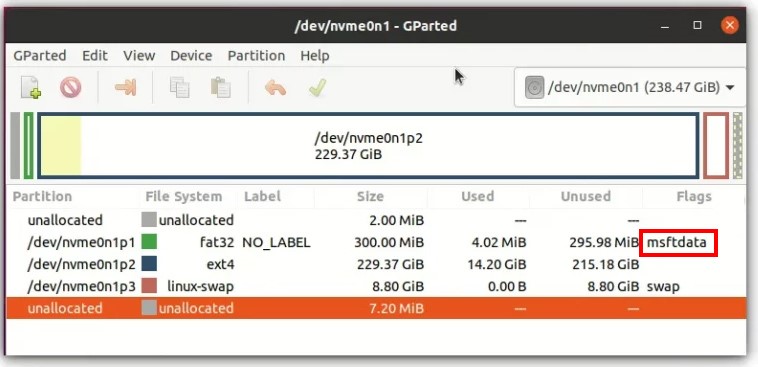
4. Then it will add a msftdata flag for the ESP partition. Now, you should have a live system that doesn’t see the ESP partition and the existing boot settings of your laptop.
Step 3. Install Ubuntu to the other USB drive.
1. Double click the Install Ubuntu icon on your desktop. It will start the installation.

2. In the Ubuntu installation screen, select the keyboard layout and language according to your demand.
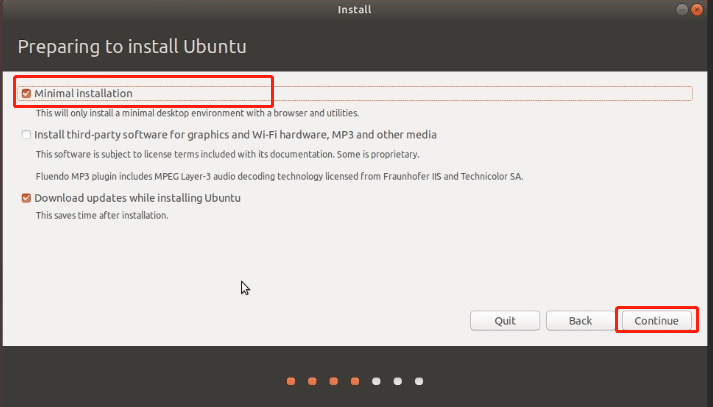
3. Select Minimal Installation and click on Continue. This minimal installation option will install a browser, and essential tools, but doesn’t contain Office software, media player, etc. It can copy fewer files to the USB and reduce the installation time.
4. Select Something else and click on Continue.
5. On the Installation type screen, you will see a list of drives and USB disks. Select the correct USB flash drive (larger than 32 GB) for bootloader installation and delete any existing partitions to free up space by clicking the “-” button.

6. Select the free space and click the “+” button to create a new partition on it. In the pop-up dialog box, select Primary and use the first partition as ESP for the bootloader.
7. Select the remaining free space to create root with the Ext4 journaling file system and keep everything under it including swap.
8. Once you have the partitions created, double-check the correct USB drive for the bootloader install. Click on Install Now.
9. Follow the on-screen prompts to set up the time zone, user name, and password. After that, all thing you should do is to wait patiently.
10. When you see the “Installation Complete” message, do not restart it right away. You have to reset the ESP partition back to its original state.
Step 4. Re-enable the ESP flags.
- Launch Gparted again just we shown in Step 2.
- Select the system disk that contains the ESP partition, and right-click it (labeled as msftdata). Then it should select esp and boot flags automatically.
After you finish all steps above, you should install Ubuntu to USB successfully. You can turn off the live Ubuntu system now.
# 3. Use the Portable Ubuntu Flash Drive on Any System
Now, you can use the portable Linux USB drive on any system as long as it allows you to boot from the USB, but make sure the secure boot is disabled. The procedure is similar to how to boot from the live USB.
Step 1. Restart your system and press the F12/F10/F2 key to access the BIOS settings when the manufacturer logo appears.
Step 2. Select the USB or Ubuntu from the boot settings and save the change.
Step 3. Then your computer should boot from the Ubuntu USB and you will see the familiar Grub screen, and you can select Ubuntu to use it.
# 4. Get the Live Ubuntu USB Back to Normal
As mentioned above, you need 2 USB drives: one for live Ubuntu and the other for the actual Ubuntu installation. If you want to use the USB for normal data transferring later, then it may be difficult to directly format them. Here MiniTool Partition Wizard comes to rescue this situation. It is a powerful partition manager that boasts many useful features like formatting partition, converting NTFS to FAT, recovering data, migrating OS, etc.
Here’s how to use MiniTool Partition Wizard to get the USB back to normal.
MiniTool Partition Wizard FreeClick to Download100%Clean & Safe
Step 1. Plug the live USB into a Windows computer.
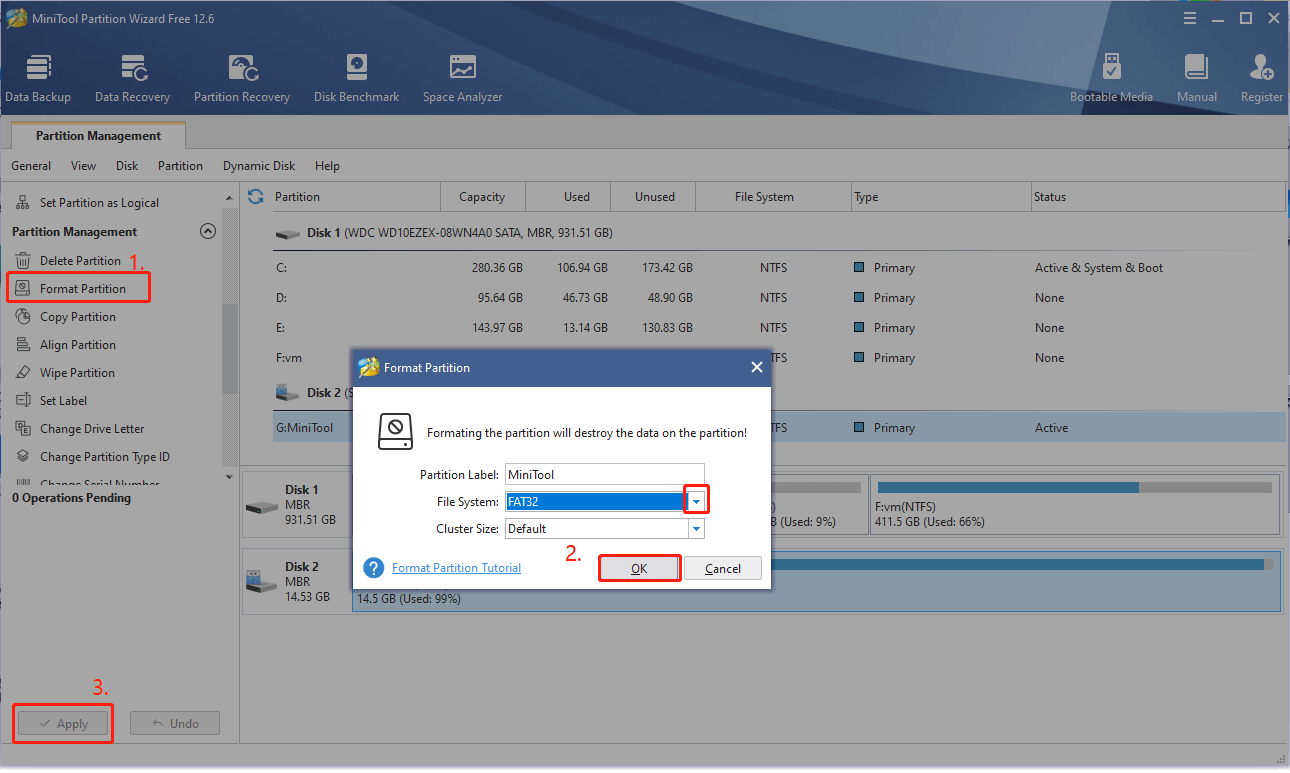
Step 2. Launch the MiniTool software to enter its main interface, and then select the USB from the disk map and click on Format Partition from the left action panel.
Step 3. Click on the File System drop-down menu and select FAT32/NTFS, and click on OK to save the change.
Step 4. Click on Apply to execute the pending operation. Now, you can use the USB flash drive as a data storage normally.
Have a Try Now!
This post mainly focuses on how to install Ubuntu on flash drive. Before you create the portable Ubuntu USB drive, make sure you read all these important tips and ideas. If you have any other opinions about this subject, leave them down in the comment area. You can also send us an email to [email protected] when you have difficulty using the MiniTool program.
User Comments :