About The Wait Operation Timed Out Error
Windows default applications often get the “the wait operation timed out” error. This occurs when the operating system cannot forward requests to open multimedia (photos, etc.) to the default Windows application. When the operation times out, the user will face this error. This is a very common error that occurs after Windows Update.
Here’s a true example from the reddit.com forum.
I can’t seem to find any detail or information on this error on this subreddit, so I was wondering if anyone else has encountered this error. This only occurs when I try to open a picture of any image type (PNG, jpeg, etc.). It only happens sometimes. I can reproduce the error by opening a picture, closing, and opening another picture in quick succession. Sometimes it will just happen on the first or second picture I try to open, sometimes it takes longer.https://www.reddit.com/r/Windows10/comments/46qi19/the_wait_operation_timed_out/

What does the wait operation timed out mean? The error indicates that the code was interrupted due to an unhandled exception that occurred while executing the request. In fact, the server becomes unable to serve the images you need through the Photos app.
The error dialog message is something like “The wait operation timed out”, including the location of the image file. In a few cases, restarting the PC will automatically resolve the issue, but this is not a permanent solution and the error may reappear. Here we provide some advantageous workarounds for this error.
![[Fixed] Microsoft Edge Keeps Deleting Saved Passwords](https://images.minitool.com/partitionwizard.com/images/uploads/2022/11/microsoft-edge-keeps-deleting-saved-passwords-thumbnail.png)
How to Fix The Wait Operation Timed Out Error
Here we summarize the following 6 methods to fix the “the wait operation timed out” error. You can try them in order until the error gets solved.
Method 1: Restart Windows Explorer
A simple and one of the easiest workarounds is to restart Windows Explorer using Task Manager. Restarting the explorer refreshes your entire GUI and is useful in situations where people can’t access it.
Step 1: Press the Ctrl + Shift + Esc key to open the Task Manager.
Step 2: Under the Process tab, locate the task of Windows Explorer in the list of processes. Then click on the Restart button at the bottom left side of the window.
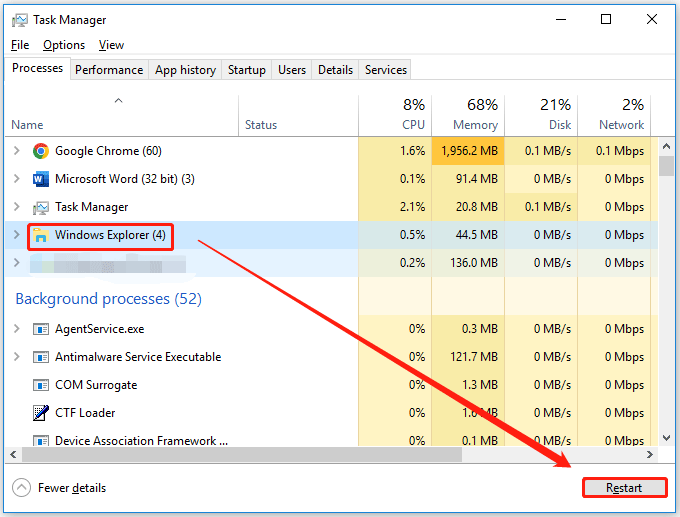
After that, you can check if the “the wait operation timed out” error gets fixed.
Method 2: End the Related Process
If you’re still unable to launch the app that’s causing the problem, you should check that the app isn’t already running in the background. Normally, if the app is already running and you open another photo or video, it should automatically switch to it.
You just need to find the default app (Photos, Movies, TV, etc.) that is causing the problem, right-click on it and select End Task. Then try opening the media again and check if the error message disappears.
Method 3: Temporarily Disable Antivirus Software
Sometimes the antivirus software on your computer can interfere with the operating system, causing the “the wait operation timed out” issue. If this is the case, you can add it to your antivirus software’s exception list. If you don’t know how to add the problematic app as an exception in your antivirus program, just disable it.
After disabling the antivirus software on your PC, restart the photo app and check if the wait operation timed out error goes away.
However, you can only temporarily disable antivirus software on your PC because it plays an important role in protecting your PC from virus attacks and malware attacks. You should enable your antivirus program as soon as possible after the “the wait operation timed out” error is resolved.
Method 4: Reset the Photos App
Another workaround to fix this problem is to reset the Photos app using settings. This option resets all configuration and user data related to your photos and puts the app in the state it was in when you first used it. This method addresses any discrepancies your application may face.
Step 1: Press the Win + I keys to open Settings. Once in settings, select the Apps category.
Step 2: Click Photos in the right pane of the screen, then click Advanced Options when expanded. This will take you to a new page where all usage and storage details can be found.
Step 3: Press Reset under Storage usage and app reset. Then click Reset again to confirm when the popup window appears.
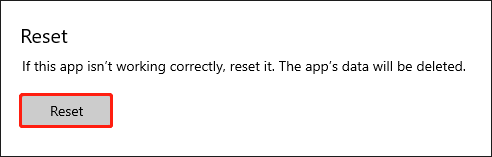
After the reset is complete, restart your computer and check if the problem is resolved.
![[5 Solutions] How to Fix the File Is Open in COM Surrogate](https://images.minitool.com/partitionwizard.com/images/uploads/2022/11/file-is-open-in-com-surrogate-thumbnail.png)
Method 5: Reinstall the Photos app
Maybe, because the Photos app is broken, this error occurs when you open Photos. So, you can try uninstalling and reinstalling the Photos app. Here are two steps to finish it.
This solution requires administrative privileges, so make sure you are logged in with an administrator account.
Step 1: Remove the Photos App
1. Right-click on the Start button and choose Windows PowerShell (Admin).
2. Input the following command and press Enter:
get-appxpackage *Microsoft.Windows.Photos* | remove-appxpackage
3. Reboot your computer when the process ends.
Step 2: Reinstall the Photos App
1. Go to Microsoft Store.
2. Search for Microsoft Photos.
3. Download and install the Photos app on your computer.
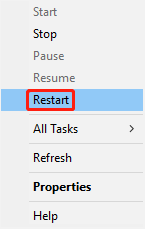
Method 6: Restart the BITS service
BITS (Background Intelligent Transfer Service) services are used to transfer files between client and server and provide important information during execution. The wait operation timed out error in the Photos app can occur due to poor functioning of this service. So, rebooting the BITS service is a good way to fix the problem. Here are the detailed steps.
Step 1: Press the Win + R key to open the Run dialog. Then type services.msc in the box and press Enter.
Step 2: Locate Background Intelligent Transfer Service (BITS). Then right-click on it and choose the Restart option from the menu.
file-is-open-in-com-surrogate
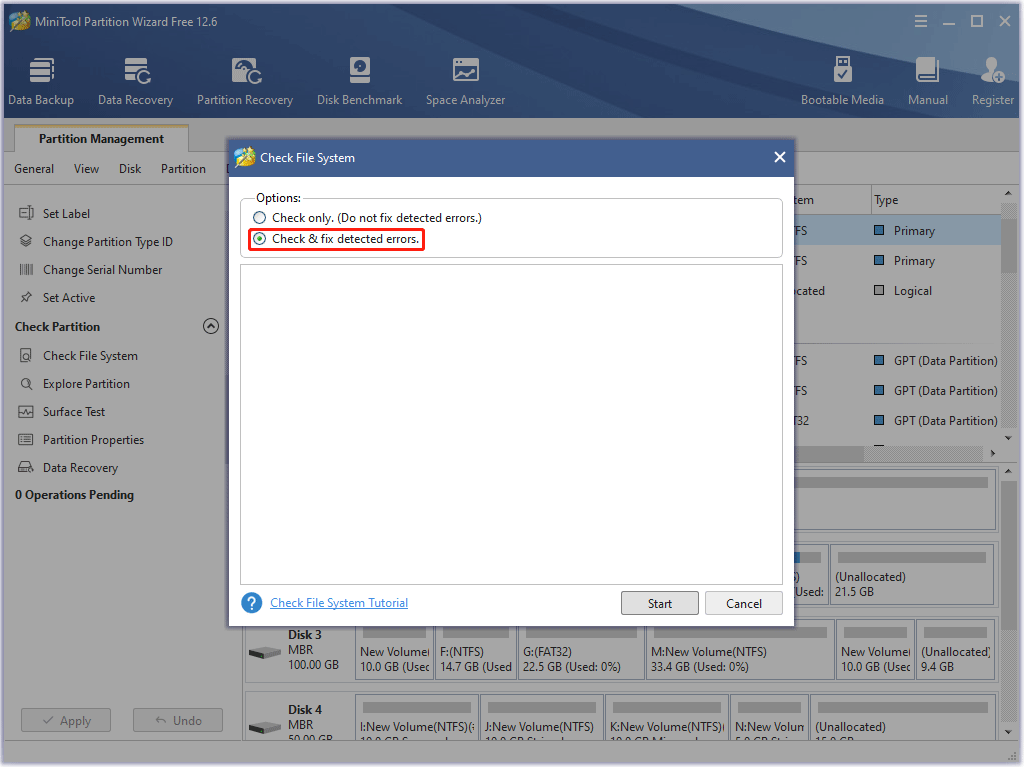
Method 7: Check the Storage Device for Errors
A faulty hard drive is responsible for the “the wait operation timed out” error. To exclude this factor, we recommend you check if there are any issues with your hard drive.
Here, we highly recommend you check the device for errors using a professional tool like MiniTool Partition Wizard. It is a reliable multifunctional partition manager that can convert MBR to GPT, resize/extend partitions, recover data, migrate OS, etc. Here’s how to use it to check the hard drive quickly.
MiniTool Partition Wizard FreeClick to Download100%Clean & Safe
Step 1: Launch the MiniTool software to get its main interface, and then select the problematic drive and click on Check File System from the left action panel.
Step 2: Select Check & fix detected errors and click on the Start button. This tool will check and repair file system errors immediately.
Step 3: In the main interface, select the drive again and click on Surface Test from the left pane.
Step 4: Click on the Start now button in the pop-up window. After that, this tool will scan the whole external drive immediately and show you the test result.
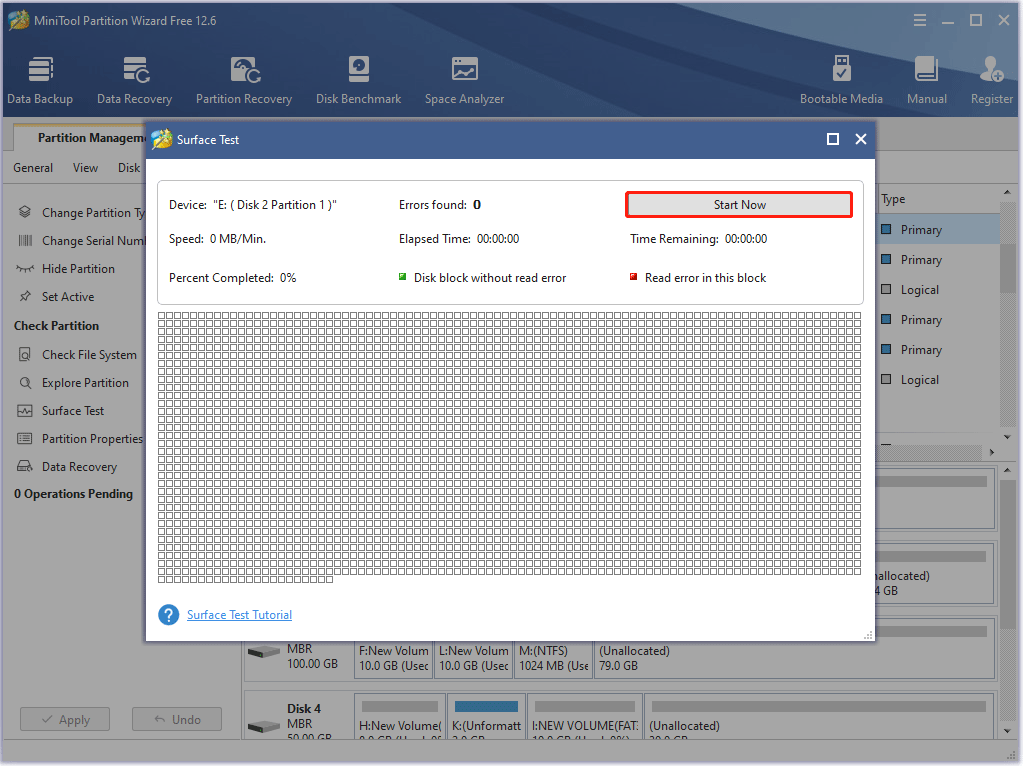
Step 5: When the hard drive error test process is completed, the disk blocks that have no read errors will be marked in green. However, if MiniTool Partition Wizard finds some hard disk errors, the blocks will be marked as red. In this case, you can either use this bad sector repair guide or consider replacing it with a new one.
More importantly, what should you do if you lose data due to bad sectors on your hard drive? There is a related article about it.
![[Full Guide] Maximized Window Won’t Drag in Windows 10/11](https://images.minitool.com/partitionwizard.com/images/uploads/2022/11/maximized-window-wont-drag-thumbnail.png)
Method 8: Enter Safe Mode
Some users reported that this error can be resolved by simply entering Safe Mode. After entering Safe Mode, Windows will automatically fix the problem. As you can see, this is an easy solution and worth trying. Here’s how:
Step 1: You can press and hold the Shift key on the keyboard, and click the Start menu on Windows 10 at the same time. Then click the Power icon in the Start menu and choose Restart.
Step 2: After you get into the Choose an option screen, you can select Troubleshoot > Advanced options > Startup Settings, and then click the Restart button to enter into the Startup Settings window.
Step 3: Next press F5 on your keyboard to select Enable Safe Mode with Networking.
Step 4: After entering Safe Mode, check if the problem occurs. If all is well, restart your PC and start Windows normally.
Method 9: Perform a System Restore
If this problem started appearing on your PC recently, you can use System Restore to fix it. This is a useful feature that allows you to restore your PC and fix many errors. Provided that a restore point was created before this issue occurred. If you don’t have the last restore point, you can clean install a version of Windows. But note that a fresh install will wipe all data on the hard drive. So don’t forget to make a computer backup before doing this.
Step 1: Press the Win + S key. Then type create a restore point in the box and select the feature from the menu.
Step 2: In the System Properties window, click on the System Restore button.
Step 3: Click the Next button in the System Restore window to continue.
Step 4: Select a system restore point and click the Next button.
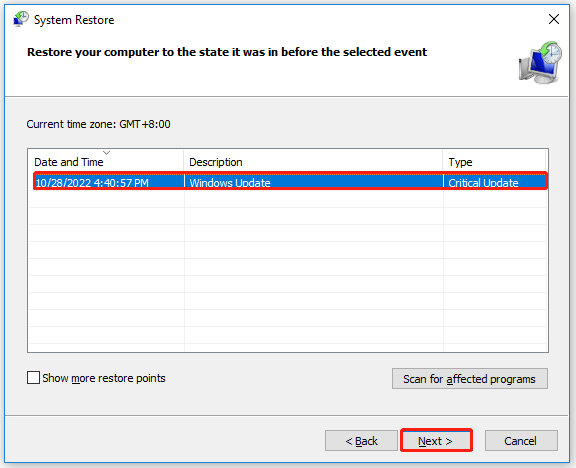
Step 5: Confirm the system restore point and click the Finish button.
After that, your computer will return to a state where this problem did not occur before.
Bottom Line
We hope these solutions helped you fix the “the wait operation timed out” error in the Windows 10 Photos app. These workarounds will work if you have the same problem with the Movies & TV app. And if you have any ideas about the subject, write them down in the comment area below. If you encounter any problem when using the MiniTool Partition Wizard software, you can contact us via [email protected].
About The Author

Position: Columnist
Vega enjoys helping people with computer problems, including disk management, data recovery, data backup, and more. She is constantly expanding her knowledge in related fields. And she will continue to bring more easy-to-understand professional articles to help people solve various problems on the PC.
User Comments :