What Is Secure Boot
Secure Boot is a security feature available on most motherboards with UEFI firmware enabled. It is a part of Microsoft Windows 8 and higher operating systems. This feature was designed to ensure your device boot using only the software trusted by the Original Equipment Manufacturer (OEM).
If the software fails to pass the authentication set by the OEM, your motherboard will refuse to load it. That’s to say, the Secure Boot option can prevent malicious software or malware from attacking the boot sector.
However, many users find the Secure Boot is unsupported, off, or unavailable on Windows 11/10. What causes the error? Let’s keep reading.
Why Secure Boot Is Unsupported in Windows 11/10
What causes the Secure Boot unsupported/off/unavailable issue? On Windows 10/8/8.1, if you want to use the Secure Boot feature, it’s required to enable the UEFI mode which uses the GUID Partition Table (GPT).
Now, Microsoft makes the feature a prerequisite when you upgrade to Windows 11. So, if you encounter the “Secure Boot is unsupported” error, it may be caused by one of the following factors:
- Your PC is set to UEFI mode but the TPM and Secure Boot features are disabled.
- The BIOS mode is set to Legacy boot mode instead of UEFI mode.
- The partition table of your boot disk is set to MBR instead of GPT.
- The hardware of your computer is not UEFI and Secure Boot compatible.
![[Full Fixes] Can’t Type in Command Prompt Windows 10/11](https://images.minitool.com/partitionwizard.com/images/uploads/2023/01/cant-type-in-command-prompt-thumbnail.jpg)
How to Fix Secure Boot State Unsupported in Windows 11/10
After analyzing all possible causes, we summarize 6 feasible ways to fix the “Secure Boot is not available” issue. Let’s try them in order until you get the problem solved.
# 1. Enable the Secure Boot
First of all, you need to enable Secure Boot in BIOS settings if you want to upgrade to Windows 11. Here’s how to check the current state of the option and enable it.
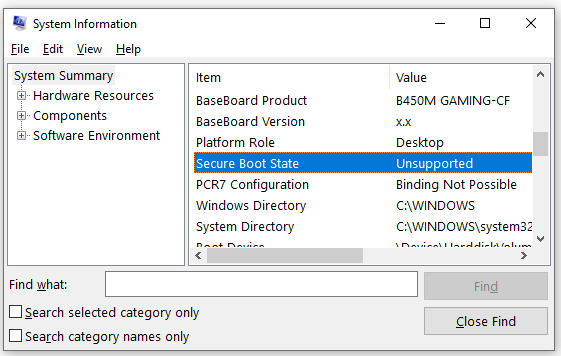
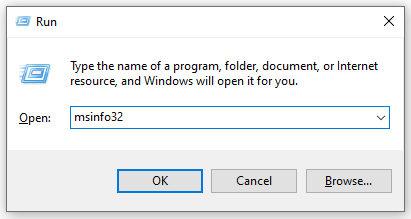
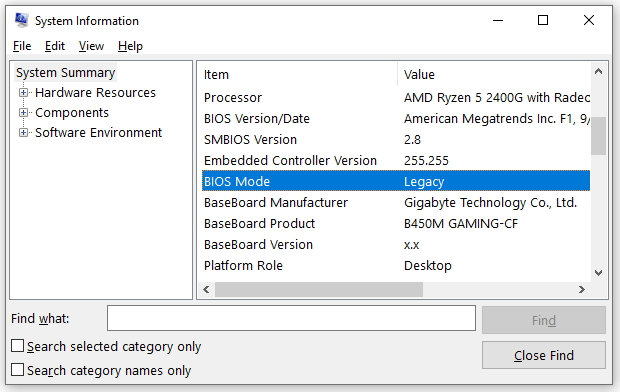
Step 1. Press the Win + R keys to open the Run dialog box, and then type msinfo32 in it and hit Enter to open the System Information window.
Step 2. Select System Summary from the left panel and check the Secure Boot State in the right panel. If it is Off or Unsupported, you need to enable it in BIOS. To do this work, proceed with the following steps.
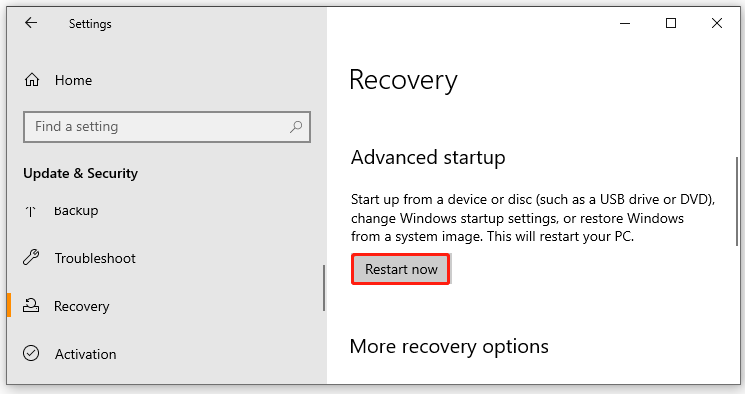
Step 3. Press Win + I keys to open the Settings window, and then select Update & Security > Recovery and click on Restart Now under the Advanced startup section. Then your PC will restart right now and enter into BIOS.
On Windows 11, you need to open the Settings window and select System > Recovery from the left panel and click on Restart now next to Advanced startup from the right panel.
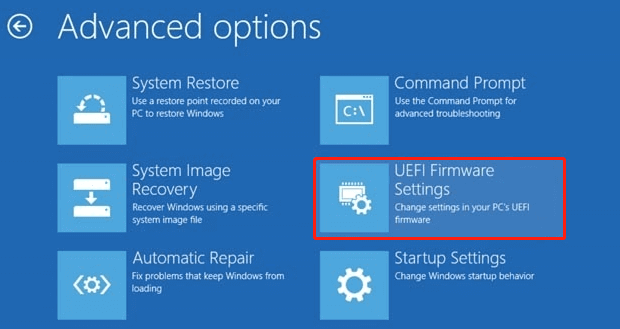
Step 4. Select Troubleshoot and then Advanced options in the Advanced startup menu.
Step 5. Select UEFI Firmware Settings and click Restart to boot your computer into UEFI BIOS.
Step 6. Select BIOS Setup, navigate to the Secure Boot category from the left panel and select the Secure Boot Enable and confirm the option.
The steps to enable Secure Boot may vary for different motherboards. If you can’t find the option, check out the manual provided by your manufacturer.
Once enabled, restart your computer and check if the “Secure Boot is off/unsupported” issue is gone.
# 2. Enable the TPM Support
If the TPM is disabled on your computer, you will encounter the Secure Boot state unavailable/unsupported issue when installing or upgrading to Windows 11. In this case, you can follow the steps below to enable TPM.
Step 1. Open the Run box again, and then type tpm.msc and press Enter.
Step 2. In the pop-up window, navigate to the Action tab from the top toolbar and select Prepare the TPM.
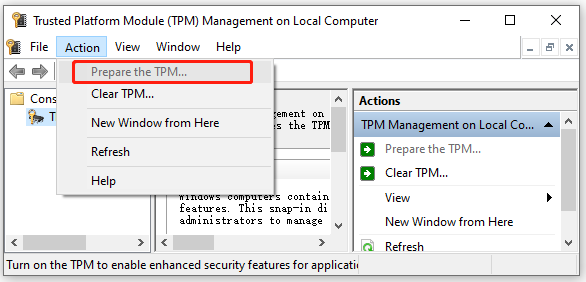
Step 3. Restart your computer and check if the unsupported Secure Boot issue disappears.
# 3. Change the BIOS Mode to UEFI
As you know, there are 2 different BIOS modes – UEFI and Legacy. If you want to make full use of the Secure Boot feature, you need to set the UEFI as the BIOS mode. Here’s how to do that:
Step 1. Open the System Information window by following Steps 1 to 2 in # 1 and check if the BIOS Mode is Legacy. If it is, you can continue the following steps to enable UEFI on Windows 10/11.
Step 2. Power on your computer, and then press the F2 keys or other function keys (F1, F3, F10, or F12) and the ESC or Delete keys to open the BIOS Setup utility window.
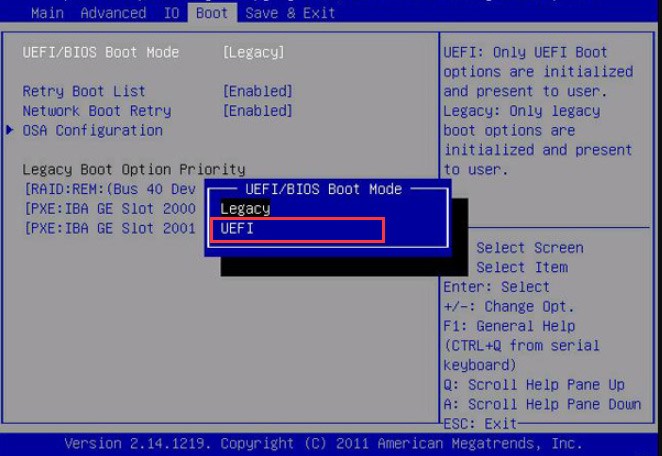
Step 3. Navigate to the Boot tab by pressing the right arrow key.
Step 4. Select the UEFI/BIOS Boot Mode, and press Enter.
Step 5. In the pop-up window, select the UEFI Boot Mode by pressing the up and down arrow keys. Then press the F10 key and Enter to save the change and exit the window.
The process may differ depending on your motherboard manufacturer. If you can’t find the UEFI option, you can check your manufacturer’s website.
Once done, restart your computer and check if the “Secure Boot state is off/unsupported” issue gets fixed.
# 4. Convert Your Boot Disk to GPT
As discussed above, the UEFI BIOS mode uses the GPT partition style. If your computer is set to Legacy Boot mode and MBR partition style, you will encounter the “Secure Boot state unavailable/unsupported” issue as well. So, you need to convert your boot disk to GPT apart from enabling UEFI.
How to convert MBR to GPT on Windows 10/11? You can use the Windows built-in tool – MBR2GPT.exe or use a professional disk conversion tool – MiniTool Partition Wizard. If you are using an MBR disk, follow the guide below to convert it to GPT.
Way 1. Convert MBR to GPT Using MBR2GPT
MBR2GPT.exe is a command line tool that starts in Windows 10 version 1703 build 15063. It can be used to convert a system disk from MBR to GPT without modifying any data. Here’s how to use it on Windows 10/11.
Step 1. Type cmd in the Search box, and then right-click the Command Prompt app and select Run as administrator. Then click on Yes in the UAC window to confirm it.
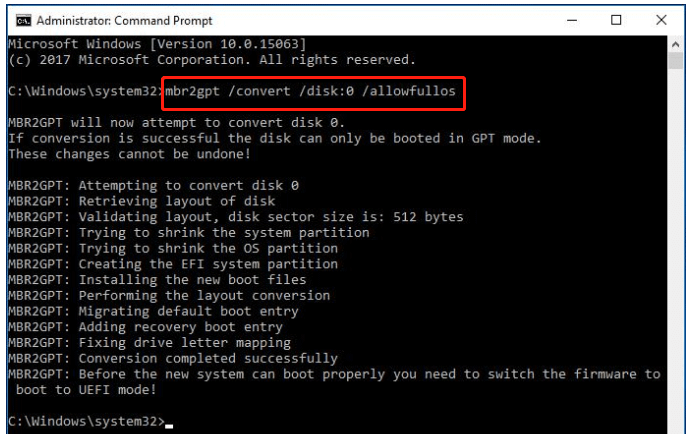
Step 2. In the elevated Command Prompt window, type the following command and hit Enter to convert the partition type of the disk.
mbr2gpt /convert /disk: n /allowfullOS
N represents the disk that you want to convert to GPT. In addition, you need to make sure your computer supports UEFI boot mode before converting.
Step 3. This conversion may take some time to complete depending on the size of your system disk. Once converted, reboot your PC and check if the unsupported Secure Boot issue is resolved.
Way 2. Convert MBR to GPT Using MiniTool Partition Wizard
Sometimes, however, the MBR2GPT tool may fail to convert your disk and run into some errors like “MBR2GPT failed to update ReAgent.xml”. In this case, you may consider using a professional disk conversion tool – MiniTool Partition Wizard to convert MBR to GPT without data loss.
Besides, the MiniTool software can help you convert NTFS to FAT32 without data loss, convert dynamic disk to basic disk, rebuild MBR, etc.
MiniTool Partition Wizard DemoClick to Download100%Clean & Safe
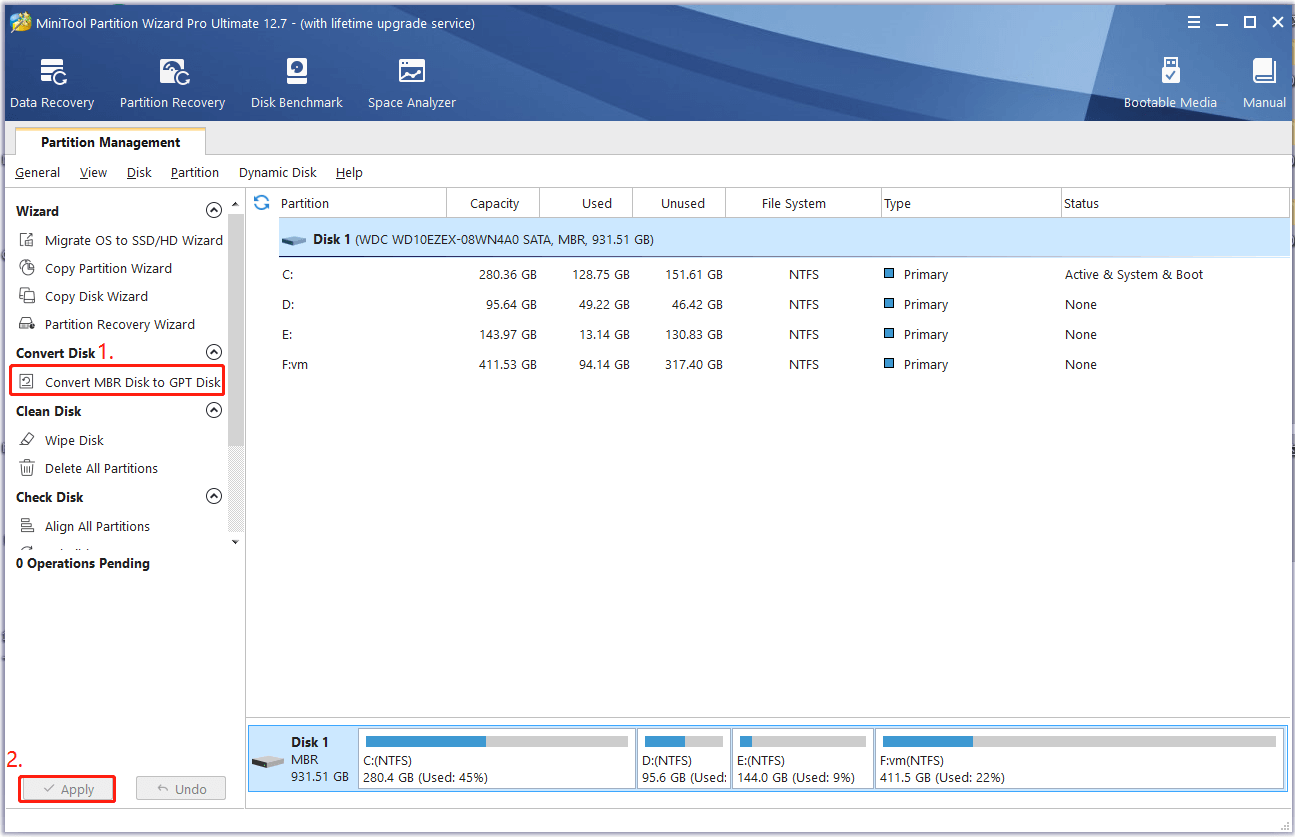
Step 1. Launch the MiniTool software to enter its main interface, and then select the disk that you want to convert and click on Convert MBR Disk to GPT Disk from the left action panel. Then click on OK to confirm this change.
Step 2. Click on Apply to execute the pending conversion.
Now, restart your system and check if the “Secure Boot is not available” issue persists.
# 5. Perform a Clean Boot
Sometimes the Secure Boot is off/unsupported/unavailable just because of certain conflicting services or software. In this case, you can try performing a clean boot in which your computer will boot with a minimal set of drivers and startup programs. Then you can find out what is interfering with the Secure Boot option.
If the “Secure Boot state is off” issue disappears in the Clean Boot state, it may indicate that one of your programs or services was causing the error. To rule it out, you can repeat the clean boot process while re-enabling one of these services until the error occurs again. Once you determine the conflicting service/program, disable or uninstall it from Windows 10/11.
# 6. Clean Install Windows 10/11
If the unsupported Secure Boot issue persists after trying all the above methods, you may consider performing a clean install of Windows 10/11. This operation will delete all information on your system drive and install a fresh system without hidden corruption or problems.
Thus, it’s highly recommended you make a full backup of all important data before reinstalling Windows 10/11. If you don’t know to clean install your system, refer to this post “New SSD, Clean Install or Clone Disk or Migrate Windows OS”.
![Rufus Error Could Not Partition Drive on Windows? [Solved]](https://images.minitool.com/partitionwizard.com/images/uploads/2023/01/rufus-could-not-partition-drive-thumbnail.jpg)
What’s Your Opinion
How to fix Secure Boot unsupported/unavailable on Windows 10/11? The top 6 methods have been illustrated in this post. If you have other effective troubleshooting fixes to this problem, leave them down in the following comment zone to help more affected users.
In addition, you can send us an email to [email protected] if you have difficulty using MiniTool Partition Wizard and instant help will be for you.
User Comments :