External hard drives have become an essential tool in modern computing, providing a portable storage solution for backups, file transfers, and expanding limited internal storage.
Whether you’re a casual user or a professional, knowing how to effectively use an external hard drive with Windows can streamline your workflow and protect your data.
This guide covers everything from initial setup to advanced management, ensuring you get the most out of your external storage device.
What Is an External Hard Drive?
Before diving into how to use them, it’s important to understand the basics of an external hard drive and its benefits to Windows users.
Types of External Hard Drives
Based on the storage technology, external hard drives primarily fall into two categories: HDD and SSD.
HDD (Hard Disk Drive): Traditional mechanical hard drives with spinning disks offer high storage capacities at a lower cost per gigabyte. They are bulkier and less durable than SSDs, but are ideal for long-term, high-capacity storage.
SSD (Solid State Drive): Using flash memory and no moving parts, they offer faster read and write speeds, a more compact size, and increased durability. SSDs are more expensive but are ideal for frequent file transfers or running applications directly from the drive.
Key Benefits for Windows Users
Here are some of the key benefits of using an external hard drive for Windows users.
- Storage Expansion: Windows devices, especially laptops, often have limited internal storage. External hard drives add extra space for photos, videos, games, and documents.
- Data Backup: By storing backups externally, you can prevent data loss due to hardware failure, malware, or accidental deletion.
- Portability: Easily transfer files between devices—perfect for sharing work between home and office or migrating data to a new computer.
- OS Compatibility: Most external hard drives work seamlessly with Windows, though some may require formatting for optimal use.
- Improved Performance: By moving large files and applications to an external drive, you can free up internal storage space, potentially improving your computer’s load times and processing speed.
- Backup and OS Image Creation: External drives are ideal for creating full backups of your system or even OS images for quick recovery in the event of a serious system failure.
How to Use an External Hard Drive?
After learning the basic information about the external hard drive, it’s time to set up an external hard drive on your computer.
How to use an external hard drive on Windows? Here, we provide a step-by-step guide for that.
- Connect and detect the external hard drive.
- Initialize, partition, and format the drive.
- Transfer files and backup data.
- Boot or run apps from the drive.
- Safely eject the drive.
Step 1: Connect and Detect the External Hard Drive
Connecting an external hard drive to your computer is simple. Plug it into your computer and turn on both the hard drive and the computer.
USB and Thunderbolt are the most common interfaces for external hard drives. Some drives may support FireWire or eSATA, but these interfaces are outdated.
Here are some tips for connecting an external hard drive.
- If your computer lacks ports, use a powered USB hub.
- If you have a USB 3.0 or Thunderbolt 3 hard drive, connect it to a 3.0 port.
- If the external hard drive has its own dedicated power supply, use that.
Once connected, Windows will usually automatically detect the drive. A notification will appear in the taskbar, and the drive will appear under “This PC” in File Explorer (labeled with a drive letter, such as “E:” or “F:”).
If the drive isn’t detected, try the following:
- Unplug and replug the cable.
- Try a different USB port.
- Restart the computer.
- Disconnect other USB devices, especially if using a USB hub.
- Connecting the external hard drive to another computer can rule out hardware failure.
Step 2. Initialize, Partition, and Format
When you insert an external hard drive, it usually needs to be initialized, partitioned, and formatted.
#1. Initialize the drive
A brand-new hard drive that’s not yet recognized by the system needs to be initialized first to inform the operating system of its existence and basic structure. This can be done using the Disk Management tool.
Step 1. Press the Win + X key and then select Disk Management to open it.
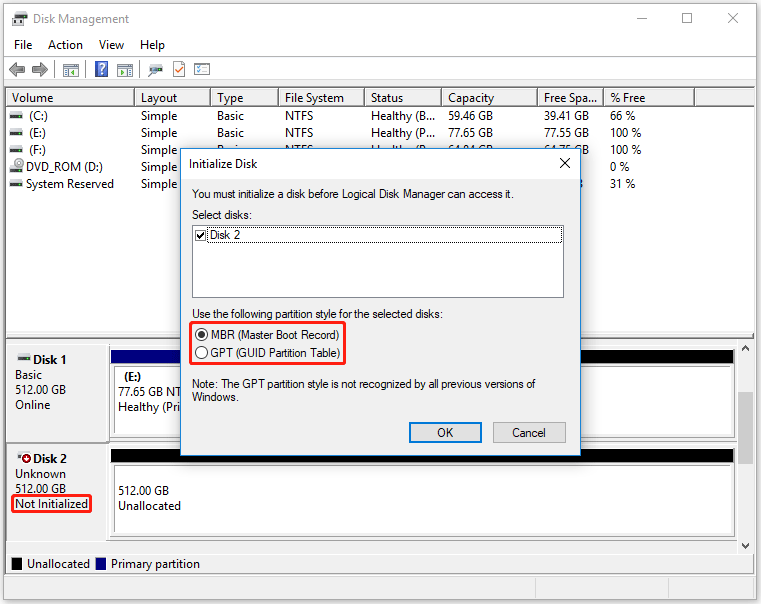
Step 2. In the Disk Management window, locate the uninitialized external drive (it will show as “Not Initialized“). Right-click on the disk and select Initialize Disk.
Step 3. In the Initialize Disk dialog, select the appropriate partition style (MBR or GPT). GPT (GUID Partition Table) is recommended for drives larger than 2TB, while MBR (Master Boot Record) is suitable for smaller drives or older Windows versions.
Step 4. After initialization, right-click the Unallocated space on the drive and select New Simple Volume.
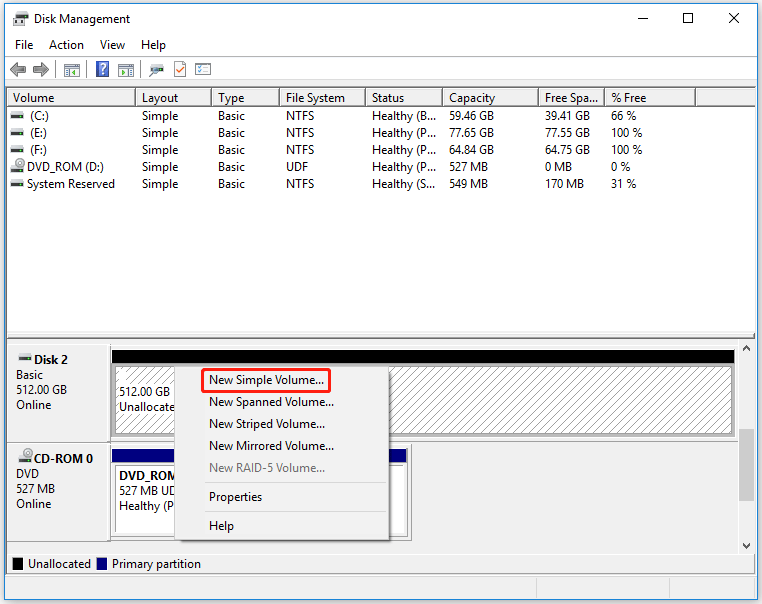
Step 5. Follow the wizard to specify the volume size, assign a drive letter, and select a file system format.
#2. Partition the drive
Partitioning divides a hard drive into separate storage areas, helping with file organization. For example, you could have one partition for backups and another for media files.
MiniTool Partition Wizard is the best free tool for partitioning an external hard drive. One of its most important features is managing hard drive partitions. You can use it to easily create, resize, expand, shrink, move, format, delete, merge, split, copy, and erase partitions.
It also offers some advanced features that can help you clone a hard drive, convert disks between MBR and GPT, clone Windows 10 to SSD, check hard drive health, recover data from hard drives, etc.
MiniTool Partition Wizard FreeClick to Download100%Clean & Safe
MiniTool Partition Wizard can shrink, extend, and split NTFS and FAT32 partitions. Furthermore, it can extend partitions even if unallocated/free space isn’t behind or adjacent to the partition. It can even extend a partition by taking free space from another partition.
How to partition the drive using MiniTool Partition Wizard? Here’s a guide.
Move/Resize a Partition
Step 1. Download, install, and launch MiniTool Partition Wizard. Right-click a partition and select Move/Resize.
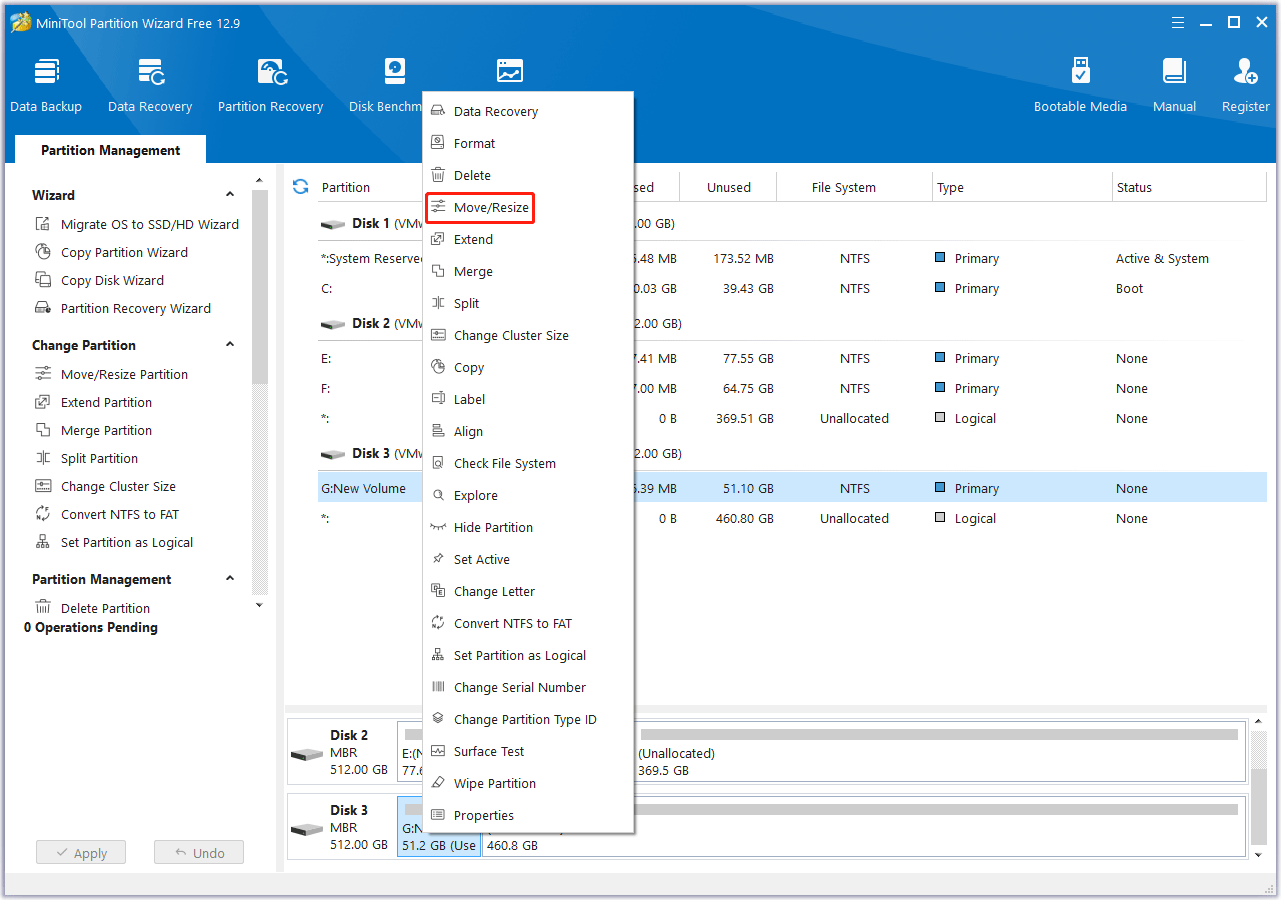
Step 2. In the pop-up window, under Size And Position, drag the arrow icons to shrink or extend the partition. You can also drag the partition blocks to change the partition’s location. Then, click OK.
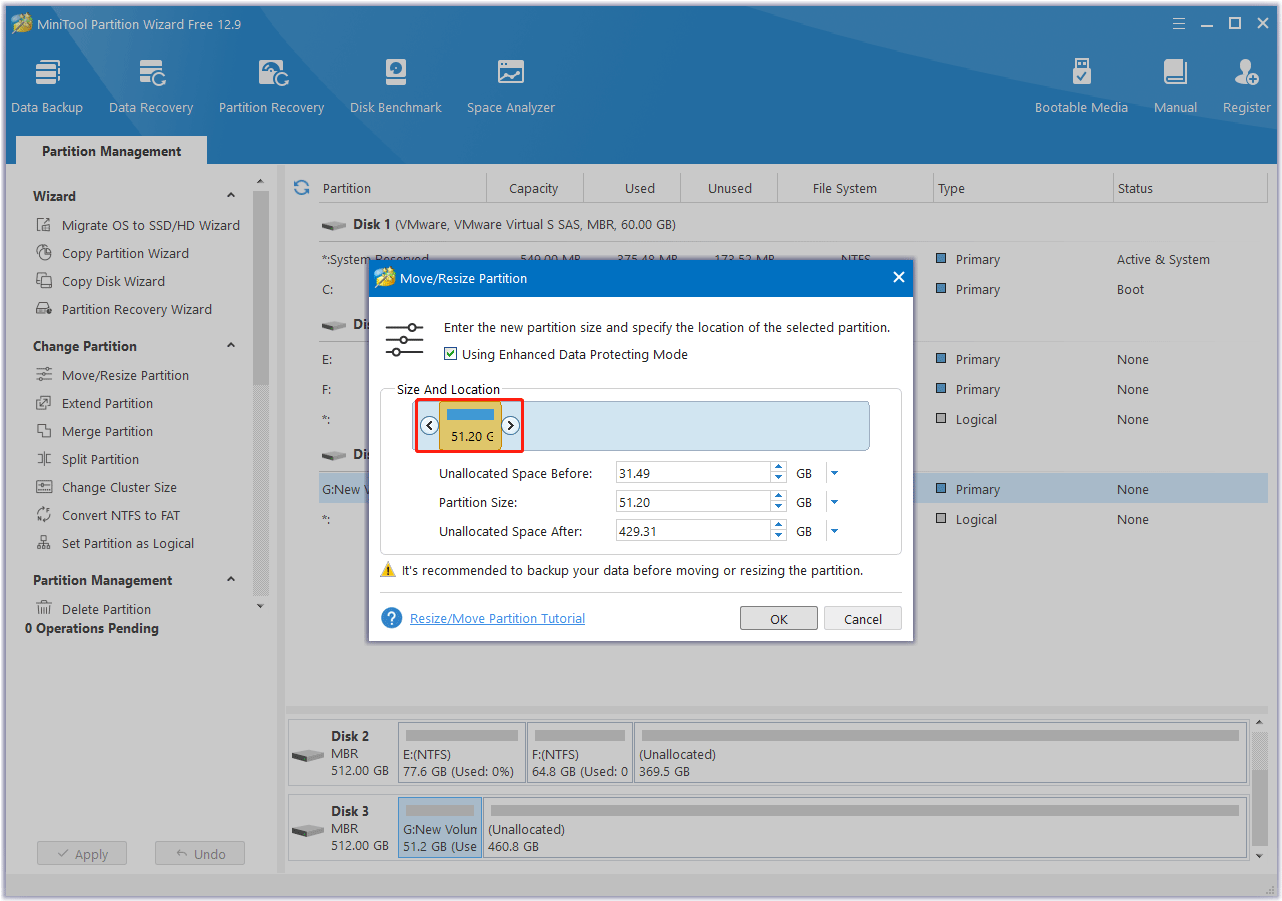
Step 3. Check the partition layout and click Apply to perform the operation.

After you resize the partition, you will get an unallocated space. You can right-click it and select Create. Then set the partition parameters.
Extend a Partition
Step 1. On the MiniTool Partition Wizard main interface, right-click a partition and select Extend.
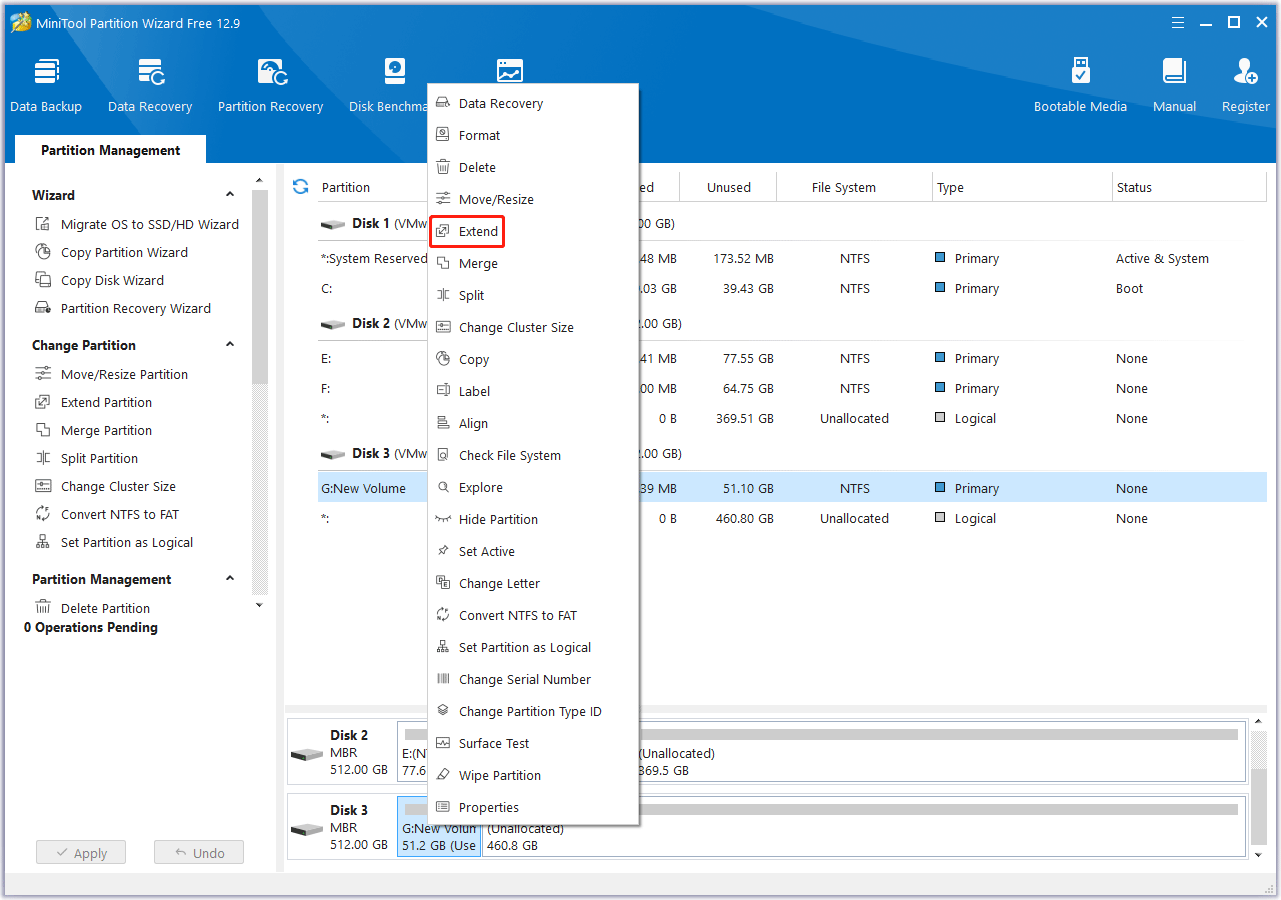
Step 2. In the pop-up window, select a partition or unallocated space to acquire free space. Then, determine the amount of free space to acquire. Click OK.
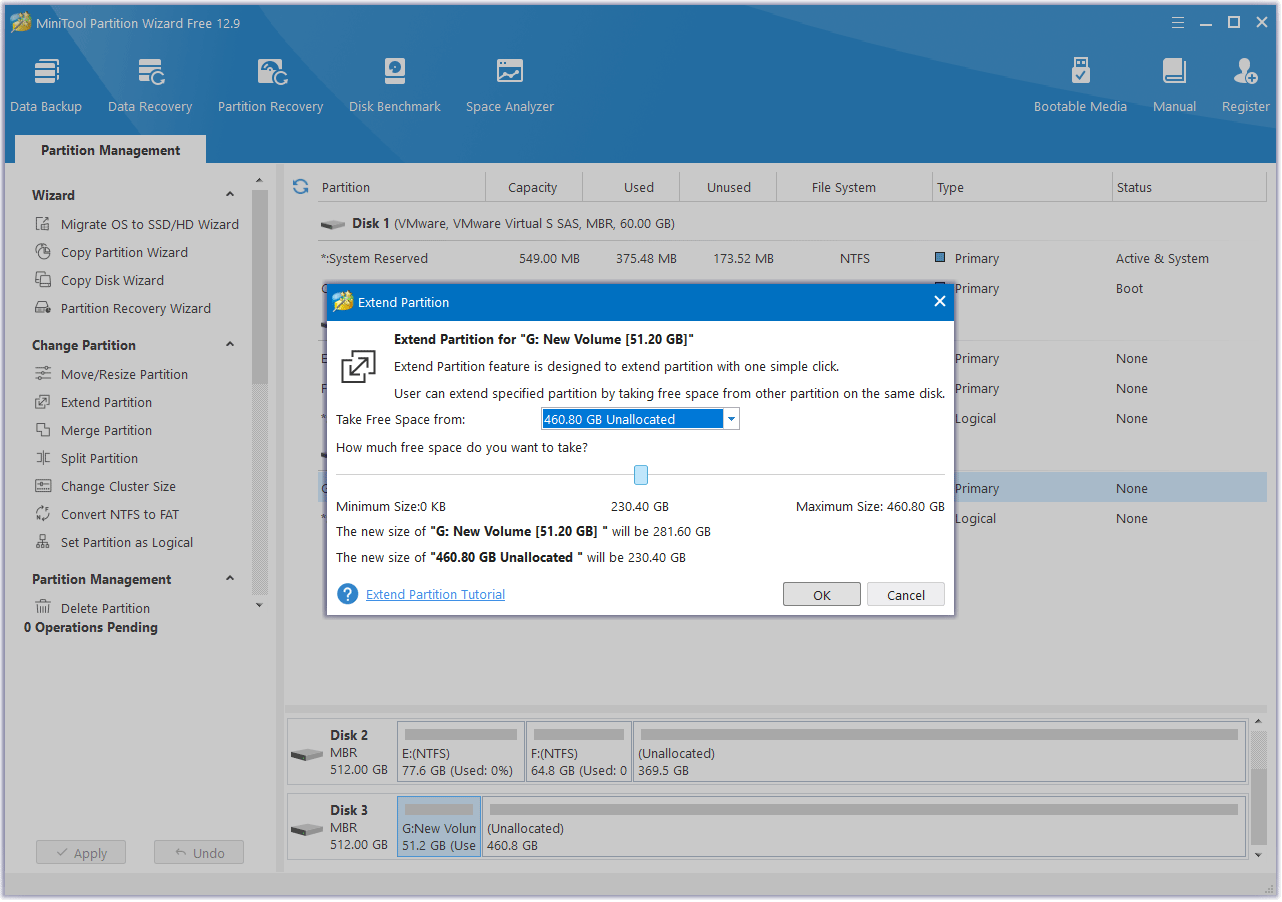
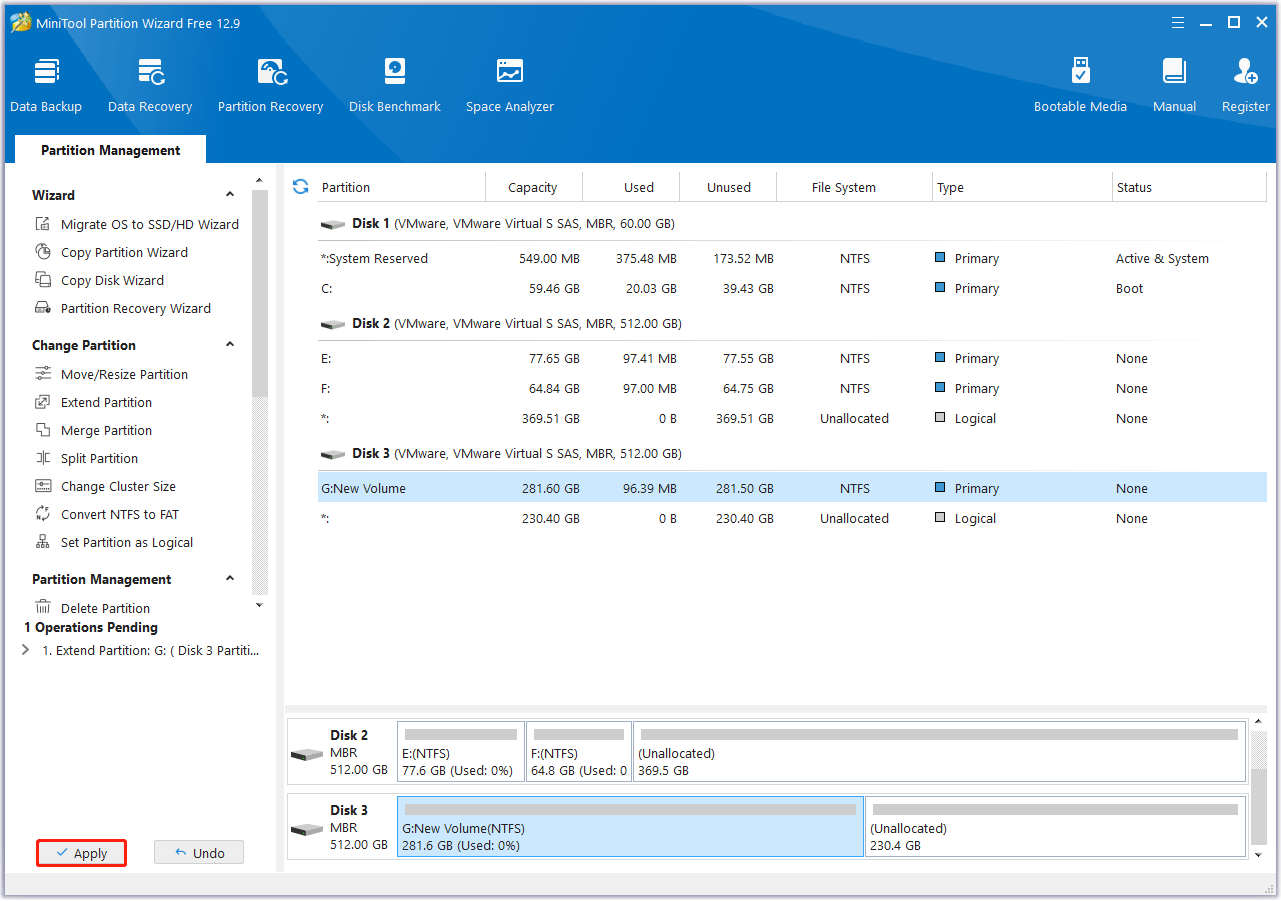
Step 3. Finally, review the disk layout and click Apply to execute the operation.
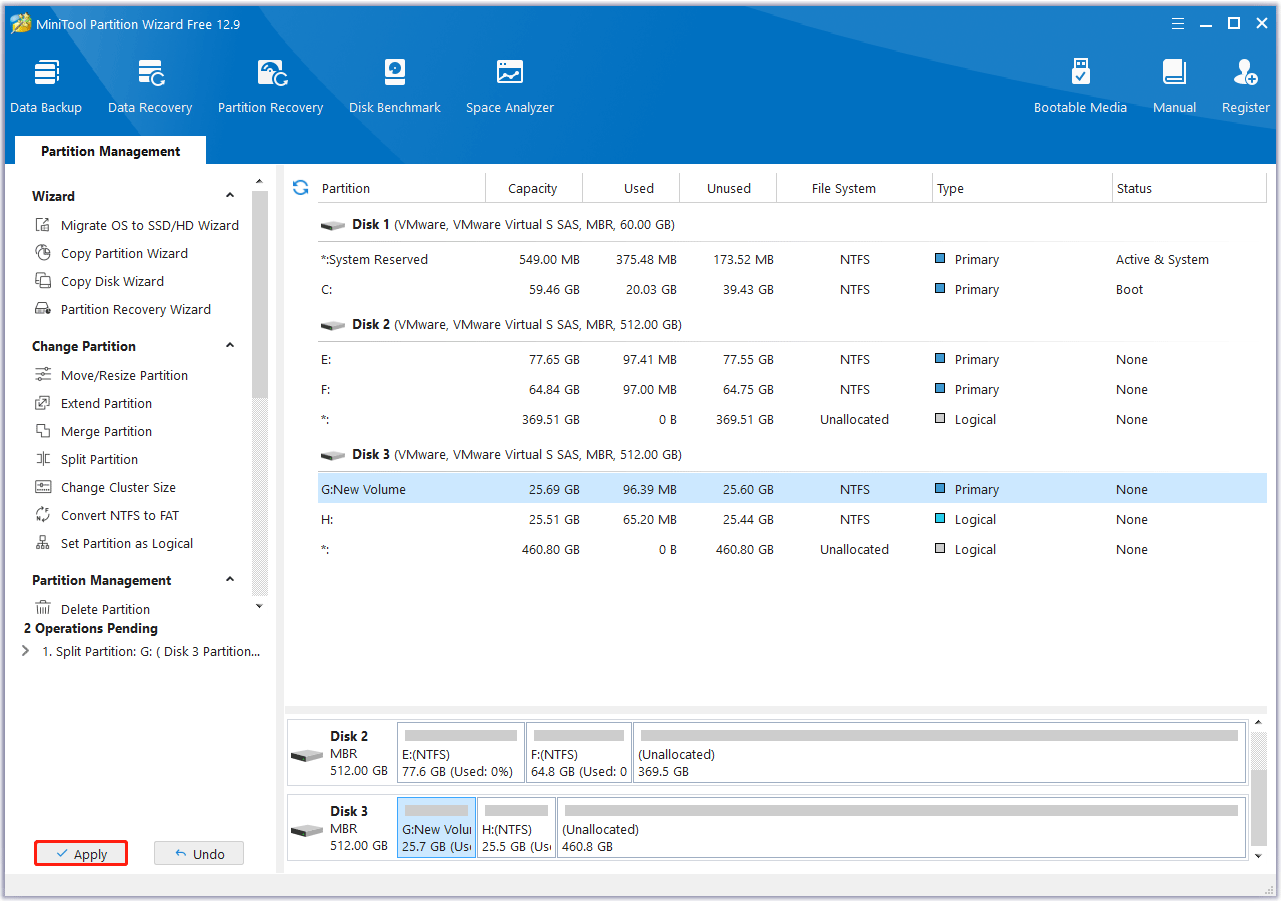
Split a Partition
Step 1. From the main interface of the partitioning software, right-click the partition you want to split and select Split.
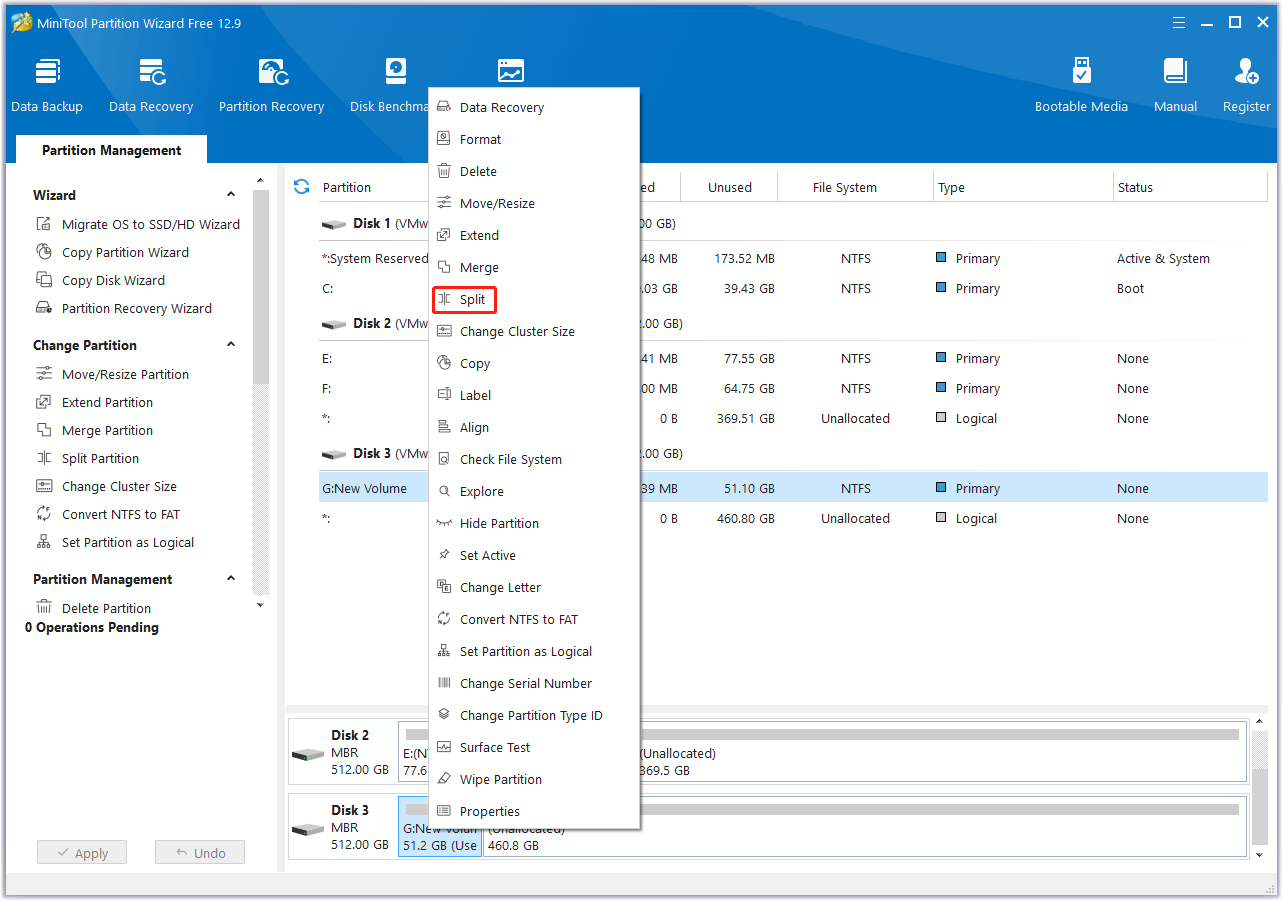
Step 2. Drag the sliders left and right to determine the size of the original and new partitions. When finished, click OK to return to the main interface.

Step 3: Returning to the main interface, you will see that the original partition has been split into two partitions. If the preview result is satisfactory, click Apply to take effect.
#3. Format the drive
Drives formatted for macOS (APFS or HFS+) or Linux (ext4) won’t work properly with Windows. Reformatting ensures that Windows can read and write to the drive.
Windows supports several file systems (NTFS, exFAT, and FAT32), each with its own advantages and disadvantages:
- NTFS: The default file system for Windows. Supports large files (over 4GB), encryption, and compression. Ideal for Windows-only drives.
- exFAT: Compatible with Windows, macOS, and Linux. Supports large files and is ideal for cross-platform use (for example, sharing files between PCs and Macs).
- FAT32: An older, universal format, but only supports files under 4GB. Use only for small files or older devices.
How do I format an external hard drive? You can format the drive with MiniTool Partition Wizard. It is a professional partition manager that boasts a lot of features, including creating/resizing/formatting partitions.
It can also format drives larger than 32GB to FAT32, which Windows usually cannot do. It even allows you to convert the drive between FAT32 and NTFS without losing data.
Here is how to format the drive using MiniTool Partition Wizard.
MiniTool Partition Wizard FreeClick to Download100%Clean & Safe
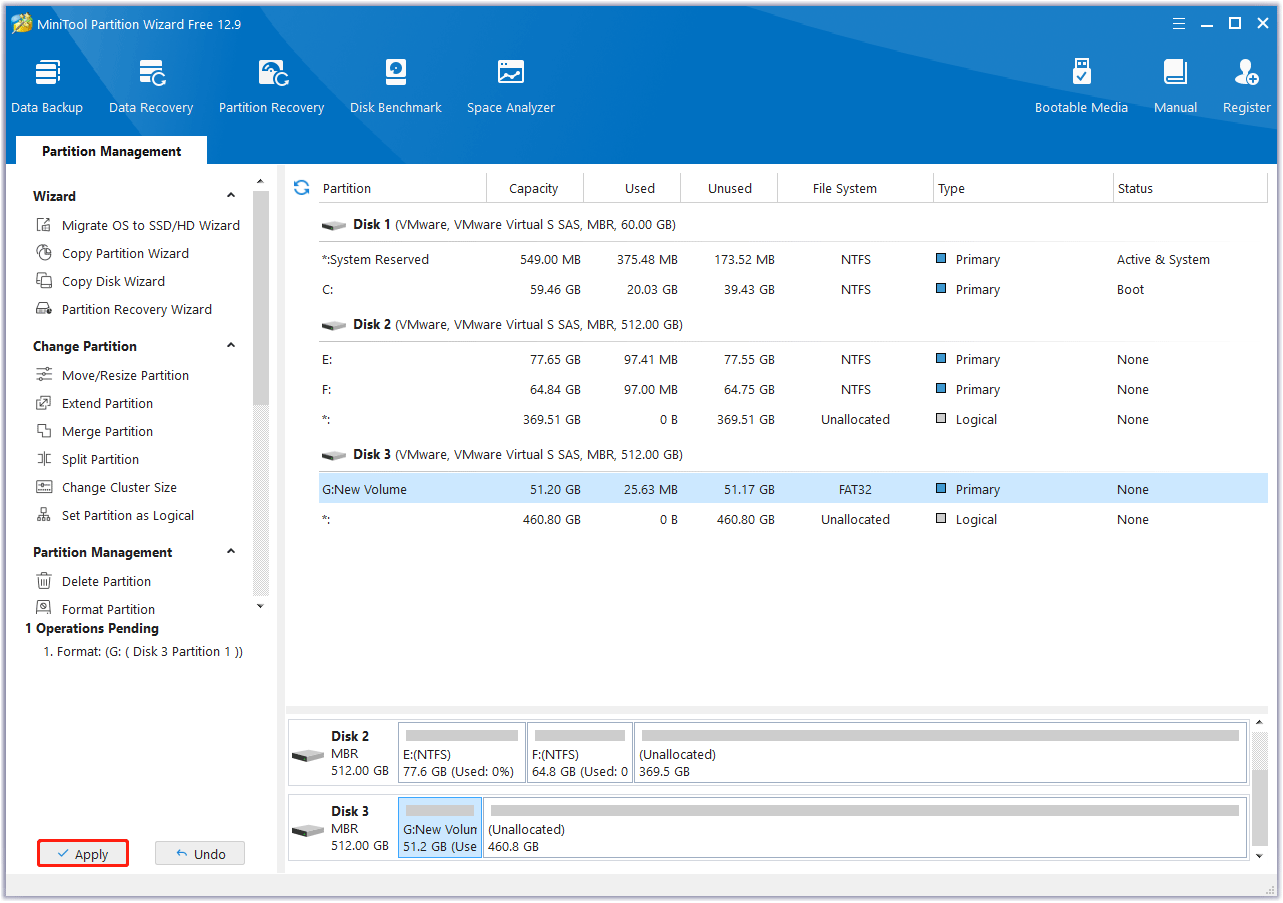
Step 1: Launch MiniTool Partition Wizard to enter its main interface. Now, click on this partition and choose Format Partition from the left action panel.

Step 2. In the new pop-up window, set the Partition Label, File System, and Cluster Size. Then click OK to continue.
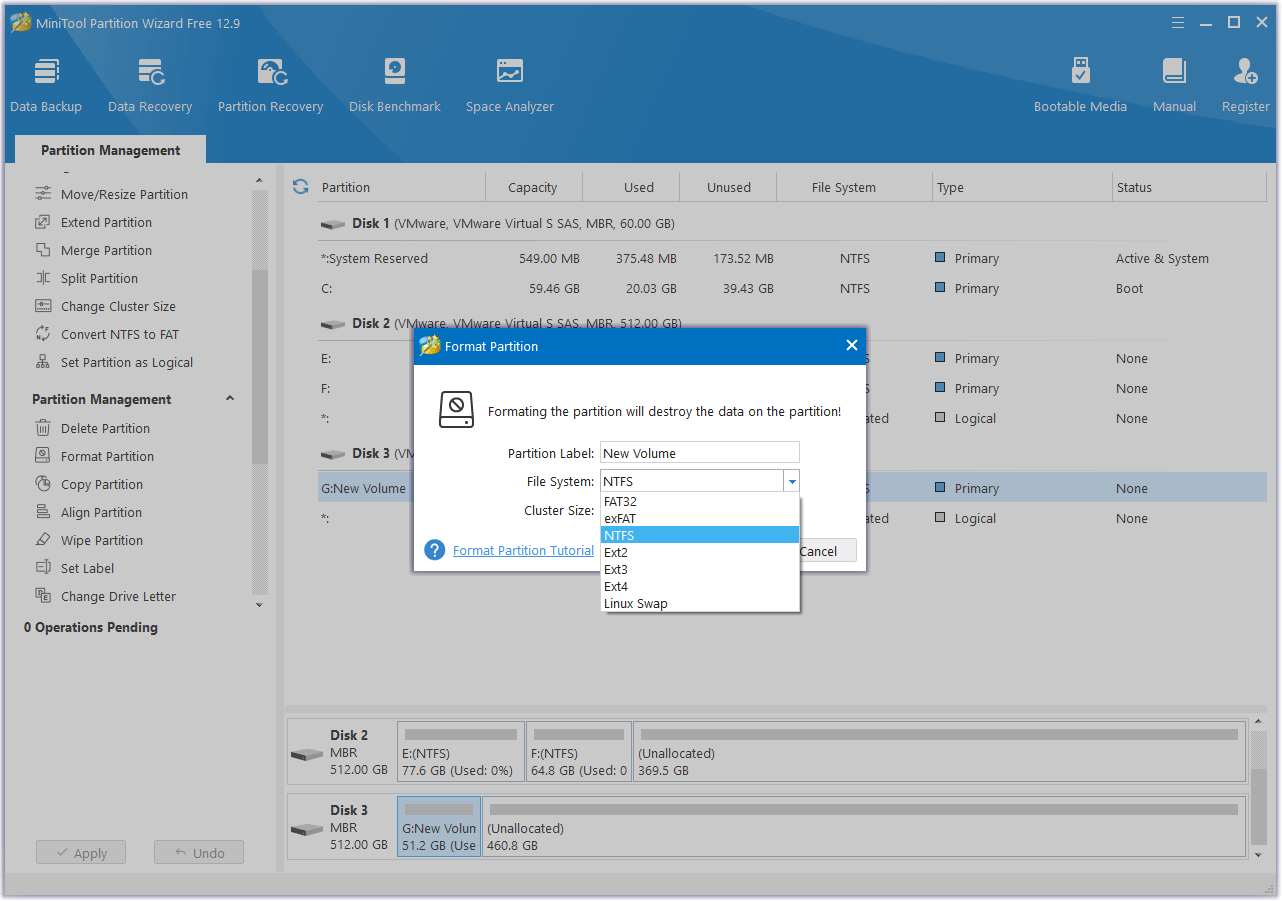
Step 3. Then, you can preview the partition being formatted. Now, click Apply to confirm the changes.
Step 3. Transfer Files and Back Up Data
Now, you can choose to transfer files or backup data.
#1. Transfer Files
Drag and Drop: Open two File Explorer windows. One is for your internal storage, and one is for the external hard drive. Drag files or folders between them.
Copy/Paste: Right-click a file, select Copy, navigate to the external hard drive, right-click, and select Paste.
Cut/Paste: Use this function to permanently move files (instead of copying them). Note that cutting large files can take time, and interrupting the process may result in data loss.
#2. Back up Data
An external drive is great for backups, protecting your data from ransomware, hardware failure, or accidental deletion.
You can use the Windows backup tool, File History, to automatically back up your files to an external drive.
- Go to Settings > Update &Security > Files Backup.
- Click Add a drive under Back up using File History and select your external drive.
- In More options, you can customize the backup frequency and retention time.
File History itself has some shortcomings in Windows, such as limited backup sources (primarily certain files on the system’s C: volume/partition) and larger target storage requirements (because it doesn’t compress backup copies).
MiniTool ShadowMaker eliminates these shortcomings and serves as both a supplement and alternative to the File History utility. MiniTool ShadowMaker is a professional and reliable data backup software.
MiniTool ShadowMaker TrialClick to Download100%Clean & Safe
Step 4. Boot or Run Apps (Optional)
For advanced users, you can also boot your computer from the external hard drive or run apps from the drive.
Boot Your Computer from the drive
For this to work, your external hard drive needs to have a bootable operating system installed on it. You can install Windows on an external hard drive using tools like Rufus or the Windows Media Creation Tool. Then, follow the steps below:
- Restart your computer so you can access the BIOS or UEFI settings.
- As your computer starts, repeatedly press the designated key to enter the BIOS or UEFI setup. This key is usually displayed briefly on the screen during startup and is commonly F2, F10, or Del.
- In the BIOS/UEFI menu, navigate to the Boot or Boot Order section.
- Find your external hard drive in the list of bootable devices and set it as the first boot priority.
- Press F10 to save your changes and exit the BIOS/UEFI setup.
- Your computer will then restart and attempt to boot from the external hard drive.
Run Apps from the drive
Some applications can be installed or run directly from an external hard drive, though this can sometimes impact performance compared to internal storage.
Make note of the external drive letter. When installing applications, select the external hard drive as the installation location (look for the “Custom” or “Advanced” option in the installer).
Step 5. Safely Eject the Drive
Before disconnecting, it’s good practice to safely eject the drive from your computer to prevent data corruption. Here are the steps:
- Click the Show hidden icons arrow in the taskbar.
- Find the Safely Remove Hardware and Eject Media icon.
- Click it, select your external drive from the list, and wait for the Safe to Remove Hardware notification to appear before unplugging.
If you encounter the error message “Windows is unable to stop the device” when ejecting the drive, it means a program is still using files on the drive. Close any open files/folders on the drive and try ejecting it again.
How to Prolong an External Hard Drive?
To prolong the lifespan of an external hard drive, follow these key practices:
#1. Handle with Care (Especially for HDDs)
- Avoid physical shocks: HDDs have moving parts, so drops, bumps, or vibrations can damage internal components. SSDs are more durable, but still need protection.
- Keep it stable: Place the drive on a flat, steady surface while in use—avoid moving it during operation.
#2. Manage Temperature and Environment
- Prevent overheating: Ensure good ventilation; don’t stack objects on it or use it in direct sunlight/closed spaces for long.
- Avoid extreme conditions: Keep it away from moisture, dust, and extreme cold.
#3. Use and Disconnect Properly
- Eject safely: Always use the “Safe to remove” function before unplugging to prevent data corruption.
- Avoid sudden power loss: Don’t unplug while transferring files.
#4. Maintain the Drive
- Wipe the exterior gently with a dry cloth and avoid liquids or harsh cleaners.
- Regularly run disk checks to fix errors.
By following these steps, you can significantly extend your external hard drive’s life.
Recover Lost Data from an External Hard Drive
What if you find that files from your external hard drive are lost unexpectedly? Don’t worry. You can try to recover files from your external drive using third-party software. MiniTool Partition Wizard is a great choice.
It can help you perform data recovery from formatted/unformatted partitions, RAW partition data recovery, recovery of deleted files, restoration of lost partitions, and more.
MiniTool Partition Wizard DemoClick to Download100%Clean & Safe
Here is how to recover lost data with MiniTool Partition Wizard:
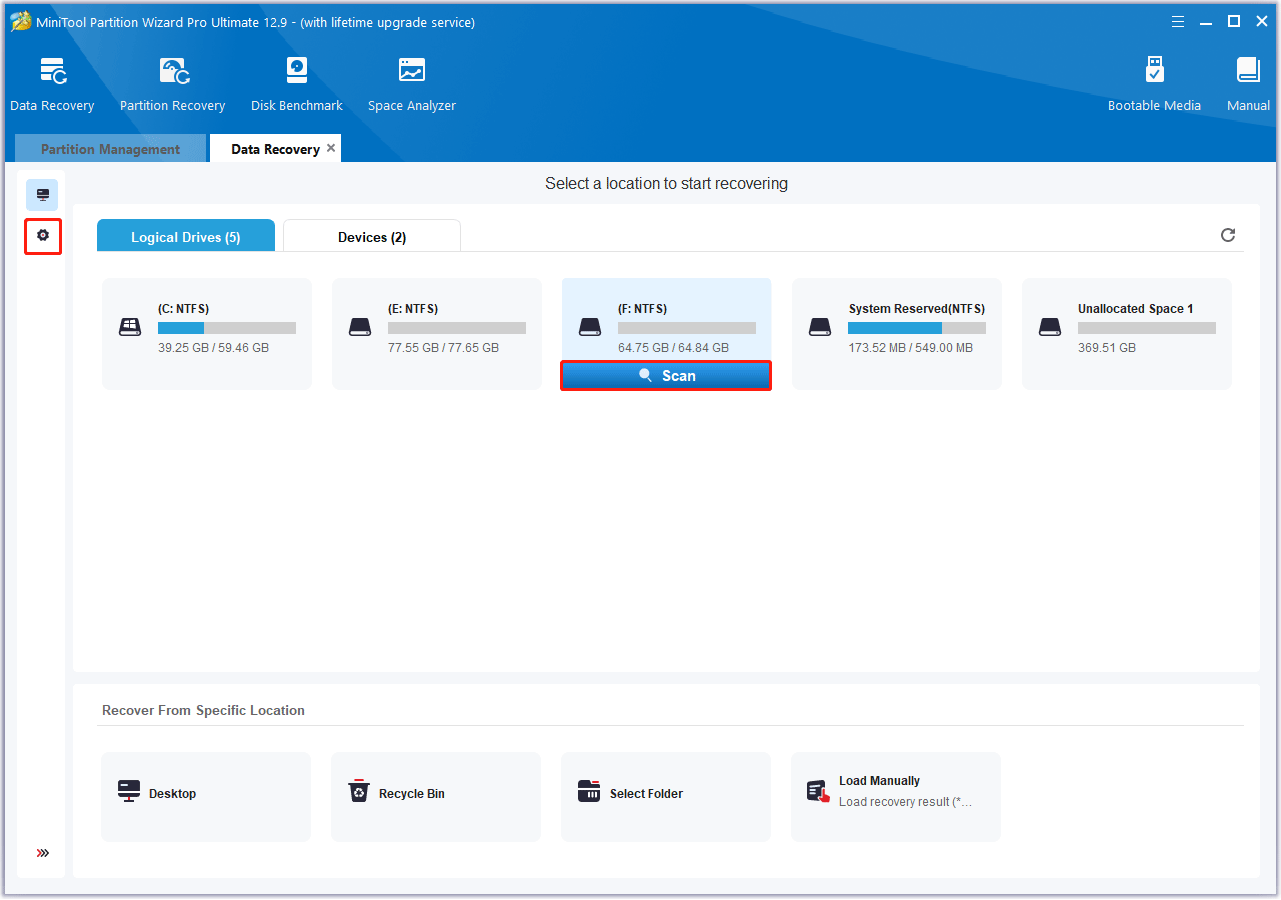
Step 1. Launch the MiniTool software to enter its main interface and click Data Recovery in the top toolbar.
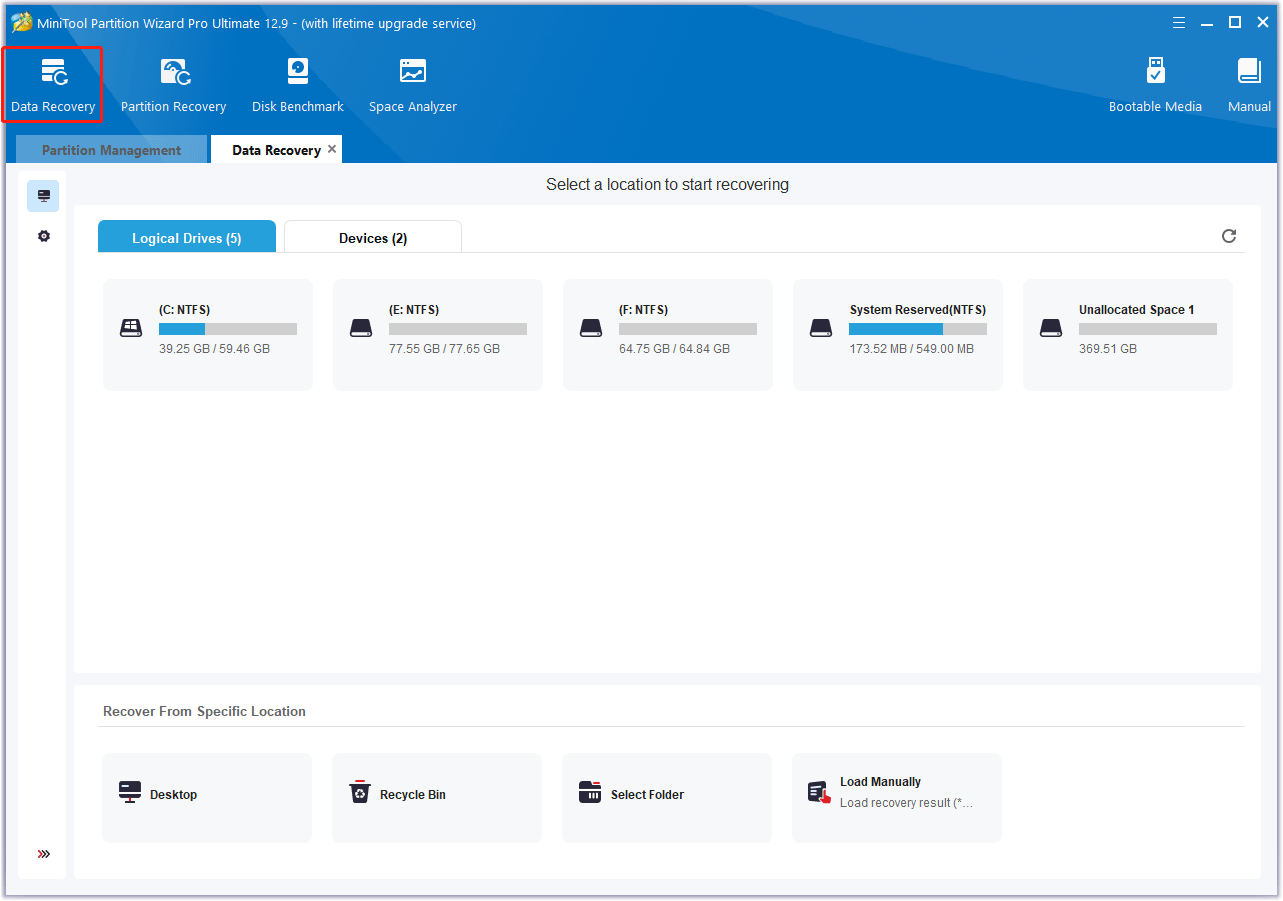
Step 2. In the pop-up window, under the Logical Devices tab, select the hard drive where you are losing data and click Scan. In addition, you can also customize the scan settings.
Step 3. Then, wait for the scan to complete. If the desired data is found, you can click the Pause or Stop icon to get instant data recovery.
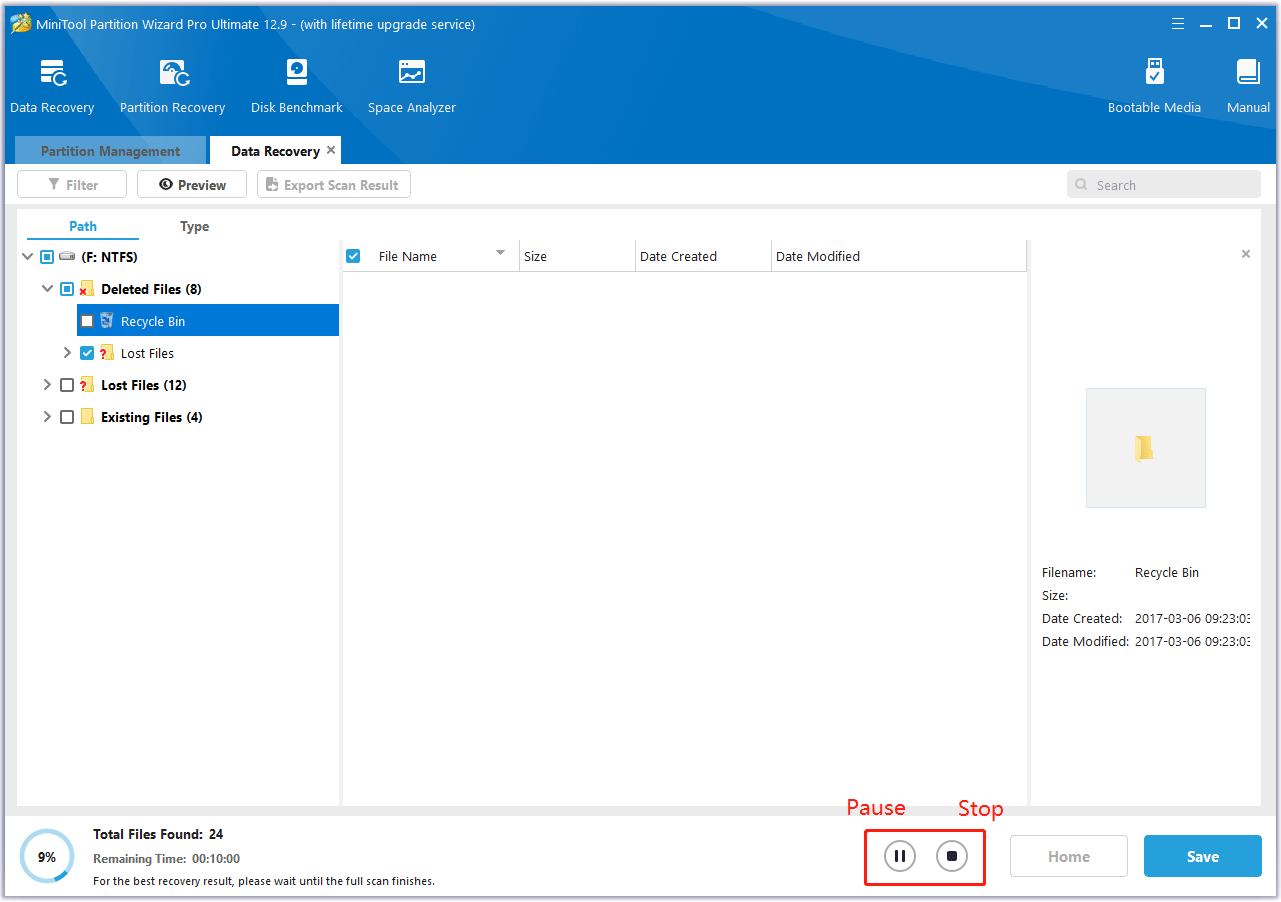
Step 4. After completing the scan, you can go to the Search box in the upper right corner and type the specific file name to quickly find the needed file.
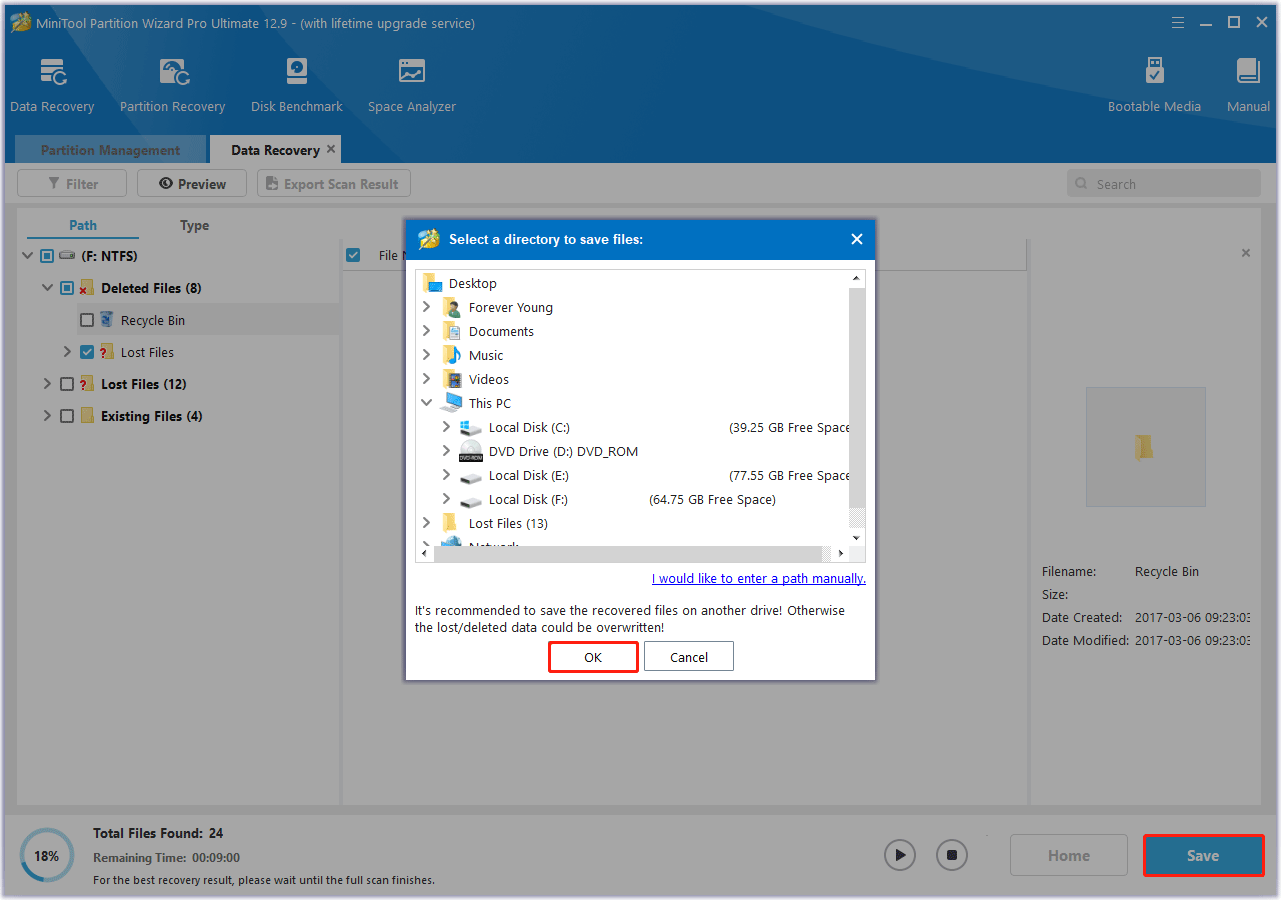
Then, make sure to tick the checkboxes of the folders/files you want to recover and click Save. Here, you can also click the Preview button to preview the files/folders.
Step 5. In the pop-up window, select the location to save the selected files/folders and click OK to confirm this action.
Bottom Line
External hard drives are versatile tools for Windows users, providing storage expansion, backup capabilities, and portability. By following this guide, you can set up an external hard drive correctly, transfer data efficiently, and back up your data securely.
Remember to handle your drive with care, eject it safely, keep it clean, and maintain it regularly to ensure years of reliable use.
If you have any questions or suggestions on how to use MiniTool Partition Wizard, please do not hesitate to contact us via [email protected].
Use an External Hard Drive FAQ
Step 2. Right-click the uninitialized disk, select Initialize Disk.
Step 3. Choose a partition style.
1. Use MiniTool Partition Wizard to check for disk errors.
2. Format the external hard drive.
About The Author

Position: Columnist
Vega enjoys helping people with computer problems, including disk management, data recovery, data backup, and more. She is constantly expanding her knowledge in related fields. And she will continue to bring more easy-to-understand professional articles to help people solve various problems on the PC.
User Comments :