Partition loss often results from human error, partition management failure, etc. When a partition is missing, data loss, system crashes, and various issues may happen. This post explains partition recovery principles and shows you how to do that with MiniTool Partition Wizard, TestDisk, and GParted.
What Is a Partition?
A physical hard drive has a single, contiguous storage space. Disk partitioning will divide the storage space into multiple independent, isolated areas. These independent spaces are called partitions.
The operating system treats partitions as independent drives. This is beneficial for data classification and management, improving file reading and writing efficiency, and protecting data security.
Disk partitioning is done by modifying the partition table located at the beginning of the hard drive. The partition table outlines and describes the partitions on that disk. It records the partitions’ start and end logical block addresses (LBAs), partition type, size, and activity flag (active or not).
There are three main types of partitions.
- Primary Partition: It can be used to directly install an operating system, serving as the boot/system partition. On MBR disks, only it can be marked as the active partition to contain booting files.
- Extended Partition: It is used to create logical partitions.
- Logical Partition: A storage area partitioned within an extended partition. It cannot be used for booting. Click Primary Partition vs Logical Partition to know more.
The partition table uses the partition type mark to distinguish them. For example, 0x05 or 0x0F indicates that the partition is an extended partition. 0x0B is a FAT32 partition and 0x07 is an NTFS partition (usually primary).
As for logical partitions, they are not recorded directly in the MBR, but in the extended partition. The first sector of each logical partition is the EBR (Extended Boot Record). The EBR defines its logical partition and a pointer to the next EBR, forming a linked list structure.
On the other hand, a file system is the mechanism in the operating system responsible for organizing, storing, naming, and managing data. The main reason why a disk needs to be partitioned before it can store data is that partitioning creates a file system.
A file system stores data on a hard drive, SSD, or flash memory through a hierarchical structure (directories and files). It defines the read, write, control permissions, and retrieval methods of the data. It is like an “archiver” managing digital files within a computer.
In Windows, the main file systems include NTFS, FAT32, FAT, and exFAT. Click NTFS vs FAT32 vs exFAT to know their differences.
When Do You Need to Perform a Partition Recovery?
Disk partitions are crucial for storing and accessing data. If a partition is lost or corrupted, the system will be unable to read the data within it, potentially leading to data loss, software malfunction, or system damage.
To restore access, partition recovery is required. Keep reading to learn the symptoms and causes of partition loss and the differences between partition loss and partition corruption.
The Symptoms and Causes of Partition Loss
The core symptom of a lost partition is that the original partition space is displayed as Unallocated or Free space in Disk Management.
Meanwhile, partition loss can also cause the following phenomena.
- Missing Drive Letter: The partition’s drive letter completely disappears from File Explorer.
- Formatting Prompts: When you try to open this partition, the system prompts “You need to format the disk before you can use it.” However, when you do as required, it prompts that “Windows was unable to complete the format.” This situation usually occurs when the partition of a USB drive is lost.
- Initialization Prompt: A disk that already has partitions is suddenly asking you to initialize it.
- Application Errors: When accessing applications or files originally stored on this partition, the system displays error messages such as “Drive not found” or “File read error.”
- Slow File Access: The hard drive experiences severe and continuous stuttering or unusual reading noises when attempting to read data from the lost partition location.
- Blue Screen or Automatic Reboot: A lost partition table leads to corrupted system boot files, resulting in a blue screen upon startup.
Why does a partition get lost? The causes may be as follows.
- Human Error: The partition was accidentally deleted.
- Partition Management Failure: The process of resizing, merging, or splitting disk partitions was interrupted midway due to a sudden power outage, software conflict, etc.
- Partition Table Corruption or Loss: Unexpected power outages, forced shutdowns, virus attacks, improper uninstallation of multiple systems, etc., may damage or delete partition table information.
- Improper USB Flash Drive Removal: A USB flash drive is improperly removed while reading or writing data (without clicking “Safely Remove Hardware”). In this case, the drive is very easy for the file system to be corrupted or the partition table to be lost due to a sudden power outage.
- Connection Issues: Damaged hard drive controller driver, loose disk data cable, insufficient power supply to USB interface, causing the system to be temporarily unable to read partition information.
- Physical Damage: The hard drive develops a large number of physical bad sectors, which happen to be located where the partition table is stored, or the hard drive circuit board/head is damaged, making it impossible to read data.
Partition Loss vs Partition Corruption
Compared to partition loss, the biggest difference of partition corruption is that the corrupt partition itself exists, but the file system is corrupted, making files unreadable. In Disk Management, this partition is usually displayed as RAW.
In addition, lost partitions can be recovered by restoring the partition table to make them reappear. Corrupted partitions often require repairing the file system or using data recovery software to salvage files.
Here is a table showing the difference between partition loss and partition corruption.
| Feature | Partition Loss | Partition Corruption |
| Original Partition Status | Disappears | Exists but corrupts |
| File System | Unknown/Gone | RAW or corrupted |
| Core Cause | The partition table is lost, modified, or corrupted | The file system is corrupted |
| Recovery | Partition recovery | File system repair or data recovery |
Lost Partition Recovery Principles
Partition recovery is the process of restoring a deleted or lost partition along with its data. Why can lost partitions be recovered? How are lost partitions recovered? This section will explain the partition recovery principles.
#1. The partition and data are still there.
When a partition is deleted or lost for some reason, only the partition table is changed. The partition and data themselves remain on the disk.
#2. Volume Boot Record can locate the partition.
Each partition has a Volume Boot Record (also called Partition Boot Record or DOS Boot Record), located in the first sector of the partition.
The VBR contains the following components, describing the partition.
- OEM ID: Identifies the file system (NTFS or FAT32).
- BIOS Parameter Block (BPB): Defines disk geometry, including bytes per sector, sectors per cluster, reserved sectors, hidden sectors, total sectors, etc.
- Extended BPB: Contains file system specific data, such as MFT location (NTFS) or FAT table locations (FAT32).
#3. Rebuild the Partition Table according to the VBR.
Partition recovery software will scan the disk to find the Volume Boot Record (VBR). Since the VBR is always located at the beginning of a partition and records detailed partition information, the software can recalculate the partition’s start and end positions, file system type, etc.
Then, fill in this information to rebuild the partition table record. Thus, the lost/deleted partition recovery can be done successfully.
HDD vs SSD vs USB Partition Recovery
SSD partition recovery will be much more difficult than HDD partition recovery. The reason lies in the different handling mechanisms of HDD and SSD after data deletion.
For HDDs:
When you delete a file on an HDD, the operating system doesn’t physically erase the data from the disk platter. Instead, it only deletes the file pointer and index record in the file allocation table, marking the storage area where the file resides as “free.”
The data remains on the disk until it is overwritten by new files. Since the data is still there, partition recovery software can find the VBR to recover lost partitions.
For SSDs:
Unlike traditional hard disk drives (HDDs), SSDs cannot directly “overwrite” new data in place because of the way NAND flash memory operates. They must first erase the existing data before writing new data. To promptly clear this deleted data and prevent the disk space from becoming full and thus slowing down, SSDs have introduced the TRIM mechanism.
The operating system uses TRIM to inform the SSD controller that data is no longer needed. The SSD will mark this invalid data as “erased” and then use garbage collection (GC) to completely erase data after a few seconds or minutes.
Once the data is erased (the erasing process will overwrite the data with 0 and 1), it cannot be recovered. The question is: when is TRIM triggered?
In Windows (8, 10, and 11), the TRIM command for SSDs is triggered automatically in two main ways.
- On-the-Fly: When you delete a file, Windows immediately sends a TRIM command to the SSD.
- Periodic: Windows automatically schedules a “re-TRIM” operation to ensure all deleted blocks are accounted for. By default, Windows runs this re-TRIM optimization once a week. However, in reality, Windows may only perform a full re-TRIM once every 30 days.
USB Partition Recovery:
Are USB flash drive partition recovery and external SSD partition recovery the same as SSD partition recovery? After all, they use the same storage medium.
In fact, USB partition recovery and SSD partition recovery are slightly different because most USB flash drives and external SSDs do not support TRIM. Instead, they use the Active Garbage Collection mechanism, enabling the USB drives to actively erase invalid data when idle.
Therefore, USB partition recovery is easier than SSD partition recovery, but more difficult than HDD partition recovery.
Partition Recovery vs Data Recovery
Partition recovery and data recovery have similarities and differences. The similarity lies in the same core principle that the data itself remains in the disk sectors. As long as the data hasn’t been overwritten, it can be recovered.
The difference lies in their focuses: partition recovery searches for the VBR, while data recovery searches for the file system log (such as the $MFT in NTFS). The log will record files that have been marked for deletion but not yet overwritten. Thus, these files’ original filenames, paths, and contents can be recovered.
If the file system index is lost (e.g., due to a corrupted partition table), data recovery software will skip the file system and directly scan each sector of the disk. It will search for known file header and footer identifiers (e.g., FFD8…FFD9 for JPG files) to reassemble damaged or lost files.
It’s important to note that partition recovery is generally more difficult than data recovery. When partition recovery fails, important files can be retrieved through data recovery.
How to Perform Partition Recovery in Windows 11/10
This section shows you how to perform partition recovery Windows 10/Windows 11. Before proceeding, you should learn the following precautions.
- After a partition is lost, do not create a new partition in the same location or write data to it. This may overwrite the VBR, causing partition recovery to fail.
- If the lost partition is a system partition or located on SSDs, shut down the computer and attempt recovery using a PE boot disk.
- If the partition loss was due to physical damage, partition recovery may fail, and you must seek professional hard drive data recovery services.
- It is impossible to recover formatted partitions because formatting will directly overwrite the VBR in the original location. Only data recovery is possible.
Recover Partitions via MiniTool Partition Wizard
To recover deleted partitions, MiniTool Partition Wizard, the best partition recovery software, is recommended. It is capable of FAT32, exFAT, and NTFS partition recovery.
MiniTool Partition Wizard DemoClick to Download100%Clean & Safe
Here is how to use this software to undelete partitions.
Step 1: Download and install MiniTool Partition Wizard (to a safe location, without the risk of data overwriting). Launch this software and click Partition Recovery on the toolbar.

Step 2: On the pop-up window, click Next. Then, select a disk for partition recovery and click Next.

Step 3: Select a scanning range and then click Next.
- Full Disk: Scanning the entire disk.
- Unallocated Space: Scanning the unallocated space only.
- Specified Range: Allowing you to enter a Starting LBA and an Ending LBA to specify the scanning range.

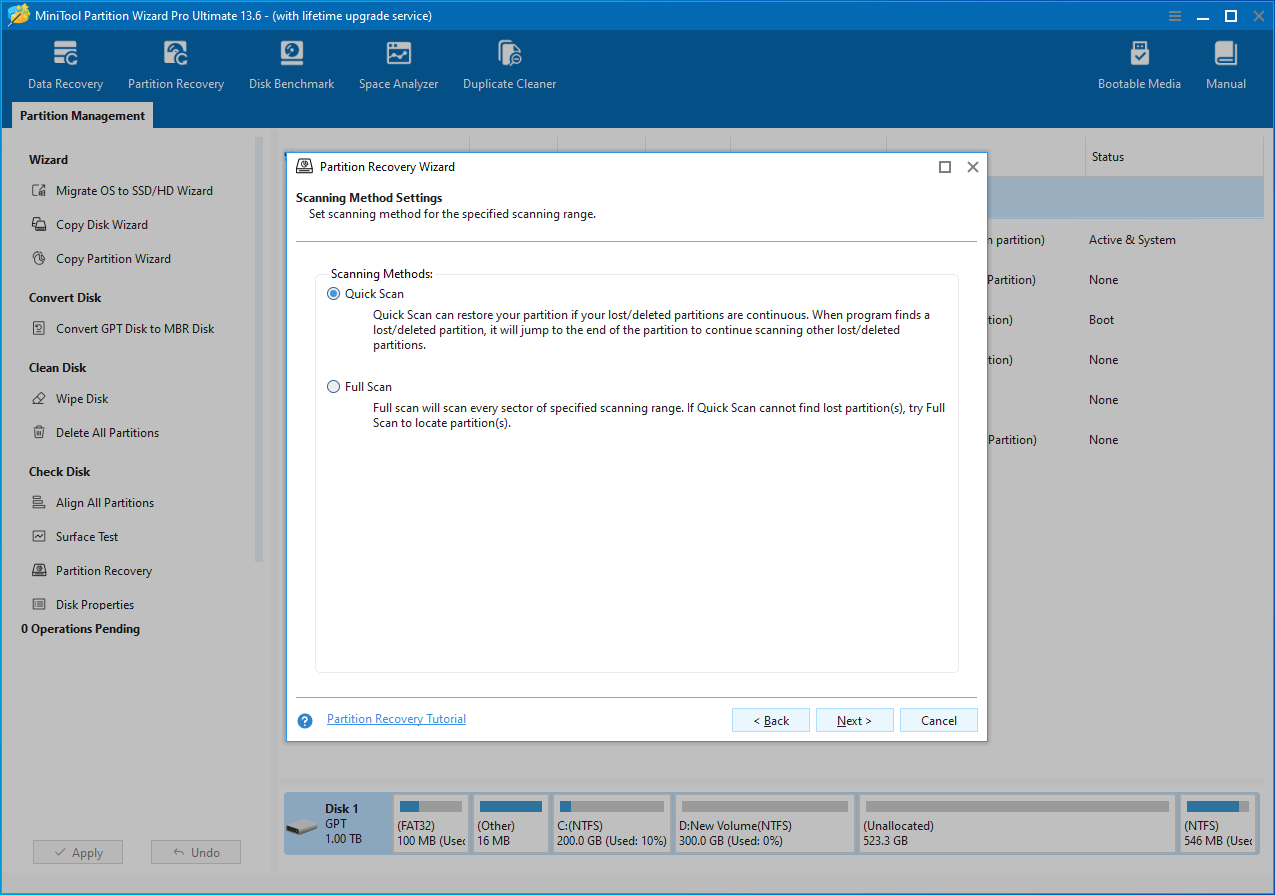
Step 4: Select a scanning method and click Next.
- Quick Scan: When it finds a VBR, it will automatically jump to the end of the corresponding partition to continue searching for another VBR. In other words, if the space of a lost partition is later incorporated into another partition (extend volume), the lost partition cannot be recovered using this method.
- Full Scan: It will scan every sector in the scanning range to find all VBRs. This method will take a longer time, but you may find more lost partitions.
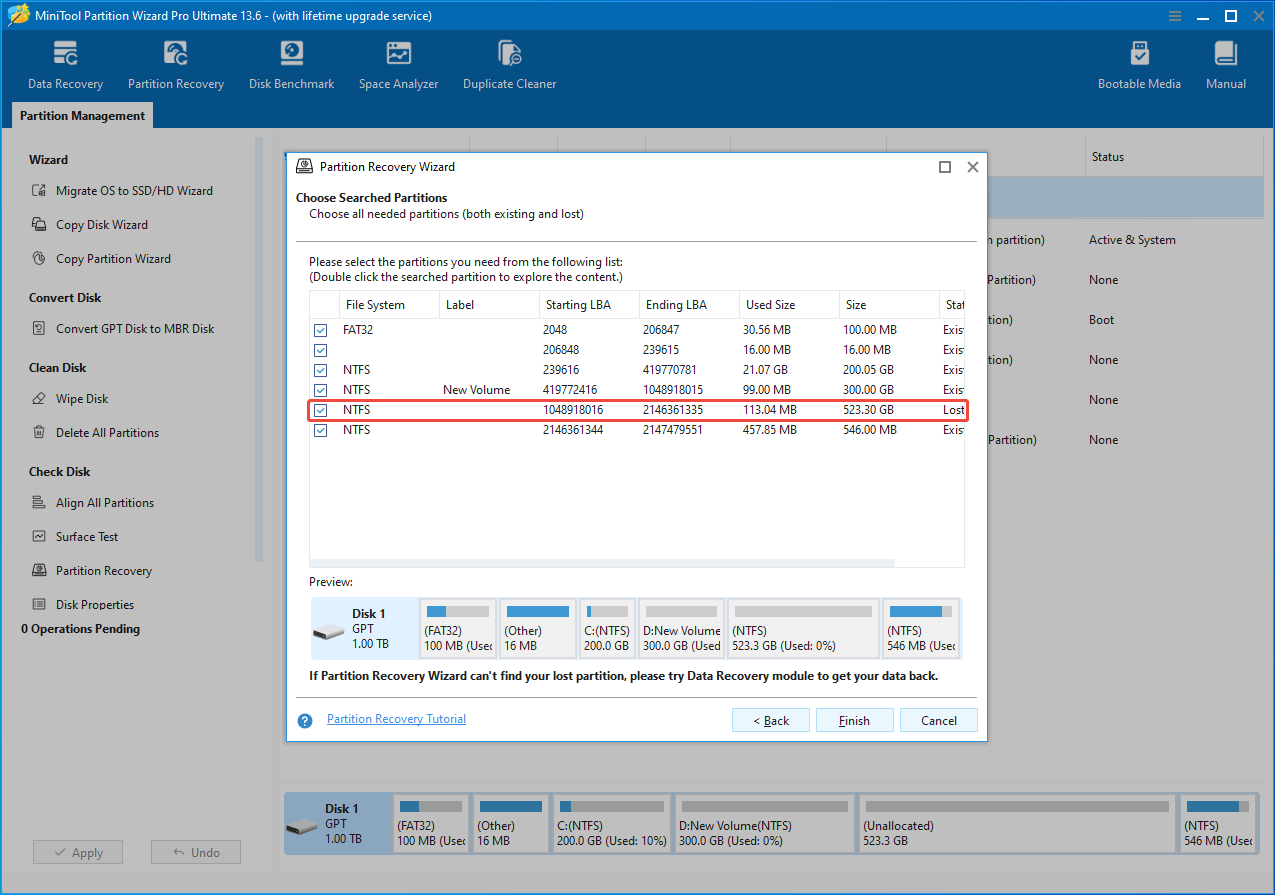
Step 5: Choose the partition to recover. Note that both existing partitions and desired lost partitions should be selected. Then, click Finish.
- If existing partitions are not selected, they will be deleted during the recovery process.
- If a lost partition overlaps with an existing partition, only one can be retained. You will need to choose whether to keep the existing partition or recover the lost partition.
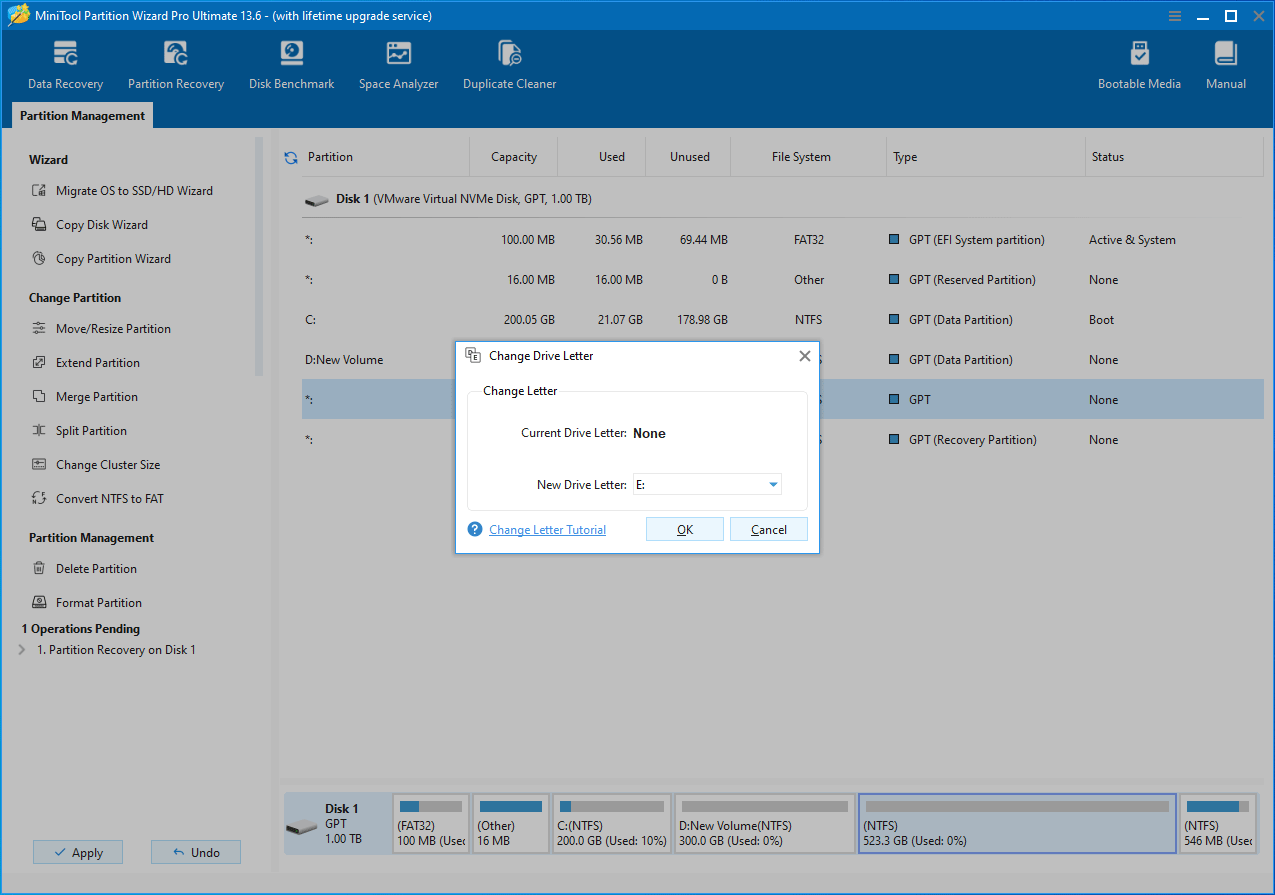
Step 6: The recovered partition has no drive letter. You need to add a drive letter to it, making it appear in Windows File Explorer. To do that, right-click on the recovered partition and choose Change Letter.

Step 7: On the pop-up window, select a new drive letter and click OK.
Step 8: Click Apply to execute the pending operations.

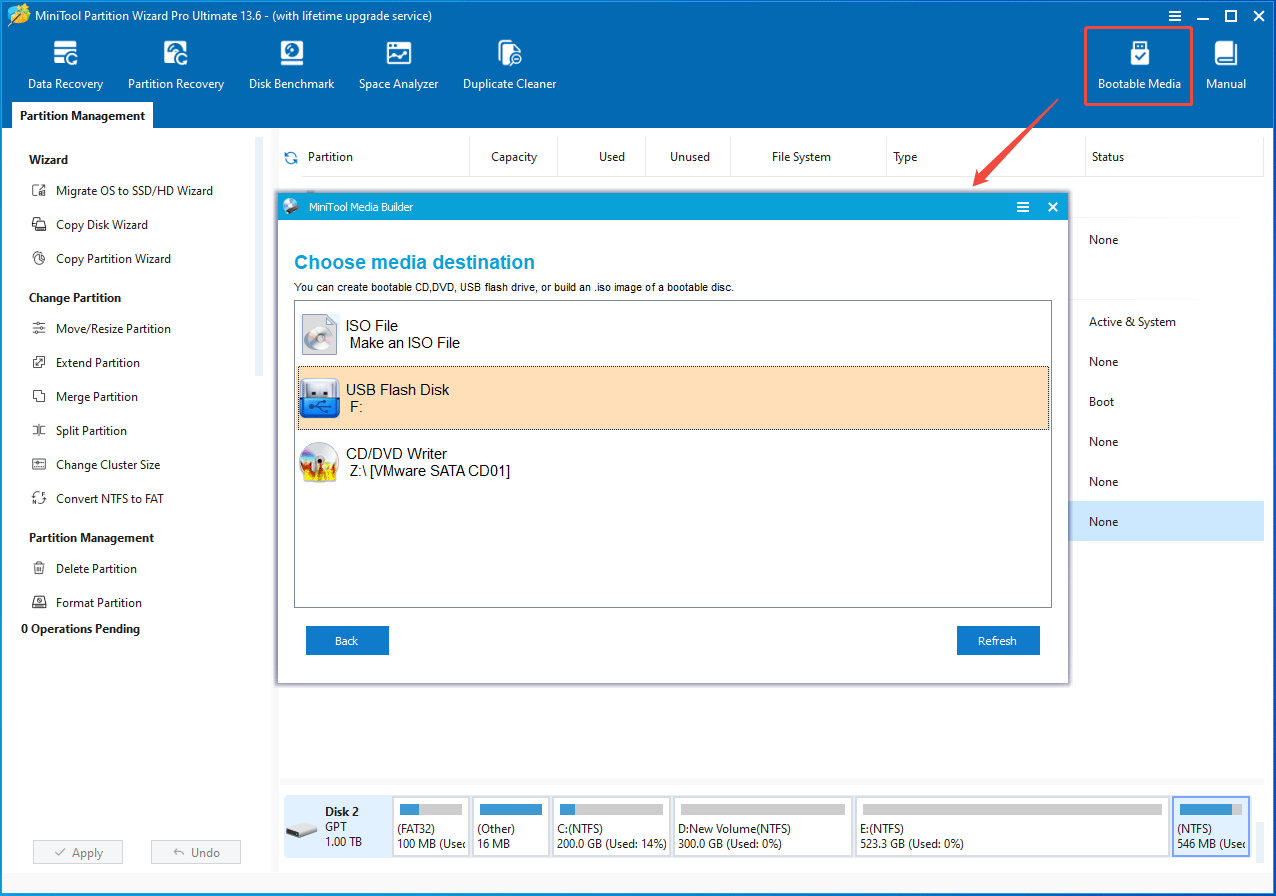
If you need to recover partitions with a boot disk (e.g., perform active partition recovery), MiniTool Partition Wizard can also help you. Here are the steps:
- Connect a USB drive to a well-running computer.
- Launch MiniTool Partition Wizard and then click the Bootable Media feature in the upper right corner.
- On the MiniTool Media Builder window, follow the on-screen instructions to create a bootable USB drive.
- After the media creation is completed, use the bootable USB drive to boot up the computer where partitions are lost.
- Once MiniTool Partition Wizard opens, recover partitions as described above.
Open-Source Partition Recovery Software
If you want to try free partition recovery software, TestDisk and Gparted can meet your demands. They are open-source software that is capable of partition recovery.
#1. TestDisk
TestDisk is a free, open-source, and powerful command-line data recovery utility primarily designed to recover lost partitions, repair corrupted file systems, and fix non-booting disks. It is more suitable for users who are familiar with command lines.
To recover deleted/lost partitions with this software, follow the steps below.
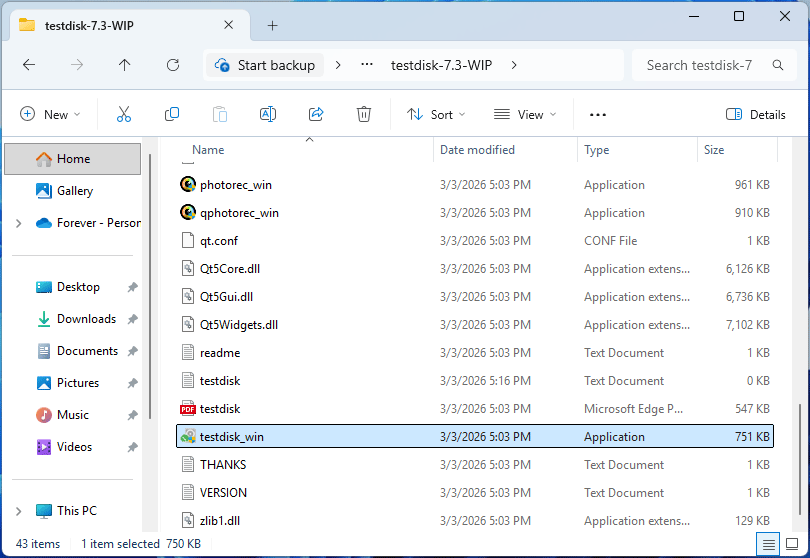
Step 1: Download TestDisk from CGSecurity. Extract the download ZIP file. In the extracted folder, find testdisk_win.exe and double-click it to run.
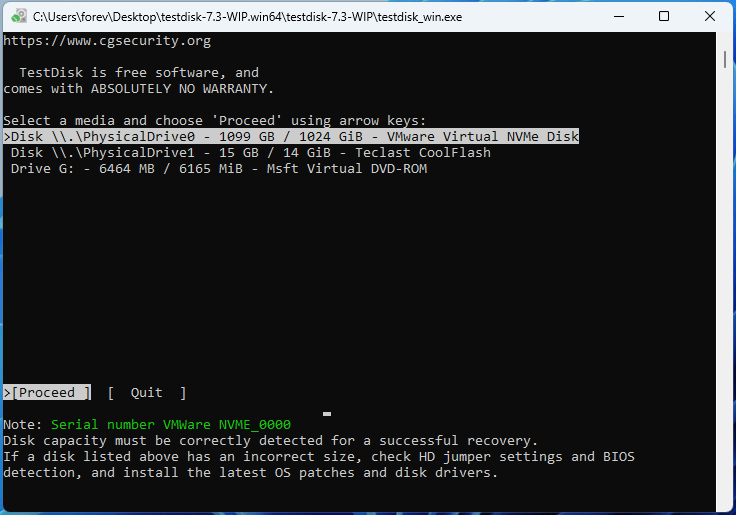
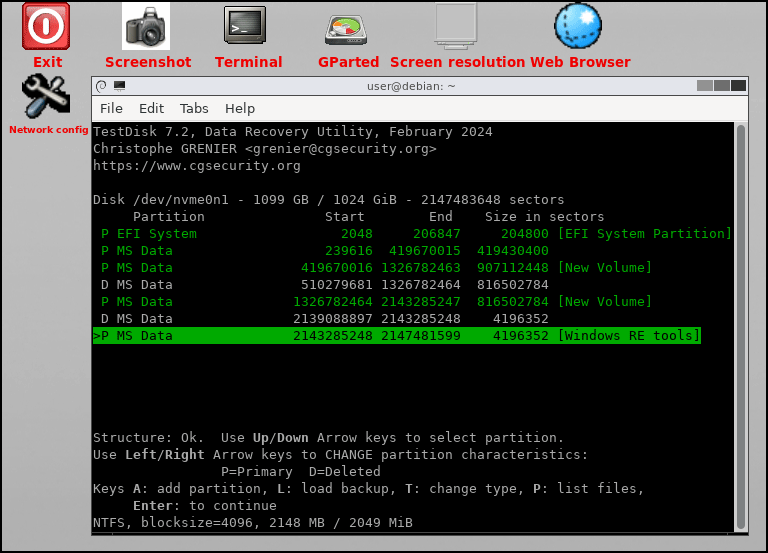
Step 2: Once TestDisk opens, use the arrow key to select Create a new log file (a fresh testdisk.log file will be generated) and press Enter. Then, make sure the disk where the partition is lost and the Proceed option are highlighted. Press Enter.
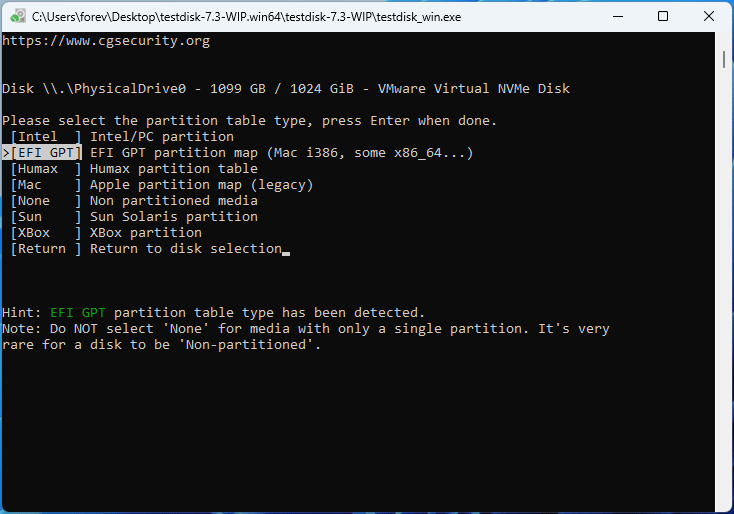
Step 3: Select the partition table type and press Enter. TestDisk will detect the partition table and select it automatically. For Windows, EFI GPT or Intel (MBR) partition table type is usually the option.
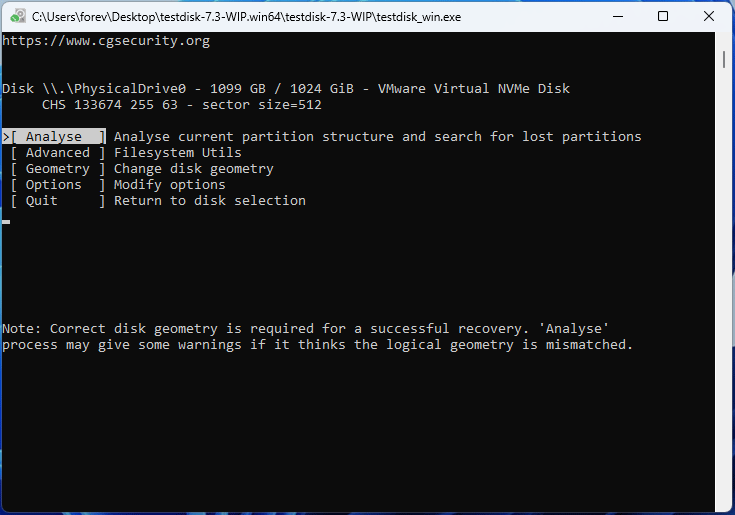
Step 4: Select Analyse and press Enter. Then, select Quick Search and press Enter.
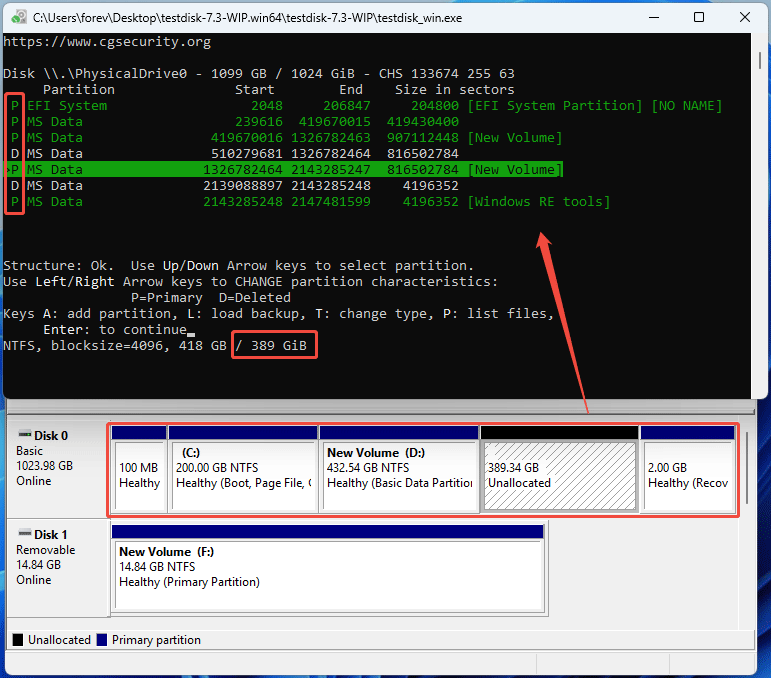
Step 5: According to the disk structure in Disk Management, use the Left/Right arrow keys to change the existing partitions and the partition to be recovered from D (white) to P (green) status. Then, press Enter.
2. If you don’t change existing partitions from D to P, they will be deleted.
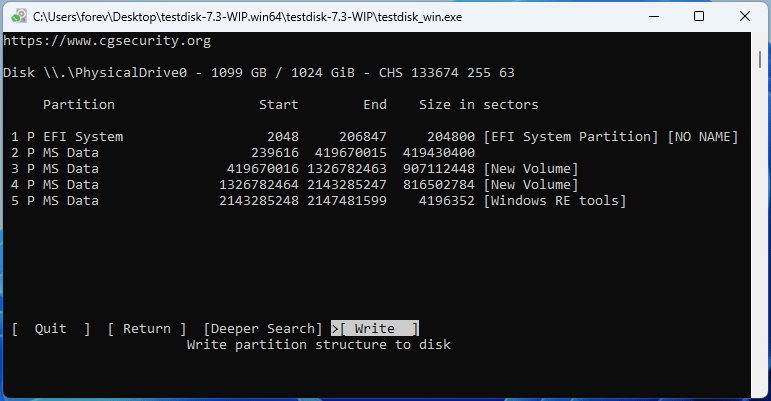
Step 6: Select Write and press Enter. Type Y and then select OK to confirm. Finally, restart your computer to make the changes take effect. Then, you can check if the partition has been recovered.
#2. Gparted Live USB
GParted is a free, open-source graphical tool for managing disk partitions, allowing users to resize, copy, move, and create partitions without data loss. In addition, it contains TestDisk, allowing you to recover lost or accidentally deleted partitions.
Notably, GParted can’t run directly on Windows. Instead, you need to create a GParted Live USB. Then, use this USB drive to boot up the computer and run GParted. In other words, you can use this tool to do active partition recovery, etc.
Here is the guide.
Step 1: Download the GParted Live ISO (the AMD64 version) from the official website and then burn it to a USB drive with a tool like Rufus. After that, use the GParted Live USB to boot up the computer where partitions are lost.
Step 2: Once the GNU GRUB interface opens, select GParted Live (Default settings) and press Enter.

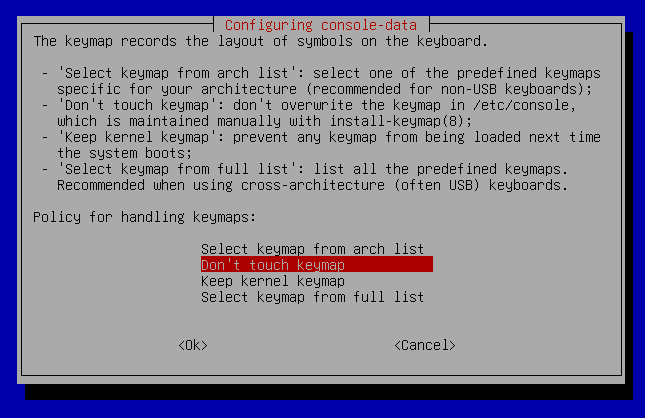
Step 3: In the Configuring console-data window, select Don’t touch keymap and press Enter.
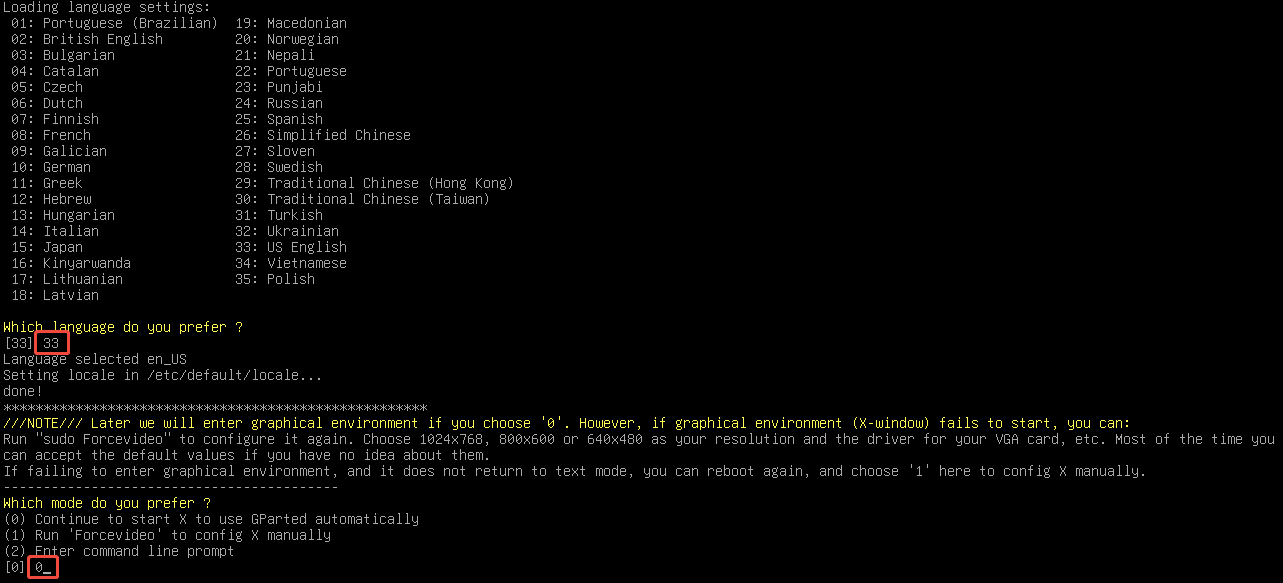
Step 4: Select the language you prefer (type the language number and press Enter) and the mode you prefer (type 0 and press Enter). Note that the “Continue to start X to use GParted automatically” mode is recommended.
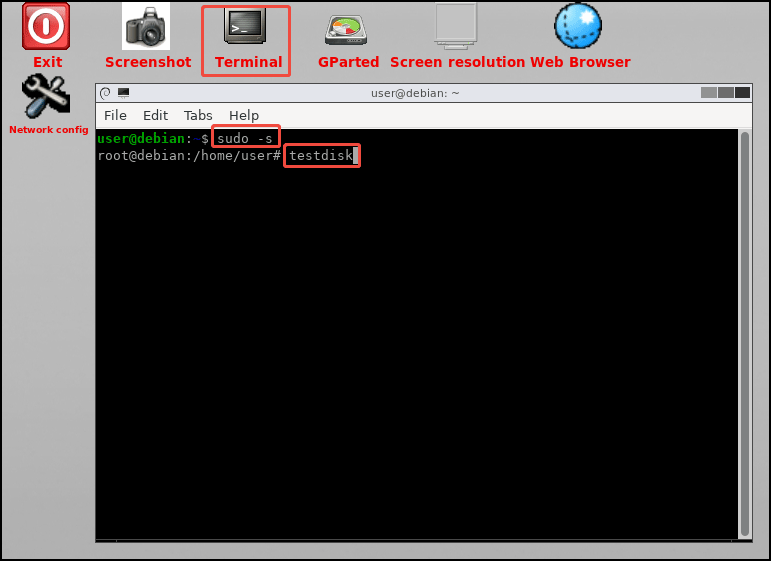
Step 5: Once the GParted window opens, it means that you have entered the main interface of the GParted Live USB. Minimize the GParted interface. Double-click Terminal to open it. Type “sudo -s” and press Enter. Type “testdisk” and press Enter. This will open the TestDisk tool.
Step 6: Follow the steps described in the TestDisk section to complete the partition recovery.
What to Do If Partition Recovery Fails?
Sometimes, partition recovery may fail for the following reasons.
- The VBR has been overwritten by creating a new partition in the original location or writing new files to the VBR sector.
- The partition table is severely corrupted and cannot be reconstructed.
- The hard drive has physical defects.
If the partition recovery fails, you can perform data recovery to get important files back. Then, create a partition on the unallocated space.
MiniTool Partition Wizard offers the data recovery feature, allowing you to recover data from NTFS, FAT32, and exFAT partitions. Here is the guide.
MiniTool Partition Wizard DemoClick to Download100%Clean & Safe
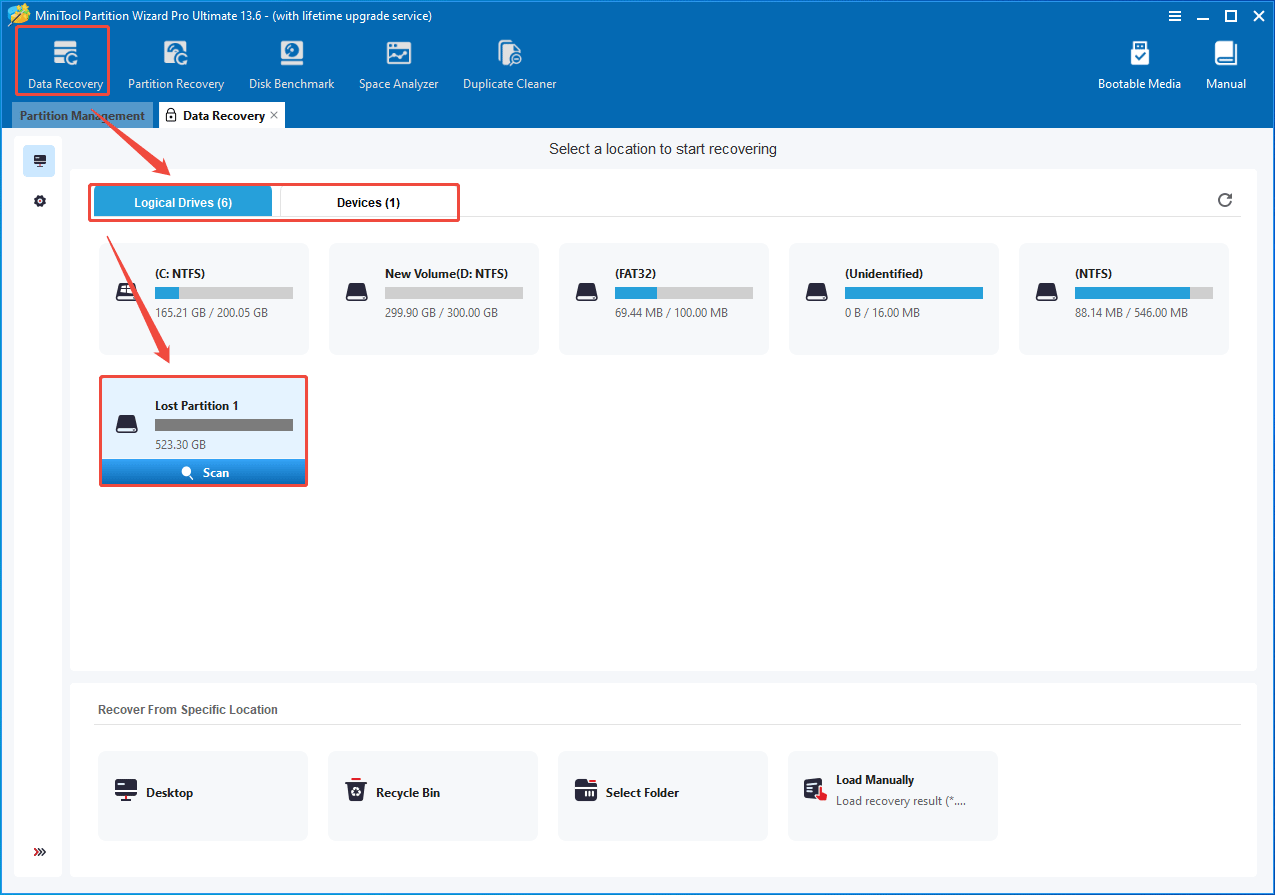
Step 1: Launch MiniTool Partition Wizard and click Data Recovery. Under Logical Drives, hover over the Lost Partition and click Scan. If there is no lost partition, open the Devices tab and scan the disk where the partition is lost.
Step 2: Wait for the scanning process to complete. Then, you need to find the files you want to recover. To do that, three tools can help you.
- Filter: Many of the scanned files are irrelevant. The Filter tool can make Path and Type display only specific files. You can specify the File Type, Date Modified, File Size, and File Category.
- Path: Missing files detected during the scan will be placed in the scanned partitions. Files that cannot be associated with any partition are displayed as RAW files (not linked to any recognized partition).
- Type: Scanned results are categorized by file type. Knowing the type of lost file can help you find it quickly.

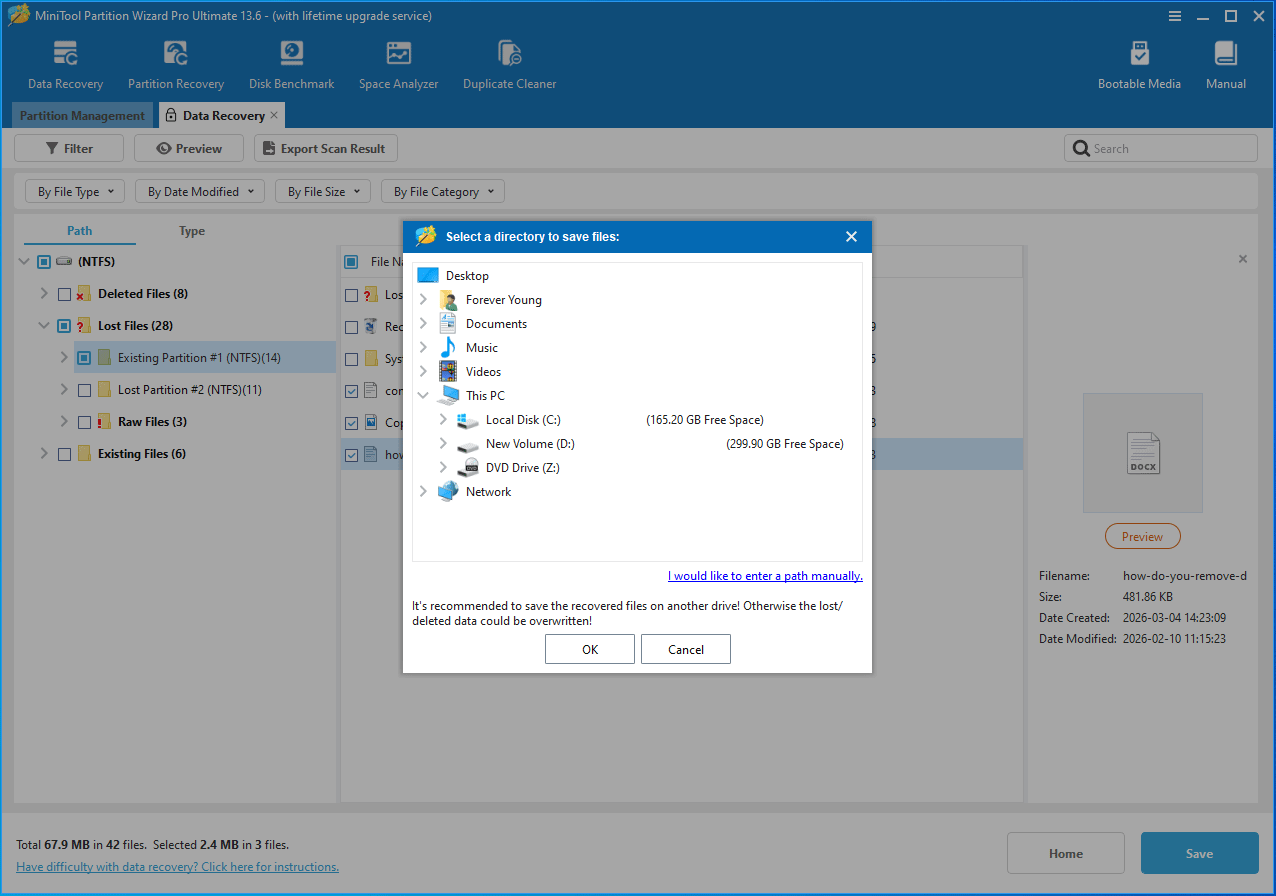
Step 3: Check the files you want to recover and then click Save. In the pop-up window, select a safe location to save recovered files.
How to Prevent Partition Loss
Partition loss can lead to data loss or system crashes, and partition recovery is not guaranteed to be successful. Therefore, preventing partition loss is crucial.
The following measures help prevent partition loss.
- Back up Data: Always back up your data before performing large-scale system updates or disk adjustments. To ensure backup security, use the 3-2-1 backup strategy.
- Handle Disk Management with Caution: Before deleting, formatting, or resizing a partition, ensure that the target partition is correct. Also, do not arbitrarily delete or modify Windows system partitions such as the EFI system partition or recovery partition.
- Maintain Hardware and Power Supply: Regularly use software to check your hard drive to promptly identify physical bad sectors/blocks. Then, either mask them or replace the hard drive. Also, prevent sudden power outages or unstable power supplies, which will cause partition table corruption. It’s recommended to use a UPS (Uninterruptible Power Supply) for desktop computers.
- Standardized Use of Software and Computers: When operating on partitions, prioritize using reliable third-party tools like MiniTool Partition Wizard. Avoid power outages or abnormal shutdowns during read/write operations. Perform regular scans to prevent malware from corrupting the partition table.
How to Repair a Corrupt Partition
If a partition becomes corrupt, try the following methods to repair it.
- Add a Drive Letter: In Disk Management, right-click the partition and choose Change Drive Letter and Paths. Click Add and OK to add a drive letter. This method can work if only the drive letter is missing.
- Repair File System: Open Command Prompt as Administrator and run chkdsk *: /f /r (replace * with your drive letter) to fix file system errors and mark bad sectors.
- Recover Partition: If the partition structure is damaged or missing, try partition recovery tools such as MiniTool Partition Wizard or TestDisk to scan the disk and rebuild the partition entry.
- Recover Data and Format the Partition: If all else fails, first recover important files, then format the partition to repair it.
Partition Recovery FAQ
To recover an OEM partition, the most reliable method is to use a recovery disc or USB provided by the manufacturer. This ensures that the partition is restored with all necessary system files and boot information.
Or, re-create an EFI partition via commands and write boot code to it. The brief process is as follows:
1. Create a Windows installation USB drive and use it to boot up the computer.
2. Open Command Prompt.
3. Use DiskPart commands to create an EFI partition (the create partition efi command), format it to FAT32 (the format quick fs=fat32 command), and then assign a drive letter to it (the assign letter=* command).
4. Repair boot files using the bcdboot #:\Windows /s *: /f UEFI command (#: is your Windows partition and *: is the new EFI partition).
However, for the Recovery Partition and EFI Partition, you can re-create them and write proper data to them. Then, they will work as the original ones. Click to know how to create the Recovery partition.
Bottom Line
This article explains the principles of partition recovery and tells you when partition recovery is possible. It also shows how to recover deleted/lost partitions with MiniTool Partition Wizard, TestDisk, and GParted.
If you encounter issues when using MiniTool Partition Wizard, send an email to [email protected] for help.
About The Author

Position: Columnist
Linda has been an editor at MiniTool for seven years. She continuously learns about computers and puts her knowledge into practice. Moreover, she is particularly knowledgeable in disk management, data recovery, system installation, and PDF editing. Her articles typically reference multiple examples or are based on her own experience, providing users with the most suitable solutions.
User Comments :