GeForce Experience is the companion application to the GeForce graphics card. It keeps your drivers up to date, optimizes your game settings (for over 1000 games) automatically, and offers you the easiest way to share your game moments with friends. As for GeForce Game Ready drivers, they are built to offer better gaming experiences by utilizing the most up-to-date display technologies.
Generally speaking, Game Ready drivers are released after a new major game is published to fix game bugs and improve game performance. However, sometimes GeForce Game Ready driver installation can’t continue because of some factors. If you are bothered by this issue too, pay attention to this post!
Reasons and Error Variations of GeForce Installation Cannot Continue
Due to multiple reasons, GeForce Game Ready driver installation can’t continue on the computer. The following are common causes for the error.
- There are issues with the GeForce Experience app/installation files.
- The available free space is insufficient to store the new driver update.
- The current driver version doesn’t support the graphics card.The malware/antivirus apps or other running apps on the laptop interfere with the Game Ready driver installation process.
The “GeForce Experience installation cannot continue” issue may come with different error messages. Here are some common error variations related to the “NVIDIA installer cannot continue” error. You can apply the given methods in this post when you receive either one of the following variations.
- NVIDIA installer cannot continue other installations are running (NVIDIA installer cannot continue a newer or same version is present)
- NVIDIA installer cannot continue – This NVIDIA graphics driver is not compatible with this version of Windows
- NVIDIA installer cannot continue Windows 11, 10, 7
- NVIDIA installer cannot continue Windows task scheduler
- NVIDIA installer cannot continue a system restart is required
- NVIDIA installer cannot continue DCH driver package
- NVIDIA installer cannot continue – This graphics driver could not find compatible graphics hardware
- NVIDIA installer cannot continue requires an NVIDIA GPU
Also read: What Causes NVIDIA Installer Failed Error and How to Fix It
Fix 1: Enable the NVIDIA Driver
What to do if NVIDIA driver installation can’t continue? An available way is to enable the NVIDIA driver through Device Manager. To do that, you can follow these steps.
Step 1: Right-click on the Start icon from the taskbar and tap Device Manager.
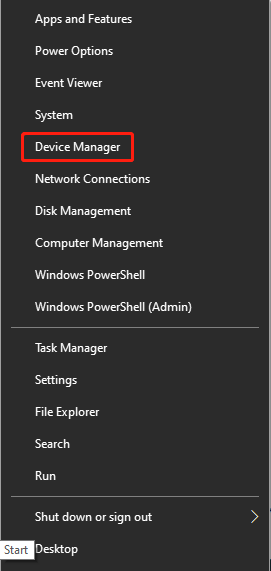
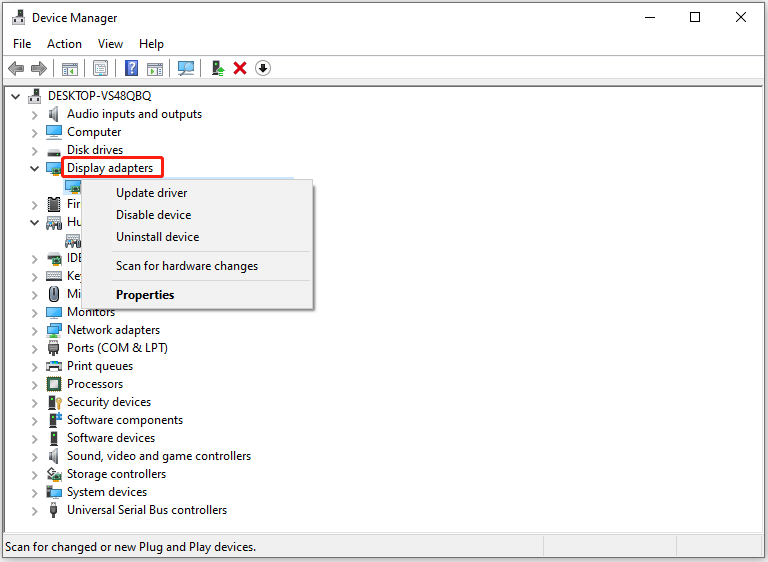
Step 2: Expand Display adapters by double-clicking on it. Then right-click on your NVIDIA driver from the listed drivers and check if it is enabled. If not, click Enable device in the pop-up menu.
When you see the Disable device option, it means that the driver is enabled.
Fix 2: Update Graphics Card Drivers
If you use GeForce Experience 3.22 or older versions, you may receive the “GeForce installation cannot continue” issue while installing NVIDIA Game Ready Driver/Studio Driver (version 471.41 or newer).
Regular Game-Reay drivers and Studio drivers are the same things, except for the Studio drivers that have been optimized and tested with specific applications.
In this case, you should upgrade GeForce Experience to the latest version. For doing that, you have two options.
- Launch the currently installed GeForce Experience version and let it update to the latest version automatically.
- Manually download and install the latest GeForce Experience version from its official website.
Fix 3: Re-launch the GeForce App
When GeForce driver installation can’t continue, try closing and then reopening the GeForce app. This operation can fix glitches in the application and then solve the discussed error in the post. You just need to exit the GeForce app on the desktop and then run it again. If this doesn’t work, try other fixes immediately.
Fix 4: Get Enough Storage Space
Insufficient free space on the computer can result in the GeForce Game Ready driver installation can’t continue error too. Even though this case is rare, it is still possible as not all of us use fancy new laptops. It is very common to encounter issues like the C drive running out of space, hard drive being full without reason, E drive full, etc.
You may suffer from storage shortage issues when you use a low-capacity SSD and have major games installed. In this case, you can find what’s taking up your hard drive space and free up space with the help of MiniTool Partition Wizard. In addition to that, you are allowed to increase disk space by extending partition capacity via this software.
At least 3GB (2.7GB exactly) of space is required to install GeForce Experience. To check the current available space on the computer, open Settings and then click System > Storage.
Here we show you how to release disk space via MiniTool Partition Wizard.
Step 1: Download and install this Windows partition manager on your computer.
MiniTool Partition Wizard FreeClick to Download100%Clean & Safe
Step 2: Run this software by double-clicking on its icon.
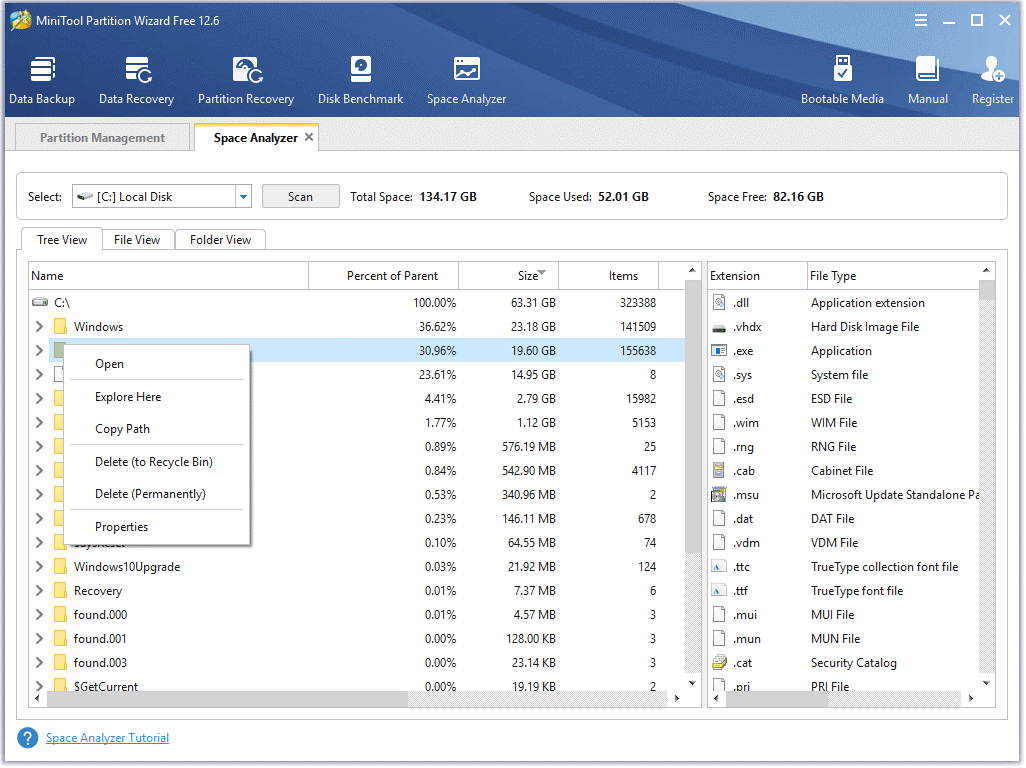
Step 3: After entering the main interface of the program, click Space Analyzer.

Step 4: From the drop-down menu, choose a folder or the drive letter of the target partition and click Scan. After the scan process ends, the software will show you the result.
Step 5: Right-click on a large and useless folder/file or program from the displayed result and click Delete (to Recycle Bin) or Delete (permanently).
Step 6: After freeing up disk space, install the GeForce Game Ready driver again to see if the error is fixed.
Also read: Quickly Remove “Unable to Read from Disk – Error Code 1117”
Fix 5: End All NVIDIA Processes
It is recommended to end all NVIDIA processes when GeForce Experience installation cannot continue. According to user reports, this method works for them. You can also have a try.
Step 1: Press Ctrl + Shift + Esc keys at the same time to open Task Manager.
Step 2: Right-click on NVIDIA processes and click End task. Alternatively, highlight the process and click the End task button at the bottom right corner of the window. Repeat this process to end all NVIDIA processes on the computer.
You’d better end other unnecessary running processes on the computer to get rid of interference generated by them.
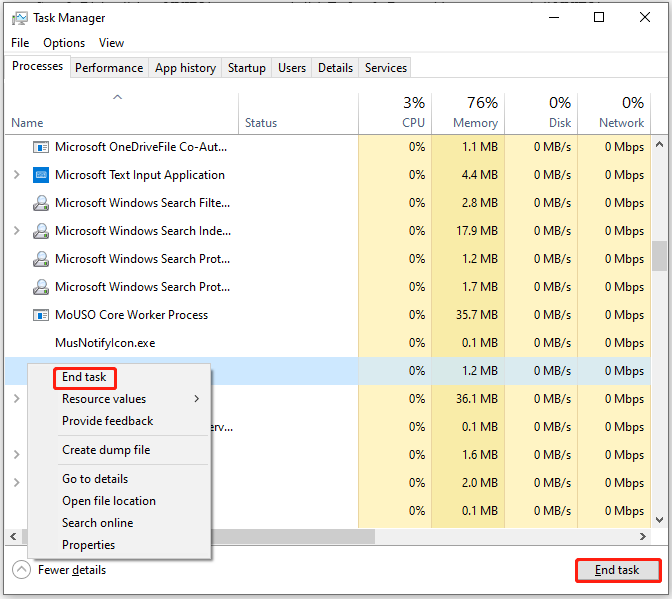
Step 3: Exit the Task Manager window and reopen the NVIDIA installer to check if the error is solved.
Recommended article: Find Causes of Error Code 0x80240004 and Solutions to It
Fix 6: Rename the NVIDIA Graphics Folder
If NVIDIA driver installation can’t continue still after trying above methods, try renaming the NVIDIA folder in the system drive. However, you need to note that all the services associated with that folder won’t run because the path of the folder has been changed after you rename it.
Here are the steps for renaming the NVIDIA graphics folder.
Step 1: Open File Explorer by pressing Windows and E keys.
Step 2: Double-click on the system drive (C drive) > Program Files.
Step 3: Right-click NVIDIA Corporation and click Rename. Then enter the new name in the field. You’d better input a name related to NVIDIA so that it can be remembered easily.
Step 4: Run the driver setup and the “GeForce installation cannot continue” error should disappear.
Radeon Settings and Drivers Do Not Match Error Fix Guide
Fix 7: Disable Antivirus or Malware Service
As mentioned earlier, the GeForce driver installation can’t continue when there’s interference from antivirus or malware services on the computer. To solve the issue, you can disable antivirus or malware temporarily. The disabling steps vary depending on the type of antivirus software. Here are guides to disabling antivirus.
- [Solution]: How to Disable Windows Defender Antivirus on Win 10
- Best Way to Disable Avast for PC and Mac Temporarily/Completely
- How to Turn off or Remove McAfee from Windows PC
A simple way to disable antivirus software is to right-click on it and click Disable. In addition to disabling antivirus and malware, you can also add GeForce files to the exclusion list of the antivirus program to avoid the discussed error.
Here’s the tutorial on how to add an app to the whitelist of Windows Defender.
Step 1: Open Settings by pressing Windows and I keys and then click Update & Security.
Step 2: Tap Windows Security > Firewall & network protection.
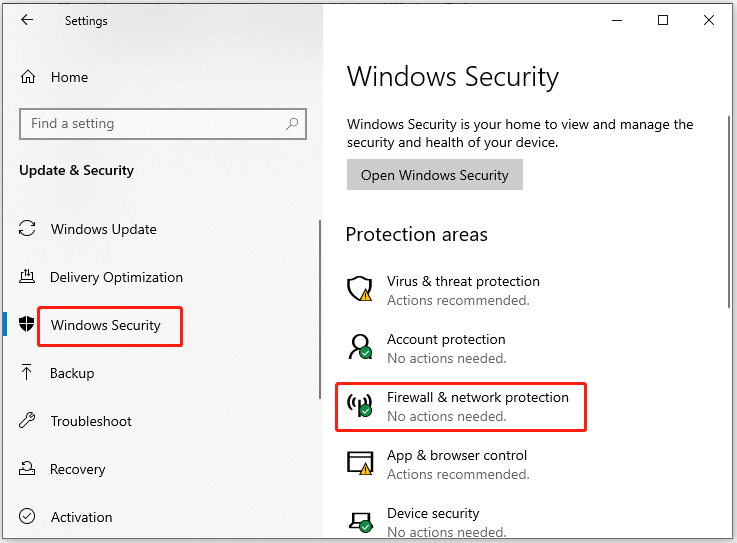
Step 3: Click on the Allow an app through firewall link to continue.

Step 4: Click Change settings and scroll down the list under the Allowed apps and features section to find GeForce Experience.
Step 5: Select GeForce Experience under both the Private and Public tabs. Then click OK to save changes.
Also read: GeForce Experience Driver Download Failed (5 Fixes)
Fix 8: Reinstall GeForce Experience
Step 1: Type add or remove programs in the search box and then click on the option from search results.
Step 2: Find NVIDIA GeForce Experience from the listed apps & features in the next window.
Step 3: Click on the target app and click the Uninstall button. Then click Uninstall in the prompted notice window to confirm the operation.
Step 4: After the uninstallation process ends, download GeForce Experience from its official website again.
Step 5: Now, download and install Game Ready Drivers through GeForce Experience to see if the error shows up.
Conclusion
To sum up, this post introduces the causes, error variations, and fixes for the “GeForce Experience installation cannot continue” issue. After reading the post, you will have an overall understanding of this issue. Importantly, you can solve it with the offered solutions in the tutorial.
If you know other methods to fix the error, don’t hesitate to tell us in the comment area. For any doubts about MiniTool Partition Wizard, contact us by sending an email via [email protected]. We will make a reply as soon as possible.
User Comments :