An Overview of Chromebook Recovery Utility
Chromebook Recovery Utility is an embedded feature in the Chrome system, which can be used to recover any devices running the Chrome OS as it can create a backup of Chrome OS. It is a good idea to create a recovery drive by using the Chromebook Recovery Utility.
When you encounter the following issues, fix them with the created recovery drive.
- The Chromebook often reboots or can’t boot up.
- After you turn on the Chromebook, it shows a white screen.
- The Chromebook crashes, freezes, or shows errors like Chrome OS is missing or damaged.
- There are some issues with the Chromebook, Chromebox, and other devices running the Chrome OS.
Even so, Chromebook Recovery Utility is not perfect. For instance, you may suffer from the Chromebook Recovery Utility not working error. The specific case varies from person to person. Various errors can trigger the Chrome OS recovery not working issue.
What are they? Here, we summarize 7 commonly encountered issues when Chromebook Recovery Utility not working. You can follow the corresponding fixes for the issue.
#1. Download Interrupted
You may encounter the download interrupted error because of a hiccup in the Wi-Fi or Ethernet connection. This is a problem occurred while creating the recovery drive. To repair this issue, you can double-click that if you are connected or online.
If not, restart your modem, disconnect and reconnect to your network, try connecting to another network, utilize your phone’s hotspot, or restart your PC to fix the issue.
#2. Unable to Unzip File
The “Unable to unzip file” error usually appears when the Chromebook Recovery Utility tries to create the USB recovery drive but fails. It is also a problem occurred while creating the recovery drive. What’s worse, this error happens randomly without the specific reason. After looking into the Chrome OS recovery not working issue, we find some available solutions to it.
Solution 1: Ensure that You Have Enough Available Space
When the screen goes black and the unzip process ends, it is very likely that the Chromebook doesn’t have abundant space. Generally speaking, you need to ensure that there is 8GB free space at least on the Chromebook to download the file.
But you are usually required to prepare more space to download and unzip the file. You should make sure that the Chromebook has a minimum capacity of 8GB and 16GB is recommended. Otherwise, you will fail to download and unzip the file and receive the “unable to unzip file” error.
Besides, the SD card or USB drive you’re using should have at least 4GB free space. Here, you need to note that not all the drives have the amount of advertised space. Hence, you are suggested to pick an 8GB drive if you’re using a 4GB USB or SD card. If possible, get a 16GB drive.
Also read: How to Increase Disk Space for Laptop? Try These Methods Now
Solution 2: Run the Recovery Utility as Admin
You should ensure that you run the Recovery Utility as admin while running it on Windows. When the prompt shows up and asks for admin permission after you run the tool, click Allow.
As an alternative, you can right-click on the Chrome utility and select Run as administrator. Then click Allow to confirm the operation.
Solution 3: Reformat the Drive
Try reformatting the SD card or USB drive to fix the unable to unzip the file error. Connect it to your PC and then find it on your desktop, File Explorer, or Disk Management. Right-click on the drive and select Format. Then follow the prompted instruction to finish the formatting process.
You can also try the SD card formatter – MiniTool Partition Wizard to format the drive. This tool allows you to format external storage devices like USB flash drives, TF cards, CF cards, and internal hard drives as well.
MiniTool Partition Wizard FreeClick to Download100%Clean & Safe
Step 1: Connect the USB drive or SD card to your computer.
Step 2: Launch MiniTool Partition Wizard to enter its main interface.
Step 3: Right-click on the USB drive or SD card from the disk map and click the Format option in the pop-up menu. Alternatively, you can also click on the target drive and click Format Partition in the action panel.
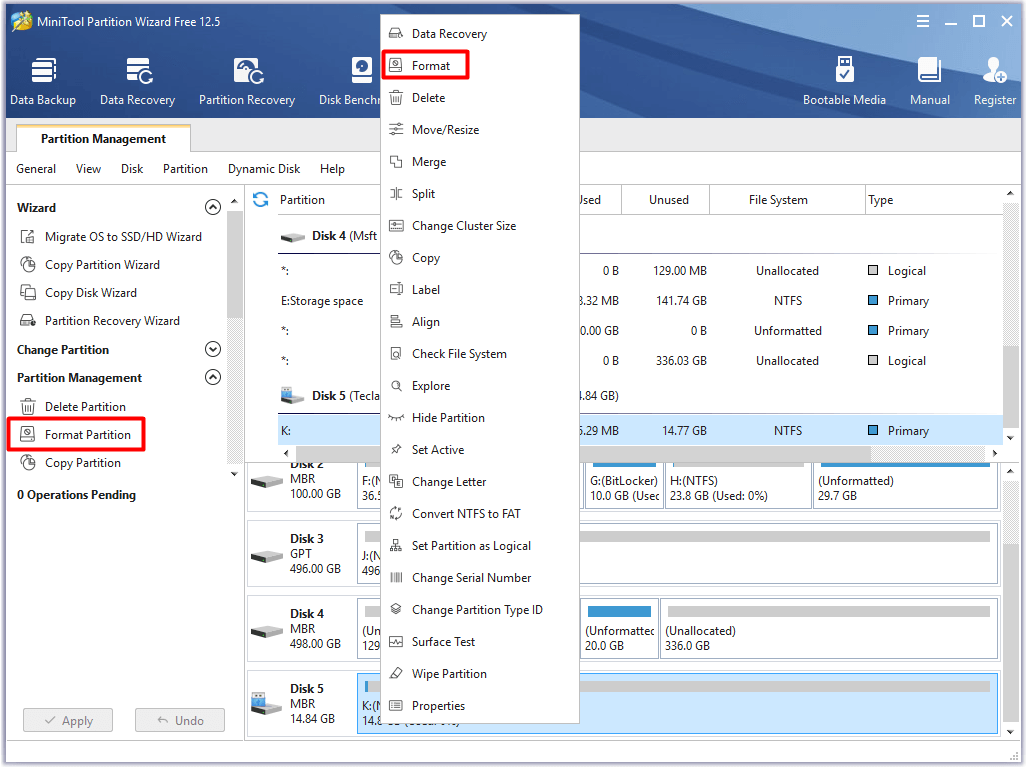
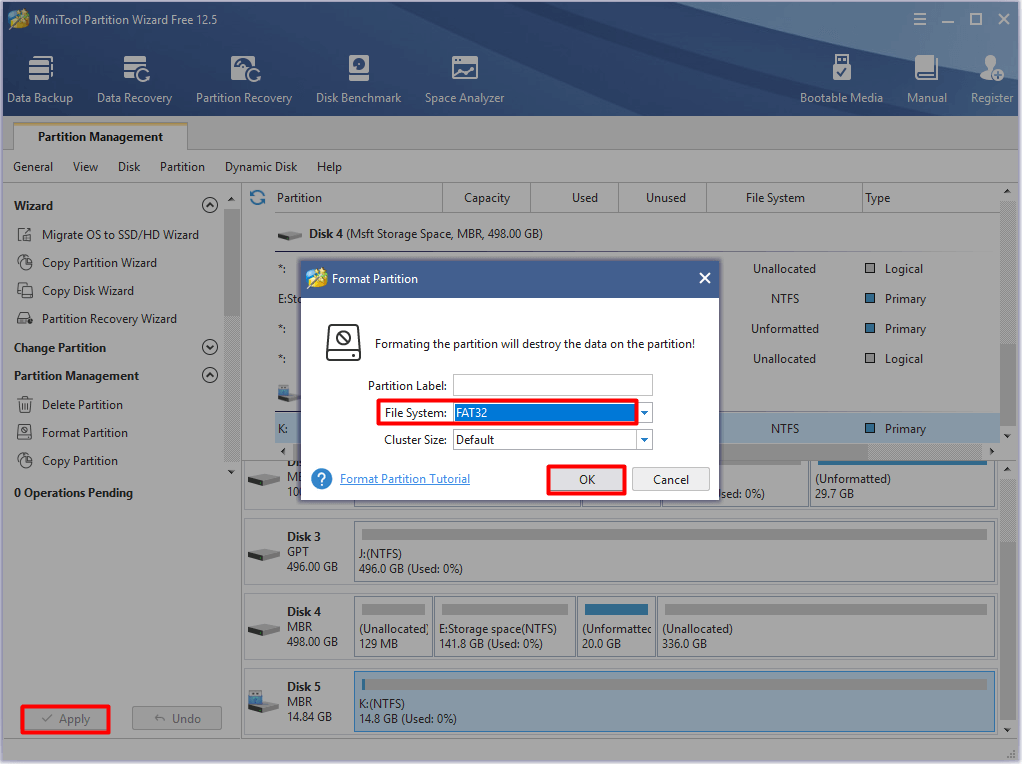
Step 4: In the Format Partition window, choose the FAT32 file system from the drop-down menu and click OK to save the changes. After backing to the main interface, click Apply to carry out the pending operation.
Recommended reading: 6 Possible Causes and 6 Available Fixes for CRC Failed 7Zip
Solution 4: Wipe the Drive
The Chromebook Recovery Utility usually erases the drive while creating the recovery media. However, rogue files, virus, and malware sometimes can appear in the drive and disturb the process. Given that fact, you should ensure that there are no other media or files on the USB or SD card.
For the sake of security, you’d better erase the USB or SD card before starting the creating process. The Wipe Disk feature of MiniTool Partition Wizard enables you to wipe the disk completely quickly. Download and install this program, and then follow the given steps to wipe the drive.
MiniTool Partition Wizard FreeClick to Download100%Clean & Safe
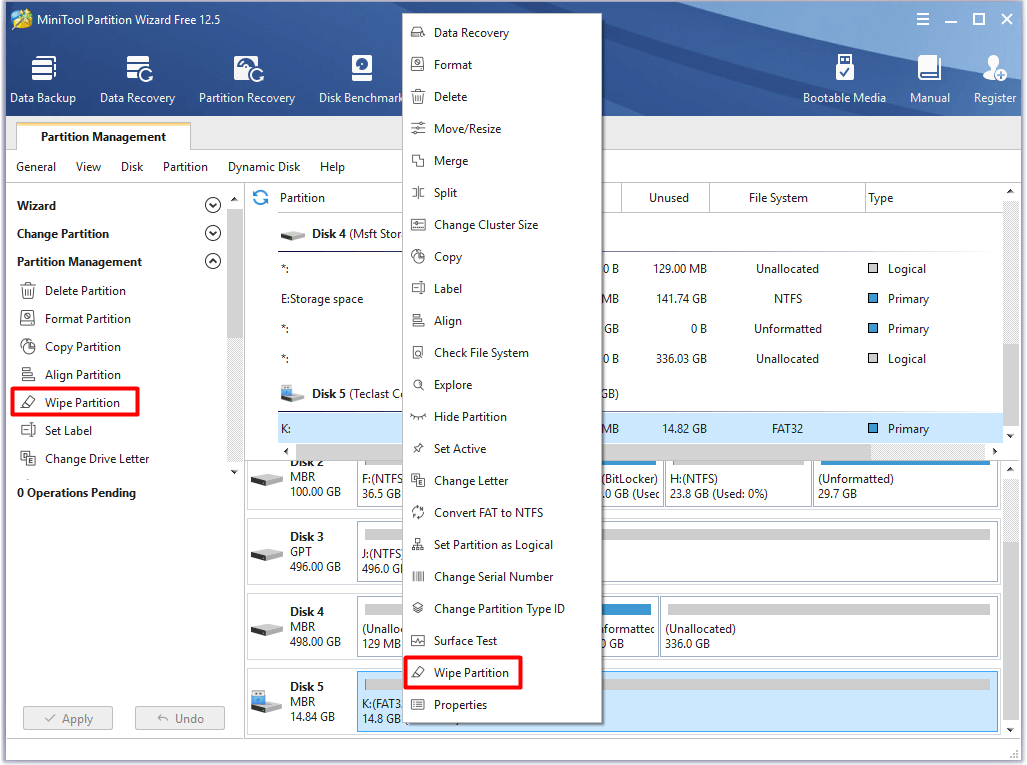
Step 1: Likewise, connect the USB or SD card to your computer.
Step 2: Run MiniTool Partition Wizard and go to its main interface.
Step 3: Click on the USB or SD card partition and click Wipe Partition in the action panel. You can also right-click on it and click the Wipe Partition option in the contextual menu.
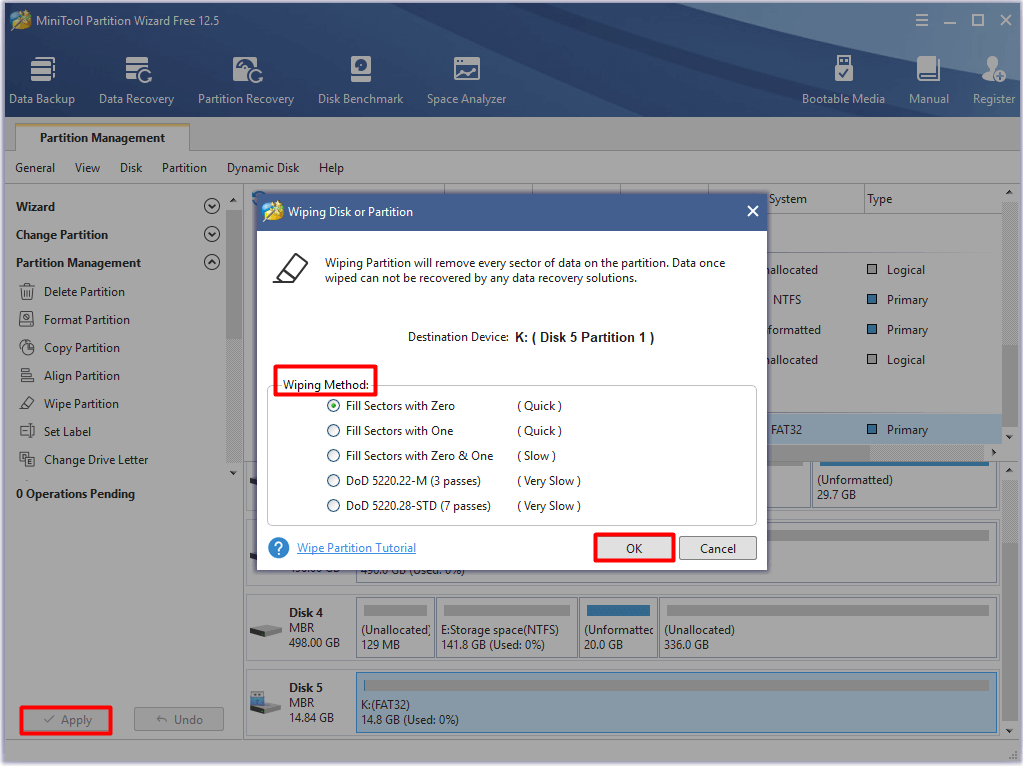
Step 4: In the elevated window, choose a wiping method from the list and click OK to save the changes. Finally, click the Apply button to execute the operation.
#3. Verification Failed
The Chrome OS recovery not working error can also occur because of the verification failure. Fortunately, the verification failed error can be solved by simply formatting the USB drive or SD card used to store the recovery media.
Plug the USB drive or SD card into your computer and then right-click on it after it appears on the desktop. Then format the drive to FAT32 by following the on-screen instruction.
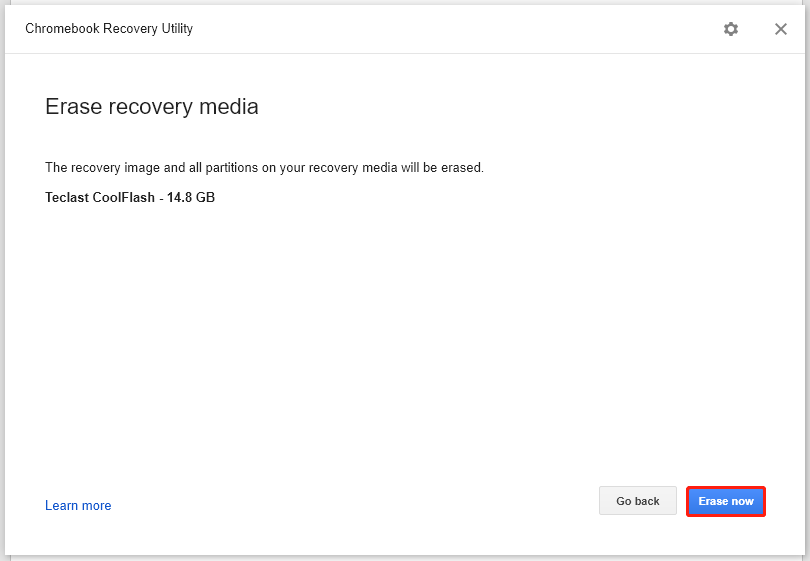
After formatting the drive, download and create the Chromebook Recovery Utility again. If this fails to work, navigate to the official website of the recovery and click Launch app. Right-click on the gear icon in the next window and click Erase recovery media.
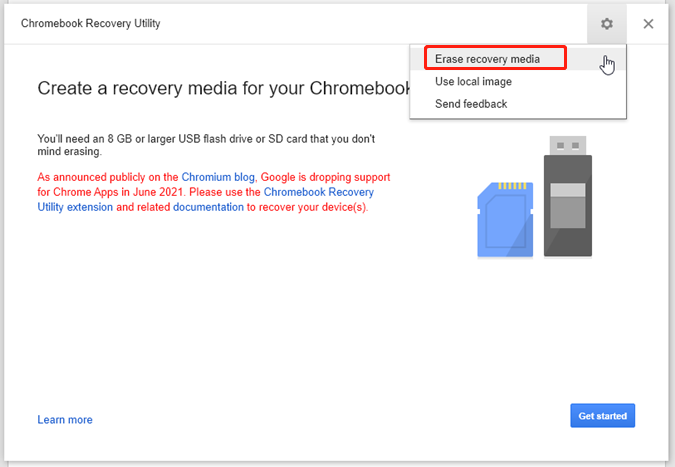
In the prompted window, choose the recovery media you’d like to erase and click Continue.

Click Erase now to begin the process. After the process ends, click Create another to get another recovery media.
![How to Copy and Paste on Chromebook? [4 Methods]](https://images.minitool.com/partitionwizard.com/images/uploads/2021/05/how-to-copy-and-paste-on-chromebook-thumbnail.jpg)
#4. An Unexpected Error Has Occurred
As implied by its error message, the “An unexpected error has occurred” issue indicates that Chrome OS has no idea of the specific reason. The main reason for the error is that the recovery drive is corrupted or fragmented.
To fix the error, you can try using a different USB drive or SD card. Alternatively, plugging the drive into another properly running PC and deleting all the files on it. After that, download another copy of Chrome OS and make a recovery media again.
#5. The Device You Inserted Does Not Contain Chrome OS
The Chromebook Recovery Utility not working error may also occur when the device you inserted does not contain Chrome OS. It means that the Chromebook can’t detect the recovery image on the USB drive or SD card or there’s no Chrome OS installed on the inserted drive.
For the first situation, try wiping the USB drive/SD card on the Windows or Mac device and then try the recovery again. For the second situation, insert a USB drive or SD with a Chrome OS installed to the device and continue the process.
#6. Please Remove All Connected Devices and Start Recovery
When you receive the “Please remove all connected device and start recovery” error message, disconnect the plugged devices on your Chromebook including printer, external mouse or keyboard, external TV or monitor, external hard drives, SD card, USB drive, and USB peripherals.
After that, try the recovery process again to see if the Chrome OS recovery not working error is solved.
#7. The Security Module on This Device Is Not Working
The security module on this device is not working error indicates that you are likely using a borrowed or loaned Chromebook from the school or work environment. These Chromebooks will block you from enabling the Developer Mode/Power wash/recovery mode by default.
What’s more, this sort of Chromebooks also affects the permission on your system. Once they are blocked, you have to contact your school or work network admin to unblock them.
Bottom Line
To sum up, this post mainly illustrates 7 frequently received issues that cause Chromebook Recovery Utility not working and their corresponding fixes. You can fix the issue by following the offered solutions.
If you encounter other issues that lead to the Chrome OS recovery not working issue, please share them with us in the comment area below. For any questions related to MiniTool Partition Wizard, please send us an email via [email protected]. We will back you soon.
Chromebook Recovery Utility Not Working FAQ
Multiple factors can cause a Chromebook not turning on. For instance, if you have a faulty power outlet or charger, the Chromebook won’t turn on. Issues with the startup routine can also lead to a Chromebook bootup failure. To resolve the issue, you can refer to this post: Chromebook Won’t Turn on? Try 5 Simple Solutions to Fix It Now!
Due to a bug or glitch, you can’t enter the Chromebook recovery mode. Certainly, other issues may also stop you from entering the recovery mode.
In most cases, the Chromebook recovery process won’t be long. On average, the process takes you about 20-40 minutes. The situation is different when you encounter some technical problems.
Though most Google Chromebooks don’t have a dedicated reset or restart button, some provide other options to allow you to reset the device. Generally speaking, you can reset a Chromebook by pressing and holding the Volume Up and Power buttons for 10 seconds.
User Comments :