Are you receiving the “BitLocker Could Not Be Enabled” error when you try to secure your Windows device? If you are, you don't need to worry about it anymore. In this post, MiniTool Partition Wizard provides the possible reasons and all the potential solutions for this error.
What Is BitLocker?
BitLocker Drive Encryption is a data protection feature that can help users resolve the threat of data theft or exposure. BitLocker and TPM often work together to provide maximum protection to users’ computers.
If you want to enable BitLocker on your PC, your hard disk must be partitioned with at least two drives: a boot drive (which contains the operating system and its support files) and a system drive (which contains the files that are needed to load Windows after the firmware has prepared the system hardware).
If the system drive and the boot drive are the same drive, a data drive is needed.
In addition to the above restriction, you also need to satisfy these requirements:
- The system drive must not be encrypted.
- The system drive must be at least 350 MB in size.
- The partition subject to encryption can’t be marked as an active partition.
No matter whether with TPM or without TPM, you can enable BitLocker. If TPM is enabled, you can save the BitLocker key into the TPM chip. Without the TPM, you must save the BitLocker key on a removable drive like a USB drive. To know more about the system requirements, you can click here to get it.
How to Turn on BitLocker Without TPM on Windows 10
About the “BitLocker Could Not Be Enabled” Error
However, some people encounter the “BitLocker Could Not Be Enabled” error when they try enabling BitLocker. When the error occurs, they can see an error message window. But different people may encounter different error messages due to the different trigger factors for this error on their PCs. Here are two typical error messages:
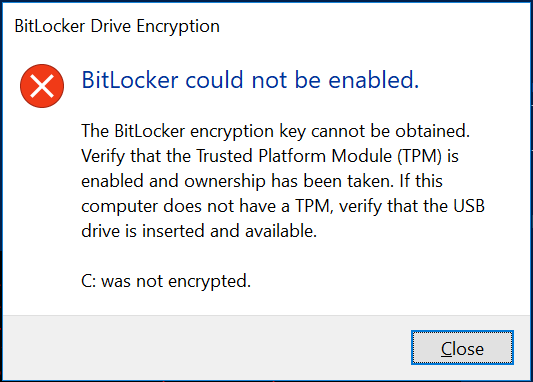
Error 1.
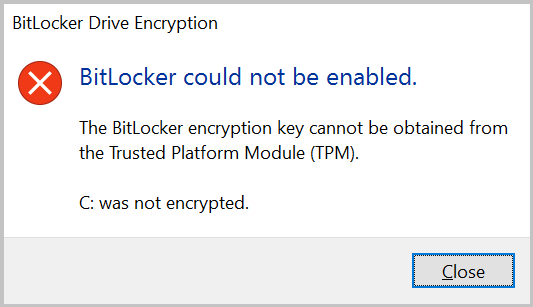
Error 2.
How to Fix the “BitLocker Could Not Be Enabled” Error?
For Error 1
Method 1. Check Your PC’s Configuration
If your computer doesn’t satisfy the system requirements for enabling BitLocker, you may be unable to enable it. So, you’d better check your computer’s configuration first once you encounter the “BitLocker Could Not Be Enabled” error. Here are the things you need to check:
- Check if the system drive is encrypted.
- Check if your disk has been partitioned to at least 2 drives.
- Check if your system drive is at least 350 MB in size.
- Check if your partition subject to encryption is marked as an active partition.
If the system drive is encrypted, you need to decrypt it first.
If your disk only has one drive, you can try resolving the “BitLocker Could Not Be Enabled” error by shrinking the existing partition to create a new data partition. However, if you want to enable BitLocker on the C drive, you’d better reinstall Windows and reallocate the partitions.
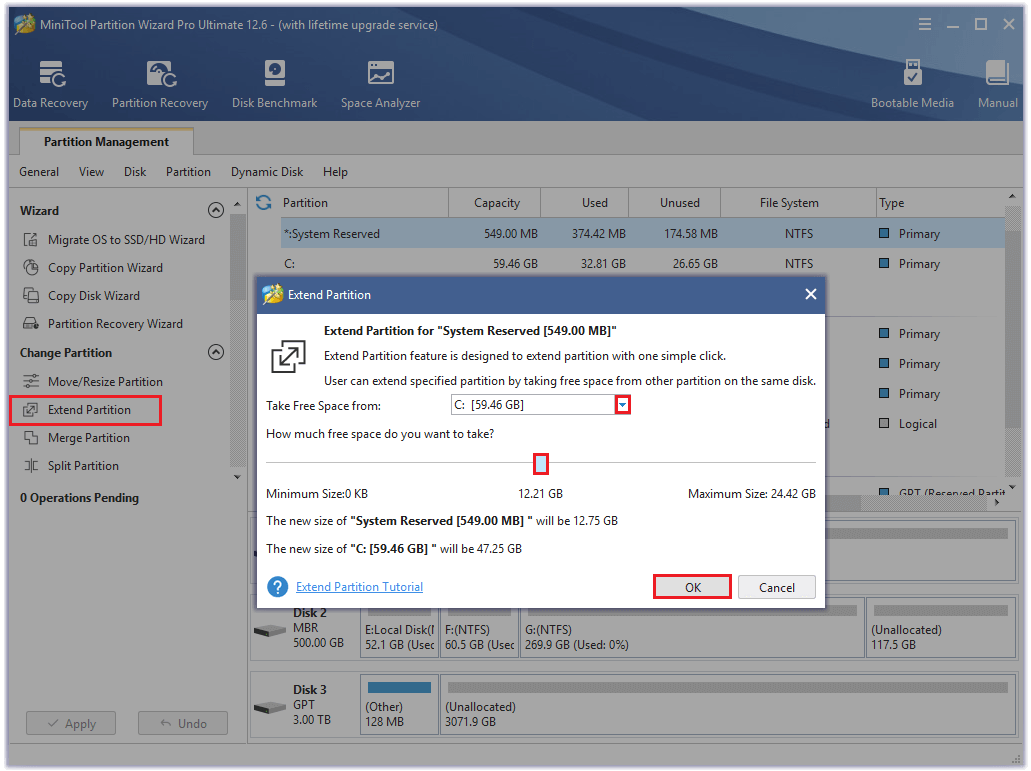
If your system drive is smaller than 350 MB, you can use MiniTool Partition Wizard’s Extend Partition feature to help you enlarge it. Here’s the guide:
MiniTool Partition Wizard DemoClick to Download100%Clean & Safe
- Download and install MiniTool Partition Wizard on your PC. Then launch it.
- Select the System Reserved partition, and then click the Extend Partition option on the left panel.
- Click the down arrow to select where to take free space from.
- Drag the blue block to decide how much space you want to take.
- Then click OK to close the Expand Partition window.
- Next, click Apply and Yes to execute the changes.
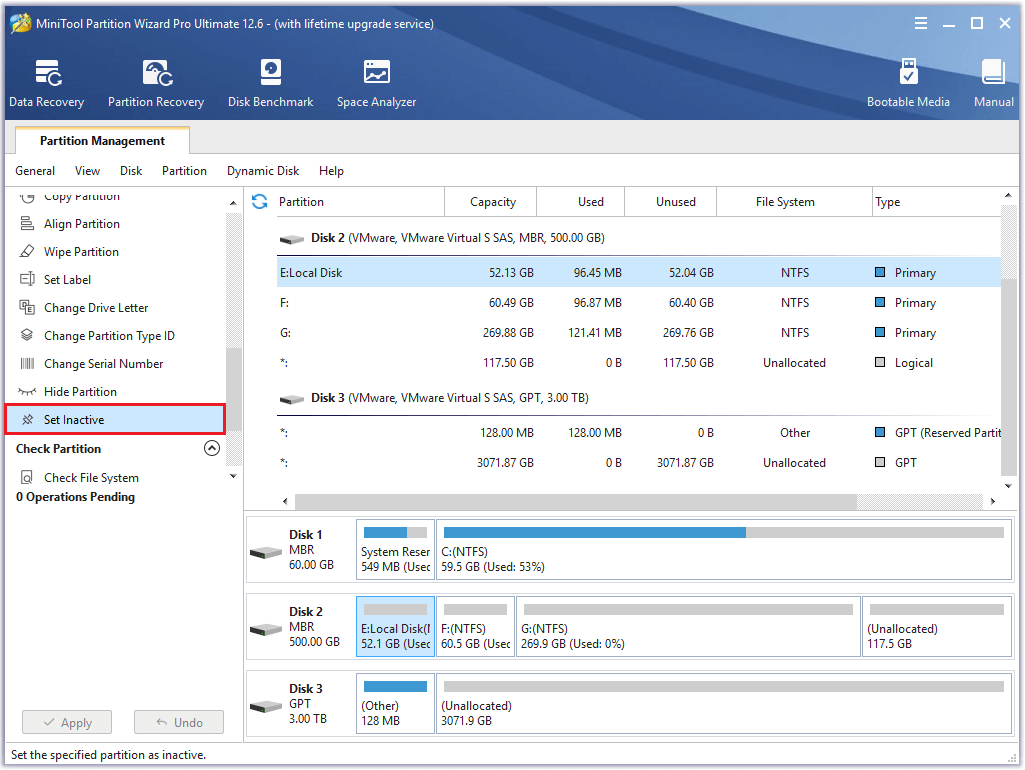
If the partition subject to encryption is marked as an active partition, you need to make it inactive first. You can also use MiniTool Partition Wizard to help you complete that. Here are the detailed steps:
The partition subject to encryption must not be the system drive. The system partition must be active. Otherwise, the PC won’t boot.
MiniTool Partition Wizard DemoClick to Download100%Clean & Safe
- Click the download button to get the MiniTool Partition Wizard package. Click the exe file to install it on your PC.
- Then launch it to its main interface.
- Select the partition that you need to make inactive.
- Select the Set Inactive option from the left panel.
- Next, click Apply and Yes to execute the pending operation.
Method 2. Check If the USB Has been Recognized
If your BIOS did not correctly enumerate the USB port with the USB drive inserted, you may also encounter the “BitLocker Could Not Be Enabled” error. In this case, you can try these ways to fix this error:
- Try a different USB port.
- Try a different USB drive.
- Check if your PC supports USB at boot time.
Method 3. Update BIOS
If your BIOS has not been updated in a long time, it may not support newer versions of BitLocker. In this case, you may encounter the “BitLocker Could Not Be Enabled” error, too. So, you can try updating your BIOS to get rid of this error.
To update the BIOS, you can refer to these posts:
- Should I Update My BIOS: Reasons & How To Check
- How to Update BIOS MSI? – Here’s Your Complete Guide
- 3 Steps to Update BIOS GIGABYTE
However, you may lose your data if you encounter a BIOS update failure. So, you’d better back up your disk before you try this fix. To make a backup, you can follow the guide in this post: How to Back up Windows to Safeguard Your Computer? Try MiniTool!

For Error 2
Fix 1. Check Your PC’s Configuration and Update BIOS
These solutions also work for Error 2.
Fix 2. Disable BitLocker and Re-Enable It Again
You can also try disabling BitLocker and re-enabling it to fix the “BitLocker Could Not Be Enabled” error. This method works for some people. To disable BitLocker, you can refer to this post: 7 Reliable Ways to Disable BitLocker Windows 10.
Fix 3. Enable the BitLocker Services
Some people report that enabling the BitLocker services helps them fix the “BitLocker Could Not Be Enabled” error successfully. You can also have a try. Here’s how to do it:
Step 1. Press the Windows and R keys simultaneously to open the Run window.
Step 2. Type “services.msc” in the box and press Enter.
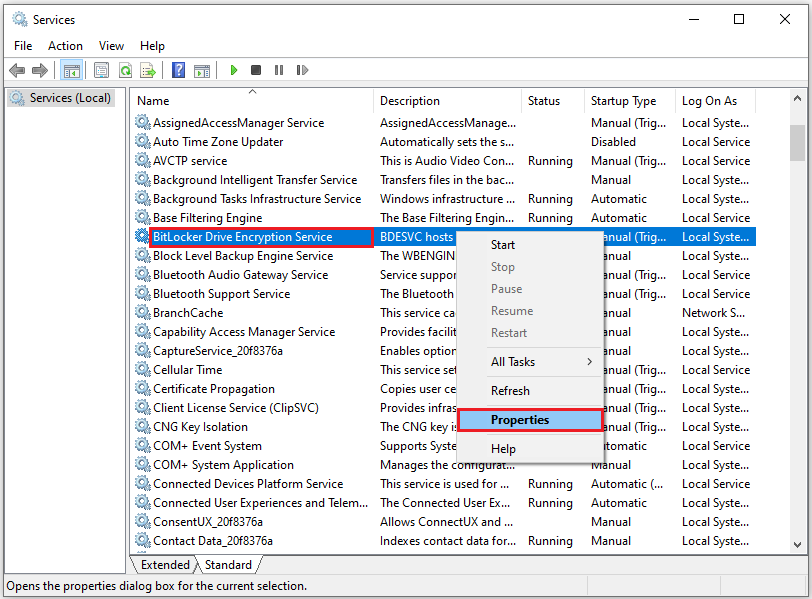
Step 3. Scroll down to find the BitLocker Drive Encryption Service entry. Then right-click it and select Properties.
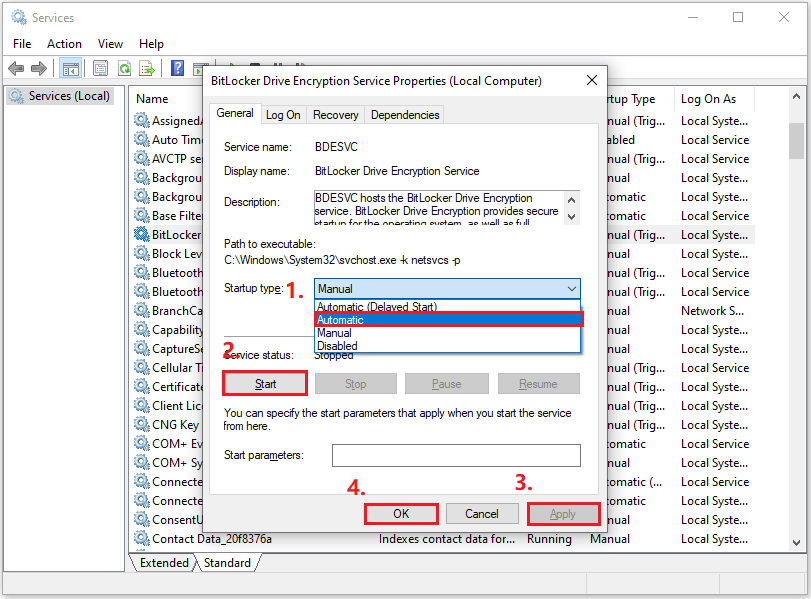
Step 4. Set the Startup type to Automatic, click Start, and then click Apply and OK to save changes.
Step 5. Check if the error has been fixed.
Fix 4. Reinstall TPM Drivers
If you encounter the “BitLocker Could Not Be Enabled” error on your PC, you can also try reinstalling TPM drivers to fix this error. Here’s the guide:
- Press the Windows and X keys simultaneously, and then select Device Manager from the menu.
- Extend the Security devices category, right-click the driver, and select Uninstall device from the menu.
- Next, click the Uninstall button in the Uninstall Device
- Once done, reboot your computer and check if the error has been resolved.

Fix 5. Clear TPM
Some Dell users report that they fix the “BitLocker Could Not Be Enabled” error successfully by clearing TPM on TPM.MSC. You can also have a try. Before doing that, please make sure you have checked all the boxes of features that are required for BitLocker to be properly enabled. Here’s the tutorial:
Step 1. Make sure you have checked all the boxes of features that are required for BitLocker to be properly enabled.
- Make sure you have enabled TPM in the BIOS.
- Open the Run window.
- Type “tpm.msc” in the box and press Enter.
- Then check if TPM is showing as active in the new window.
- Open the Run window again, type “gpedit.msc” and press Enter.
- In the Local Group Policy Editor window, navigate to Computer Configuration > Administrative Templates > Windows Components > BitLocker Drive Encryption> Operating System Drives.
- Then double-click the Require additional authentication at startup entry, set it to Enabled, and check the box next to “Allow BitLocker without a compatible TPM”.
Step 2. Clear TPM.
- Open the Run window again, type “tpm.msc” in the box, and press Enter.
- Next, click Clear TPM on the right panel.
- Once done, try enabling BitLocker again and check if the error has been resolved.
Fix 6. Convert Your Partition to GPT
TPM 2.0 is not supported in the Legacy and CSM modes of the BIOS. To make the TPM 2.0 work well, you need to set the BIOS mode to native UEFI only, disable Legacy and CSM options, and enable the secure boot feature for adding security.
To complete that, you can try converting your partition to GPT and then setting the BIOS mode to native UEFI only. Here are the detailed steps below:
Before you convert your system disk to GPT, you’d better make a backup of your whole system disk in case of any accidents after the conversion.
Step 1. Click the button below to download and install MiniTool Partition on your computer. Then launch the app to its main interface.
MiniTool Partition Wizard DemoClick to Download100%Clean & Safe
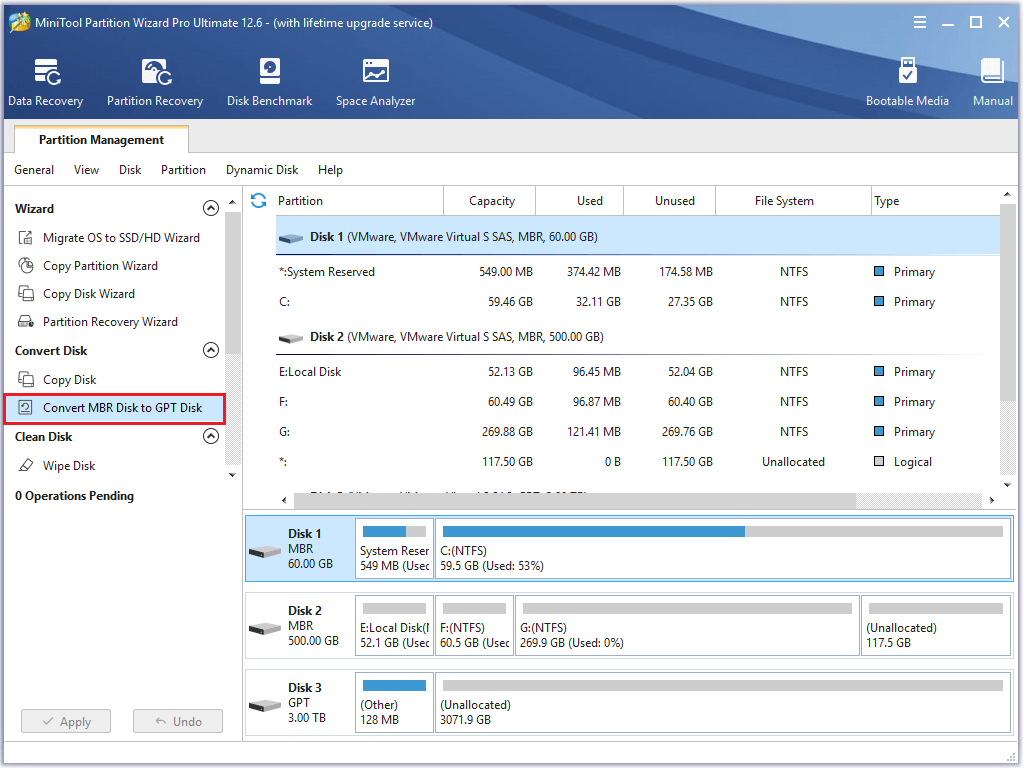
Step 2. Choose the disk that you want to convert, and then select Convert MBR Disk to GPT Disk from the left panel.
You can also right-click the disk that you want to convert from MBR to GPT, and then select the Convert MBR Disk to GPT Disk feature from the menu.
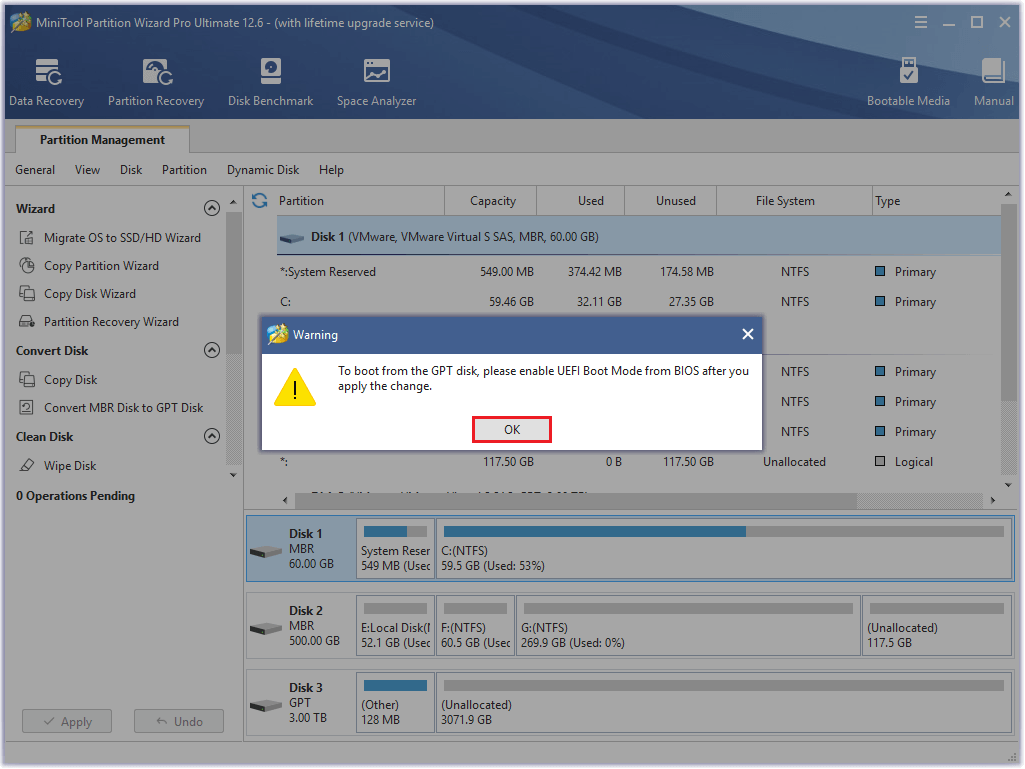
Step 3. Click OK in the warning window.
After you click OK in the first warning window, you may see a second warning window. The second window is to ask you to make sure your Windows on the disk is the 64-bit version. If your version of Windows is the 64-bit version, click Yes to continue.
Step 4. Click Apply to execute all the pending changes. Then wait for the process to complete.
Step 5. After that, click the OK button at the end of the process.
Step 6. Boot your computer to BIOS menu and switch the BIOS mode as UEFI. Reboot to normal Windows environment and try enable BitLocker again to check if the error is fixed.

Bottom Line
This post provides the possible reasons that can cause the “BitLocker Could Not Be Enabled” error and 8 fixes to help you fix it. You can try these fixes on your own to fix this error.
Do you know other methods to solve this error? Please share your ideas or experiences with us in the following comment zone. In addition, if you encounter problems while using MiniTool Partition Wizard, please contact us via [email protected]. We will get back to you as soon as possible.
About The Author

Position: Columnist
Charlotte is a technology columnist with a strong focus on the Windows operating system, specializing in disk management, backup, and data recovery. She is passionate about analyzing computer errors, identifying root causes, and delivering practical solutions. In her free time, she stays updated on the latest developments in computer systems and hardware while continuously learning new technologies to broaden her expertise. Her writing style is clear and easy to understand, making complex technical topics accessible even to users with limited computer knowledge.
User Comments :