Windows USB Troubleshooter can help you detect and solve common USB issues. If you want to give it a try, download it on your computer and then run it. In this post, Partition Magic reveals the detailed steps for doing that.
The USB flash drive is widely used in daily life. It can be used to store data, transfer data from one computer to another, back up data, create installation media, update BIOS, etc. In a word, it can meet the different demands of users.
However, it sometimes can prompt errors. For instance, you may receive errors like the last USB device malfunctioned, USB drive not recognizing in Windows 11, can’t delete partition on SD card/USB flash drive, and so on while using USB drives.
If you are stuck on these errors, you may get confused. Fortunately, you can solve them by taking some measures or using a USB troubleshooting utility. Here comes the need for Microsoft Windows USB Troubleshooter. What is Windows USB Troubleshooter and what can it do? The section below will show you the answer.
Microsoft Windows USB Troubleshooter
As its name indicates, Microsoft Windows USB Troubleshooter is an official USB troubleshooting app if yours is missing. It helps you fix common USB issues. It has been proven to be true that the Windows USB Troubleshooter can check and fix the issues below:
- USB class filter was not recognized.
- USB device is not recognized.
- USB printer device is not printing.
- USB storage device can’t be ejected.
- Windows Update is configured to never update drivers.
Are you experiencing these issues? If so, apply Microsoft USB Troubleshooter to repair them.
You might also be interested in this: Windows Repair (All In One): Download, Install, Uninstall Guide
Download Windows USB Troubleshooter
If you want to use Windows USB Troubleshooter to fix USB errors, download it to your computer first. Where to download it? As it is not available on Microsoft’s official website now, you need to get it from third-party websites.
In this section, we show you where to download Windows USB Troubleshooter and how to run it. Though Microsoft Windows USB Troubleshooter is safe to use for everyone, you’d better create a system restore point before proceeding.
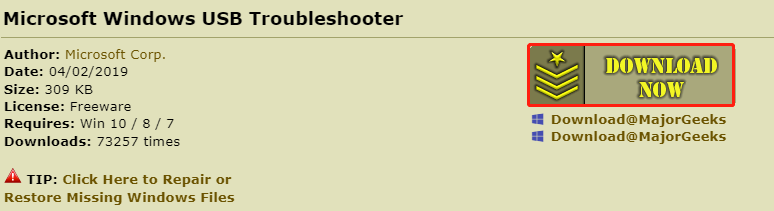
Step 1: Go to the troubleshooter download page of Majorgeek.com.
Step 2: Click on the DOWNLOAD NOW button to initialize the download process.
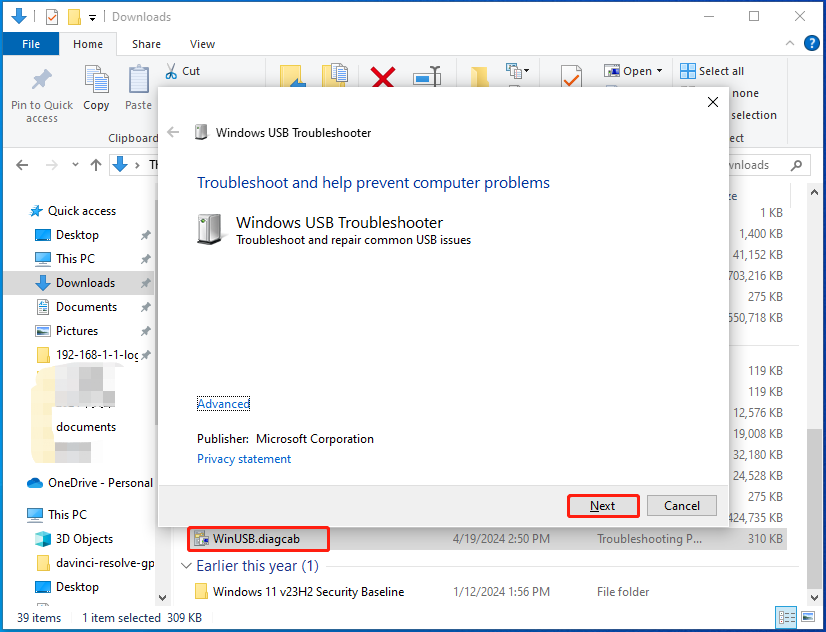
Step 3: The downloaded setup file is called WinUSB.diagcab. To run the Windows USB Troubleshooter, double-click on the WinUSB.diagcab file and click Next in the pop-up window. Please remember to connect your USB drive to the PC.
Step 4: After that, the troubleshooter will scan and fix your USB drive.
Step 5: Follow the on-screen instructions to complete the operation.
If Windows USB Troubleshooter fails to work, try using other tools to detect and fix USB issues. For instance, you can use utilities like MiniTool Partition Wizard and CHKDSK to troubleshoot issues with USB drives. They are capable of fixing issues like there’s a problem with this drive, error checking USB drive is stuck, and other common USB drive issues.
MiniTool Partition Wizard FreeClick to Download100%Clean & Safe
You may also be interested in:
How to Fix If PC Turns Off When USB Is Plugged In?
Top 4 Fastest USB Flash Drives [The Latest Update]
Top 3 Fixes for Solving USB 3.0 Ports Not Working Issue
How to Stop PC from Making Random USB Noises? 6 Ways
How to Fix an Unformattable and Unusable USB Drive? Solved
Conclusion
From this post, you can learn the basic information and the available source of Microsoft Windows USB Troubleshooter. If you encounter USB issues, get the troubleshooter to resolve them.
User Comments :