Many users report that they are vexed by the Mutex Level Number Violation BSOD error on Windows 10/11. What causes the MUTEX_LEVEL_NUMBER_VIOLATION BSOD? How to fix it? Now, let’s explore the answers together with MiniTool Partition Wizard.
BSOD (blue screen of death) is one of the most common crashing errors on Windows PCs, which often causes the computer to suddenly shut down, restart, or even completely unresponsive. This problem is also accompanied by many different error codes, such as WdFilter.sys, USBXHCI.sys, and the one discussed here.
What causes the Mutex Level Number Violation blue screen of death error? According to a survey, the BSOD error is often related to corrupted system files. Besides, other factors like outdated device drivers, third-party software interference, temporary glitches, and even broken Windows OS are also responsible for the error.
Solution 1. Run SFC and DISM Scans
If some system files related to the USB driver get corrupted, the MUTEX_LEVEL_NUMBER_VIOLATION BSOD can occur. So, it’s recommended that you perform a SFC and DISM scan to repair them.
Step 1. Type cmd in the search box, and then right-click Command Prompt and select Run as administrator option. Then click on Yes.
Step 2. Type the sfc /scannow command in the elevated command prompt and hit Enter. Then wait for the SFC scan to complete.
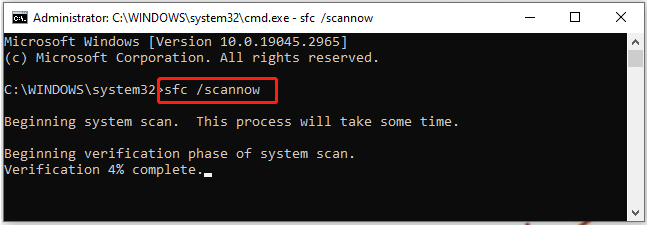
Step 3. If no corrupted system files were found, continue to run the following commands.
dism.exe /online /cleanup-image /scanhealth
dism.exe /online /cleanup-image /restorehealth
dism.exe /online /cleanup-image /startcomponentcleanup
Solution 2. Check Your Device Drivers
Sometimes outdated or incompatible device drivers can trigger the BSOD error Mutex Level Number Violation. Here you can follow the guide below to update or reinstall the drivers on Windows 10/11.
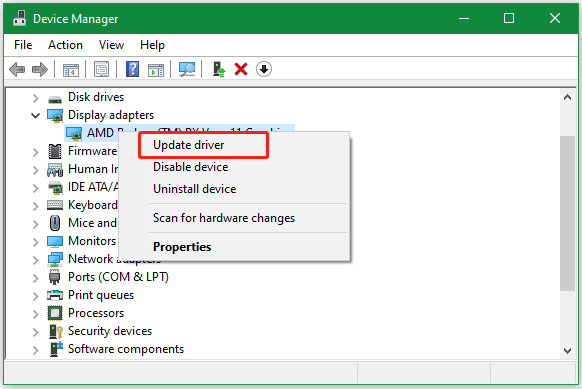
Step 1. Right-click the Start menu and select Device Manager from the context menu.
Step 2. Expand the Display adapters category, and then right-click the GPU driver and select Update driver.
Step 3. Select the Search automatically for drivers option, and wait for the system to find an updated driver, and follow the on-screen prompts to complete this update. If the Mutex Level Number Violation blue screen of death persists, proceed with the following steps.

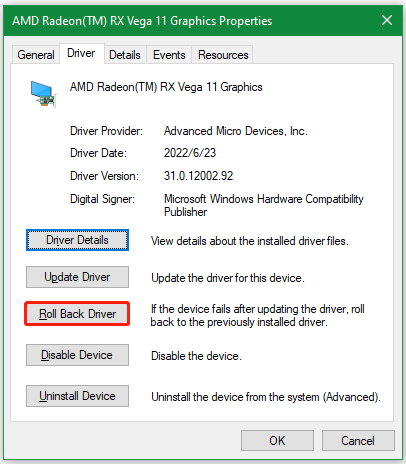
Step 4. Right-click the driver again and select Properties. Then you can click on Roll Back Driver or Uninstall Device in the pop-up window. This will revert your current driver to its previous version or reinstall a new driver.
Solution 3. Perform a Clean Boot
Some users reported that the Mutex Level Number Violation BSOD issue can be caused by conflicting software. In this case, you can try performing a clean boot in which your computer will boot with a minimal set of drivers and startup programs.
If the BSOD error occurs in a clean boot, it may indicate that one of your programs or services was causing the error. To rule it out, you can repeat the clean boot process while re-enabling one of them until the error occurs again. Once you determine the conflicting software, uninstall it from Windows 10/11.
Solution 4. Uninstall the Recently Installed Updates
If the BSOD error Mutex Level Number Violation just occurs after installing some new Windows updates, you can try uninstalling them. Here’s how to uninstall Windows 11 updates:
Step 1. Press the Win + I keys to open the Settings window and select Windows Update in the left panel.
Step 2. Click Update history in the right window to view the update history of your Windows 11 computer.
Step 3. Scroll down the list of options to the Uninstall updates section, and then select the update you recently installed and click on Uninstall.

Solution 5. Perform a System Restore
Besides, you can try performing a system restore. This can help you undo the recently changed settings and restore your system to an earlier state where the Mutex Level Number Violation blue screen of death doesn’t occur.
Step 1. Press the Win + R keys to open the Run dialog box, and then type rstrui.exe in it and press Enter.
Step 2. The System Restores window will pop up and click Next to continue.
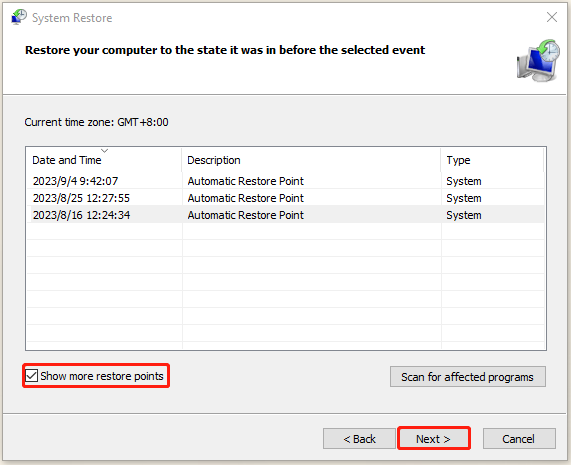
Step 3. In the list of all system restore points, select the Restore point that you want to use and click the Next button. Here you can tick the checkbox next to Show more restore points.
Step 4. Then confirm your restore point by clicking the Finish button. After that, your computer should be restored to an earlier state, and the blue screen error should be fixed.
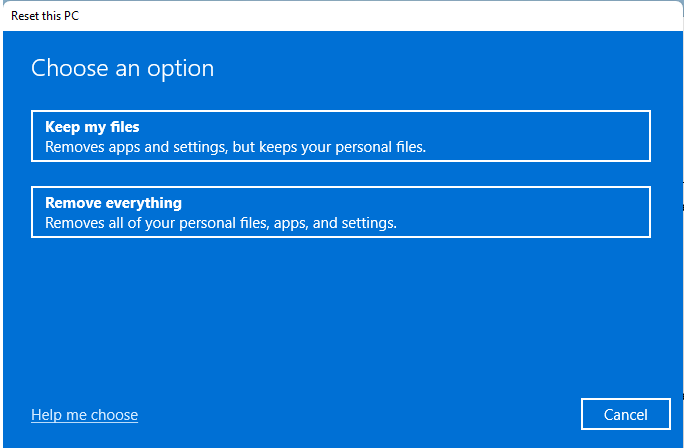
Solution 6. Reset This PC
If none of the above methods can fix the BSOD error, you may consider resetting this PC to its default settings. However, this process has a risk of deleting all data on your system disk. So, we strongly recommend you back up them beforehand. MiniTool Partition Wizard is a powerful data backup utility that can clone hard drive, migrate OS to SSD/HD, and copy a partition to another drive. Here you may have a try.
MiniTool Partition Wizard DemoClick to Download100%Clean & Safe
How to fix Mutex Level Number Violation BSOD? We have introduced 6 feasible solutions in the post. If you have any other fixes or suggestions, please share them with us in the following comment zone.
User Comments :