What Causes Adobe Error Code 182?
What causes Adobe error code 182? After searching for this error on the internet, I found that these reasons can mainly cause the error code 182:
- The installation folder path is too long, nested too deep, or in a restricted directory.
- Your system lacks the necessary permissions.
- The Windows operating system is outdated.
- Strict user account controls (e.g., corporate or school PCs),
- Modified default installation locations
- Installers running from external/synced folders (e.g., OneDrive or network drives).
- The installation language isn’t English (North America) or English(international).
MiniTool Partition Wizard FreeClick to Download100%Clean & Safe
How to Fix Adobe Error Code 182?
How to fix Adobe installation error code 182? In this section, I summarize some useful solutions. You can try them one by one until you fix the error successfully.
Solution 1. Change The Language During Installation
Some people report that they successfully fix Adobe installation error code 182 by changing the Language to English (North America) or English (International) during installation. You can also have a try. If this solution doesn’t work, you can continue and try the following solutions.
Solution 2. Rename the Setup Folder & Use a Simple Path
The Adobe Setup Installer’s folder name and structure can impact the installation process and lead to Adobe error code 182. In this case, you can try to rename the folder and place it in a root-level location to fix the error. Here’s the way:
Step 1. Press the Win + E keys simultaneously to open the File Explorer window.
Step 2. Navigate to the location where you saved the Adobe installation files.
Step 3. Right-click the Adobe installation folder, and select Cut.
Step 4. Navigate to a top-level directory, such as the Desktop. Paste it here and rename the folder to something straightforward like “Adobe_Install.”
Step 5. Open the folder and double-click the setup file to start the installation process.
Step 6. Follow the on-screen guide to complete the installation.
Some people report that they fix the Adobe error code 182 successfully by compressing and re-extracting the Setup folder. You can also have a try. Here’s how to do that:
- Locate and move the Adobe installation folder to your desktop.
- Right-click it and select Add to Archive to create a compressed version.
- Keep the default settings in the compression window and click OK.
- After that, right-click the compressed file and select Extract to “Adobe” to decompress it. (The name in the “” may be different according to your Adobe program.)
- Once done, open the folder and run the Setup file, and check if the error is fixed.
Solution 3. Update Windows
Sometimes, the outdated Windows may also cause you to fail to install Adobe and encounter the error code 182. In this case, you can try updating Windows to fix the error. Here’s the way:
- Press the Win + I keys simultaneously to open the Settings window.
- Go to Update & Security > Windows Update.
- Then, click the Check for Update button.
- If there are available updates, update them.
Once you update your Windows to the latest version, you can try installing Adobe again and check if the error has been resolved.
Solution 4. Run Adobe Setup as Administrator
If your system lacks the necessary permissions, you can run into the Adobe error code 182 as well. In this situation, you can try running Adobe Setup as administrator to fix the issue. Here are the detailed steps:
- Open the File Explorer, and go to the location of the Adobe Setup file.
- Right-click the Adobe Setup file and select Run as administrator.
- Then, follow the on-screen instructions to install the Adobe program and check if the error has been resolved.

Solution 5. Use Creative Cloud Cleaner for a Complete Uninstall
If you have already installed a different version of some Adobe app, you can encounter the Adobe error code 182 easily. In this situation, you can use Adobe Creative Cleaner for a complete uninstall and then reinstall it to check if the error has been resolved.
Here’s how to use Adobe Creative Cleaner:
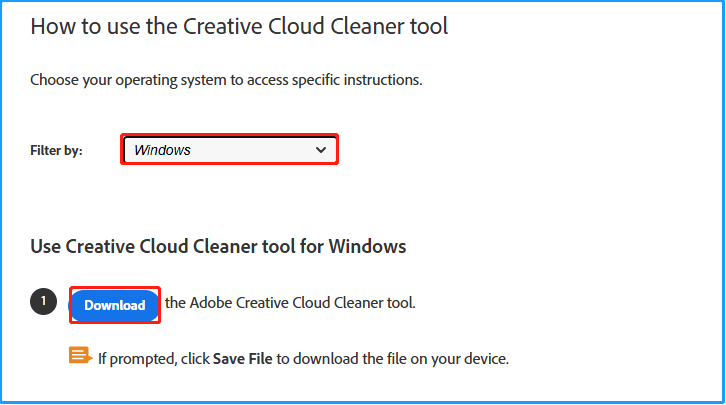
Step 1. Open your browser, and go to the Adobe Creative Cloud Cleaner official website.
Step 2. Go to the How to use the Creative Cloud Cleaner tool section, select Windows from the drop-down menu of Filter by, and click Download.
Step 3. Right-click the download file and select Run as administrator.
Step 4. Then, choose your language, type “e” for English, “j” for Japanese.
Step 5. After that, you can review the Adobe End-User License Agreement. Type “y” and press Enter to accept it and move on.
Step 6. Then, type “1” and press Enter to clean up all Adobe apps from your PC.
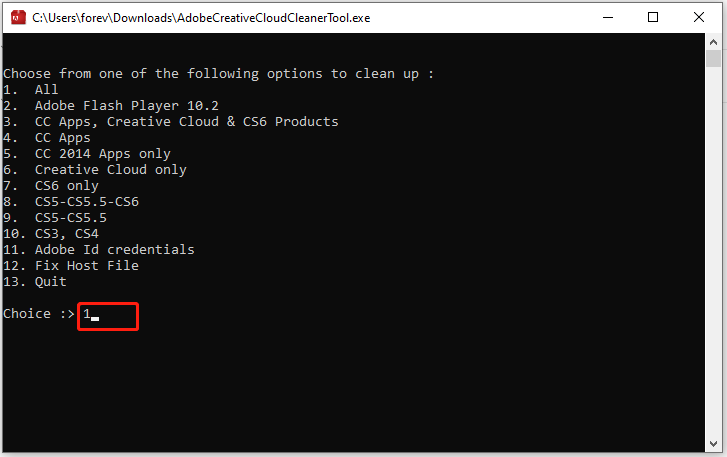
Step 7. Next, type the number of Clean All and press Enter.
Step 8. After that, type “y” and press Enter to continue.
Step 9. Once done, restart your computer and try installing Adobe software.
Wrapping Things Up
How to fix Adobe error code 182? Now, you may already know the answer. This post examines the potential causes of Adobe error code 182 and offers several effective solutions to resolve it.
About The Author

Position: Columnist
Charlotte is a technology columnist with a strong focus on the Windows operating system, specializing in disk management, backup, and data recovery. She is passionate about analyzing computer errors, identifying root causes, and delivering practical solutions. In her free time, she stays updated on the latest developments in computer systems and hardware while continuously learning new technologies to broaden her expertise. Her writing style is clear and easy to understand, making complex technical topics accessible even to users with limited computer knowledge.
User Comments :