Are you looking for effective ways for this error 0x80071aa8 - 0x2000a the installation failed in the SAFE_OS phase? If yes, you are at the right place. This post from MiniTool Partition Wizard provides several feasible ways for this error.
While upgrading your Windows operating system or while installing an update, you encountered the 0x80071AA8 – 0x2000A The installation failed in the SAFE_OS phase error. Its full error message is:
Error 0x80071AA8 – 0x2000A, The installation failed in the SAFE_OS phase with an error during PREPARE_FIRST_BOOT operation
This is an annoying error and prevents you from updating Windows. How to fix this error? Please keep reading.
![How to Fix BSOD Error Stop Code 0xC0000218? [4 Ways]](https://images.minitool.com/partitionwizard.com/images/uploads/2023/08/0xc0000218-thumbnail.png)
Fix 1. Run Windows Update Troubleshooter
You can try running Windows Troubleshooter to fix the error 0x80071aa8 – 0x2000a. How to run this tool? The tutorial is below.
Step 1: Press Windows + X and then choose the Settings option.
Step 2: Click Update & security and then Troubleshoot.
Step 3: Locate Windows Update on the right side, click it, and then click Run the troubleshooter.

Fix 2. Reset Windows Update Components
The Windows Update component is an important part of Windows Update. One way to fix Windows Update issues is to reset Windows Update components. The steps are as follows:
Step 1: Press Win + R, input cmd, and press Ctrl + Shift + Enter to open Command Prompt as administrator.
Step 2: Input the following commands and press Enter after each to stop the involved services.
- net stop wuauserv
- net stop cryptSvc
- net stop bits
- net stop msiserver
Step 3: Then, execute the following commands to reset SoftwareDistribution and Cartroot2 folders.
- ren C:\Windows\SoftwareDistribution SoftwareDistribution.old
- ren C:\Windows\System32\catroot2 Catroot2.old
Step 4: Finally, restart these services by running the command below:
- net start wuauserv
- net start cryptSvc
- net start bits
- net start msiserver
Once done, restart your computer, and then try updating again to see if the error code gets solved.
![[Full Guide] GPT Formatted Disk Legacy Boot Not Supported](https://images.minitool.com/partitionwizard.com/images/uploads/2023/08/gpt-formatted-disk-legacy-boot-not-supported-thumbnail.png)
Fix 3. Temporarily Disable Antivirus Software
Sometimes antivirus software prevents Windows from installing the latest updates. One way to check for this is to temporarily disable your antivirus software. If that doesn’t work, turn on your antivirus software now.
Fix 4. Change BIOS Mode from Legacy to UEFI
An effective solution to this problem is to enable UEFI mode in the system BIOS. For this, your BIOS should support UEFI mode. You can check the system’s BIOS Mode in System Information. To launch it, click Windows Search and enter System Information. After that, select the System Information app from the search results.
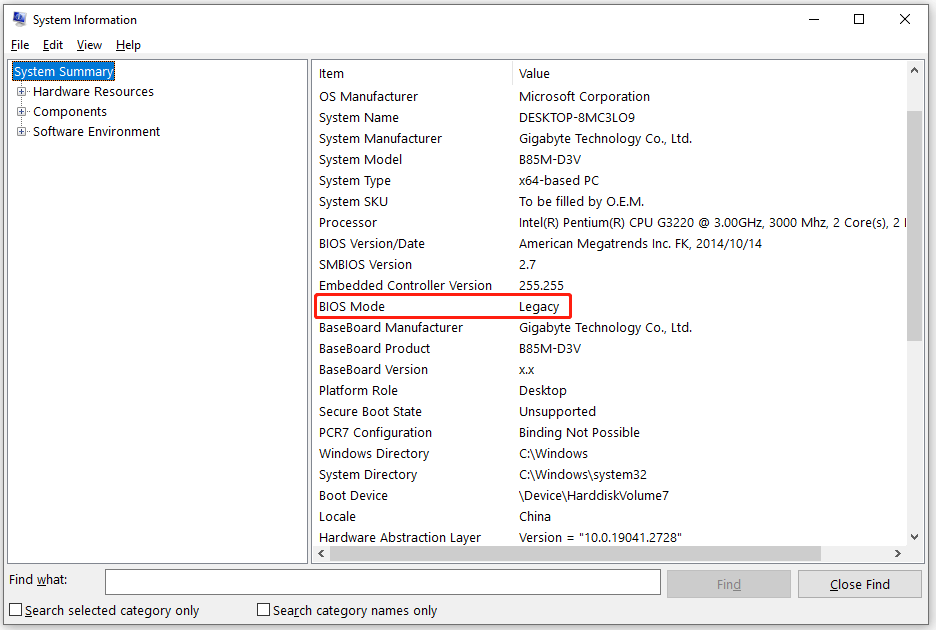
If your BIOS mode is set to Legacy, change it to UEFI and check if that resolves the issue. If it shows both Legacy and UEFI, your system supports both Legacy and UEFI BIOS modes. Now you can switch from Legacy to UEFI BIOS mode.
To change from Legacy to UEFI, you can convert the MBR disk to a GPT disk to convince your computer to use the UEFI menu.
So, how to convert MBR to GPT without data loss? You can use MiniTool Partition Wizard. It is an all-in-one partition manager, which can help you move/resize partitions, extend partitions, convert NTFS to FAT, migrate OS to SSD/HD, copy disks/partitions, etc.
Considering that you are converting the system disk, it is best to make the following preparations in advance to prevent accidents after the conversion:
- Create a bootable USB drive with MiniTool Partition Wizard.
- Create system images or backup entire system disks.
Then you can follow the steps below to convert the MBR disk to GPT disk with MiniTool Partition Wizard Bootable Edition.
MiniTool Partition Wizard DemoClick to Download100%Clean & Safe
Step 1: Download and install this software on your PC. Then connect the USB bootable USB drive to the computer.
Step 2: Press a specific key to enter BIOS. And set the USB drive as the first boot device.
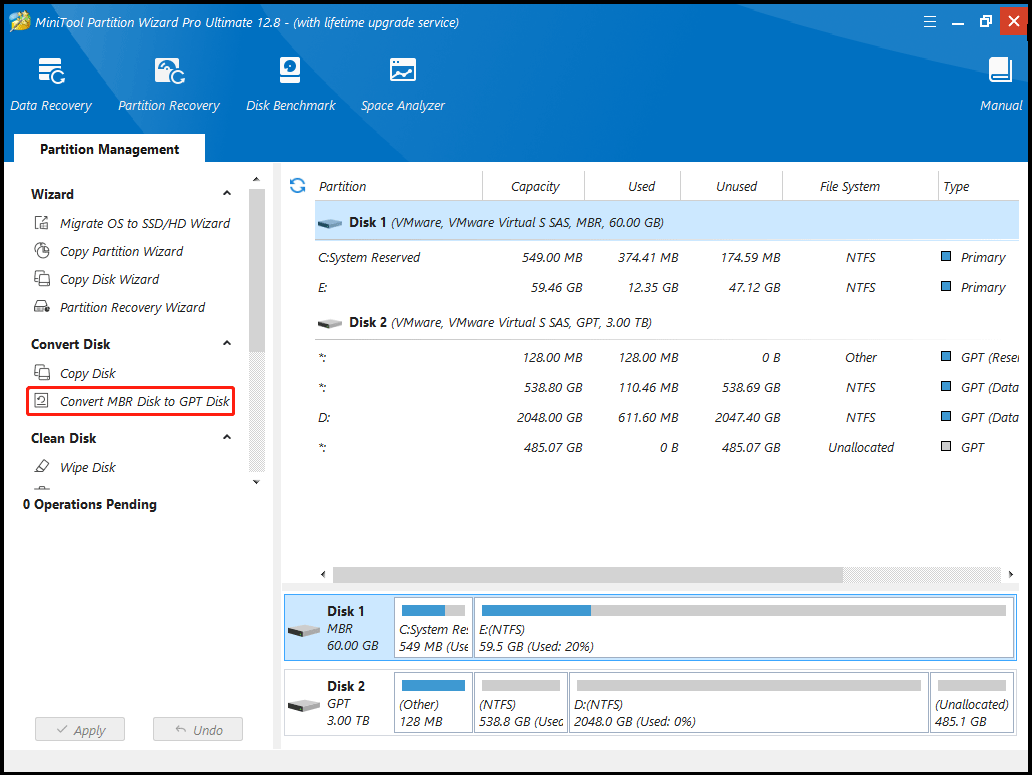
Step 3: In the main interface of MiniTool Partition Wizard, select the target disk and choose Convert GPT Disk to MBR Disk from the left side panel.
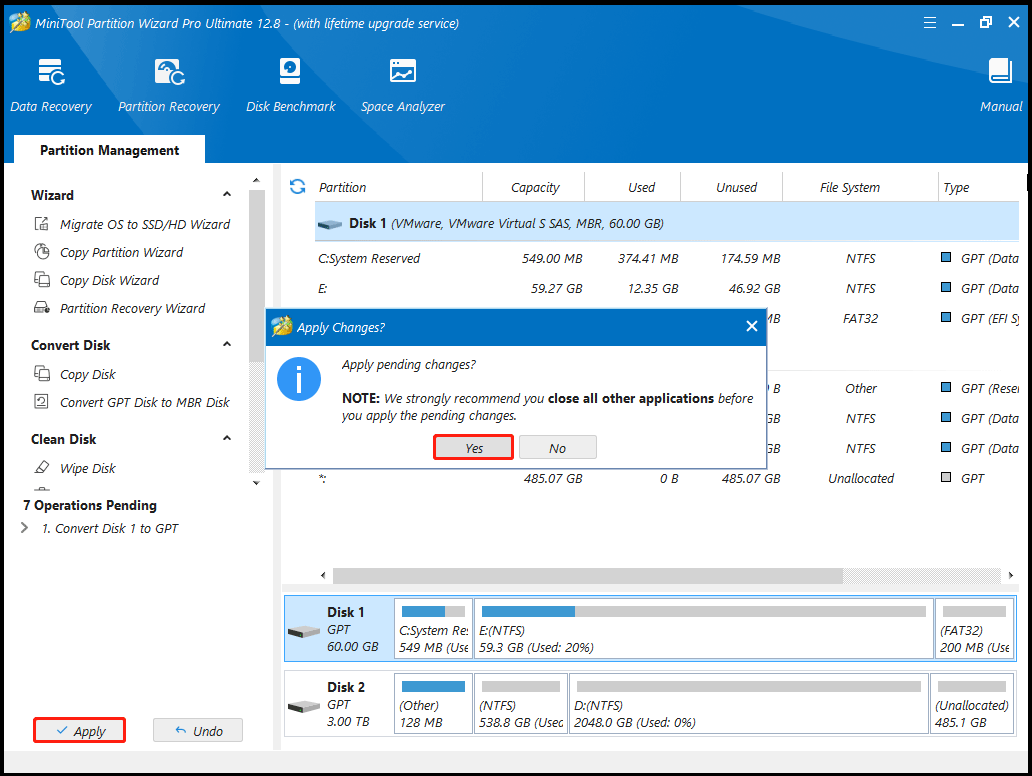
Step 4: This interface is the preview of the conversion result. Click on Apply to execute the change.
Step 5: Tap the Yes button to confirm the conversion. Wait for the completion of disk conversion. Then click on the OK button finally.
If none of the above solutions fixed the error, a clean install of the Windows operating system can help. Note that a clean install will erase everything on the drive where Windows is installed. Therefore, it is best to back up your data before performing a clean install.
About The Author

Position: Columnist
Vega enjoys helping people with computer problems, including disk management, data recovery, data backup, and more. She is constantly expanding her knowledge in related fields. And she will continue to bring more easy-to-understand professional articles to help people solve various problems on the PC.
User Comments :