Many users report that their Windows won't boot with Secure Boot enabled. To solve this issue, you can update the BIOS, check system files, and convert the MBR disk to GPT using MiniTool Partition Wizard.
What Is Secure Boot?
Secure Boot is a security feature built into modern UEFI firmware. It helps prevent malware, rootkits, and unauthorized operating systems from loading during startup.
When Secure Boot is enabled, the firmware checks whether bootloaders, drivers, and operating system components are digitally signed and trusted.
If Windows or the boot environment doesn’t meet Secure Boot requirements, the computer may fail to boot.
Why Won’t Windows Boot with Secure Boot Enabled?
Here are the most common reasons.
1. The System Disk Uses MBR Instead of GPT
Secure Boot requires UEFI firmware mode. Although UEFI can technically boot some MBR configurations, Secure Boot works properly only when Windows is installed in UEFI mode on a GPT disk.
If your system disk is MBR, enabling Secure Boot may prevent Windows from starting.
2. Windows Was Installed in Legacy BIOS Mode
Many older Windows installations use Legacy BIOS mode. If Secure Boot is enabled while the system is still configured for Legacy mode, Windows may become unbootable.
3. Corrupted EFI Boot Files
The EFI System Partition (ESP) contains files required for UEFI startup. If these files become corrupted, Secure Boot may block startup.
4. Damaged Boot Configuration Data (BCD)
The BCD store contains startup information. If the BCD becomes corrupted, Windows may fail to boot after Secure Boot verification.
5. Missing Secure Boot Keys
Some motherboard firmware allows users to delete or modify Secure Boot keys. If Platform Keys (PK), Key Exchange Keys (KEK), or database keys (db) are missing, Secure Boot may malfunction.
6. Outdated BIOS/UEFI Firmware
Older BIOS versions sometimes contain Secure Boot bugs. Updating firmware can resolve compatibility problems.
To identify the cause, first check:
| Check Item | Required for Secure Boot |
| BIOS Mode | UEFI |
| Disk Type | GPT |
| TPM | Recommended |
Now, try the following methods to fix boot failure after enabling Secure Boot.
Method 1. Restore BIOS Default Settings
Incorrect firmware settings often trigger boot failures. If you can successfully enter your BIOS menu screen, follow the steps to restore BIOS default settings:
- Restart the PC.
- Press the BIOS key to enter the BIOS menu.
- Locate Load Optimized Defaults or Load Setup Defaults.
- Press F10 to save changes.
- Restart the computer.
If Windows boots successfully, re-enable Secure Boot afterward.
If your PC won’t let you enter the BIOS menu after turning on Secure Boot, try the steps below:
- Shut down the PC, turn off the power supply switch on the back, and unplug the power cord from the wall.
- Open your computer’s side case panel to expose the motherboard.
- Locate the CMOS battery.
- Use a small flathead screwdriver or your fingernail to gently press the metal release tab on the slot. The battery will pop out.
- Leave the battery out for minutes. This cuts all temporary power to the BIOS chip, forcing it to completely forget all custom settings and revert to factory defaults.
- Pop the battery back into place, slide the case cover back on, plug the power cord back in, and turn on your PC.
Method 2. Verify UEFI Mode Is Enabled
When you encounter the issue, try to verify if the UEFI mode is enabled.
- Enter BIOS.
- Locate the Boot section.
- Find Boot Mode or CSM Support.
- Disable Legacy Boot or CSM.
- Enable UEFI Mode.
- Save settings.
Now try booting again.
Method 3. Convert MBR to GPT Without Losing Data
As mentioned above, your disk should be a GPT disk when Secure Boot is enabled.
To check whether your disk uses GPT:
- Press Win + X.
- Select Disk Management.
- Right-click the system disk.
- Choose Properties.
- Open the Volumes tab.
- Check Partition Style.
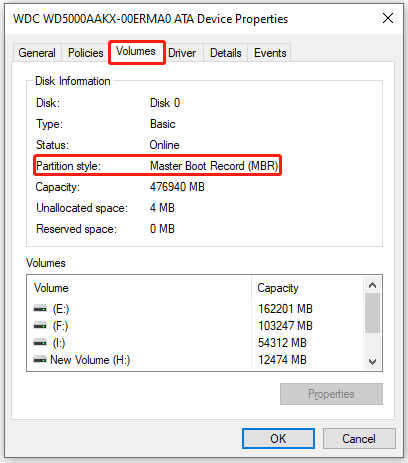
If your system disk uses MBR, converting it to GPT is usually the most effective fix.
MiniTool Partition Wizard allows you to convert the system disk from MBR to GPT without deleting partitions.
Its Bootable Edition can help you complete various partition operations when Windows fails to start, including converting MBR to GPT, recovering lost/deleted partitions, rebuilding MBR, cloning disk/partition, etc.
For the problem that the system cannot boot, you should prepare a working computer and a USB in advance, and then download MiniTool Partition Wizard.
MiniTool Partition Wizard DemoClick to Download100%Clean & Safe
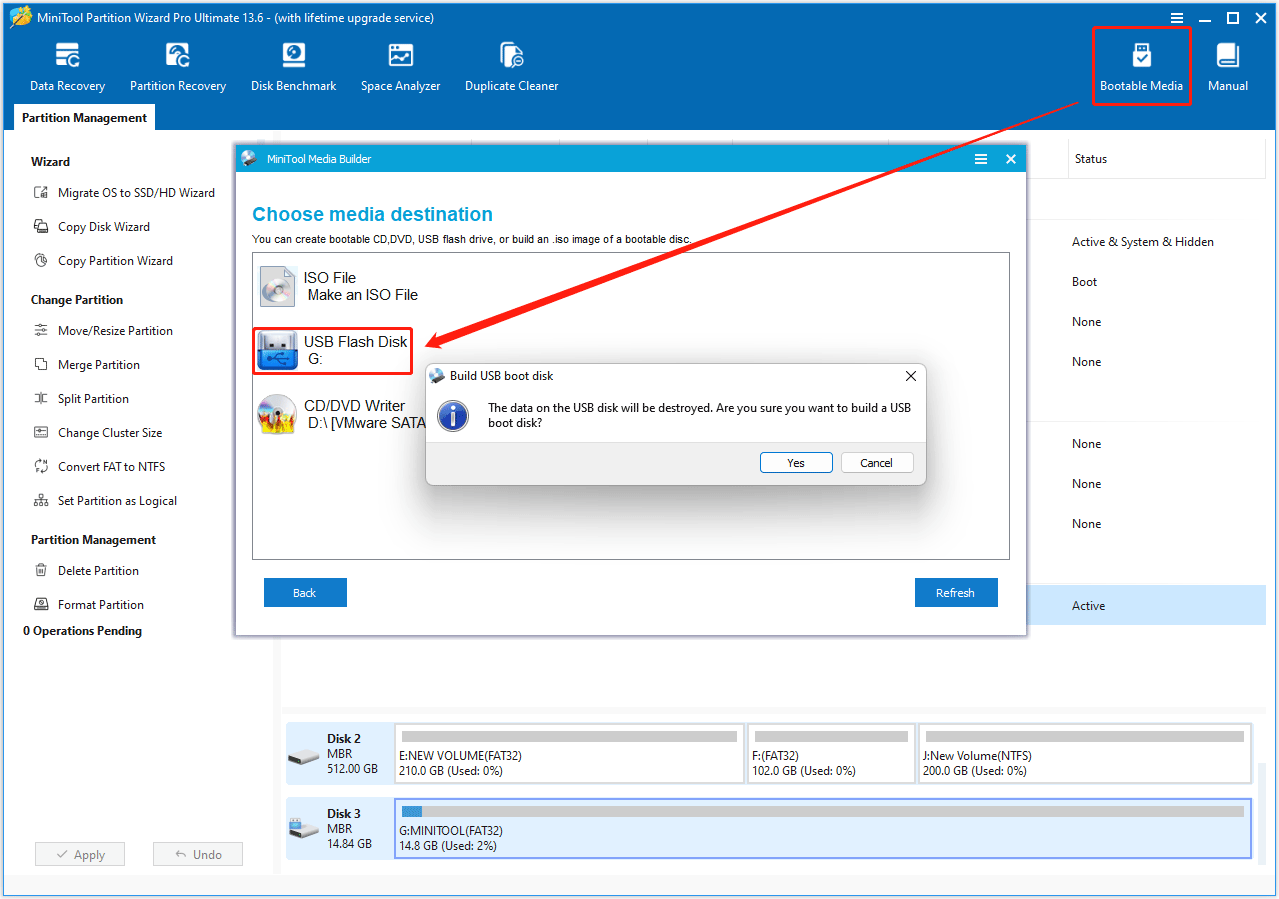
Step 1. Make a bootable USB drive on a working computer.
- Insert a USB flash drive into a working PC. Building bootable media will format your USB drive. So, you need to back up the USB drive data if there are important files.
- Launch MiniTool Partition Wizard and click Bootable Media in the top right corner.
- In the pop-up window, click WinPE-based media with MiniTool plug-in.
- Select USB Flash Disk. You will be warned that the data on the USB disk will be destroyed. Click Yes,and then MiniTool Partition Wizard will start to create a bootable drive.
- Wait patiently until the process ends and click Finish.
- Finally, eject the USB drive from the computer safely.
Step 2. Boot the problematic computer from the USB drive.
- Plug the bootable USB drive into the problematic computer.
- Restart the computer and then press the boot menu key (F2, F8, F9, F11, F12, Esc, etc.) immediately when the computer logo appears.
- When the Boot Menu appears, select the bootable USB drive.
- Then your computer will load from the USB drive and enter the main interface of MiniTool Partition Wizard after a while.
Step 3. Convert the MBR disk to a GPT disk.
- Highlight the target disk and choose Convert MBR Disk to GPT Disk from the left action panel.
- Click Apply and Yes to execute the change.

Method 4. Update the SSD Driver
If you only experience this issue with Secure Boot enabled, but the boots work fine, your SSD drivers may be the source of the problem. So, you need to update the SSD driver using Device Manager in Safe Mode. Here’s a tutorial for booting into safe mode:
Step 1: Boot into WinRE.
Step 2: Boot into Safe Mode.
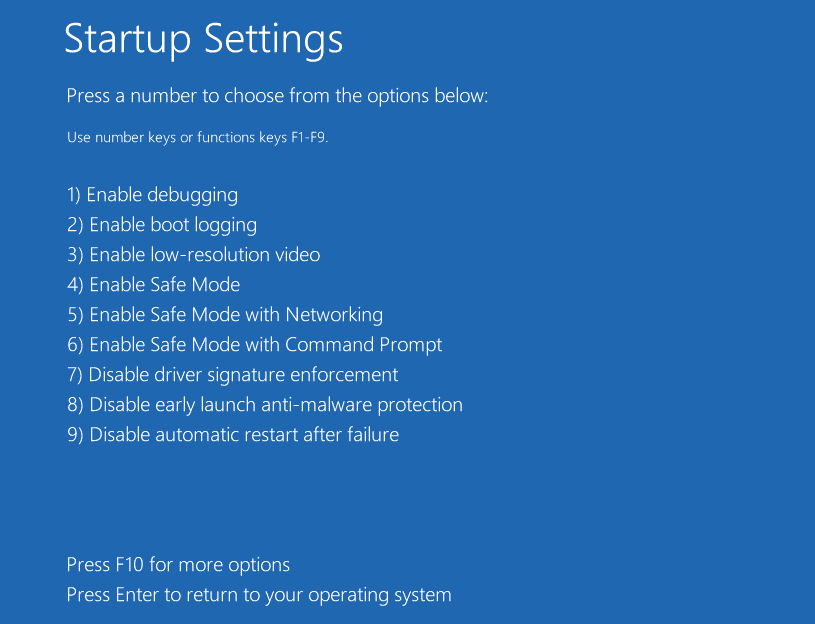
- Navigate to Troubleshoot > Advanced options after you enter WinRE.
- Click Startup Settings and wait for a while.
- Press the F5 key to choose Enable Safe Mode with Networking option, thus booting into safe mode.
After the computer boot into Windows or safe mode, you can update your SSD driver.
Step 1: Press the Win + X keys and select Device Manager from the pop-up context menu.
Step 2: Expand the Disk drives category, and then right-click the SSD driver and select Update driver.
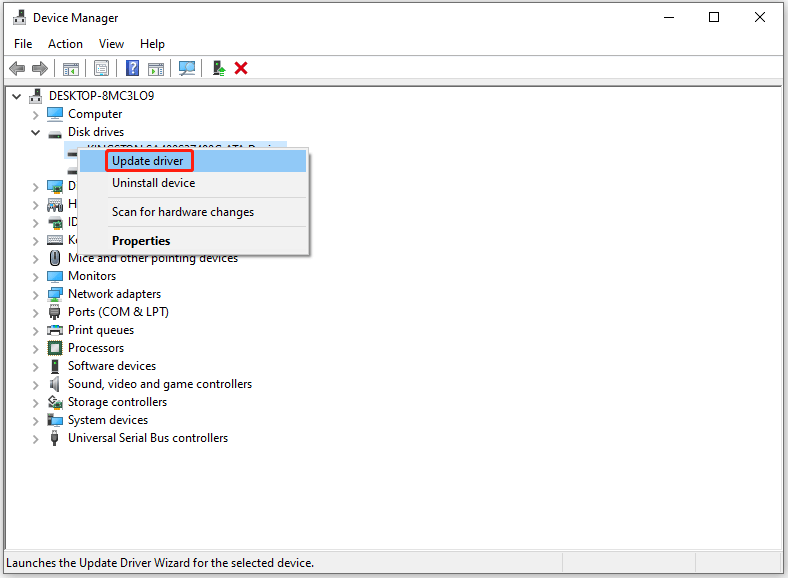
Step 3: In the pop-up window, you can select Search automatically for drivers and follow the on-screen prompts to complete the process. Once done, restart your PC and check if the “Windows 10 won’t boot with Secure Boot enabled” error gets fixed.
Method 5. Install Pending Windows Updates
Microsoft recently fixed startup issues caused by outdated Windows updates. You need to install every pending Windows update before you can apply the patch that fixes this “Windows does not start after enabling Secure Boot” issue. This way also requires you to enter Safe Mode. Here is a tutorial to install pending Windows updates.
Step 1: Press the Win + R keys to open the Run dialog box. Then type ms-settings:windowsupdate in the text field and press Enter.
Step 2: After opening the Windows Update window, select Check for Updates.
Step 3: After the update has finished downloading, select Install Now to begin a local installation.
Restart your computer to see if the issue has been resolved. If Secure Boot is still preventing you from starting your computer, continue with the method after that.
Method 6. Repair EFI Boot Files
If EFI files are damaged, rebuild them.
Step 1. Enter Windows Recovery Environment
- Boot from a Windows installation USB.
- Select Repair your computer > Troubleshoot > Advanced Options > Command Prompt.
Step 2: Rebuild EFI Files
Run the following commands and press Enter after each.
- diskpart
- list volume (Locate the EFI partition)
- select volume x
- assign letter=s
- exit
- bcdboot C:\Windows /s S: /f UEFI
Restart the computer.
![[Solved] Windows 10 Won’t Boot after Partition Resize](https://images.minitool.com/partitionwizard.com/images/uploads/2023/04/windows-10-wont-boot-after-partition-resize-thumbnail.png)
Method 7. Boot from bootx64.efi or bootia32.efi File
Some users reported that manually booting the PC from the bootx64.efi file resolved the issue. Files with the EFI extension are bootloaders. In most cases, these files are located on a specific system partition. This system partition does not have any drive letter and is usually hidden.
If you have a UEFI-based system, you may find the EFI file under Windows Boot Manager in the following location:
- \EFI\boot\bootx64.efi
- \EFI\boot\bootia32.efi
To manually boot your computer from an EFI file, you should enter the boot options in the BIOS. There you will find all the boot options available on your computer depending on the manufactures of the computers. See if a bootx64.efi or bootia32.efi file is available. If yes, start your computer from this file.
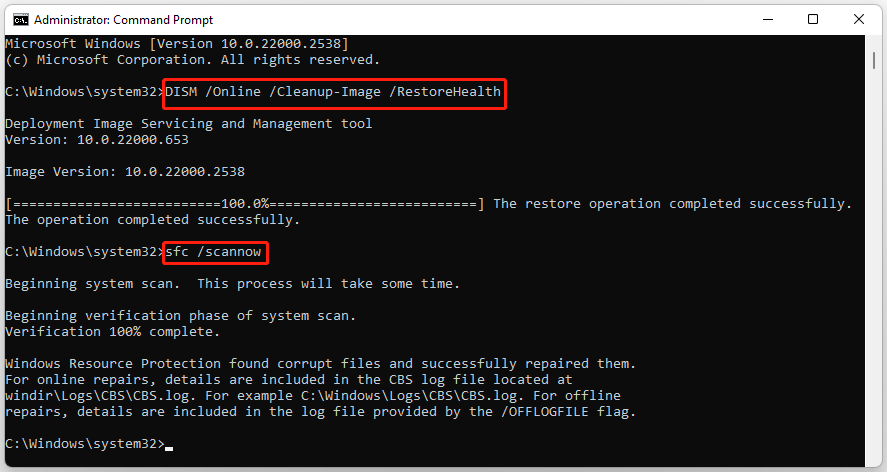
Method 8. Run DISM and SFC Tools
The “Windows computer won’t boot after enabling Secure Boot” error may be caused by corrupted system files. You can repair them by running DISM and SFC tools. Here are the steps:
- Type cmd in the search bar, right-click Command Prompt, and then select Run as administrator.
- Type DISM /Online /Cleanup-Image /RestoreHealth and press Enter.
- After the DISM process finishes, type sfc /scannow and press Enter.
Method 9. Rebuild the BCD
Open Command Prompt in Recovery Environment. Then run the following commands and press Enter after each.
- bootrec /fixmbr
- bootrec /fixboot
- bootrec /scanos
- bootrec /rebuildbcd
Restart the PC afterward.
Method 10. Restore Secure Boot Keys
Many boot issues disappear after restoring the default key database. If Secure Boot keys are missing, try the steps below to restore Secure Boot keys:
- Restart your PC and repeatedly tap your BIOS key (usually Delete or F2).
- Navigate to the Security, Boot, or Authentication tab.
- Select Secure Boot.
- Look for an option named Key Management or Secure Boot Mode.
- If Secure Boot Mode is set to Standard, change it to Custom (this unlocks the key settings).
- Select Install Default Secure Boot Keys, Restore Factory Keys, or Load Default PK.
- Confirm the prompt by choosing Yes or OK.
- Change the Secure Boot Mode back to Standard (if applicable).
- Press F10 to save changes and exit.
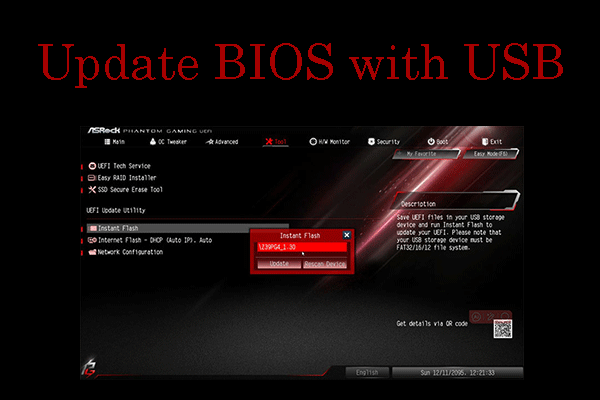
Method 11. Update BIOS Firmware
An outdated BIOS can cause Secure Boot compatibility issues. Visit your motherboard or laptop manufacturer’s support page and install the latest BIOS update.
Popular vendors include:
- ASUS
- MSI
- Gigabyte
- Dell
- HP
- Lenovo
- Acer
Follow the manufacturer’s instructions carefully because an interrupted BIOS update can render the system unusable.
Method 12. Clean Install
If the above methods can’t solve the “boot failure after enabling Secure Boot” error, you can try to clean install your PC to solve it.
But all data on the hard drive will be erased after you clean install, so pay attention that you need to back them up before you do.
Facing the situation that Windows cannot boot normally, you should take advantage of MiniTool Partition Wizard, which can help you back up data before installing Windows.
MiniTool Partition Wizard DemoClick to Download100%Clean & Safe
Here are the steps:
- Boot the PC from the created bootable USB flash drive as the steps mentioned above.
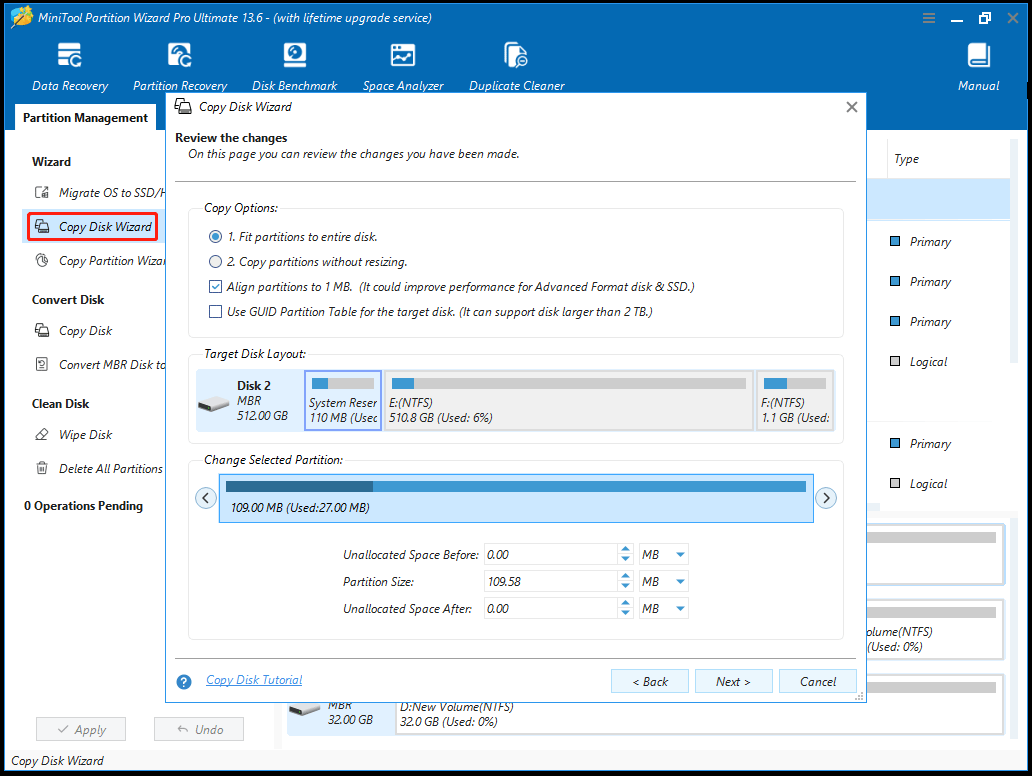
- In the main interface of MiniTool Partition Wizard, click on Copy Disk Wizard in the action panel. Then click on Next.
- In the pop-up window, select the disk to copy and click on Next.
- Select the destination disk in the next window and click on the Next button.
- Pick Copy Options based on your needs or situation.
- Click Finish > Apply > Yes to carry out the pending operation.
After backing up data, you can refer to this article to clean install your PC.
Windows Won’t Boot with Secure Boot Enabled FAQ
If your Windows 10 drive uses the older MBR partition layout, the motherboard ignores it completely, leaving nothing to boot into except the BIOS screen.
Bottom Line
If Windows 10 or Windows 11 won’t boot with Secure Boot enabled, the issue is usually related to an incompatible boot configuration rather than hardware failure.
For most users, converting an MBR disk to GPT, repairing EFI boot files, and rebuilding the BCD store will resolve the problem.
By following the solutions above, you should be able to enable Secure Boot successfully while keeping Windows bootable and secure.
For any issues while using MiniTool Partition Wizard, you can send us an email via [email protected] to get a quick reply.
About The Author

Position: Columnist
Vega enjoys helping people with computer problems, including disk management, data recovery, data backup, and more. She is constantly expanding her knowledge in related fields. And she will continue to bring more easy-to-understand professional articles to help people solve various problems on the PC.
User Comments :