A lot of users want to have a confirmation prompt when deleting a file. At this time, you need to enable the Windows 10 confirm delete feature. How to disable/enable Windows 10 delete confirmation? This post of MiniTool will walk you through a step-by-step guide and help you recover deleted data.
About Window 10 Confirm Delete
If you are using Windows 8 or the latest Windows 10 operating system, you may have found that you won’t be prompted with a confirmation message when deleting a file. This is because the Windows 10 confirm delete feature is disabled by default.
If you haven’t enabled this option, then the file or folder will be moved to the Recycle Bin directly when you press the Delete key. Sometimes, the selected files could be permanently deleted without moving them to the Recycle Bin if the files are too large or you select the checkbox for Don’t move to the Recycle Bin.
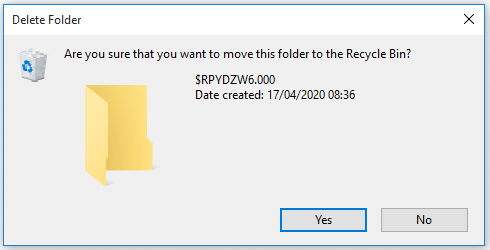
To avoid deleting files by mistake, a lot of Windows 10 users want to enable Windows 10 delete confirmation. After enabling this feature, then confirmation dialogue will pop up with the message “Are you sure that you want to move this file/folder/shortcut to the Recycle Bin?”
How to Disable/Enable Windows 10 Confirm Delete
There are 3 simple methods to disable/enable the confirm deletion dialogue box on Windows 10. You can set it by using the Recycle Bin as well as Registry Editor and Group Policy Editor.
Method 1. Use the Recycle Bin Properties Option
The first and simplest method to enable the confirm delete Windows 10 feature is to use the Recycle Bin properties option. To do so, follow the step-by-step guide below:
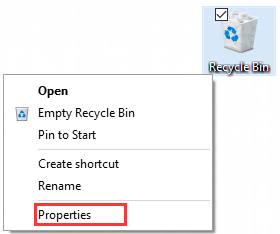
Step 1. Right-click the Recycle Bin shortcut on your desktop and select Properties from the pop-up menu.
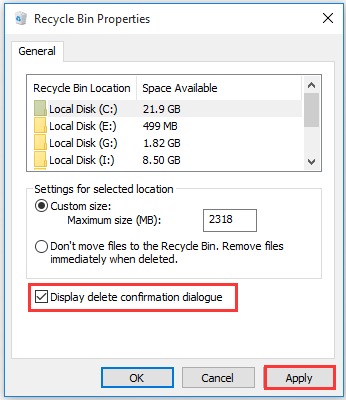
Step 2. In the Properties window, tick the checkbox for the Display delete confirmation dialogue and click on Apply button to make the change take effect.
After that, the Windows 10 confirm delete dialogue box will appear on the screen when deleting a file.
Method 2. Use the Registry Editor
In addition, you can use the Registry Editor to enable the delete confirmation Windows 10 feature. Here is a complete guide for you.
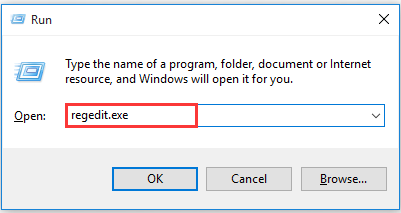
Step 1. Press Win + R keys to open the Run dialogue box, and then type regedit.exe in the box and hit Enter key. Click on the Yes button to open the Registry Editor if you are prompted.
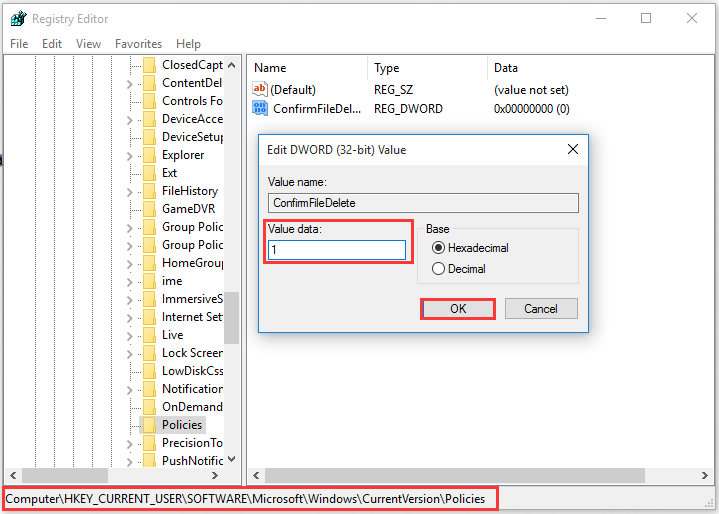
Step 2. In the Registry Editor window, go to the following path via the left-hand navigation bar. The destination path may be slightly different depending on your Windows 10 version.
HKEY_CURRENT_USERSoftwareMicrosoftWindowsCurrentVersionPolicies or
HKEY_CURRENT_USERSoftwareMicrosoftWindowsCurrentVersionPoliciesExplorer
Step 3. Once you arrive at the destination path, right-click the blank area on the right side and select New > DWORD (32-bit) Value from the pop-up menu.
Step 4. Name the new key to ConfirmFileDelete, and then double click the key and set its Value data to 1, and click on OK to save the change.
Step 5. Exit the Registry Editor window and restart your computer to make it take effect
Method 3. Use the Local Group Policy Editor
This method is suitable for a system administrator who want to enable the Windows 10 confirm delete feature for all users in the enterprise. If you are using a Windows 10 Pro or Enterprise operating system, then you can use the Group Policy Editor. Here’s how:
Step 1. Open the Run dialogue box again, and then type gpedit.msc in it and hit Enter.
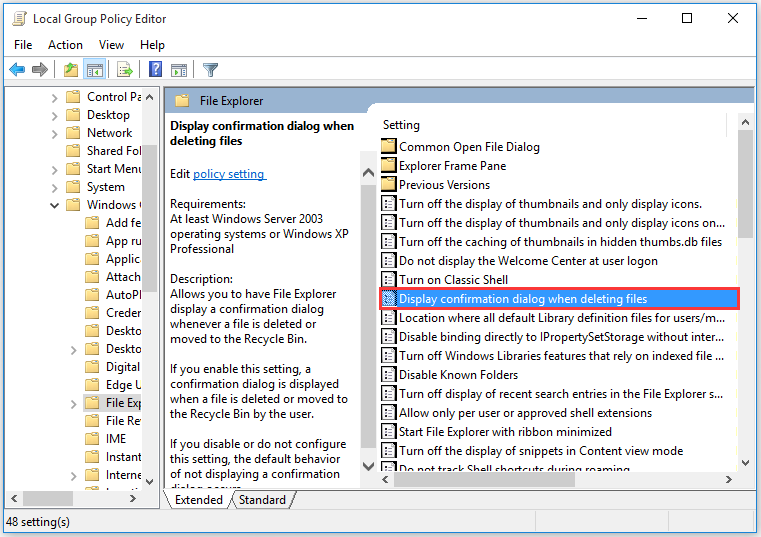
Step 2. In the Local Group Policy Editor window, go to the following path via the left-hand navigation bar.
User ConfigurationAdministrative TemplatesWindows ComponentsFile Explorer
Step 3. On the right side, scroll down the list of entry keys until you find the Display confirmation dialogue when deleting files entry and double click it.
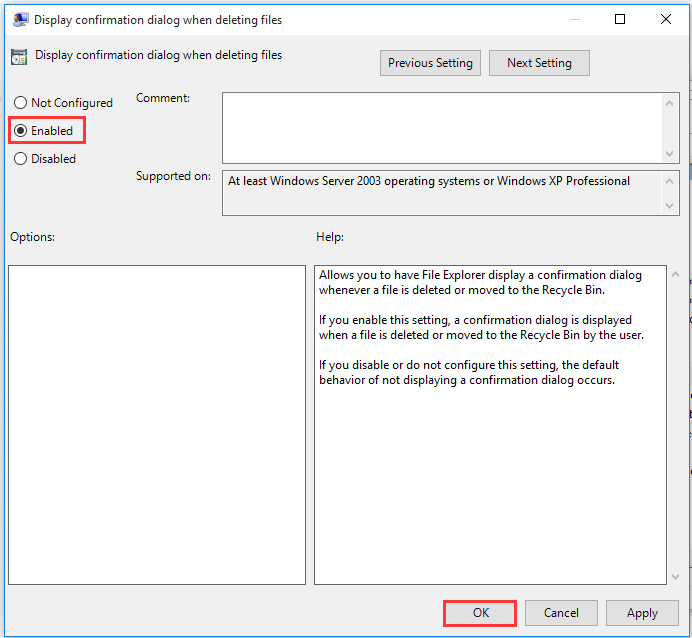
Step 4. In the pop-up window, select the Enabled option and click on OK button to turn on the confirm deletion feature. If you want to turn off this feature, then select the Disabled option. After that, exit the editor and restart your computer to take it into effect.
How to enable Windows 10 confirm delete? Three methods have been illustrated to you. You can select one based on your demands. Here comes a new question. What would happen if I disable the confirm deletion? Let’s keep reading the following part.
What Would Happen If I Disable Windows 10 Delete Confirmation
After the confirm delete Windows 10 feature is disabled, you can directly press the Delete key to remove the files without any confirmation dialogue. For those who want to delete files as fast as possible, disabling this feature is an ideal choice.
Sometimes, however, you may get into trouble because of this choice. Usually, the selected files or folders will be moved into the Recycle Bin. Then you can open the Recycle Bin again and restore them from it. But there are some exceptions that cause you to lose data.
Here we summarize 2 main cases that you may encounter after disabling the Windows 10 delete confirmation.
Case 1. You delete the files or folders in the local disk.
If you delete the files or folders with small size, you can open the Recycle Bin and restore them. However, if the deleted files are larger than the maximum size of your Recycle Bin, the selected item will be deleted permanently without being put into Recycle Bin for temporary storage.
Case 2. You delete the files or folder from a removable storage device.
If you delete files from an external storage device, then the files or folders will be directly deleted without being moving into the Recycle Bin no matter how large the files are. Here is a true example from answers.microsoft.com who reported the files are gone over from an external drive.
Separate from Recycle Bin: When I am connected to an external drive (my Android phone, connected via USB in “File Transfer” mode), I can view, copy and delete files (e.g. photos) on that drive. However, when I delete files on my phone, I don’t get any confirmation dialogue! This is a case where I definitely want confirmation because there is no Recycle Bin — the files are gone forever. Any thoughts? I am running Windows 10 Home. What should I do to restore my files? Please help!
In order to avoid data loss, we recommend you enable the delete confirmation Windows 10 feature. However, there are still a great many people using the default settings. What can I do if the files are deleted accidentally? Let’s keep reading.
How to Recover Lost Data After the Windows 10 Delete Confirmation Is Disabled
How to recover deleted data on Windows 10? Here you can choose a method based on your own situation. If the deleted files are located on the local disk, please refer to case 1. If you accidentally delete the files of an external drive, you can read case 2.
Case 1. Recover Lost Data from Local Disk
For the small files or folders, it is very simple to restore. You can open your Recycle Bin, and then right-click the files that want to recover and select Restore from the context menu. However, the large files won’t be moved into the Recycle Bin.
At this time, you need a professional tool to recover deleted files. Here MiniTool Partition Wizard is highly recommended. It is a multifunctional partition manager that can help you convert MBR to GPT, convert FAT to NTFS, format hard drive, perform disk benchmark, migrate OS to SSD/HD, extend partition, etc.
Now, press the button below to download this program and install it on your Windows 10 PC.
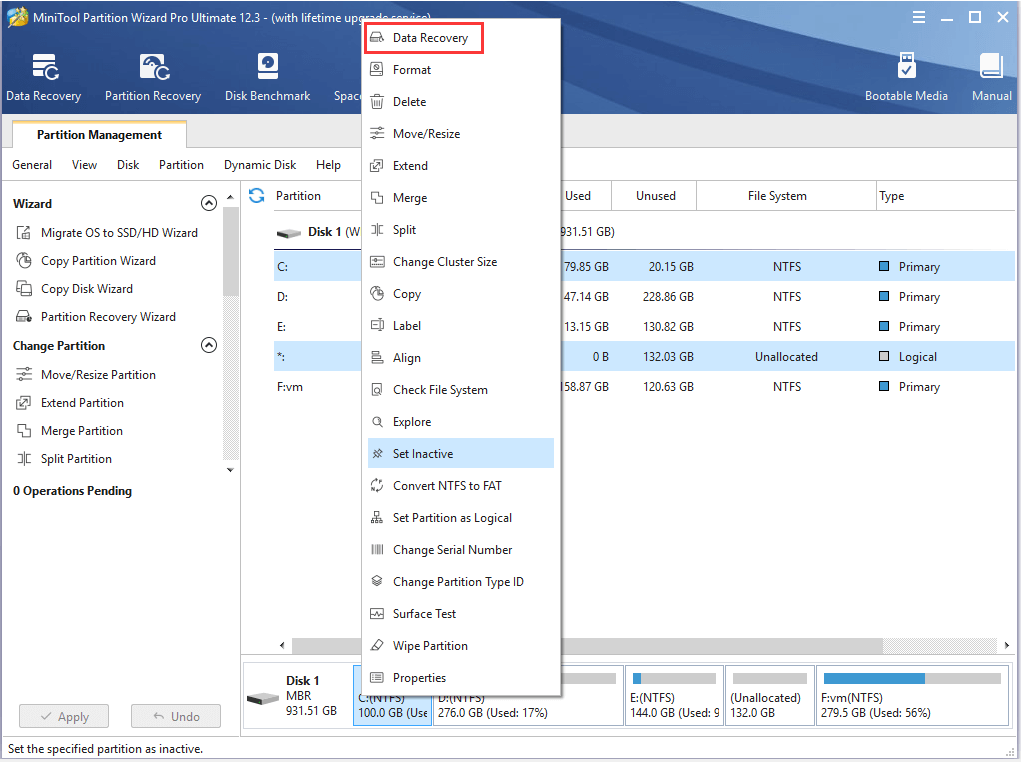
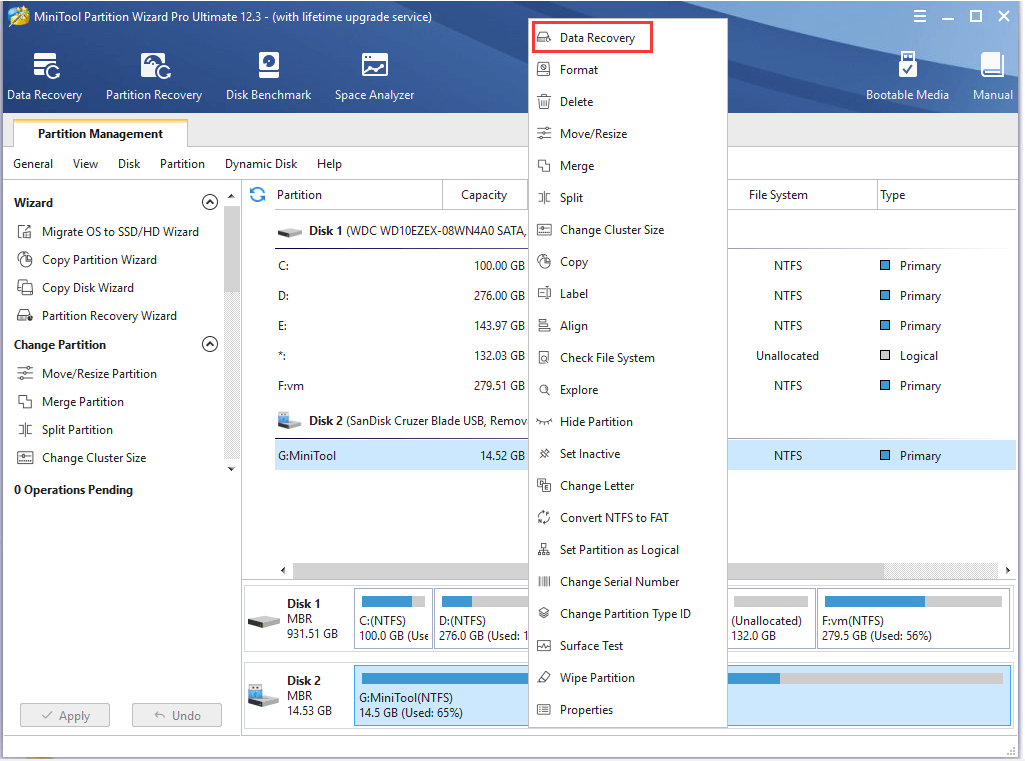
Step 1. Launch the program to enter its main interface, and then right click the drive that you delete the files and select Data Recovery.
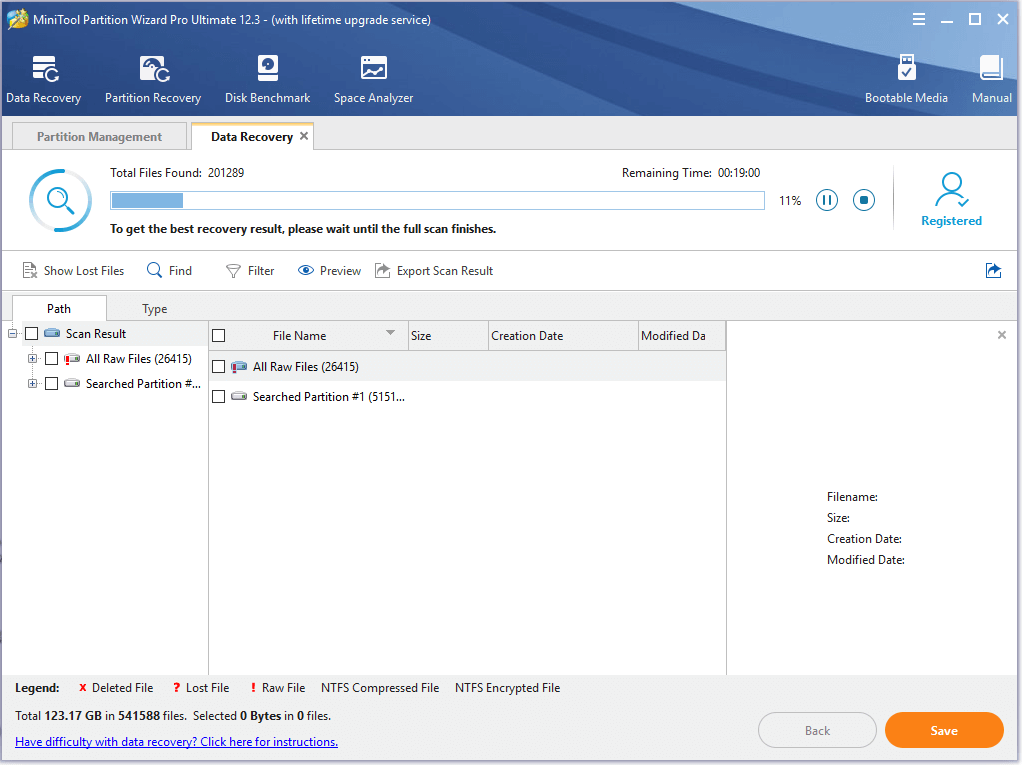
Step 2. Then you need to wait for this scan to complete. After the scan completes, tick the checkboxes next to the needed files and click on the Save button.
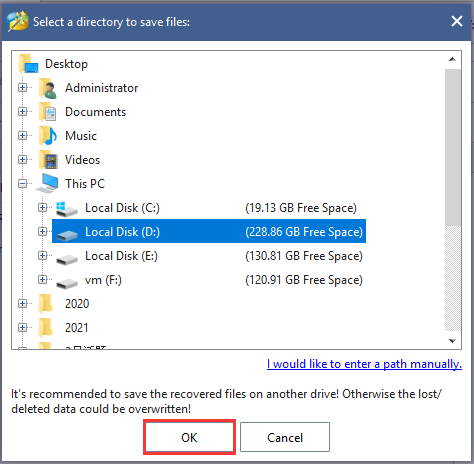
Step 3. Select a directory to save the needed files and click on OK. Here we recommend you save the recovered files to another drive. Otherwise, the recovered data could be overwritten.
Case 2. Recover Lost Data from a Removable Storage Device
MiniTool Partition Wizard can not only recover lost data on the local disk but on an external drive. If you accidentally delete the files from a removable storage device, you can utilize the Data Recovery feature as well. Here is a quick guide for you.
Step 1. Connect your external storage device to the Windows PC.
Step 2. Launch this software to enter its main interface, and then right-click the external drive from the disk map and select Data Recovery. Here we take a USB flash drive for example.
Step 3. Then you can refer to Step 2 to Step 3 in the above case to save the lost files to another location.
Bottom Line
How to enable Windows 10 delete confirmation? How to recover the accidentally deleted data? Now, I believe that you have already known the answers to this post. If you have any better ideas on this topic, write them in the comment area. Also, you can send us an email via [email protected] if you have any suggestions about the MiniTool software.
Windows 10 Confirm Delete FAQ
- Press Win + E keys to open the File Explorer.
- Navigate to the View tab and select the Options > Change folder and search options from the top menu.
- In the pop-up window, select the Double click to open an item option under the Click items as follows
To do so, follow the steps below to stop Windows from automatically emptying your Recycle Bin
- Press Win + I keys to open the Settings app, and then navigate to the System
- Select Storage from the left menu.
- To >disable Recycle Bin auto-deletion, toggle of the switch for Storage Sense can automatically free up space by getting rid of files you don’t need, like temporary files and content in your Recycle.
- Press Win + I keys to open the Settings app, and then navigate to the Personalization
- Select Themes from the left menu, scroll down the right sidebar, and click on the Desktop icon settings
- Tick the checkbox for the Recycle Bin and click on Apply to execute the change.
User Comments :