
If your Hitachi external hard drive is not recognized or showing up in Windows, first check the USB connection and then open Disk Management to see whether Windows detects the drive. This guide from MiniTool Partition Wizard walks you through the causes and solutions step by step.
An external hard drive can suddenly stop appearing in File Explorer even if it was working normally before. In some cases, the problem is easy to fix, while in others, using the wrong troubleshooting method can make existing data harder to recover. Therefore, it is important to identify the drive’s status in Windows before trying any solution.
This guide walks you through the necessary checks and solutions step by step.
Why Is Hitachi External Hard Drive Not Recognized
A Hitachi external hard drive may not be recognized in Windows for different reasons, and the symptoms can vary depending on the underlying problem.
The table below summarizes the most common causes and their typical symptoms.
| Possible Cause | Typical Symptoms | What to Check |
| Faulty USB cable or port | The drive does not appear in File Explorer or Disk Management | Try a different USB cable and USB port |
| Insufficient power | The drive disconnects repeatedly or does not spin up properly | Connect it directly to the computer and avoid USB hubs |
| Missing drive letter | The drive appears in Disk Management but not in File Explorer | Assign a drive letter to the partition |
| Outdated or corrupted drivers | Windows detects the device inconsistently or shows a device error | Check and update the drivers in Device Manager |
| File system corruption | The drive appears as RAW or Windows asks you to format it | Recover important data before formatting |
| Damaged or missing partition | The drive appears as Unallocated in Disk Management | Recover data before creating a new partition |
Once you identify why your Hitachi external hard drive is not recognized, the next step is to recover any important data before trying further repairs or formatting the drive.
Recover Data from Hitachi External Hard Drive Not Recognized
Before solving the Hitachi external hard drive not recognized issue, you’d better recover the data from the Hitachi external hard drive to avoid making data unrecoverable.
How to recover data safely and easily? Here I recommend you use MiniTool Partition Wizard. It is a professional and reliable data recovery tool that enables you to recover data from external hard drive.
Besides, it is also a comprehensive partition manager that contains a wide range of features. For instance, you can use this program to partition hard drive, convert MBR to GPT, clone a hard drive, and more.
MiniTool Partition Wizard DemoClick to Download100%Clean & Safe
Here’s how to recover data with MiniTool Partition Wizard.
Step 1: Download and install MiniTool Partition Wizard on your PC. Then launch it to get its main interface. Click on Data Recovery in the top toolbar.
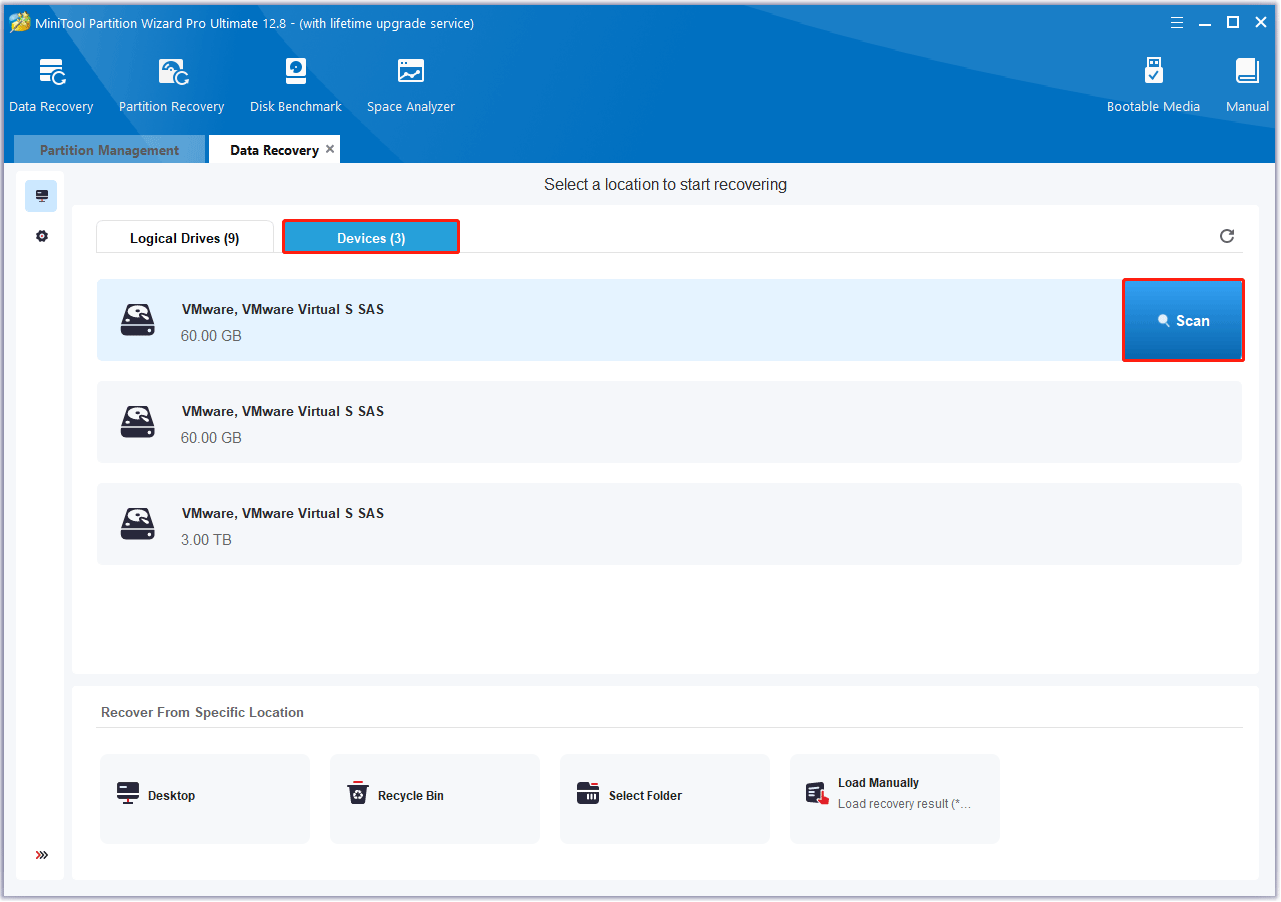
Step 2: In the Data Recovery window, go to the Devices tab, move your cursor to the target Hitachi external drive, and then click on the Scan button.
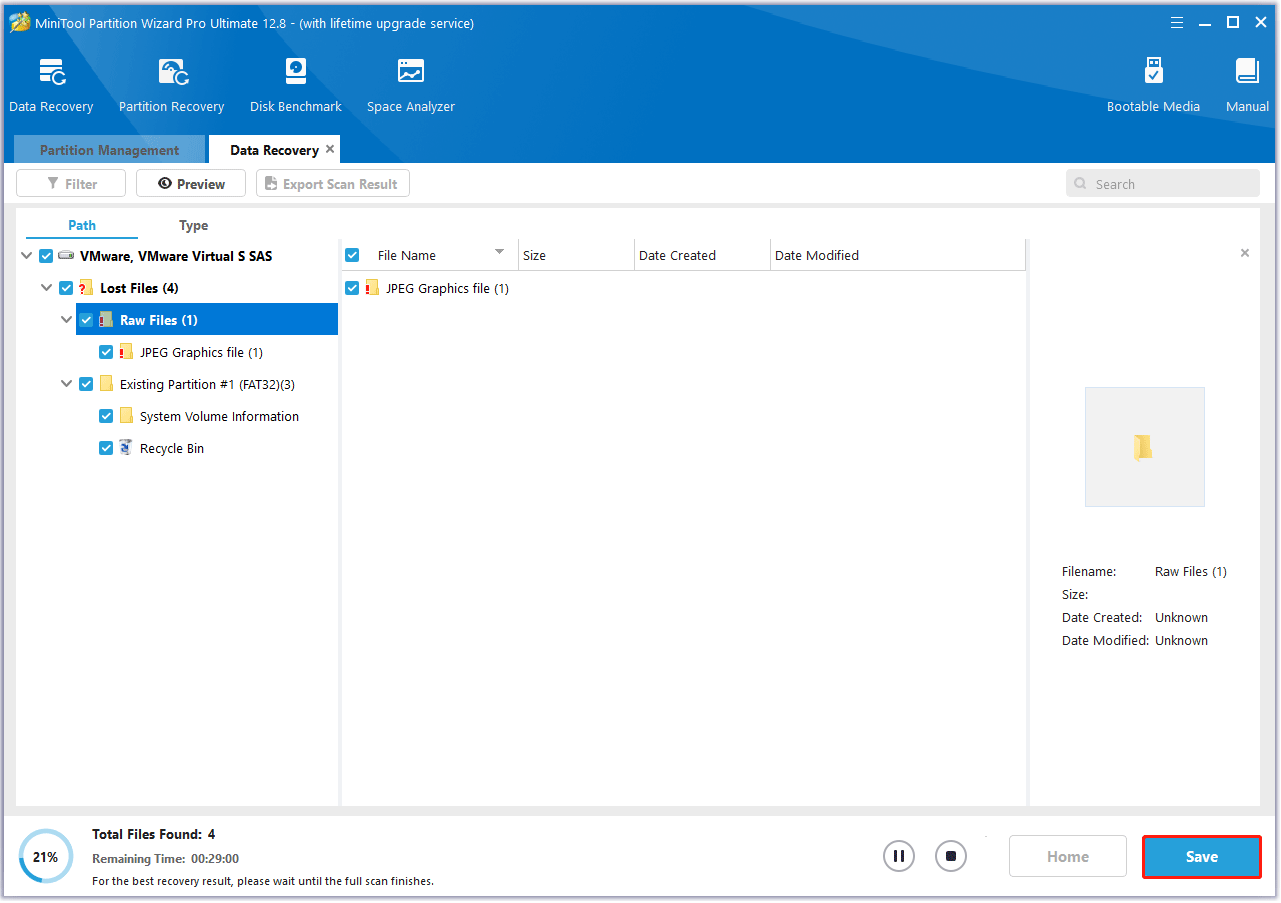
Step 3: After that, you can see the program scanning your disk. While the scan is in progress, you can preview the scanned files and click the Pause or Stop icon to end it when you find all the necessary files.
Step 4: Once the scanning is done, check the files you want to recover, and then click on Save.
Step 5: In the pop-up window, choose a directory to store the selected files. You’d better choose a different drive to save these files. Or, the lost/deleted data could be overwritten.
How to Fix Hitachi External Hard Drive Not Recognized
After you have recovered data from your Hitachi external hard drive, you can follow these solutions to fix the Hitachi external hard drive not showing up issue.
Solution 1. Check the USB Port/Cable
When faced with the Hitachi external hard drive not detected issue, the first thing you should do is to check the USB port/cable and USB connection. If the connection is loose, remove the external hard drive and reconnect it. If you notice any physical damage to the stock cable, replace it. If the USB port is not working, you can try other available USB ports on your computer.
Check if the Hitachi external hard drive not showing up problem disappears after plugging the cable into another USB port. If not, try the other methods in this article to resolve the error.
Solution 2. Initialize Hitachi External Hard Drive
If you are using a Hitachi external hard drive for the first time and encounter the problem of the Hitachi external hard drive not showing up, you need to check whether it has been initialized. If it has not been initialized before, you can try to initialize it and create a new partition to fix this error. Here’s how to do it:
Step 1: Right-click on the Windows icon and select Disk Management.
Step 2: Find the external drive that is not showing up. If it shows “Not Initialized”, right-click on the disk and select Initialize Disk.
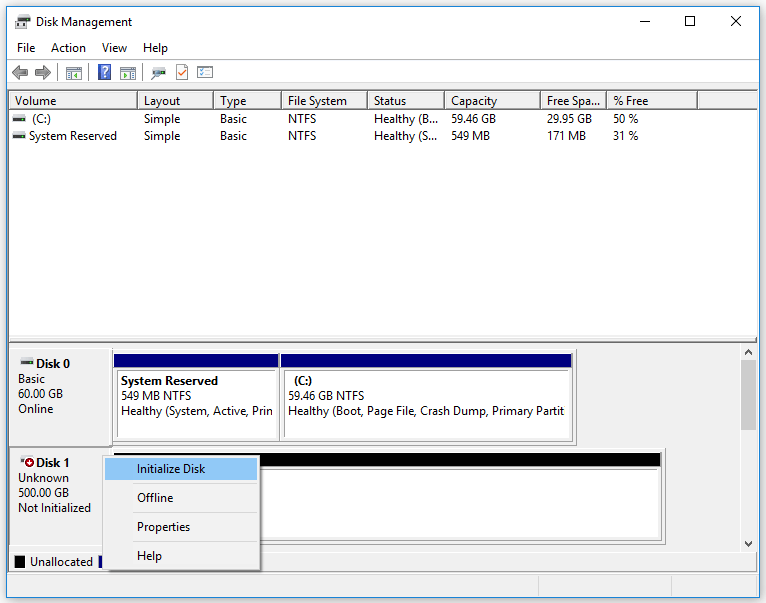
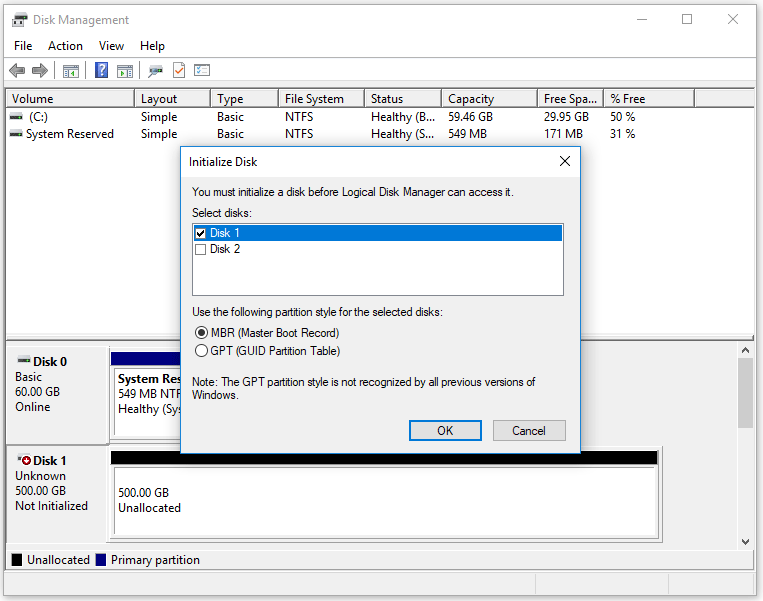
Step 3: In the pop-up window, choose a partition style based on your situation and click on OK.
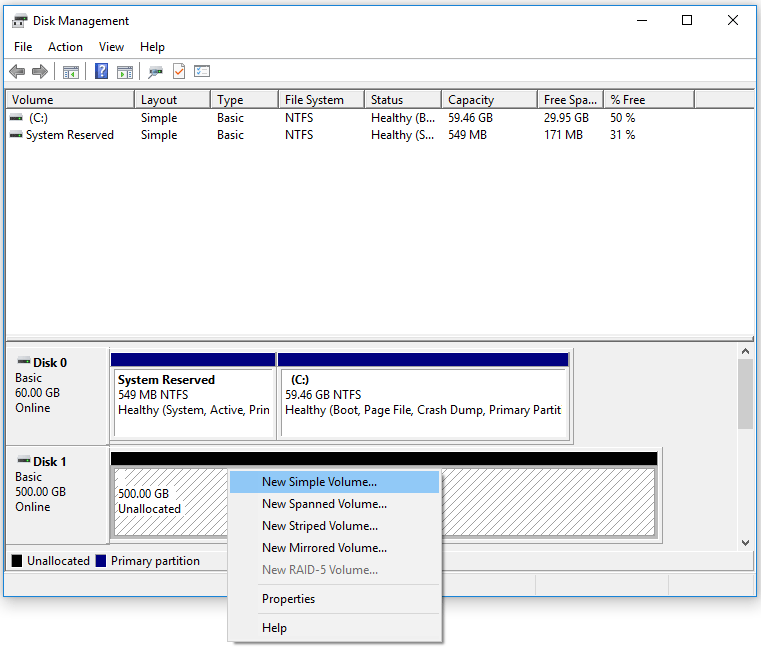
Step 4: Then right-click on the unallocated space and click on New Simple Volume.
Step 5: Follow the on-screen instructions to assign the drive letter and format the volume.
Solution 3. Update Hitachi External Hard Drive Driver
The Hitachi external hard drive not working issue can also be caused by the outdated hard drive driver. So, you should update the driver.
Step 1: Right-click on the Windows icon and select Device Manager.
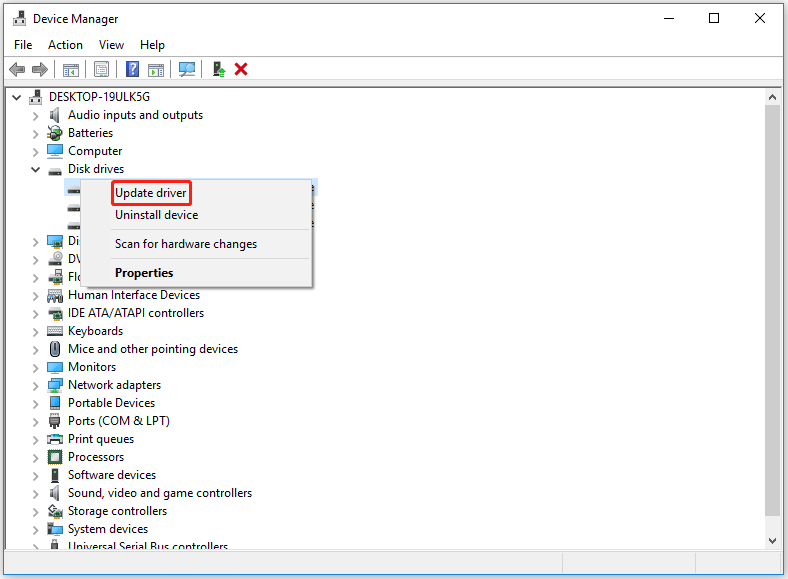
Step 2: In the Device Manager window, expand disk drivers and right-click on your device, select Update driver.
Step 3: In the pop-up window, choose Search automatically for drivers. Then, your Windows will search your computer and the Internet for the latest driver software for your device. Just follow the on-screen instructions to update the driver to the latest version.
If updating the driver fails, try the next option Uninstall device.
Solution 4. Change the Drive Letter
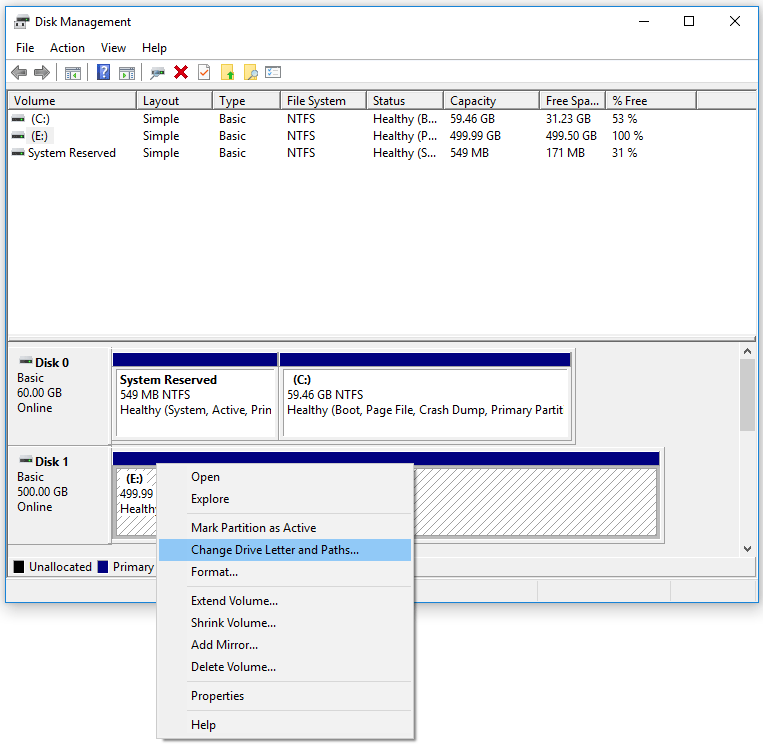
Your Hitachi external hard drive does not get recognized if it doesn’t have a drive letter. To make it show, you need to assign a drive letter in Disk Management.
Step 1: Open Disk Management again. Then find your external hard drive and right-click on it to choose Change Drive Letter and Path.
Step 2: Assign the drive a new letter that doesn’t exist on your PC and click on OK to confirm.
Solution 5. Format the Hitachi External Hard Drive
Your Hitachi external hard drive does not get recognized if the file system is not compatible with your Windows PC. So, you should format it to a compatible file system.
How to format an external hard drive on Windows? Microsoft provides several built-in tools that you can use to format your hard drive, including Diskpart, Disk Management, and File Explorer. Here we take Diskpart as an example:
Using Diskpart:
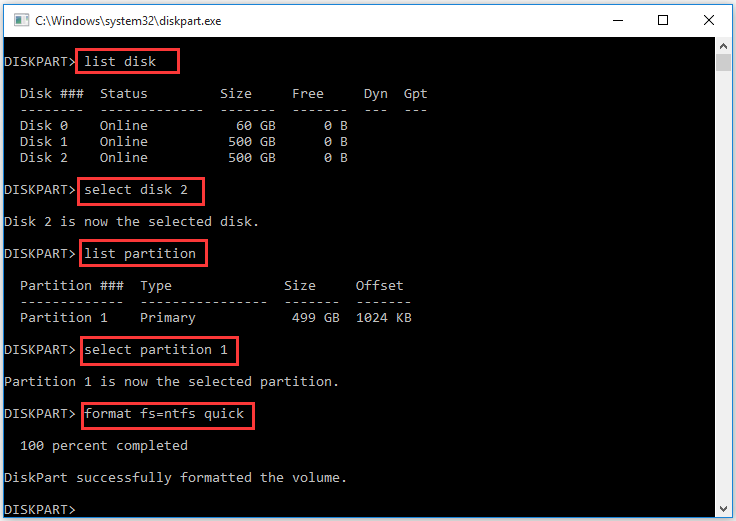
Step 1: Press the Win + R key to open the Run dialog box, then type diskpart in the box and press Enter.
Step 2: In the Diskpart window, type the following commands one by one and press the Enter key after each typing. After completing the following commands, your drive should be formatted as NTFS or FAT32.
- list disk
- select disk * (replace * with the number of the drive you connected)
- list partition
- select partition 1 (1 represents the partition to be formatted)
- format fs=ntfs quick or format fs=fat32 quick
Step 3: Then type assign letter=F (replace F with an unused letter) and press Enter to assign a specific drive letter for the newly created partition.
Diskpart helps you format your Hitachi external hard drive. However, sometimes you may encounter “Diskpart has encountered an error incorrect function” and “Virtual Disk Service Error” while using Diskpart. Additionally, this tool cannot help you format drives larger than 32GB to FAT32.
Solution 6. Check Bad Sectors on External Hard Drive
If formatting the external hard drive to a compatible file system does not resolve the Hitachi external hard drive not detected issue, you can suspect bad sectors on the external hard drive. To check this, you can use the Surface Test feature of the MiniTool Partition Wizard.
MiniTool Partition Wizard FreeClick to Download100%Clean & Safe
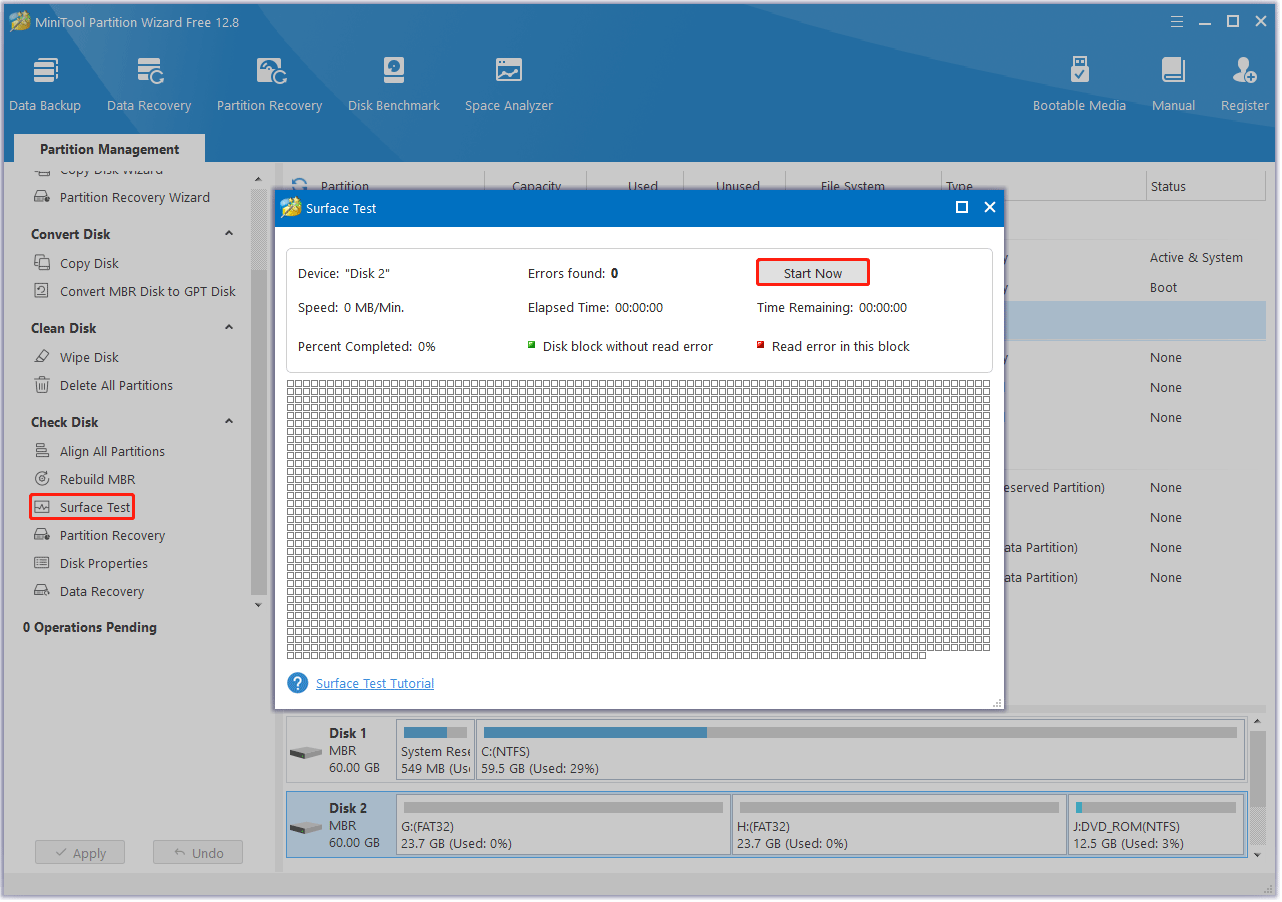
Step 1: Launch MiniTool Partition Wizard to enter its main interface. Then choose the Hitachi external hard drive, and then select Surface Test from the left panel.
Step 2: In the pop-up window, click on the Start Now button to begin scanning bad sectors. If any blocks are marked red, it means there are bad sectors on the hard drive. Then you can follow this guide to fix these bad sectors.
Bottom Line
How to solve the Hitachi external hard drive not recognized issue on Windows? Now, you may already get the solutions. This post explores possible reasons and efficient ways for this issue.
If you have any other useful solutions to this problem, you can share them with us in the following comment zone. If you encounter certain issues while using MiniTool Partition Wizard, you can send us an email via [email protected] to get a quick reply.
User Comments :