
If your drive shows up in Disk Management but not Explorer, the most common causes include a missing drive letter, an unallocated or uninitialized disk, an unsupported or corrupted file system, or a partition that is inaccessible. This guide explains how to identify the cause and make the drive appear in File Explorer.
Why Does a Drive Show Up in Disk Management but Not File Explorer?
A drive can appear in Disk Management or Device Manager but not File Explorer when Windows detects the physical disk but cannot mount a usable volume. The most common causes are the following.
| Possible Cause | Description |
| Missing drive letter | Windows detects the drive but doesn’t assign it a drive letter |
| Uninitialized disk | The disk appears as Unknown or Unallocated |
| Disk offline | Windows detects the disk but has taken it offline |
| Missing or corrupted partition | The partition is lost or the file system is damaged (RAW file system) |
| Unsupported file system | The drive may use a file system that Windows cannot normally read |
| Driver issues | The disk driver is outdated or corrupted |
| Power or connection issues | A faulty USB port, cable, or insufficient power prevents access |
How to Fix a Drive That Shows Up in Disk Management but Not Explorer
If the cause is a missing drive letter, a lost or corrupted partition, the disk being offline, or an unrecognized file system, Disk Management will clearly indicate this. Please open Disk Management to check the disk status before taking any measures.
Method 1. Troubleshoot the Connection and Power Issues
Connection or power issues often occur with USB flash drives or external drives. Please unplug and reinsert them. If possible, try connecting to a different USB port. For desktop computers, a rear USB port is preferable.
Moreover, you can also troubleshoot the power issue by disabling USB selective suspend and preventing the computer from turning off the USB device to save power. Here are the guides.
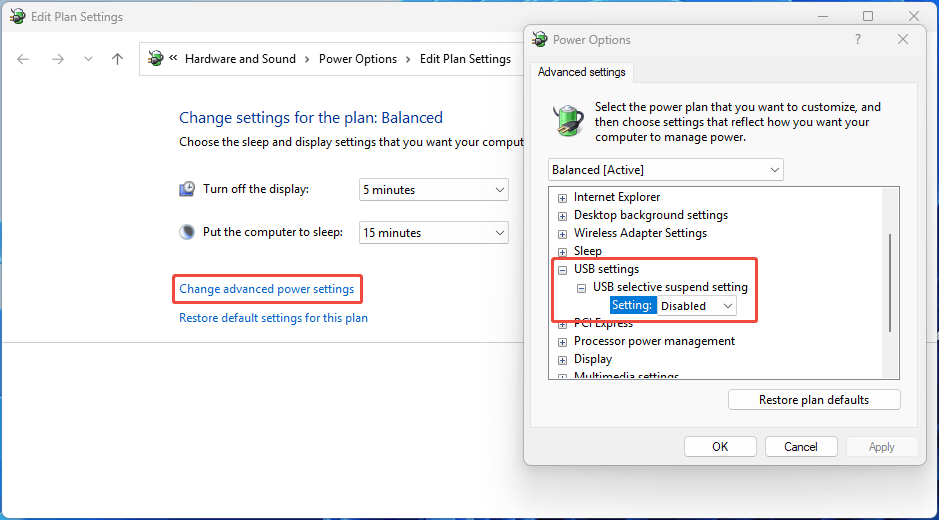
#1. How to Disable USB Selective Suspend
- Press Win + S, type Edit power plan, and press Enter.
- Click Change advanced power settings.
- Scroll down and expand USB settings.
- Expand USB selective suspend setting.
- Set the setting to Disabled for both on-battery and plugged-in options, then click OK.
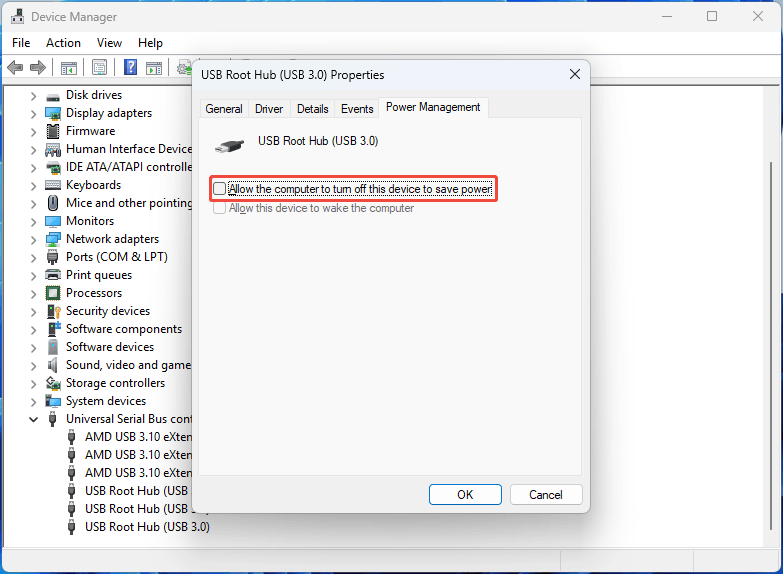
#2. How to Prevent the Computer from Turning off the USB Device to Save Power
- Open Device Manager.
- Scroll down and expand the Universal Serial Bus controllers section.
- Right-click on USB Root Hub (USB 3.0) and select Properties.
- Go to the Power Management tab.
- Uncheck the box that says Allow the computer to turn off this device to save power, then click OK.
Method 2. Update the USB or Hard Drive Driver
If your drive shows up in Device Manager but not in File Explorer, updating the device driver in Device Manager may be a solution.
Step 1. Right-click the Start menu and select Device Manager from the context menu.
Step 2. Expand the Universal Serial Bus Controllers category, and then right-click the affected USB controller and select Update driver.
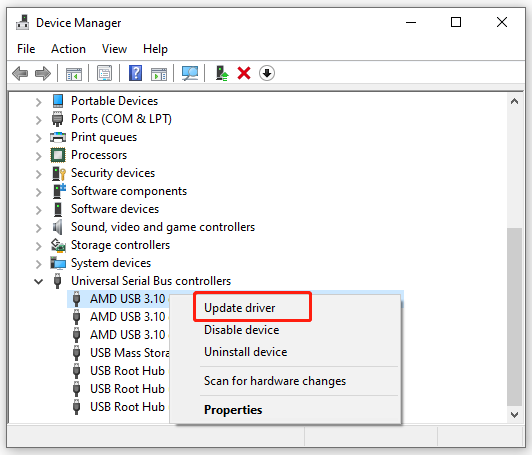
Step 3. In the pop-up window, you will have 2 choices to update the USB controller driver. You can update it automatically or manually based on your preference. Then follow the on-screen prompts to complete this update.
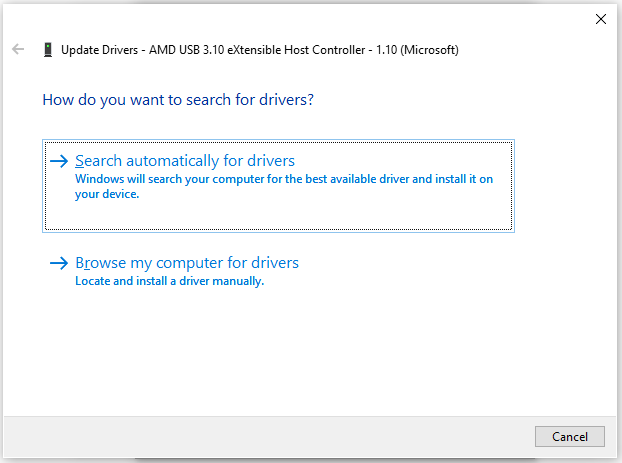
Method 3. Assign a Drive Letter
If the “drive not showing up but detected” issue is caused by a missing drive letter, you can solve it by assigning one to it. Here is the guide:
- Open Disk Management.
- Right-click the partition that has no drive letter.
- Select Change Drive Letter and Path.
- Click Add and choose a drive letter.
- Click OK.
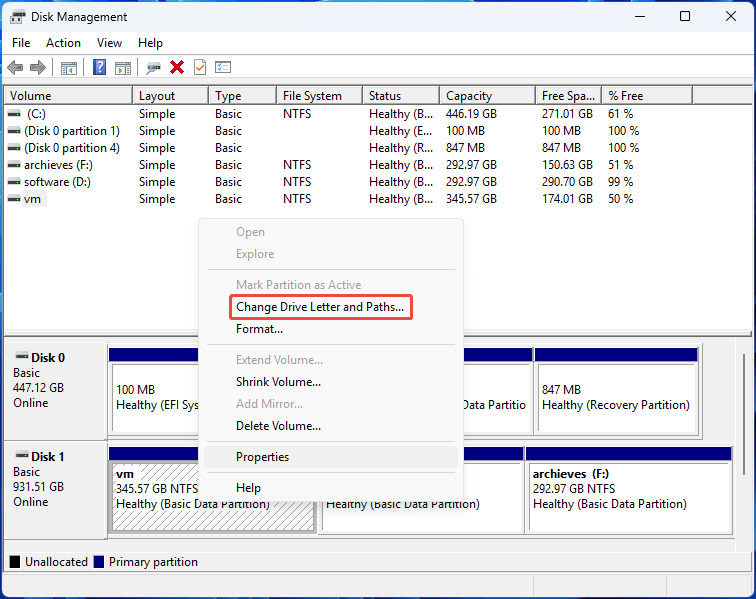
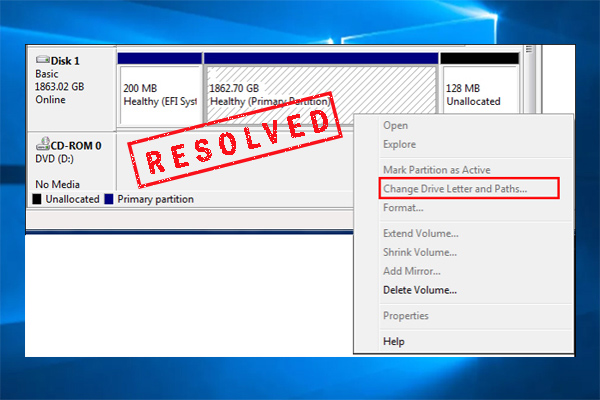
Method 4. Bring the Disk Online
If Disk Management shows the drive as Offline, Windows can detect the physical disk but cannot normally access its volumes through File Explorer. Bringing the disk online may resolve the problem.
In Disk Management, find the disk that is marked Offline. Right-click the disk label on the left, such as Disk 1, and select Online.
Method 5. Initialize the Disk and Create a Partition
If the drive is new, it will show as Unknow or Not Initialized in Disk Management. Of course, it doesn’t show in File Explorer. Here is the guide to initialize the drive.
- In Disk Management, right-click the disk and select Initialize Disk.
- Choose GPT or MBR and click OK.
- Right-click the unallocated space and choose New Simple Volume to format it.
Method 6. Recover the Lost Partition from the Hard Drive
If the drive becomes unallocated because a partition is lost, do not create a new partition on it. Instead, you need to recover the lost partition using MiniTool Partition Wizard. This will also recover the data in it.
MiniTool Partition Wizard DemoClick to Download100%Clean & Safe
Step 1. Run the program to enter its main interface and click on Partition Recovery from the top toolbar.
Step 2. In the pop-up window, click on the Next button and select the drive and click on Next.
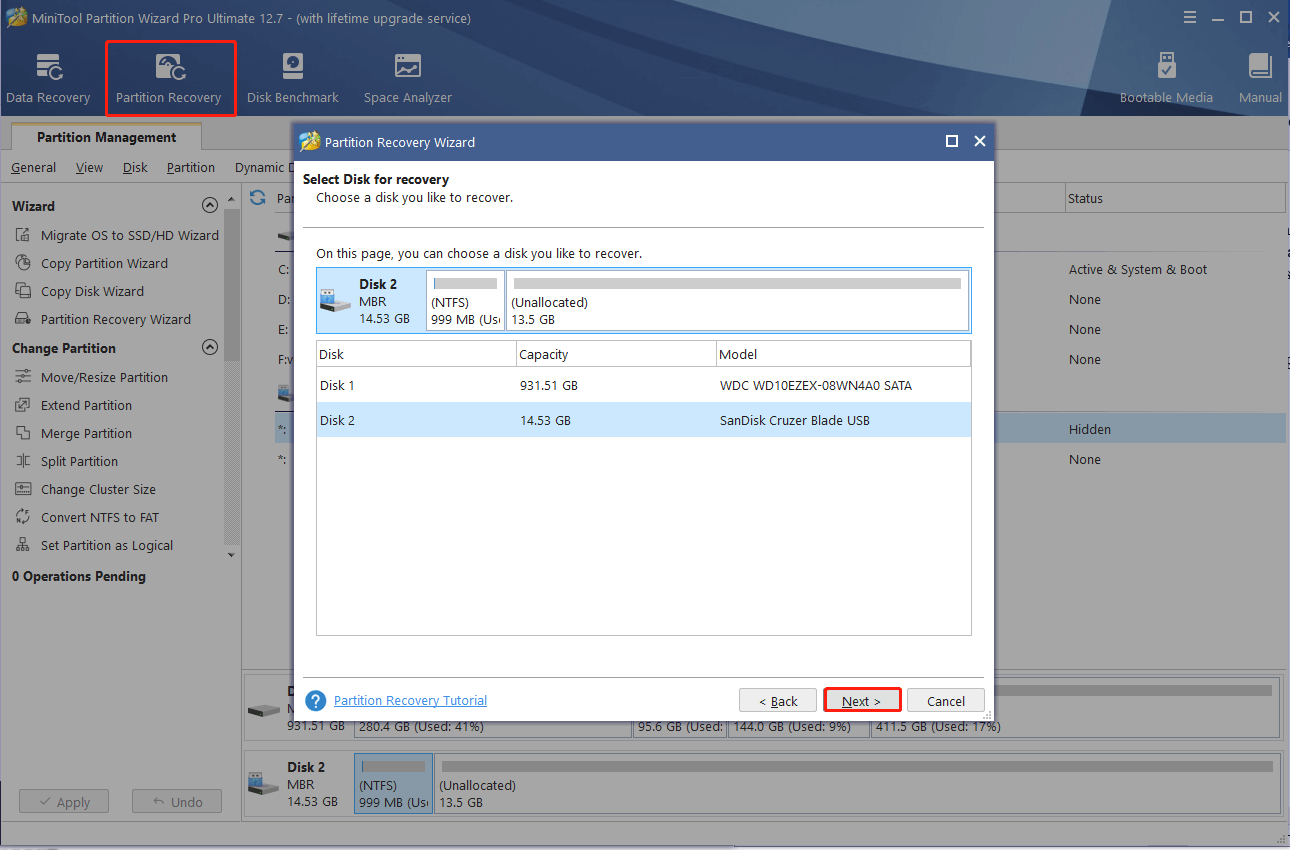
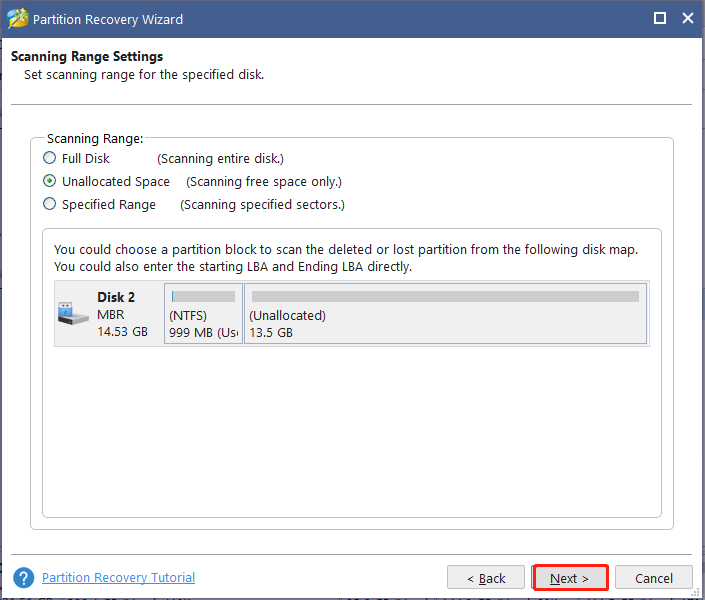
Step 3. Set a scanning range for the selected disk based on your needs. Here you can choose Full Disk, Unallocated Space, and Specified Range and clock on Next to go on.
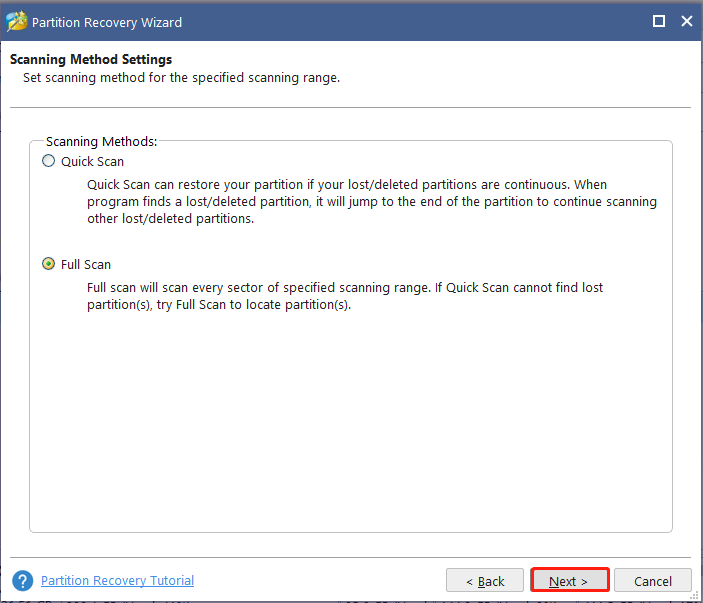
Step 4. Select a scanning method to scan the disk and click on Next.
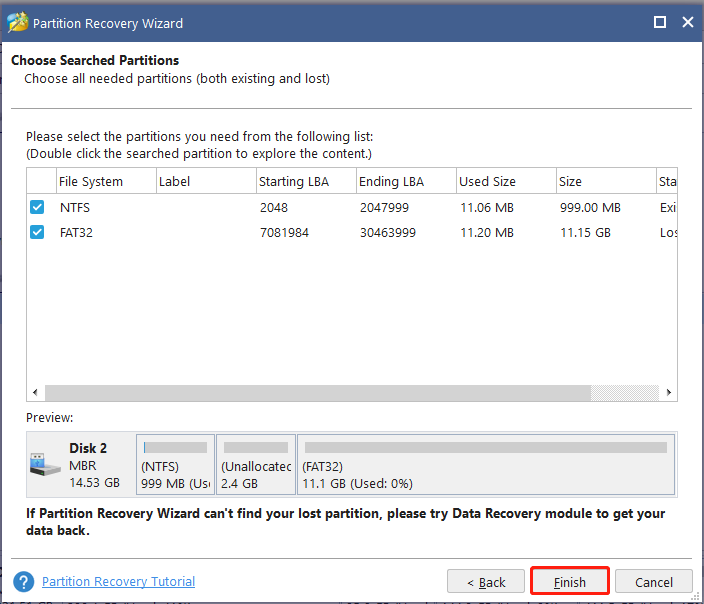
Step 5. Now, you need to wait for some time until the scanning process ends. Once done, make sure that you check all partitions including existing partitions and deleted/lost partitions, and click on Finish > Apply.
Step 6: Right-click the recover partition and choose Advanced > Change Letter. Follow the wizard to assign a letter to the drive. Then, it can show in File Explorer.
![System Restore Taking Up Too Much Space on Windows 10/11? [Fixed]](https://images.minitool.com/partitionwizard.com/images/uploads/2023/03/system-restore-taking-up-too-much-space-thumbnail.jpg)
Method 7. Format the Drive
If Disk Management shows your drive as RAW or doesn’t recognizing your drive, formatting the partition may solve the issue. However, before formatting the partition, you need to move the data off it.
If the file system is not recognized by Windows, connect the drive to a compatible system and transfer the data.
If the files system is corrupt, you need to use MiniTool Partition Wizard to recover data first. Here is the guide.
MiniTool Partition Wizard DemoClick to Download100%Clean & Safe
- Download, install, and launch MiniTool Partition Wizard.
- Click Data Recovery.
- Select the RAW (Unidentified) partition for scanning.
- Wait for the scanning to complete.
- Find important files and save them to another drive.
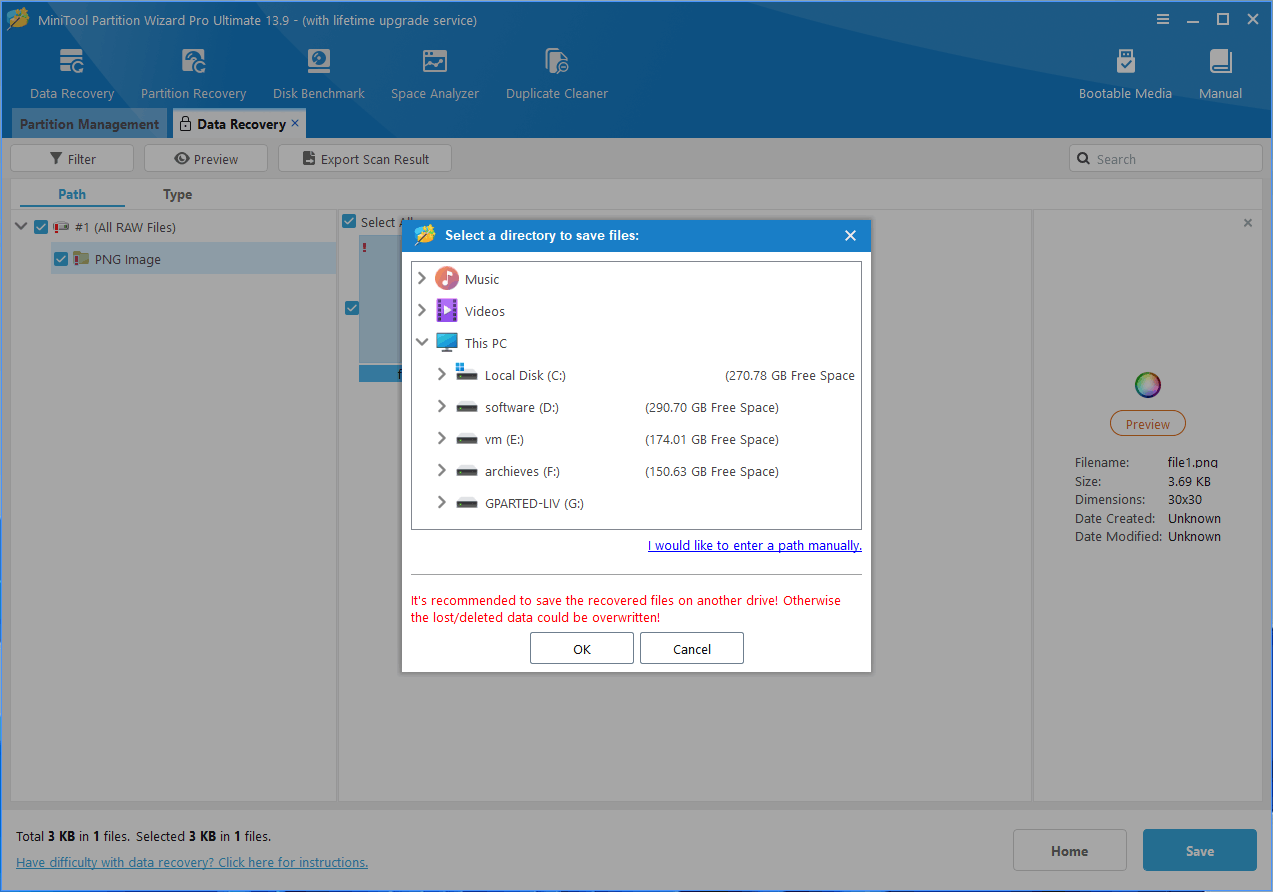
Once the important data has been recovered, you can format the partition in Disk Management.
Drive Shows Up in Disk Management but Not Explorer FAQ
Bottom Line
This post offers 7 methods to fix the “drive shows up in Disk Management but not Explorer” issue.
If you have any problems or suggestions when using MiniTool Partition Wizard, contact us at [email protected]. We’ll get back to you as soon as possible.
About The Author

Position: Columnist
Linda has been an editor at MiniTool for seven years. She continuously learns about computers and puts her knowledge into practice. Moreover, she is particularly knowledgeable in disk management, data recovery, system installation, and PDF editing. Her articles typically reference multiple examples or are based on her own experience, providing users with the most suitable solutions.
User Comments :