Many users reported that they receive the Boot Guard verified failed error when or after updating BIOS on Dell. What causes Dell BIOS Guard error? How to Fix it? Now, let’s explore the answers together with MiniTool.
What Causes the Boot Guard Verified Failed Error
According to user reports, the Boot Guard verified failed error often occurs when trying to update BIOS on Dell laptops. Sometimes, however, the Dell BIOS Guard error also happens after they update BIOS and restart their laptops.
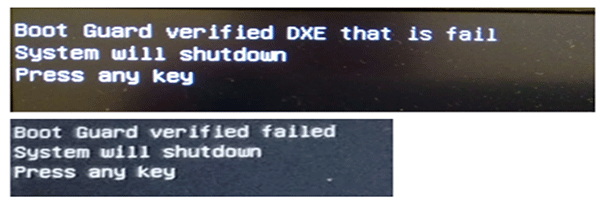
In addition, this error varies on different Dell laptops. Someone receives the “Boot Guard verified failed. System will shutdown. Press any key” message, while some others receive the “Boot Guard verified DXE that is failed” message. Here’s a true example from the Reddit forum:
I have a Dell Inspiron 5577 gaming laptop that every time Windows updates it causes CMOS errors. Today I attempted to update the bios and now all I get at the boot-up screen is the dell logo and boot guard error. I've removed batteries and pressed the power button and tried control and escape. Nothing is helping. Can anyone help me?
reddit.com/r/Dell/comments/olq31b/boot_guard_verified_fail_system_will_shut_down/
What causes the Dell Boot Guard verified failed error? After analyzing lots of posts and user reports, we found the error is often related to two main factors. The first is an outdated BIOS, while the other is corrupted BIOS.
If the “Boot Guard verified DXE is fail” error suddenly happens when you start/restart the laptop, then it can be caused by outdated BIOS. If the Boot Guard error just occurs after or when updating BIOS, then the BIOS of your system may get corrupted.
How to Fix Boot Guard Verified Failed Dell on Windows 10/8/7? After analyzing the reasons for why Boot Guard verified DXE is fail, we explore the following 3 feasible methods to fix the error. It’s highly recommended that you try them in order until the problem gets fixed.
Solution 1. Update BIOS
As discussed above, the main reason behind the Dell Boot Guard verified failed error is outdated BIOS. So, we recommend you check the BIOS version on your computer first. If it’s indeed outdated, don’t worry. We will walk you through detailed steps to update BIOS on Dell.
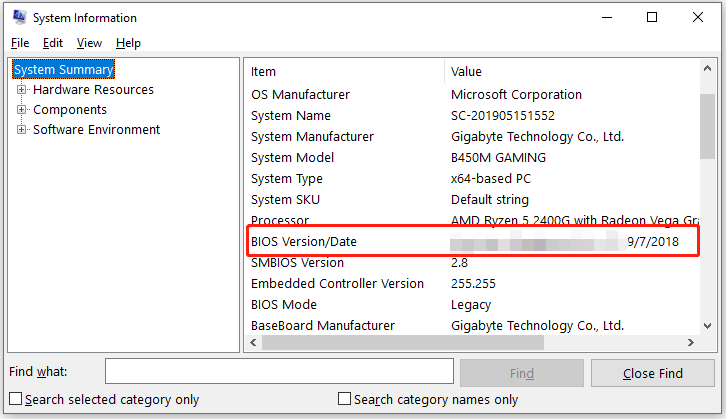
Step 1. Press the Win + R keys to open the Run dialog box, and then type msinfo32 in it and hit Enter.
Step 2. In the System Information window, scroll down to the BIOS Version/Date section and check if it is the latest version of the Dell BIOS update.
There are 2 available methods to update BIOS Dell. The first is to update within Windows, while the other way is to update using a USB flash drive. Here we will show you how to do that in detail.
Dell recommends you to disconnecting any external devices like printers and scanners before updating the BIOS. Besides, make sure that your battery is present in the laptop and the AC adapter is connected with it the whole time while updating BIOS.
Way 1. Update Dell BIOS Within Windows
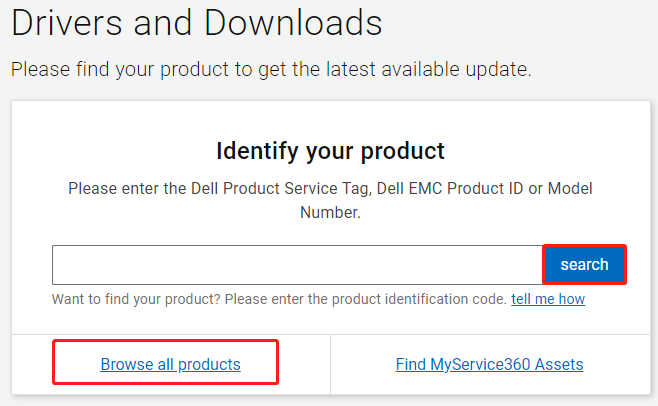
Step 1. Click here to open the Dell support official website, and then enter your Dell Product service tag in the box and click on Search.
Also, you can click on Browse all products and select your system and drivers manually.
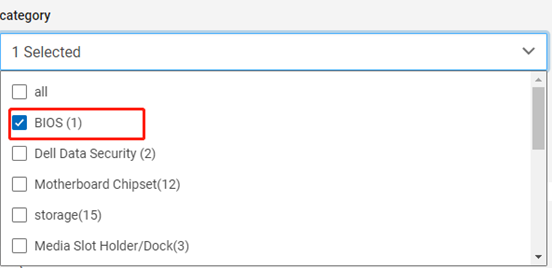
Step 2. Select your working system, go to the Category tab, and select BIOS from the drop-down menu.
Step 3. Tick the checkbox next to the latest version of Dell BIOS that you want to get and click on Download. Then select a location to save the downloaded file.

Step 4. Once downloaded, double-click the executable file and click on Yes to run it.
Step 5. Follow the on-screen instructions to complete the BIOS installation on your Dell laptop. After that, reboot your PC and check if the “Boot Guard verified DXE is fail” error message disappears.
Way 2. Update Dell BIOS Using a USB Drive
However, if you cannot boot into the system or encounter errors while installing the Dell BIOS update, you may have to update the BIOS through a USB drive. Here you need to prepare a fully empty USB drive formatted with FAT32 first and use it to update BIOS.
Part 1: Format Your USB Drive to FAT32
When it comes to formatting a USB drive to FAT32, you may want to use Windows built-in tools like Diskpart or Disk Management. However, Windows tools have limitations in formatting a drive larger than 32GB. In addition, you may encounter some errors like “Windows was unable to complete the format”, “The format did not complete successfully”, etc.
So, we highly recommend you use a professional formatter like MiniTool Partition Wizard. It is a trusted partition manager that boasts many powerful features, including format/extend/resize/wipe/create partitions, migrate OS, benchmark disk, rebuild MBR, etc. Here’s how to format the USB to FAT32 with the MiniTool program.
MiniTool Partition Wizard FreeClick to Download100%Clean & Safe
Step 1. Launch the MiniTool program to enter its main interface, select the USB drive from the disk map and click on Format Partition from the left action panel.
Step 2. In the pop-up dialog box, select FAT32 from the File System drop-down menu and click on OK to save the change. Here you can set the Partition Label and Cluster Size according to your needs.
Step 3. Click on Apply to execute the pending changes. After that, you can use the USB to install the Dell BIOS update.

Part 2. Update Dell BIOS Using the USB Drive
Now, you can use this USB drive to update the BIOS version on your Dell laptops.
Step 1. Connect the USB flash drive to the system that is running normally.
Step 2. Download the Dell BIOS update executable file as we explained in Way 1 and save it to the USB drive. Here you need to note down the exact name of the file like “XPS_9550_1.14.0.exe”.
Step 3. Remove the USB drive and plug it into your Dell laptop.
Step 4. Restart the Dell laptop and press F12 before the computer is booted. By doing so, you will enter BIOS.
Step 5. In the Dell Boot menu, highlight the USB flash drive and hit Enter.
Step 6. A Command Prompt window will pop up, type the exact file name of the BIOS update file, and hit Enter. Then follow the on-screen instructions to complete the update.
![[Fixed] The Boot Configuration Data Store Could Not Be Opened](https://images.minitool.com/partitionwizard.com/images/uploads/2022/07/the-boot-configuration-data-store-could-not-be-opened-thumbnail.png)
Solution 2. Run BIOS Recovery Tool
If you encounter the “Boot Guard verified DXE that is failed” error and cannot boot into the system after updating BIOS, then it may indicate that the BIOS gets corrupted. In this case, the BIOS Recovery tool is a good option that can help repair a corrupt BIOS. It can recover BIOS using the recovery files from a hard drive or a USB drive.
Step 1. Turn on your Dell laptop, and then press and hold the Ctrl + Esc keys until the BIOS Recovery screen appears.
Step 2. Select Recover BIOS under the BIOS Recovery Options and press Enter to start the BIOS recovery process.
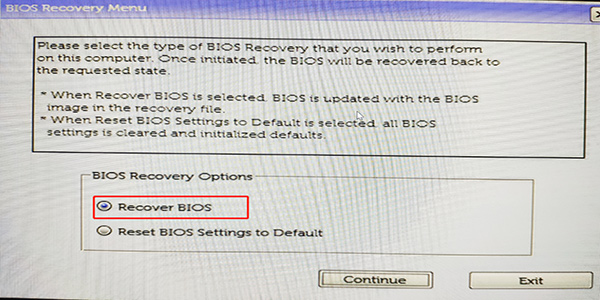
–image from dell community
Step 3. Once this process is complete, restart your system and check if the Boot Guard verification failed error gets fixed.
Solution 3. Reset BIOS
If the above 2 methods fail to work, you can try resetting BIOS to its default settings. Here is a tutorial for you.
Step 1. Restart your computer and press the F12 key to enter BIOS.
Step 2. Look for an option named Restore Defaults/Reset All Settings to Default/Reset to Default or something else. Once found, select this option and press F10 to save and exit the BIOS window.
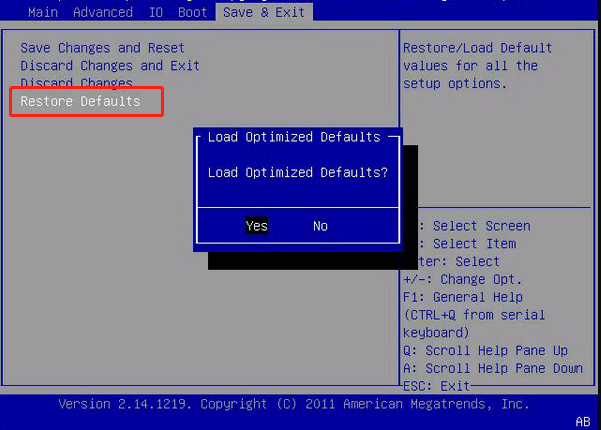
Now, you can reboot the laptop and check if the “Boot Guard verified DXE that is failed” problem is solved.
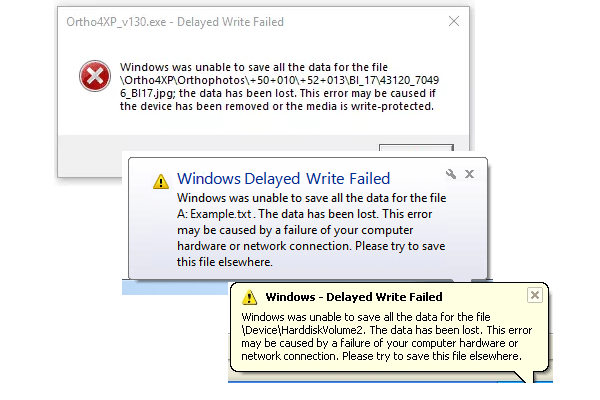
Bonus Tip: Recover Lost Data Caused by the Dell Boot Guard Verified Failed Error
Well, some users experience data loss on the laptop due to the Dell Boot Guard verified failed error caused by corrupted BIOS. Don’t be alarmed. These lost data can be restored using a professional data recovery tool like MiniTool Partition Wizard. If you also encounter data loss due to the error, use the MiniTool software to recover them now!
MiniTool Partition Wizard DemoClick to Download100%Clean & Safe
Step 1. Launch the MiniTool software to enter its main interface and click on Data Recovery from the top toolbar.
Step 2. Select the location that you want to recover lost data from and click on Scan. Here we take the Desktop location for example.
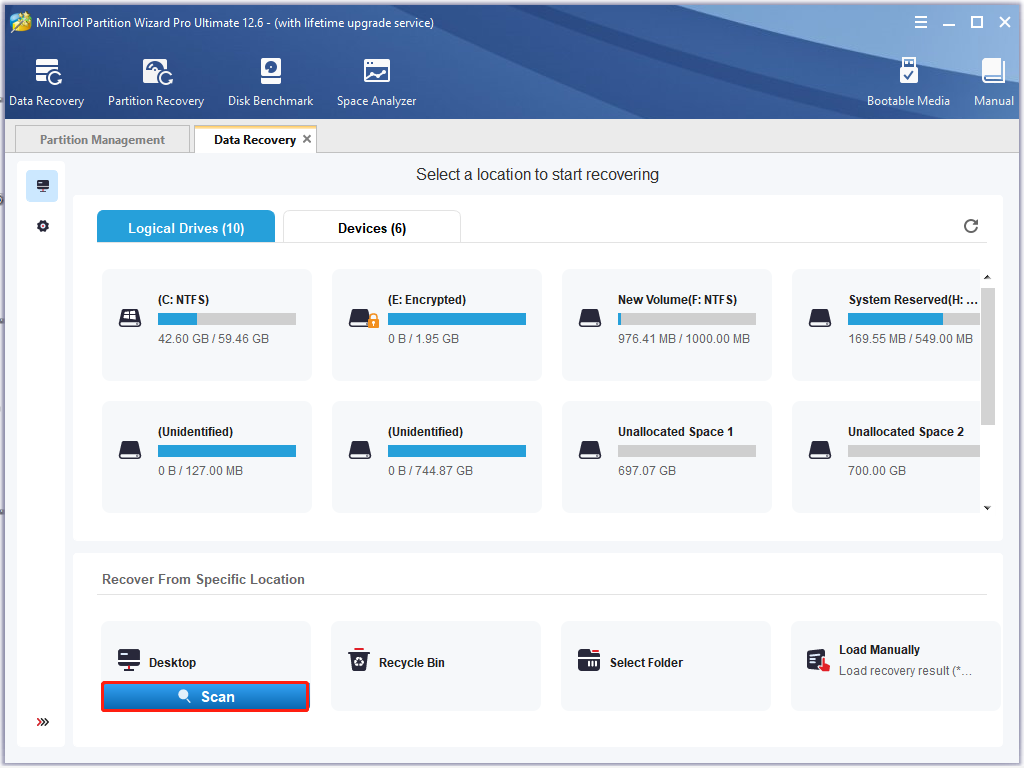
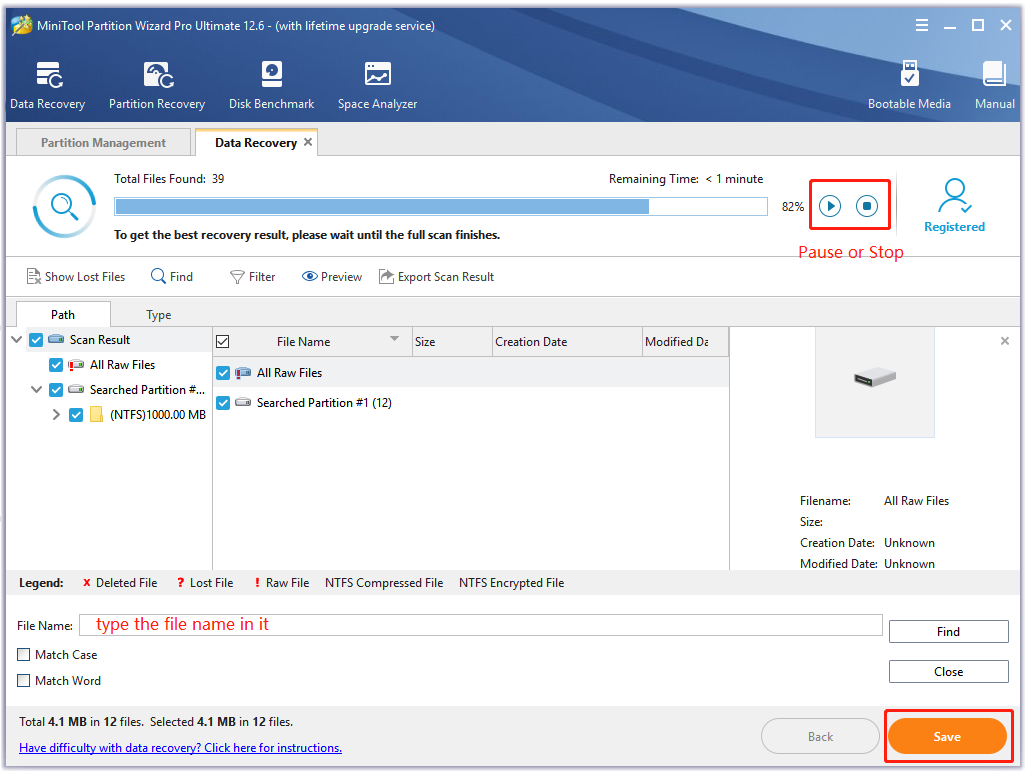
Step 3. Then this tool will start scanning your selected location. If you have found the lost data, click on the Pause or Stop icon to suspend the process, then tick the checkboxes next to the file and click on Save.
Also, you can click on Find, and then type the File name in the search bar to find your desired data quickly.
Step 4. Select a directory to store the recovered file in the pop-up wizard and click on OK to confirm the location. It’s highly recommended to save the recovered data on another drive. Otherwise, the lost/deleted data could be overwritten.

What’s Your Opinion
This post mainly focuses on how to fix the “Boot Guard verified DXE is fail” error on Windows. If you encounter the Dell BIOS Guard error when updating BIOS, you can try the given 2 methods in this post to update BIOS. In addition, you can use the Dell BIOS Recovery tool to recover the BIOS.
If you have any other suggestions about the Dell Boot Guard verified failed error, write them down in the following comment area. Well, you can send us an email to [email protected] if you have problems with the MiniTool software.
User Comments :