If a file is too large for the destination file system, you can’t transfer the file successfully. Fortunately, you can resolve the issue by taking some measures. Here, Partition Magic analyzes the possible causes and collects available troubleshooting methods.
The File Is Too Large for the Destination File System
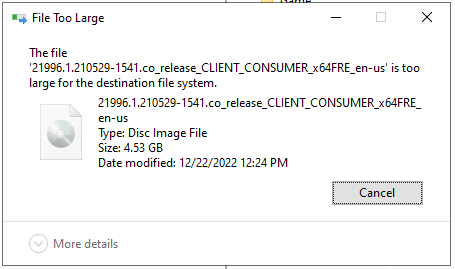
“The file is too large for the destination file system” error message usually appears when you transfer a file that is larger than 4GB to a FAT32 partition. Then you will fail to transfer the file to the target drive.
Here’s a true user feedback from learn.microsoft.com.
“I brought an Onn 32 gigabyte USB stick from Walmart that I'm using for a place to store program and other thing. The file I'm trying to copy is 4.5gb iso file and the stick has 22gb free. When I try to copy it, I get an error stating that the file is too big for the file destination.”
However, some users claim that they still receive the message “file too large for destination file system” even if their drive is already in NTFS. Here’s a post from superuser.com, which complains the issue.
“I have some large database files (4-7GB) that I need to transfer to an external hard drive (WD My Book, 6TB). However, when attempting to copy the files to the hard drive, I receive the error that says The file '[my filename]' is too large for the destination file system and have to abandon the copying process. My external hard drive is already an NTFS file system.”
Causes of File Too Large for Destination File System
The file size limit of the destination drive is the main cause of the issue. As mentioned earlier, the “file too large for destination file system” issue mainly appears while you transfer or save a file to FAT32 partition.
The supported maximum file size of FAT32 is 4GB. So, if you transfer a file over 4GB to a FAT32 partition or drive, you will receive “The file is too large for the destination file system” message.
The file size is also responsible for the issue. Sometimes, file system compatibility issues can also be the cause of the discussed issue. That’s why you still encounter the issue even if the drive is already in NTFS.
Further reading:
FAT32 is one of the most frequently used file systems. It is mainly used on older systems and removable storage devices like USB flash drives and SD cards.
It has good compatibility and can work on almost all operating systems like Windows, macOS, Linux, Android, gaming consoles, smart TVs, etc. However, it has a 4GB file size limit and 2TB partition size limit.
If you have a 3TB hard disk, you can’t format it as a single FAT32 partition. Things are worse if you use Disk Management because it can’t create/format/extend a FAT32 partition to exceed 32GB.
MiniTool Partition Wizard FreeClick to Download100%Clean & Safe
Furthermore, FAT32 lacks file permissions & encryption and is more vulnerable to corruption.
How to Fix the Issue
What can you do to fix “The file is too large for the destination file system” issue? Based on the above possible reasons, you can compress the file or change the file system of the destination drive to get rid of this annoying error.
You can compress the file with a file compressor to a supported file size by the FAT32 partition. Besides, converting FAT32 to NTFS or reformatting the partition to NTFS/exFAT is also an available way to bypass “The file is too large for the destination file system” error.
If you want to avoid the issue, transfer files to a cloud storage service. To sum up, 4 available solutions for “file too large for destination file system” are provided. You can try them to troubleshoot the problem.
Here is a video guide:
Check the File System of the Destination Drive
The “file too large for destination file system” issue can happen to both FAT32 and NTFS drives. The solution varies slightly depending on the file system type. So, you’d better check the file system of the destination drive before carrying out any solution.
How to check the destination drive’s file system? Well, you can check the information via either Disk Management or File Explorer.
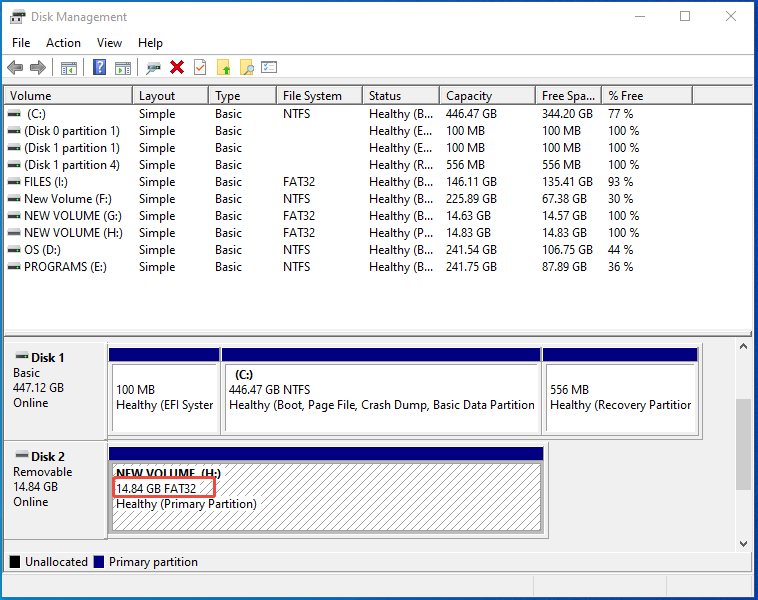
View File System via Disk Management
- Type disk management in the search box.
- Click Open under Create and format hard disk partitions.
- Check the file system of the destination drive in Disk Management.
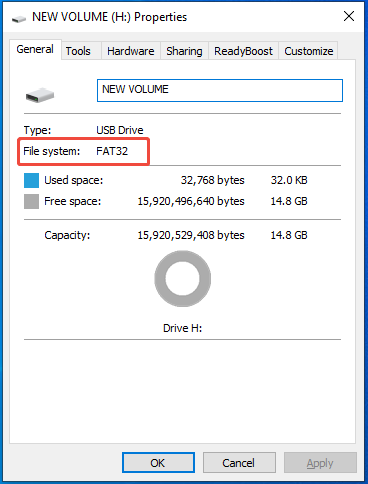
View File System via File Explorer
- Open File Explorer by pressing the Windows and E keys.
- Click on This PC in the left pane.
- Move to the right side of the File Explorer.
- Right-click the destination drive and select Properties.
- Pay attention to the File System field in the Properties window.
Method 1: Compress the File
As the error message indicates, the file is too large for the destination file system. Hence, compressing the file is an available solution to the issue. You can use file compressors like YouCompress and Online File Compressor to compress files.
Both of them are online tools, helping you compress video, image, audio, and PDF files with Internet. If you are connected to the network, you can use them to compress files.
In this scenario, I show you how to compress the file via YouCompress.
Step 1: Go to youcompress.com on your browser.
Step 2: Click Select file and locate & open the file to transfer.
Step 3: After the file is uploaded, tap on Update File & Compress.
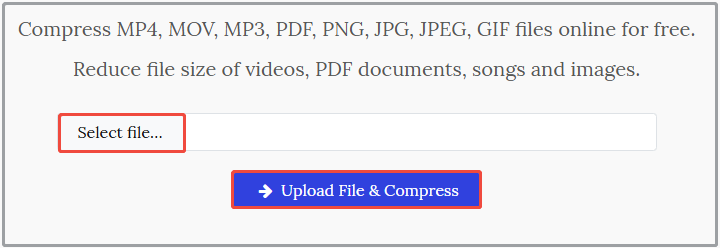
Step 4: Once the file is compressed, download it to your computer.
Then transfer the file again to see if it is still too large for the destination file system. If so, try other methods to get rid of the issue.
Method 2: Convert the Destination Drive to NTFS
If the destination drive is FAT32, consider converting it to NTFS. The supported file and partition size of NTFS are larger than that of FAT32, which reach up to 8PB. Hence, converting the FAT32 drive to NTFS is an effective way to resolve “this file is too large for the destination file system” issue.
In this section, I will show you how to convert the file system by using MiniTool Partition Wizard and Command Prompt respectively. According to your preference, select a tool to make the conversion.
Further reading:
How to choose a suitable file system? According to you needs, pick an ideal one.
- You should choose FAT32 if you want to share files with the most devices and none of the files exceed 4GB.
- You should select exFAT if files are larger than 4GB and you need good support across devices.
- You should pick NTFS if your files are over than 4GB and you share them with Windows users.
Option 1: Use MiniTool Partition Wizard
MiniTool Partition Wizard can help you convert FAT32 to NTFS or NTFS to FAT32 without data loss. Therefore, you are able to switch between FAT32 and NTFS easily with this software. Here, it’s recommended to use it to turn the drive to NTFS.
Besides, this free disk partition software helps you partition hard drives, clone hard drives, migrate OS to SSD/HDD, recover data from hard drives, etc.
Now, download, install, and launch MiniTool Partition Wizard on your computer. After that, follow the steps below to complete the operation.
MiniTool Partition Wizard FreeClick to Download100%Clean & Safe
Step 1: In the main interface of the software, right-click the FAT32 drive in the disk map and choose Convert FAT to NTFS. Alternatively, highlight the FAT32 drive and hit Convert FAT to NTFS in the left pane.

Step 2: Confirm the current and new file system and click the Start button. Then the software will start converting the file system.
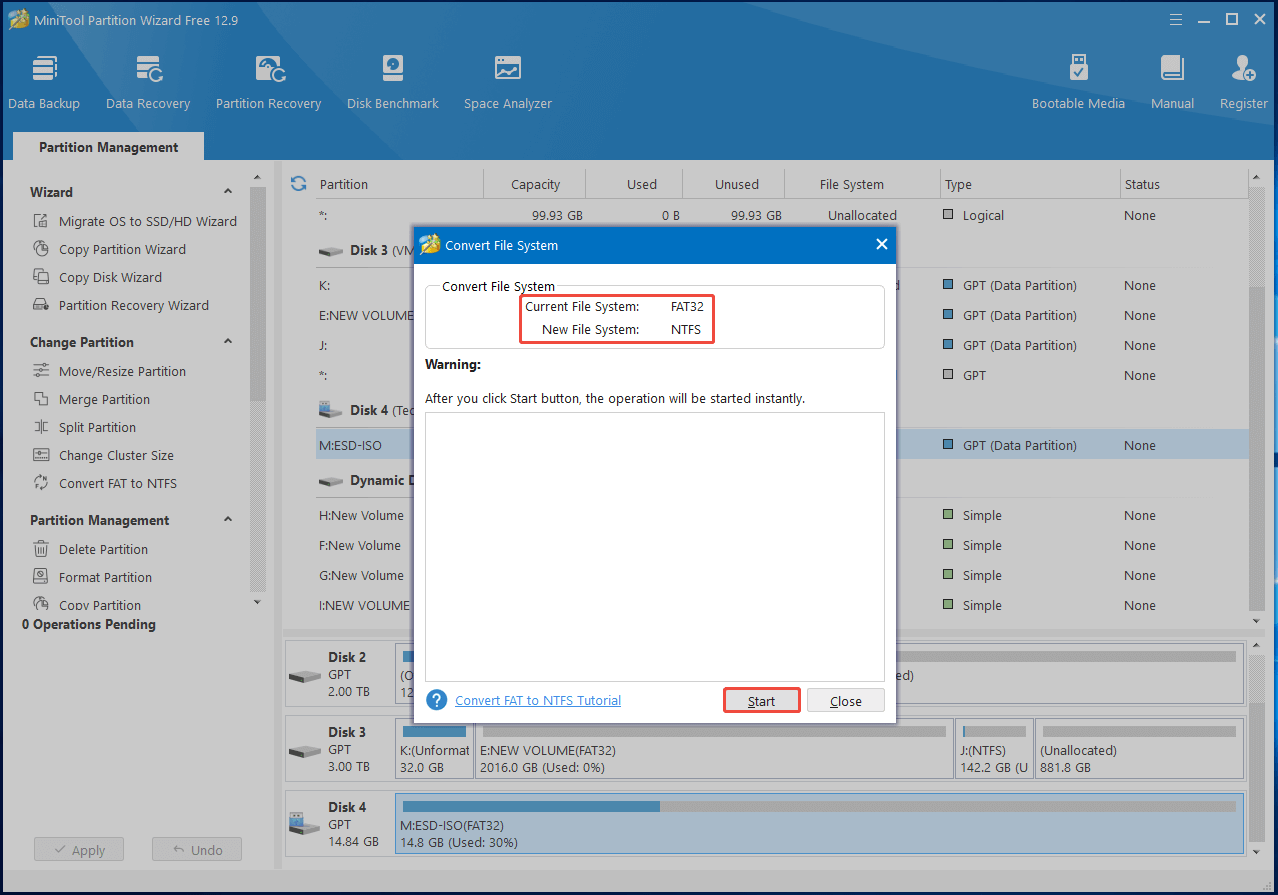
Step 3: Wait for the finish of the conversion. Once done, the drive will turn to NTFS.
Option 2: Use Command Prompt
Command Prompt helps you convert FAT32 to NTFS by running a few command lines. Here’re the steps for doing that.
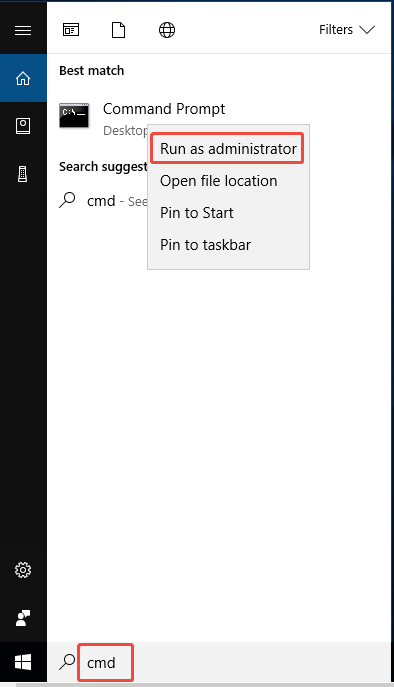
Step 1: Run Command Prompt as administrator from the search box.
- Type cmd in the search box.
- Right-click Command Prompt under Best match and choose Run as administrator.
Step 2: In the User Account Control window, hit the Yes button to continue.
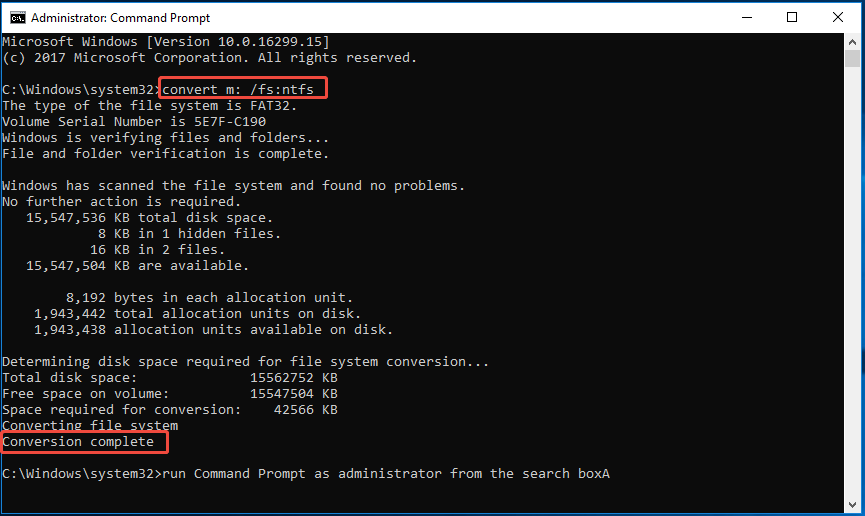
Step 3: In Command Prompt, input convert m: /fs:ntfs and press Enter. Once the conversion process finishes, you will see the “Conversion complete” message.
Method 3: Format the Drive to NTFS
Alternatively, you can also directly format the drive to NTFS. Though this method is effective, there’s the risk of data loss. To avoid that, you should back up the data stored on the drive before proceeding.
You can use the Copy and Paste feature or third-party data backup software like MiniTool ShadowMaker to perform the task. The “Copy and Paste” feature is easy to use, but it sometimes can get stuck or fail to work.
So, it’s recommended to make backups with MiniTool ShadowMaker. Get the software installed and follow the steps below to back up the data.
MiniTool ShadowMaker TrialClick to Download100%Clean & Safe
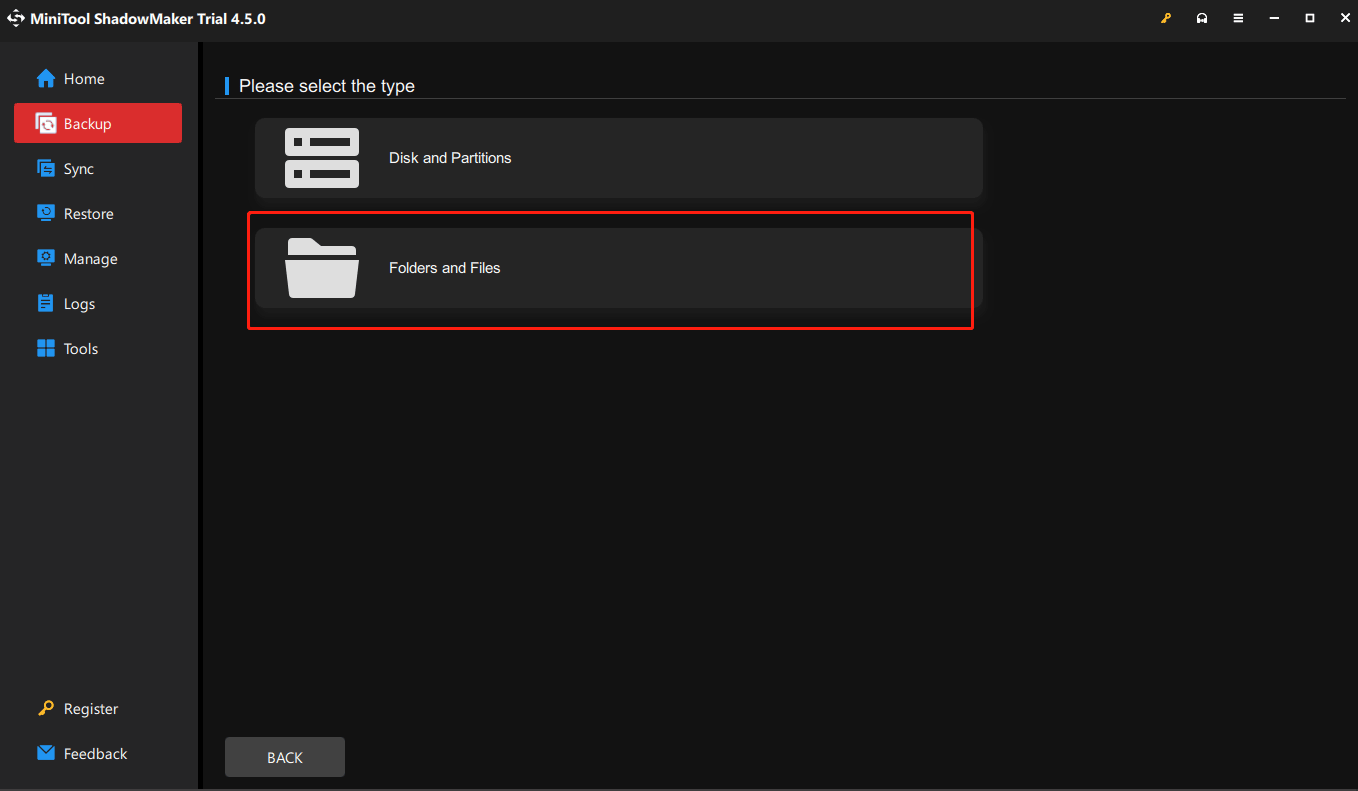
- Run MiniTool ShadowMaker.
- Tap on the Backup tab on the left pane.
- Click the SOURCE section and choose the Folders and Files option.
- Tap OK to confirm.
- Hit the DESTINATION section and select the destination path.
- Click OK to save changes.
- Choose Back Up Now or Back Up Later.
After you back up the data, you can start formatting the drive now. Here, I collect 4 easy methods to format the drive to NTFS or exFAT. You can pick one way to perform the task.
Option 1: Use File Explorer
File Explorer provides a format option, helping you format storage devices conveniently. Within a few clicks, you can finish the formatting operation.
Follow the steps below to go through the process.
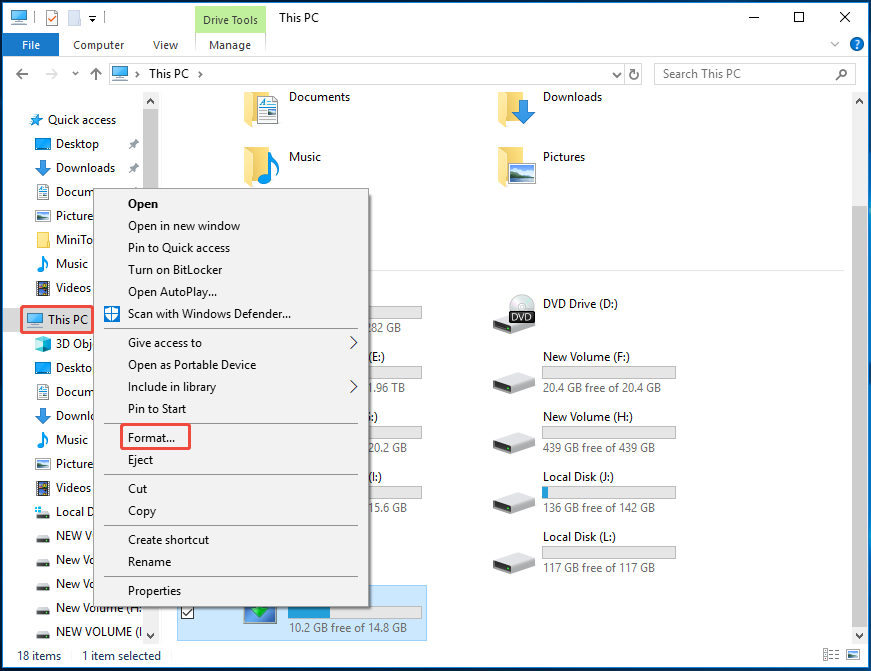
Step 1: Press Windows + E to open File Explorer.
Step 2: Click This PC in the left pane.
Step 3: Move to the right side, right-click on the target drive, and choose Format.
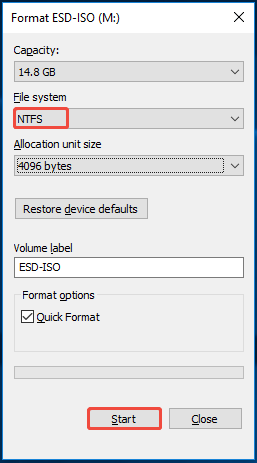
Step 4: Configure parameters based on your needs and click Start. If you don’t have specific requirements, simply follow the default settings.
- Choose NTFS from the file system drop-down menu.
- Set a suitable allocation unit size from the menu.
- Input the volume label.
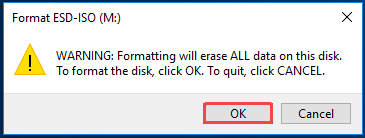
Step 5: Click OK in the prompted window to confirm the operation. After a while, the drive will be formatted to NTFS.
Option 2: Use Disk Management
Disk Management is a built-in tool on Windows that allows you to perform various tasks on hard disks. For instance, you can set the disk online/offline, initialize the disk, convert the disk to dynamic one, and convert the disk to MBR/GPT.
You are also allowed to create/format/extend/shrink/delete volumes, mark partition as active, change drive letter and path, etc. In a word, Disk Management is a multifunctional disk managing tool.
Now, open Disk Management and use it to format the drive.
Step 1: Open Disk Management from the Quick Link menu.
- Right-click the Start icon at the bottom left corner of the desktop to open the Quick Link menu.
- Choose Disk Management.
Step 2: Right-click the FAT32 partition and select the Format option.
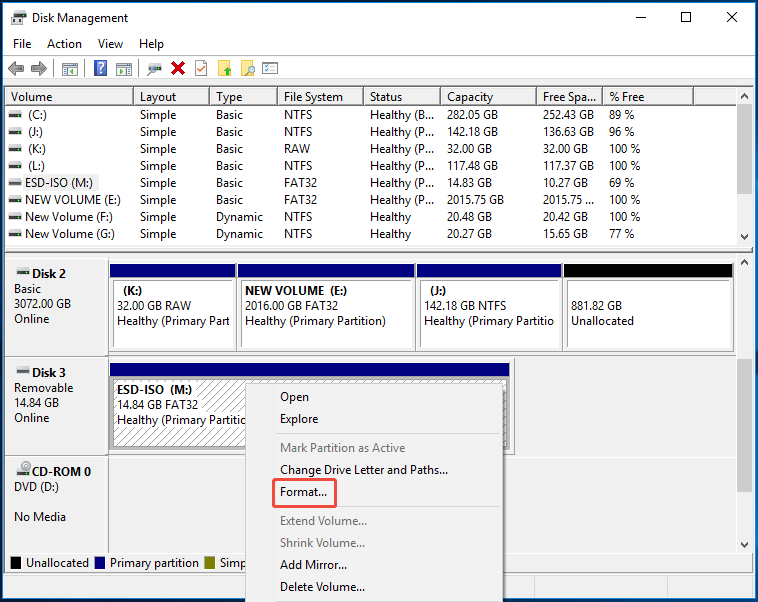
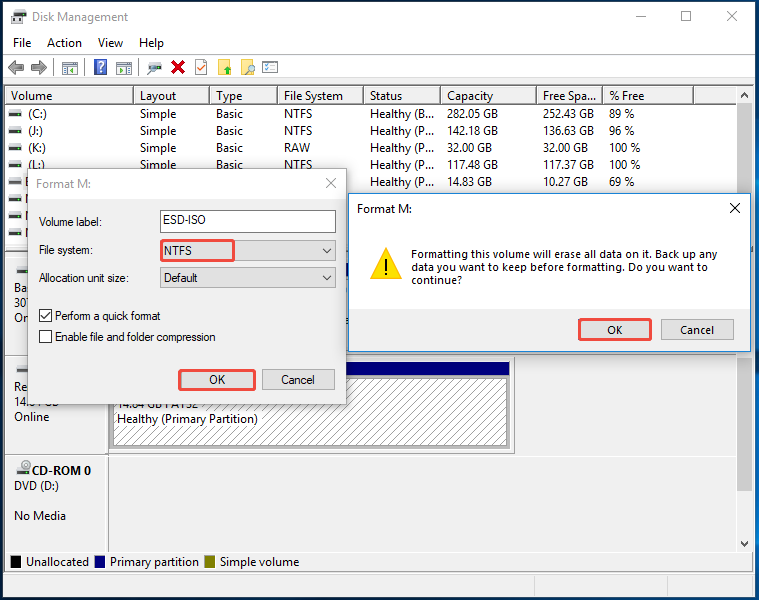
Step 3: Choose NTFS file system from the drop-down menu. According to your needs, set volume label and allocation unit size. Then click OK to save changes.
Step 4: In the warning window, click OK to move on.
Option 3: Use DiskPart
DiskPart is a command-line tool on Windows. It helps you perform various tasks related to hard disk by running a few command lines.
For example, you can create/extend/shrink/format/delete partitions, clean disks, assign drive letter, convert MBR to GPT, and make other changes by using DiskPart.
Now, run DiskPart as administrator and format the FAT32 drive to NTFS with it.
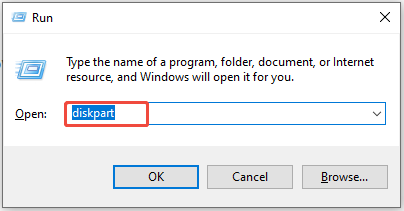
Step 1: Run DiskPart as admin from Run.
- Press the Windows and R keys simultaneously to open the Run window.
- Type diskpart and press the Ctrl + Shift + Enter keys.
- In the User Account Control (UAC) window, click Yes to allow the operation.
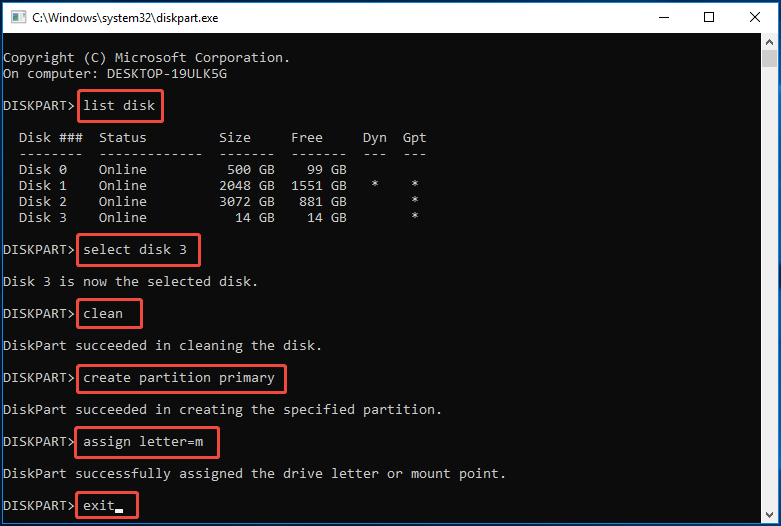
Step 2: In DiskPart, input the following commands and press Enter after each.
- list disk
- select disk 3 (replace 3 with the exact disk number)
- clean
- create partition primary
- format fs=ntfs quick
- assign letter=m (replace m with other available drive letter)
- exit
Option 4: Use MiniTool Partition Wizard
MiniTool Partition Wizard is also an available tool to format the drive. It works with multiple storage devices, including SSDs, HDDs, USB flash drives, SD cards, external hard drives, and so on.
It can be used as a USB formatter, SD card formatter, FAT32 formatter. Compared with the above Windows format tools, it is more advanced. For instance, it offers you more file systems.
It allows you to format a drive to FAT32, exFAT, NTFS, Ext2, Ext3, Ext4, or Linux Swap. Moreover, it breaks the FAT32 partition size limit, enabling you to format a partition larger than 32GB to FAT32.
Get it installed on your PC and follow the steps below to finish the operation.
MiniTool Partition Wizard FreeClick to Download100%Clean & Safe
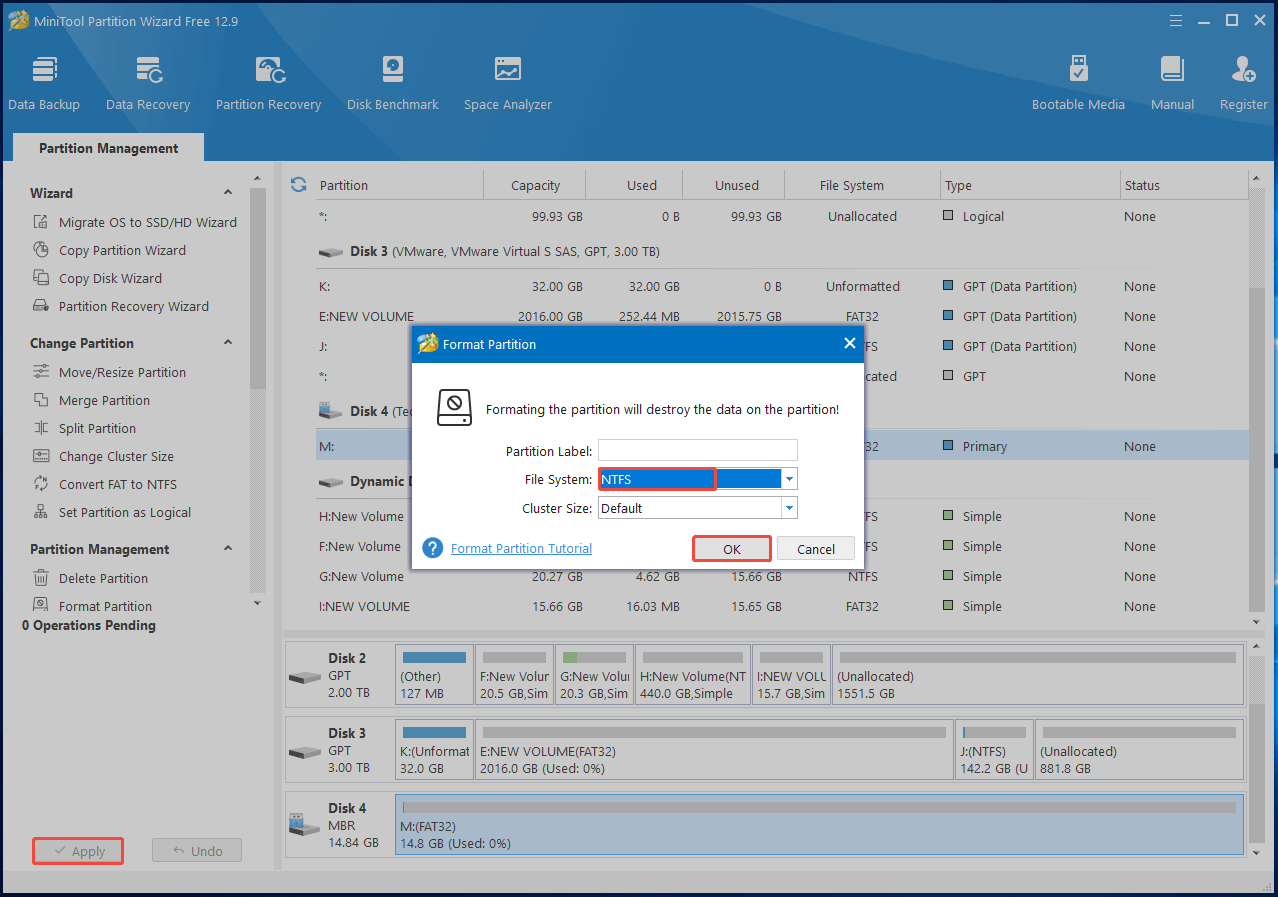
Step 1: Run the software, right-click the target drive, and choose Format.

Step 2: Pick NTFS from the file system drop-down menu and click OK.
Step 3: Click Apply > Yes to carry out the pending operation.
Method 4: Transfer the File with Cloud Storage
You can also upload local files to a cloud storage service or transfer files between different cloud storage services to bypass the file too large for destination file system issue.
Cloud storage services like Google Drive, Dropbox, or OneDrive are good to use. Here, I illustrate how to transfer files to Google Drive.
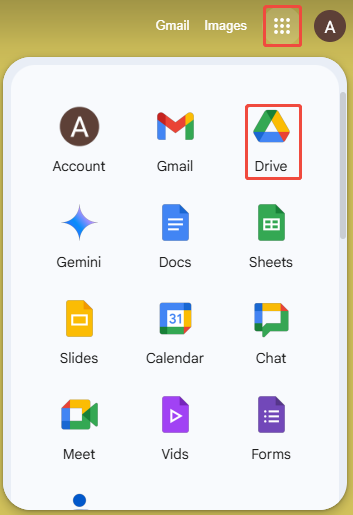
Step 1: Access Google Drive on your computer.
- Tap on the Google apps icon.
- Click Google Drive.
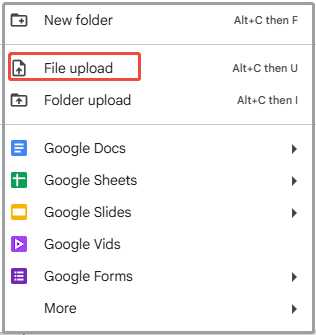
Step 2: Right-click the New option and select File upload.
Step 3: In the prompted window, locate the file to transfer, select it, and click the Open button.
Step 4: Wait for the finish of the upload process.
Bottom Line
If you transfer a file over 4GB to a FAT32 partition, then this file is too large for the destination file system. You can reduce the file size or change the file system of the destination drive to resolve the issue.
To avoid “file too large for destination file system” issue from happening, transferring files to the cloud storage service is an ideal method. Up to now, available methods to troubleshoot and prevent the discussed issue have been offered to you.
According to your situation, take suitable actions. If you encounter any issue while using MiniTool Partition Wizard, contact us by sending an email via [email protected]. We will get back to you as soon as possible.
File Too Large for Destination File System FAQ
1. Locate the file to split on your computer.
2. Right-click the target file and choose “WinRAR” > “Add to archive…”.
3. In the Archive name and parameters window, configure settings like “archive name”, “split to volumes, size”, and other options based on your needs.
4. Click OK to begin the archiving process.
Then you can transfer or save files to FAT32 partitions without “file too large for destination file system” issue.
User Comments :