ReadyBoost Overview
What is ReadyBoost on Windows? How does it work? This section will focus on the 2 questions.
What Is ReadyBoost
To help users speed up Windows PC, Microsoft introduced a new disk caching feature called “ReadyBoost” in 2007. At the very beginning, this tool can only be used for making Windows Vista run faster. Now, ReadyBoost is included in later versions of the Windows operating system.
When running many apps and programs, much cache will be generated and then slow down your computer. With the ReadyBoost, many NAND memory mass storage devices, including SD cards, USB flash drives, and CompactFlash can be used to store cache created by RAM. The ReadyBoost is suitable for computers with HDD instead of SSD.
You can find the Windows ReadyBoost tab from the drive’s properties dialog. The minimum cache that you can save in a drive is 250MB. Besides, it utilizes AES-128 to compress and encrypt all data placed on the flash drive.
How Windows ReadyBoost Works
ReadyBoost works relying on a helper tool for SuperFetch – a disk cache management technology that was designed to improve the responsiveness between RAM and cache when loading apps. However, SuperFetch has some limitations on the speed of transferring speed between RAM and the cache. This is why ReadyBoost comes into being.
When plugging in a USB flash drive or SD card to your computer and enabling the ReadyBoost feature, Windows will free up memory by using the ReadyBoost cache stored in a USB stick instead of the hard drive. By doing so, many small files can be read faster from a USB stick than be read from your hard drive.
Now, you may have an overall understanding of the Windows ReadyBoost. The more important thing is how to use ReadyBoost Windows 10. Let’s keep reading the following part.

How to Use ReadyBoost Windows 10
You can use either a USB flash drive or an SD memory card for ReadyBoost Windows 10. Here we will walk you through detailed steps to run ReadyBoost on a USB stick.
ReadyBoost Windows 10 Requirements
To run Windows ReadyBoost smoothly, make sure that your flash memory should meet the following requirements:
- Make sure the minimum free space per flash drive is 1GB.
- Make sure the maximum free space per flash drive is 32GB.
- Make sure the minimum transfer rate is 3.5MB/s.
- Make sure your USB flash drive/SD memory card is formatted to NTFS.
In addition, you need to make sure the SuperFetch (Windows 1803 or earlier version) or SysMain service (Windows 1809 or later version) is running on your computer. Here’s how to check the status of the SuperFetch / SysMain service.
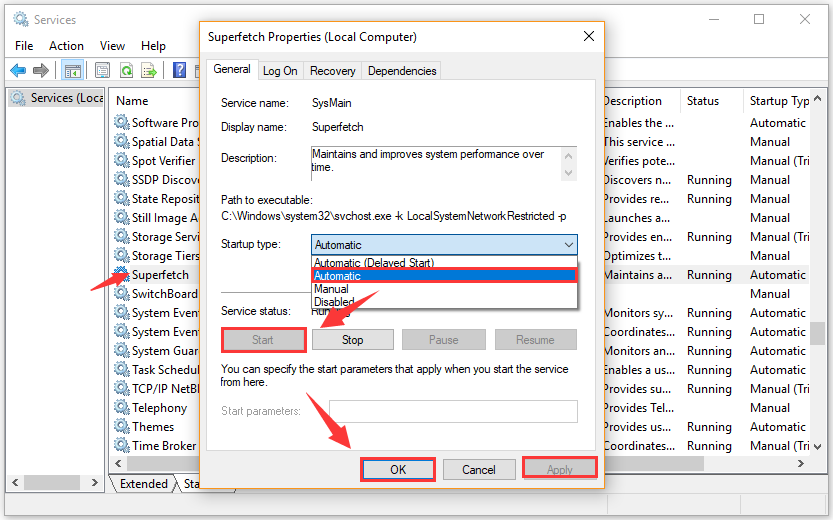
Step 1. Press the Win + R key to open the Run dialog box, and then type services.msc in it and hit Enter.
Step 2. Scroll down the list of services to reach the SuperFetch / SysMain service and check if it is running. If not, right-click it and select Properties.
Step 3. Change the Startup type to the Automatic status and click on the Start button. Then click on OK and Apply to save the changes.
Use ReadyBoost to Speed up Your Windows
Are you ready to set up a USB flash drive for Windows 10 ReadyBoost? Now, you can follow the detailed steps below:
Step 1. Insert your USB flash drive into the port of your computer and make sure it is connected properly.
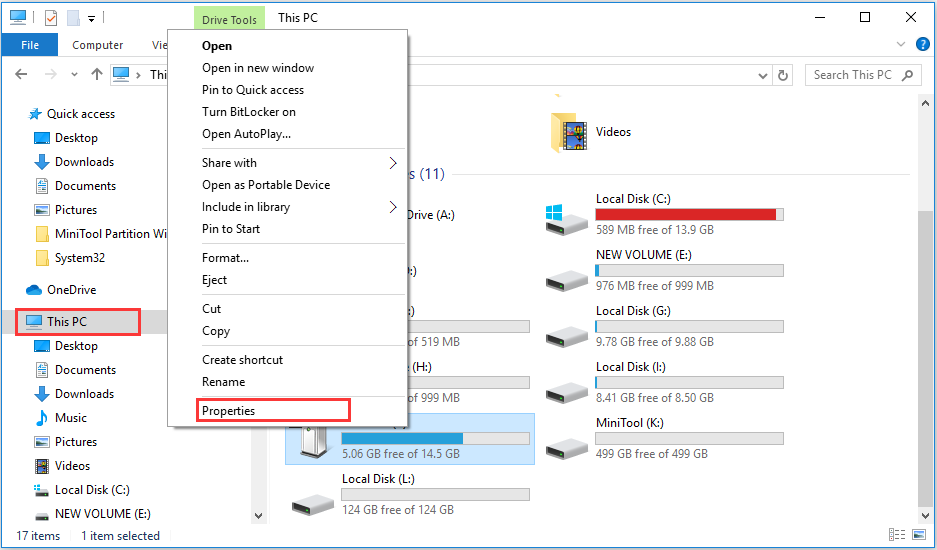
Step 2. Press the Win + E key to open the File Explorer, and then click on This PC from the left pane and navigate to the Devices and drives section.
Step 3. Right-click the USB flash drive and select Properties from the context menu.
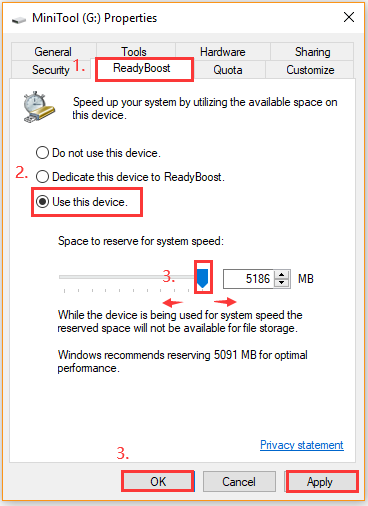
Step 4. Navigate to the ReadyBoost tab, and then you may wait for some time if you first access the ReadyBoost tab. The Windows system will start a series of tests to determine if your drive is compatible with ReadyBoost.
Step 5. Now, select the Use this device option and move the slider to modify the reserved space for the ReadyBoost feature based on your needs. If you want to use the USB stick for any other purposes, select the Dedicate this device to ReadyBoost option.
Step 6. Click on OK and Apply to execute this change.
This is the entire process of using a USB drive for Windows 10 ReadyBoost. Sometimes, however, a great many people report that ReadyBoost often runs into errors. Is it still an effective tool to speed up the system? You can find the answer from the next section.
Is Windows USB Really Effective
Is Windows ReadyBoost still worth using? The answer depends on specific situations. As mentioned above, ReadyBoost mainly utilizes a USB drive to store cache data like RAM. However, the fact is that most USB drives are slower than RAM. Besides, a computer runs faster when the cache data is stored on the RAM than on a USB stick.
Thus, ReadyBoost is really helpful only when your computer doesn’t have enough RAM. If there is enough RAM, ReadyBoost has little impact on the computer performance. In other words, ReadyBoost is an ideal choice for computers with small RAM sizes like 512MB or even 1GB.
In addition, you need to meet many requirements if you want to use Windows ReadyBoost smoothly. The transfer speed of your USB flash drive also determines how much performance you will improve. If you have an old and very slow USB stick, ReadyBoost won’t be allowed by the Windows system to use.
What’s to Do If ReadyBoost Not Working
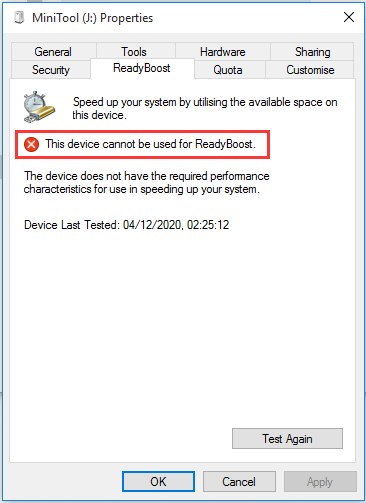
Although ReadyBoost provides an accessible way to improve computer performance, lots of users complain that ReadyBoost can’t work normally. When accessing ReadyBoost via a USB drive, many people receive the error message This device cannot be used for ReadyBoost.
This error message often appears when the USB stick isn’t compatible with Windows 10 ReadyBoost. According to a survey, some reasons like improper file system, corrupt ReadyBoost cache, incompatible or bad USB drive can trigger the error.
Here are some common methods to fix this device cannot be used for ReadyBoost error.
Fix 1. Delete All External Drives’ Folders
Each time you use a newly formatted USB drive for ReadyBoost, Windows will automatically make many folders. If these folders get corrupted, you may encounter the error. So, we recommend you delete all external drive folders.
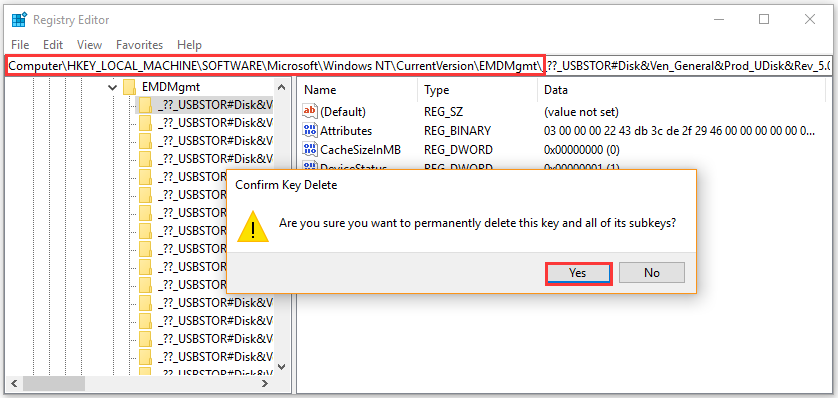
Step 1. Press the Win + R key to open the Run dialog box, and then type regedit in it and hit Enter.
Step 2. In the Registry Editor window, locate the following path from the left sidebar.
HKEY_LOCAL_MACHINESOFTWAREMicrosoftWindowsNTCurrentVersionEMDMgmt
Step 3. Once you reach the EMDMgmt location, open this folder and you will find all saved folders related to the connected drive.
Step 4. Right-click the selected folder, and then select Delete and click Yes to confirm. Here you need to delete every folder under the EMDMgmt folder.
After rebooting your computer, you can reconnect the USB stick and try to use it for the ReadyBoost. If it doesn’t work, move on to the next solutions.
Fix 2. Format Your USB Flash Drive
Sometimes, this error can occur if the file system is unsupported. In this case, you just format the USB drive as NTFS and let it use for ReadyBoost.
Here are 3 major choices to format a USB drive to NTFS. You may use DiskPart or Disk Management to fully format the drive using. However, the 2 tools have limitations when formatting a drive larger than 32GB and it will erase all data on the drive.
Here is another reliable tool – MiniTool Partition Wizard that can help you format USB drive easily. It is a professional partition manager that boasts many practical features including extend/resize the partition, wipe a hard drive, analyze disk space, check bad sectors, etc.
MiniTool Partition Wizard FreeClick to Download100%Clean & Safe
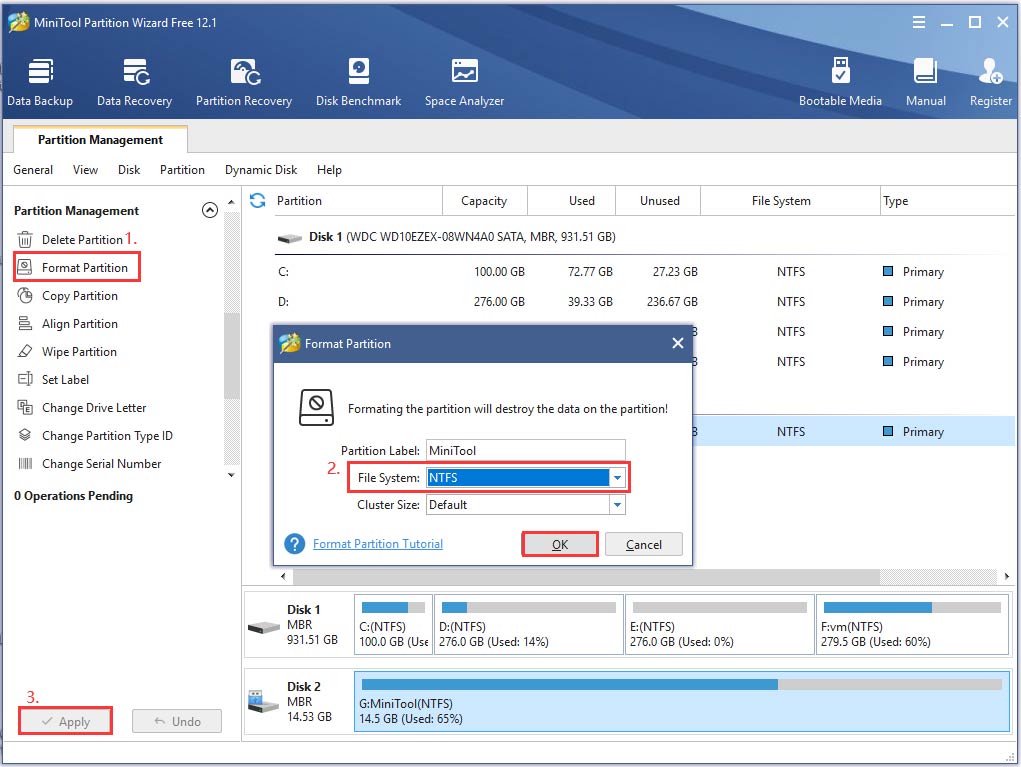
Step 1. Connect your USB flash drive to the computer and launch this program to get its main interface.
Step 2. Select the USB drive and click on the Format Partition feature on the left pane.
Step 3. Select the NTFS file system from the drop-down menu and click OK.
Step 4. Click on Apply to execute this change.
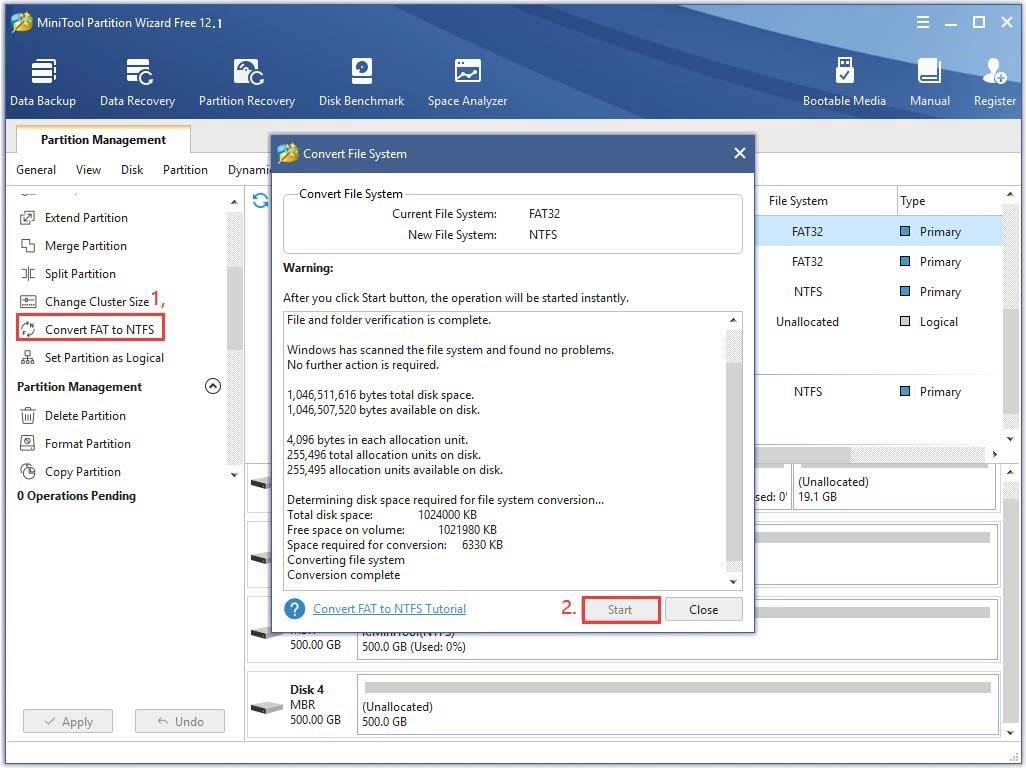
Formatting a USB flash drive will erase all data on it, but you can use this powerful tool to convert FAT to NTFS without data loss. It is very simple to operate. Click the Convert FAT to NTFS feature from the left pane and click on Start to begin converting the file system.
Fix 3. Upgrade to SSD
If the above methods fail to work, this indicates that your USB drive is not supported by the Windows ReadyBoost feature. At this time, you may need to take other solutions. In addition to ReadyBoost, there are many other methods to speed up your Windows PC.
One of the most effective and common ways is to upgrade your hard disk to SSD. How to upgrade to SSD without reinstalling OS? MiniTool Partition Wizard can help you do that easily. Now, follow the steps below to upgrade your hard drive.
Step 1. Connect the SSD drive to your current computer and enter the interface of this program.
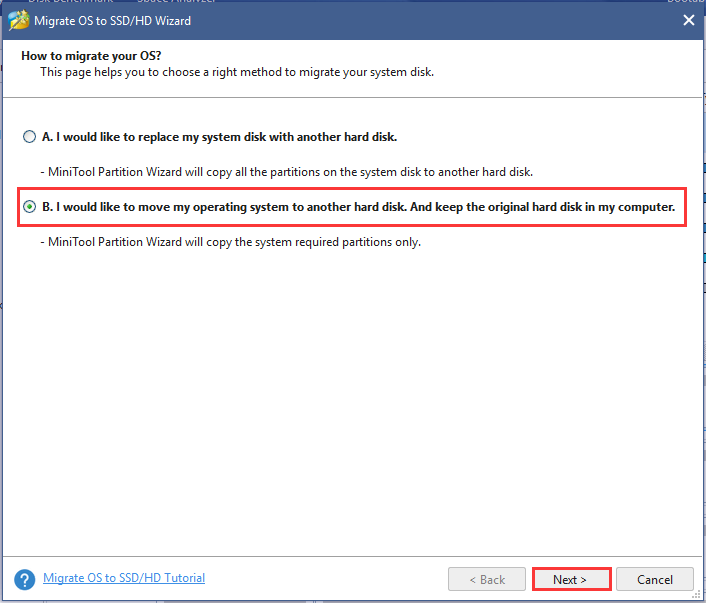
Step 2. Select the Migrate OS to SSD/HD Wizard from the left pane, and then select Option B to copy the system required partitions only and click on Next to go on.
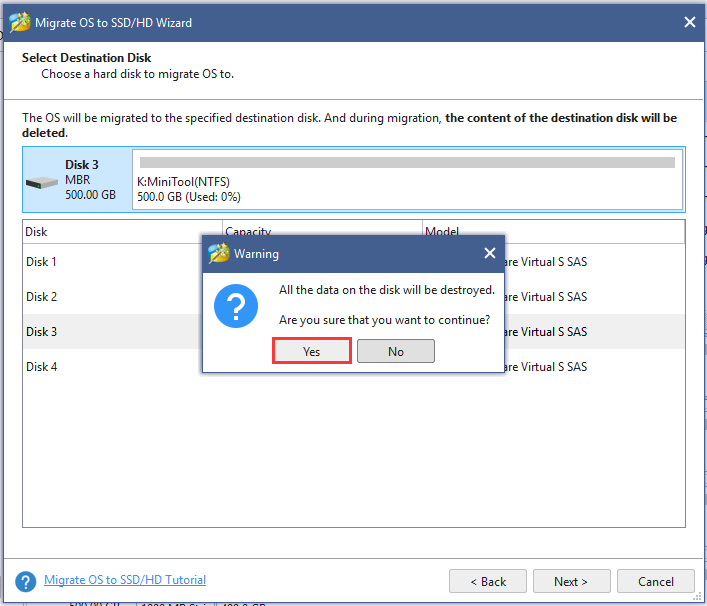
Step 3. Select your connected SSD and click on Next. If you have backed up all important data on the target drive, click on Yes to confirm this operation.
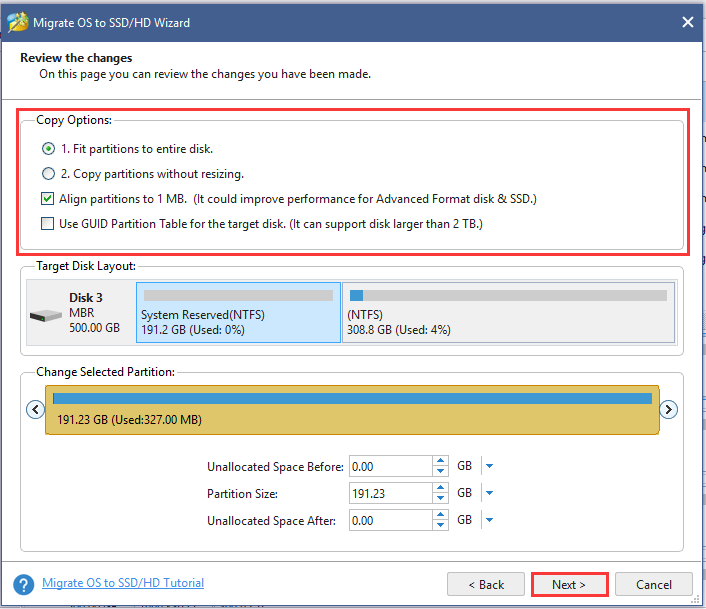
Step 4. Select a copy option based on your needs and click on Next to continue.
Step 5. Click on the Finish button in the pop-up window. Finally, click on Apply to execute the pending operations.
Alternatively, you can use the Copy Disk Wizard feature to transfer all partitions from the previous HDD to SSD.
Bottom Line
What is ReadyBoost? How to use this tool? Is it really effective? This post has explained these questions in detail. Besides, we provide some solutions for the error “This device cannot be used for ReadyBoost”.
If you have other nice suggestions for this Windows ReadyBoost feature, let us know by typing them in the comment area. Also, you can send us an e-mail via [email protected] if you have any questions about MiniTool Partition Wizard.
User Comments :