An Overview of MSI Mystic Light Not Working
Before talking about MSI Mystic Light not working error, you need to have an overall understanding of MSI Mystic Light.
What is MSI Mystic Light?
Mystic Light actually is an application, which enables you to control the LED light effects of MSI and its partner products. With this software, you can enjoy shining and cool light effects. However, many users complain that Mystic Light not working on their computer.
Such complaints can be found on technical forums and communities. Well, here is a true example from Overclockers.
Hi, I’ve just built two new identical systems featuring MSI B450 TOMAHAWK MAZ motherboard and Deepcool RF120 fans. Both were working absolutely fine with the RGB until today. The one system has reverted back to static red colouring and Mystic Light wouldn’t open. I’ve uninstalled and reinstalled the software and now it opens, but just won’t change colour whatever I do. It’s staying read no matter what. Any ideas? Thanks in advance. –Overclockers
To work out this error, it is vital to find the possible causes behind it. The more clues you find, the more likely you are to resolve the error. Now, check the further information about MSI Mystic Light not working z370!
Also read: Seagate External Hard Drive Not Working No Light – 4 Fixes
Why Does MSI Mystic Light Not Working
Everything happens for a reason. There is no exception for the Mystic Light not working error as well. What factors can trigger the MSI Mystic Light not working error? According to user reports, we found that the error occurs in these cases.
When you are running an outdated version of MSI Mystic Light or Dragon Center, Mystic Light will not work. You will come across the Mystic Light not working error when installing a corrupted MSI Mystic Light or Dragon Center.
As claimed by some users, the Mystic Light doesn’t appear in the Dragon Center at all. In some case, users cannot control specific lights. In a word, almost all the types of MSI desktops, computers and motherboards will be affected.
Hence, plenty of users want to get rid of this error and would like to get the MSI Mystic Light working again. In the next section of the post, several troubleshooting methods will be introduced to you.
Recommended reading: Windows 10 Night Light Not Working? Here Are Fixes
How to Fix Mystic Not Working
To help you solve the MSI Mystic Light not working error, we will share you with some solutions. All of them are based on the possible causes for the error. Now, let’s explore them one by one.
Method 1: Update Dragon Center to the Newest Version
Like Windows system, Dragon Center and MSI Mystic Light are regularly updated to add new features and patches for known bugs. It is very likely that the MSI Mystic Light not working occurs due to an outdated version (Mystic Light or Dragon Center).
In this case, you should update Dragon Center (or MSI Mystic Light) to the latest version. Here, we will tell you how to install the newest version of Dragon Center and Mystic Light.
Step 1: Open MSI Dragon Center and then move to its Live Updates part.
Step 2: After clicking on the Scan button, you will see if there are any available Dragon Center and Mystic Light updates.
Step 3: If you find any new updates, choose the updates and then click the Install button to install them.
Step 4: After installing new updates, restart your computer and then check if Mystic Light runs properly. If not, try other methods immediately.
Method 2: Reinstall MSI Mystic Light or Dragon Center
Since a corrupted MSI Mystic Light or Dragon Center installation can cause MSI Mystic Light not working, reinstalling Mystic Light or Dragon Center probably resolve the error. How to do that? Here are detailed steps.
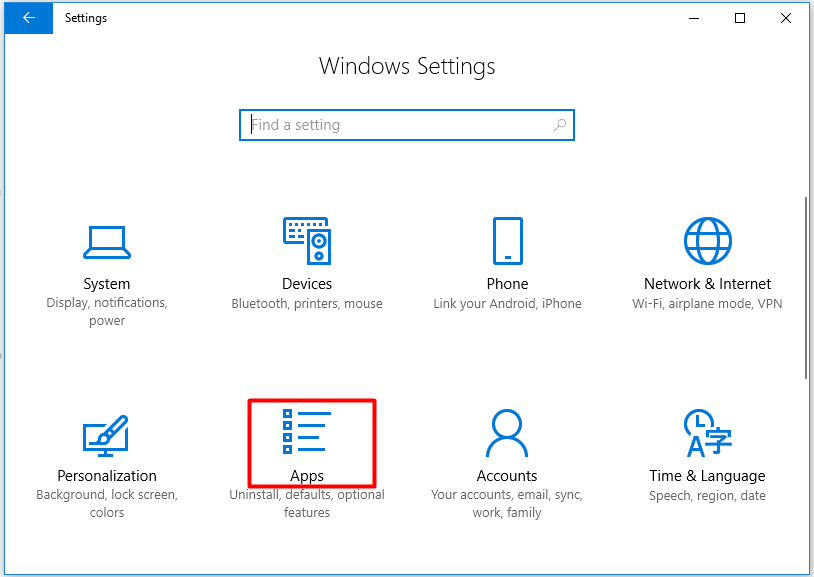
Step 1: Right click on the Windows icon on the desktop to open the Start menu and then click on Settings to go on.
Step 2: Click the Apps icon on the prompted window.
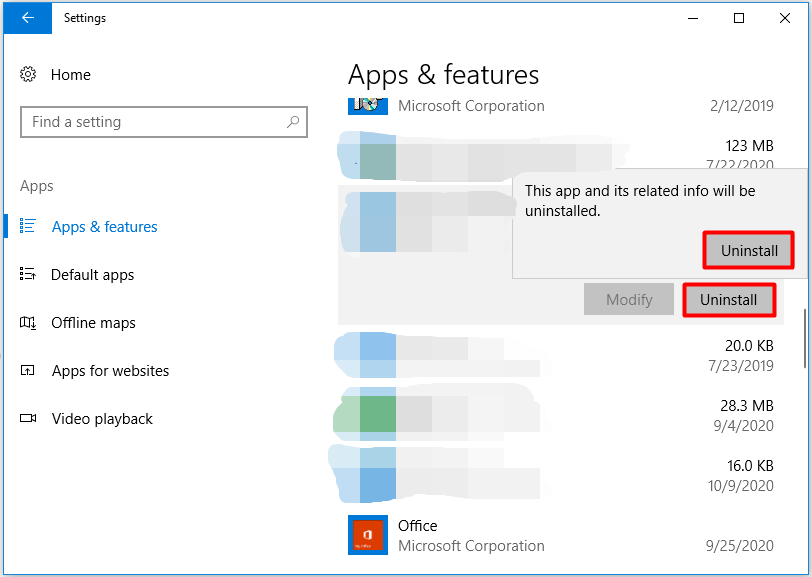
Step 3: Move to the right side of the next window and scroll down the content to find Mystic Light.
Step 4: Click on Mystic Light and then click the Uninstall button. In the confirm section, click Uninstall to execute the operation.
Step 5: After uninstalling Mystic Light, repeat the above steps to uninstall the Dragon Center and MSI SDK (if installed).
Step 6: Then restart your computer and log in to the administrator account.
Step 7: Open the File Explorer and remove the installation directory of MSI by following the path below.
C:Program Files (x86)MSI
Step 8: After that, download and install the Mystic Light and Dragon Center from the official website. Finally, reboot your system and run Mystic Light to see if it runs normally.
Method 3: Keep BIOS Up to Date
You are able to obtain the latest technological advancements and patches by updating basic input/output system (BIOS). If the BIOS is not updated to the latest version, you sometimes may receive some errors.
As you see, updating BIOS regularly is vital. How to do that? Well, you can check and update BIOS in Windows smoothly by referring to this full guide.

Method 4: Re-Enable/Disable RGB Lights in BIOS
The Mystic Light not working error could also result from a temporary glitch of the system modules or RGB lights. For this, you can disable and re-enable the RGB lights via the operating system’s BIOS. Here is the tutorial for you.
Step 1: Turn off your computer and then turn on it. During the startup process, keep pressing a key (usually F2 or F10) to enter the BIOS.
Step 2: Disable RGB light with system’s physical switch (if your system has one). Alternatively, you can also disable the RGB light manually.
Step 3: After saving the change, restart your computer and then boot into the BIOS again.
Step 4: At this time, you should enable the RGB lights. Save the change and reboot your computer. Now, the MSI Mystic Light not working issue should be repaired.
Method 5: Remove Conflicting Apps
Generally speaking, applications can co-exist and share resources in Windows. However, some conflicting programs like Riot Vanguard and anti-cheat software of Valorant can affect the normal running of MSI Mystic Light.
Under this circumstance, removing the conflicting programs is recommended. What are conflicting applications? Well, you can find them by clean booting your computer. Then follow the steps below to remove them.
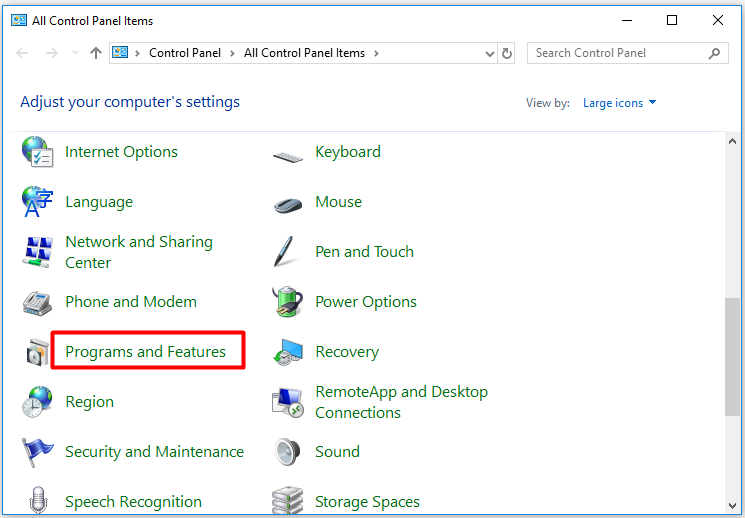
Step 1: Open the Control Panel from Run utility.
1. Press Windows and R keys to open the Run window.
2. Type control and the window and then hit Enter to open Control Panel.

Step 2: Click on Programs and Features to go on.
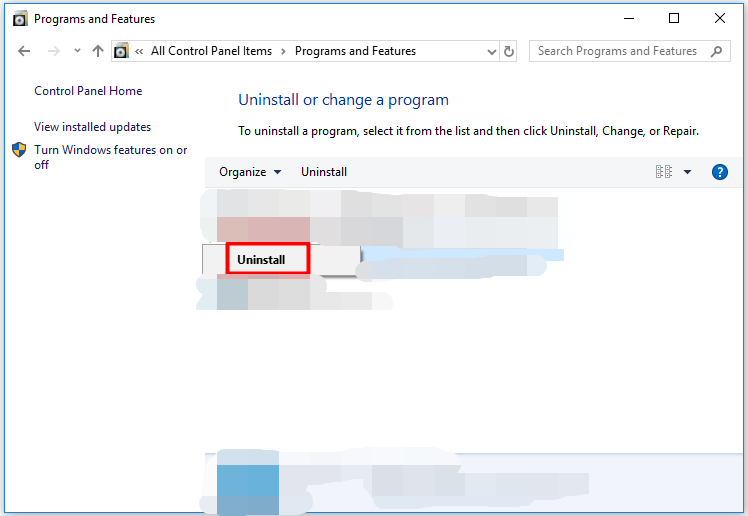
Step 3: After finding the conflicting app (like Riot Vanguard) from the listed items, and then right click on it and click Uninstall. Then follow the pop-up instruction to finish the operation.
Method 6: Reset/Reinstall Windows System
If the MSI Mystic Light not working issue still persists after executing the above methods, the corrupted Windows installation should be the fault source. For that, you need to reset or reinstall Windows to fix the issue.
How long does it take to reset a PC? This post shows a rough time range and collects the factors that affect the time to reset.
Steps for Resetting Windows
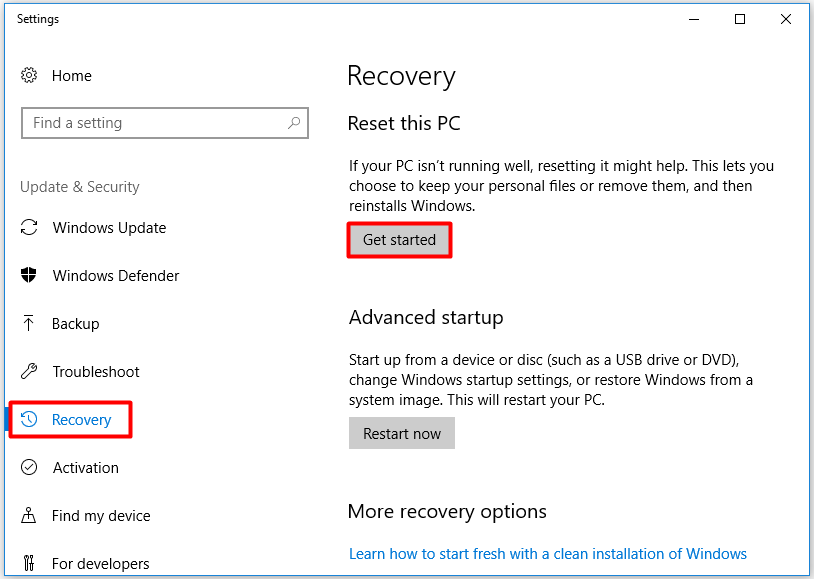
Step 1: Press Windows plus I key to open Settings, and then navigate to Update & Security section. After that, click on Recovery option in the left pane and then move to the right side of the window. Click Get started under Reset this PC section.
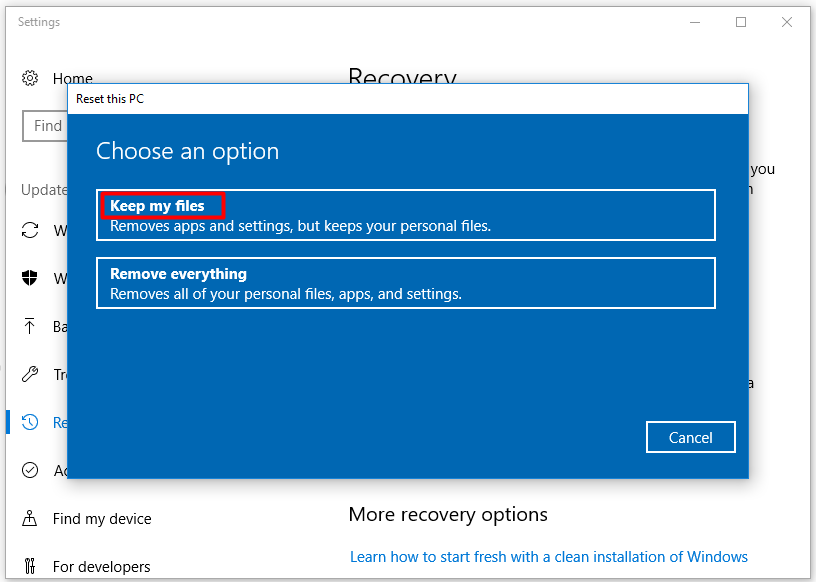
Step 2: In the next window, click Keep my files option to go on.
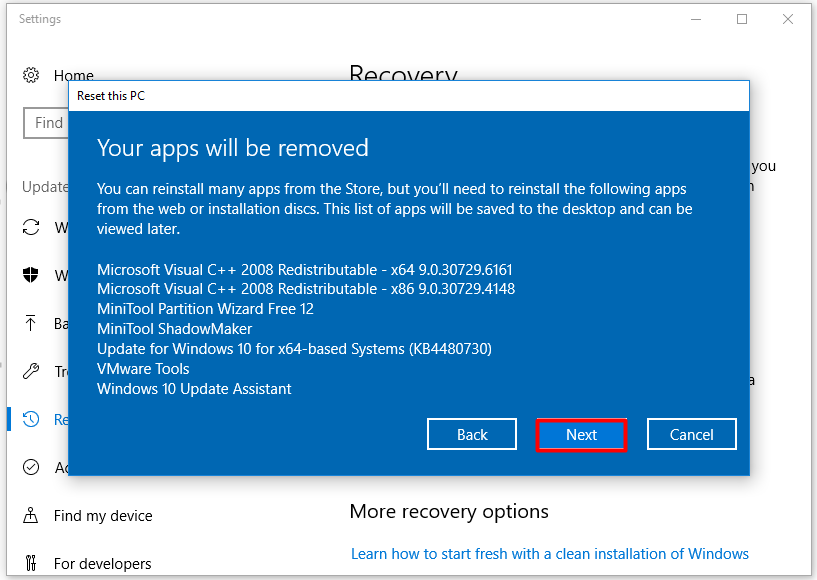
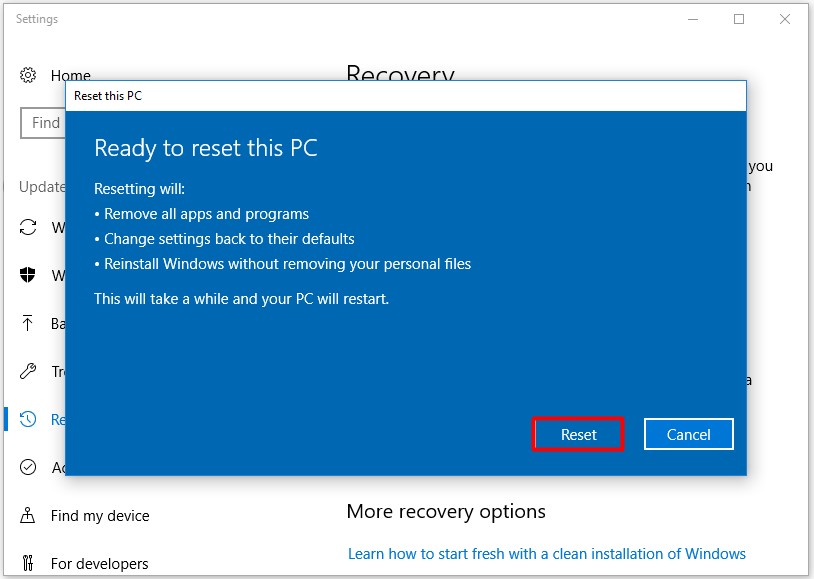
Step 3: You may receive the following notice window. Just click on Next to continue.
Step 4: Click Reset in the Reset this PC window to execute the operation. After resetting, your computer will restart automatically. What you need to do is to wait patiently.
You may also like this: Top 4 Ways to Perform Lenovo Password Reset Without Disk
Steps for Reinstalling Windows
Reinstalling Windows is a thorough way to fix corrupted Windows installation. However, all the data on your computer will disappear after reinstalling. Hence, making a backup is recommended before reinstalling. If you want to reinstall Windows quickly, MiniTool Partition Wizard can help.
The Copy Disk feature enables you to finish the reinstalling process within a few clicks. In addition to that, MiniTool Partition Wizard allows you to format/resize/extend/recover partition. It is also helpful for solving errors like Fallout 4 crashing, error 42125 zip archive is corrupted, Switch game card error, ce-32809-2, and so forth.
Here, you need to create a bootable CD/DVD/USB on a properly running PC. After that, connect the bootable media to your faulty PC, and then enter the BIOS setup and set the bootable drive as the first boot order. Save the changes and then your computer will automatically boot from the bootable media. Now, follow the steps below to begin the process.
MiniTool Partition Wizard DemoClick to Download100%Clean & Safe
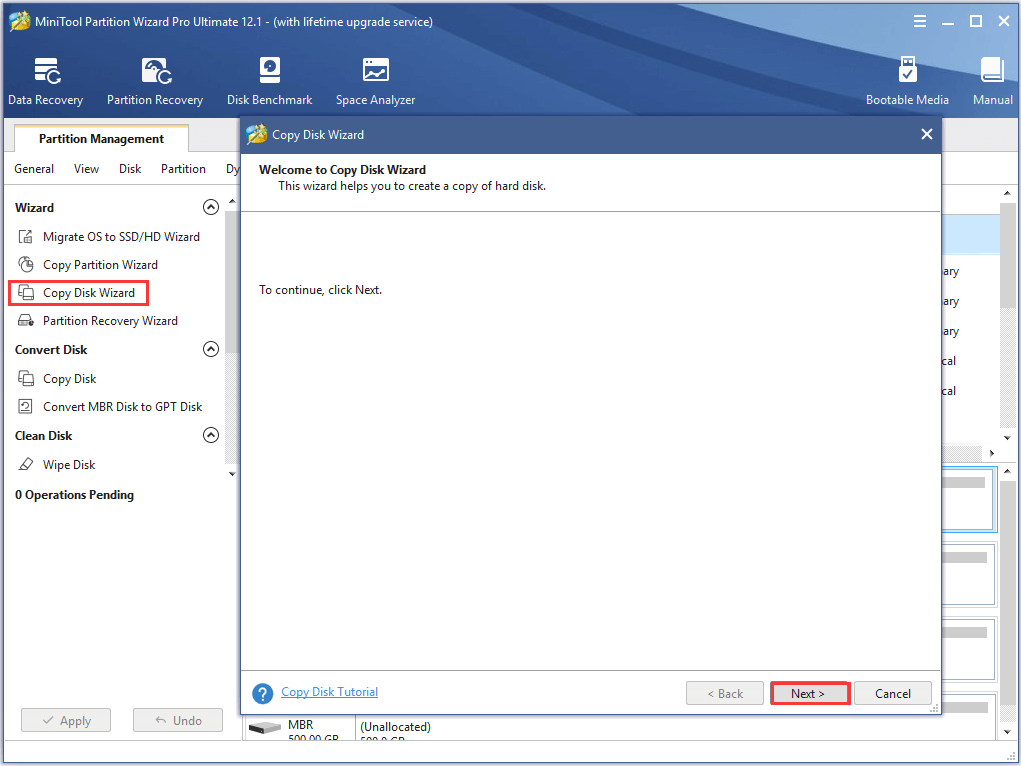
Step 1: Connect a drive including a fresh Windows system to your computer, and then launch MiniTool Partition Wizard to enter its main interface. Click Copy Disk Wizard in the left pane and then click Next in the prompted window to go on.
Step 2: In the next window, click on the drive that you connect to the computer from the listed drives and click Next.
Step 3: Then choose the system drive as the destination for the copied disk drive and click on Next.
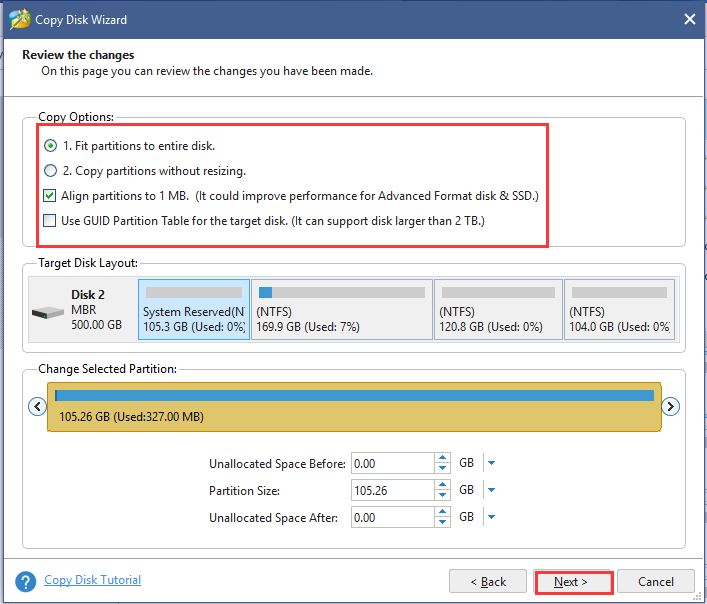
Step 4: In this window, you can configure copy settings and change the location and size of selected partition based on your demand. If you don’t have other demands, just follow the default settings. Click Next.
Step 5: Click Finish in the elevated window. After that, click Apply to carry out the operation.

Wrap up
This post shows the basic information, reasons and fixes for the MSI Mystic Light not working error. If you encounter this issue and don’t know how to troubleshoot it, this post will be helpful for you.
You just need to pick one from the given options to fix the error. To share any new ideas on Mystic Light not working issue, please leave your words in the comment area. If you have any questions on MiniTool software, send us an email via [email protected].
User Comments :