If your Windows 11 slow startup, you can improve boot times by disabling unnecessary startup programs, keeping Windows and drivers up to date, scanning for malware, repairing system files, freeing up disk space, or upgrading to an SSD by using MiniTool Partition Wizard.
A Windows 11 PC that takes minutes to start, freezes after login, or lags during startup is often slowed down by startup apps, outdated drivers, corrupted system files, an HDD, and more.
This post offers you the most effective solutions to speed it up. Let’s dive in!
Why Does Windows 11 Start Up Slowly?
Experiencing slow computer startup in Windows 11? It could be caused by:
- Too many startup programs: Multiple apps launching at startup compete for CPU and memory.
- Low memory: Limited RAM (4GB or less) forces Windows to use slower virtual memory.
- Low disk space: Insufficient free space can delay system processes.
- Outdated drivers: Old storage or graphics drivers can slow startup.
- Hardware bottlenecks: Traditional HDDs are slower than SSDs.
- Enhanced security features: Features like Core Isolation may slightly affect performance.
If your Windows 11 boots slowly, try the following methods to speed it up.

How to Fix Slow Startup Windows 11
If your PC takes forever to boot, it could be due to various issues.
To help speed up Windows 11 startup, the solutions are grouped into quick fixes for immediate improvement and advanced methods for deeper troubleshooting.
Here’s an overview of what’s included.
Quick Fixes:
- Disable Unnecessary Startup Programs
- Turn off Fast Startup
- Update Windows and Drivers
- Upgrade to an SSD
Advanced Fixes:
- Free up Disk Space
- Check for Malware
- Disable Visual Effects
- Increase RAM
- Turn off Memory Integrity
- Check for System Files
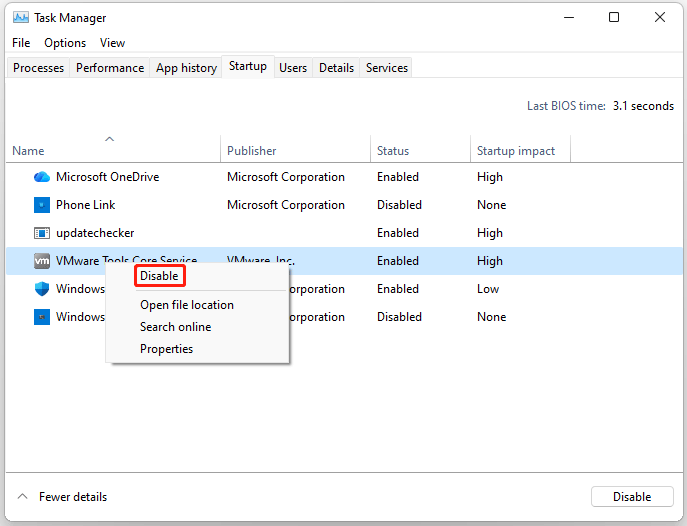
Method 1. Disable Unnecessary Startup Programs
If your Windows 11 startup freezes, it’s often caused by Fast Startup conflicting with certain drivers or system processes. Disabling Fast Startup can resolve the issue.
- Press Ctrl + Shift + Esc to open Task Manager.
- Go to the Startup tab. Here, you’ll see every app set to launch at boot, with a “Startup impact” label (High/Medium/Low/None) that tells you how much it slows down startup.
- Right-click any app with High/Medium impact and select Disable.
Method 2. Turn off Fast Startup
Windows 11’s Fast Startup is intended to make your PC boot faster, but it can occasionally cause slow startup. If your system is affected, here’s how to turn off Fast Startup.
- Search for Control Panel in the Windows Search bar and open it.
- Go to Hardware and Sound > Power Options.
- In the left-hand panel, click What do the power buttons do.
- Click Change settings that are currently unavailable.
- Uncheck the Turn on fast startup (recommended) checkbox.
- Click Save changes.
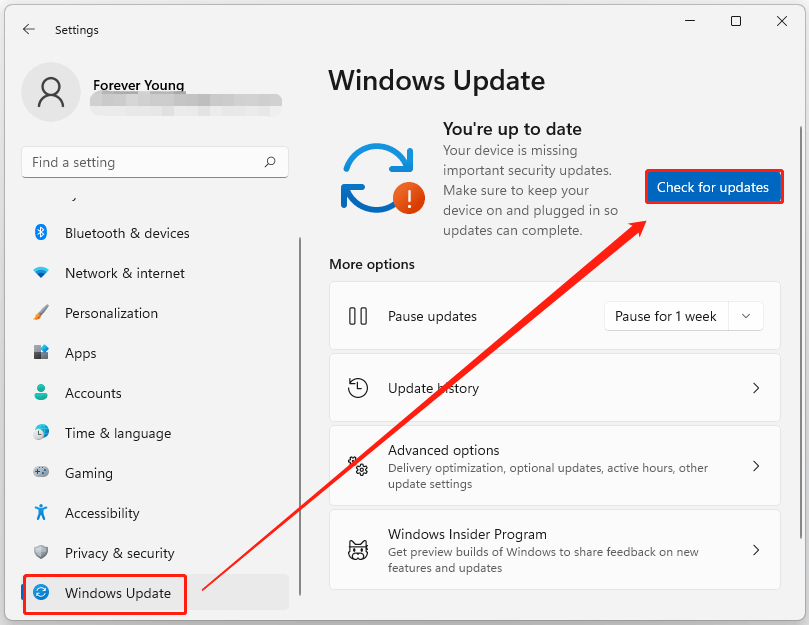
Method 3. Update Windows and Drivers
Running an outdated Windows 11 system or graphics driver can cause slow startup and performance issues. Keeping Windows updated and updating your graphics driver can fix these issues.
Here’s how.
Step 1. Update Windows.
- Press Win + I to open Windows Settings.
- Click Windows Update in the left-hand menu.
- Click Check for updates and install any available updates.
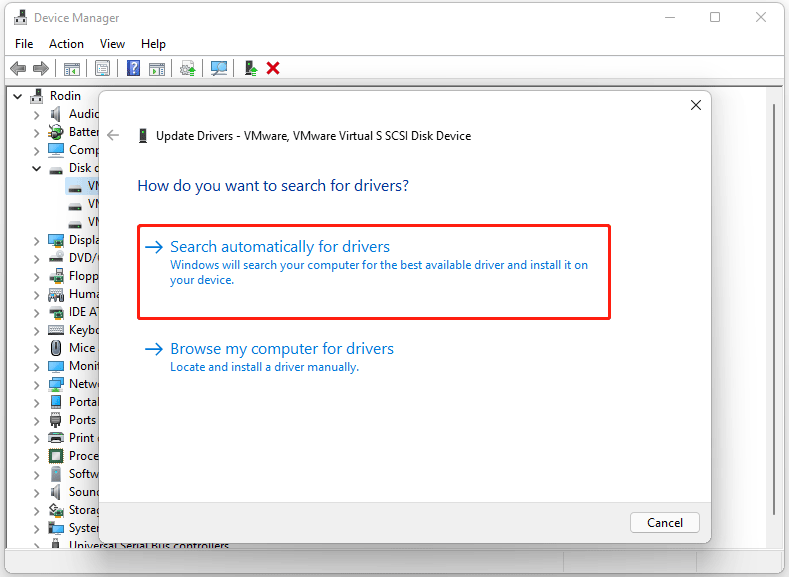
Sep 2. Update device drivers.
- Right-click Start and select Device Manager.
- Expand categories (like Display adapters, Disk drives) to find the hardware you want to update.
- Right-click the device and choose Update driver, then select Search automatically for drivers.
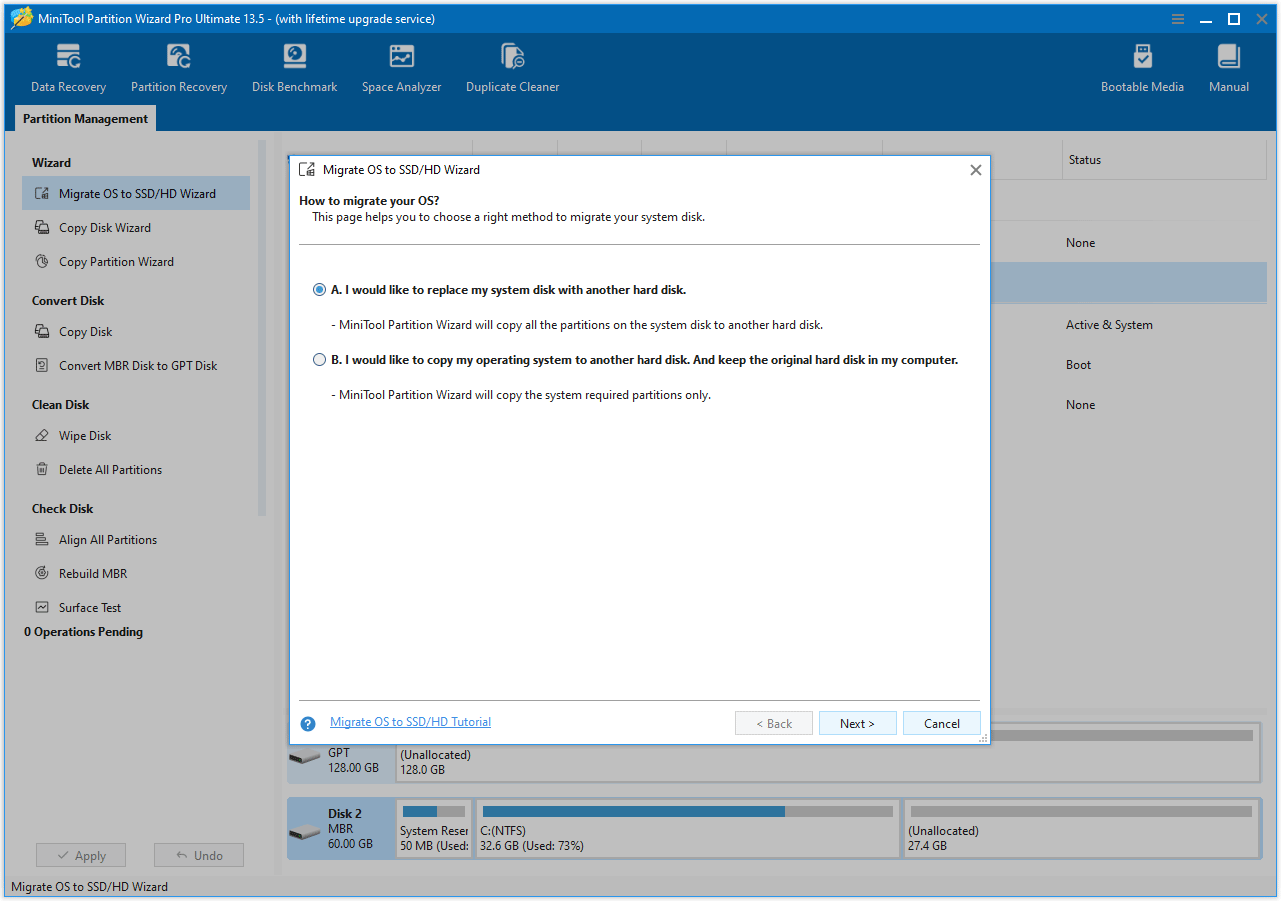
Method 4. Upgrade to an SSD
If your system is running on an HDD, upgrade to an SSD. This upgrade can dramatically speed up startup and make your PC more responsive.
To upgrade to an SSD without reinstalling everything from scratch, you can use MiniTool Partition Wizard.
MiniTool Partition Wizard DemoClick to Download100%Clean & Safe
Step 1. Launch MiniTool Partition Wizard and start the OS migration.
- Connect the SSD to your computer with an NVMe/SATA to USB adapter.
- Launch MiniTool Partition Wizard to its main interface.
- Select the Migrate OS to SSD/HD Wizard feature from the left action panel.

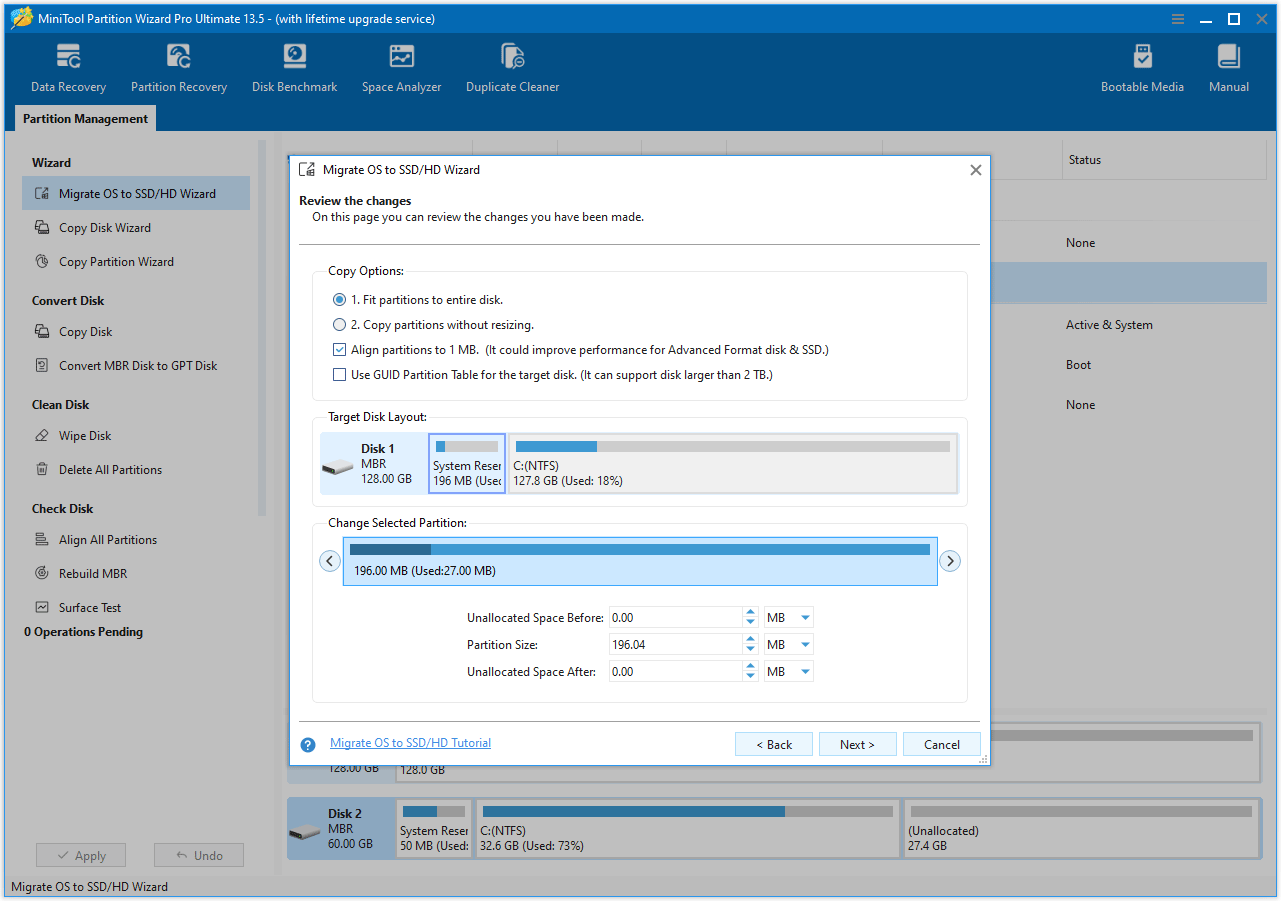
Step 2. Choose the migration method, and then click Next.
Step 3. Set the copy options.
- Select the SSD as the target disk and then click Next.
- Review the copy options and disk layout. Keeping the default option is recommended. Then, click Next.
- Click Finish.
- Click Apply to execute the operation.
Step 4. Make the computer boot from the SSD.
Method 5. Free up Disk Space
If your C drive is running out of space, the system will slow down file read speeds during startup.
To resolve this issue, it’s generally recommended to keep at least 15% to 20% of your system drive free.
To do that, you have two options:
- Delete temporary files to free up disk space.
- Extend the C partition to increase its space.
Option 1. Delete Temporary Files
Temporary files in Windows 11 can pile up over time, causing a slow startup. Removing these files can speed up your PC.
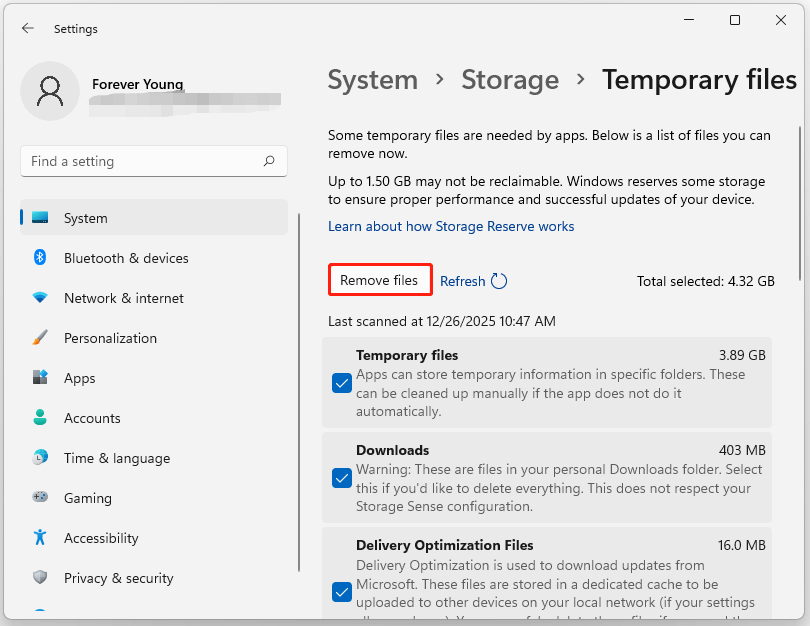
- Go to Settings > System > Storage.
- In the right panel of Storage, click the Temporary files category.
- Check boxes to select files to remove, like the Recycle Bin and Downloads.
- Click Remove files.
Option 2. Extend the C Partition
To extend the C partition, you can take free space from any other existing partitions or unallocated space. Then, MiniTool Partition Wizard’s Extend Partition feature can help you do that.
The steps are as follows:
MiniTool Partition Wizard FreeClick to Download100%Clean & Safe
- On its main interface, highlight the C partition and select Extend Partition from the left action panel.
- In the pop-up window, choose a partition or unallocated space from the drop-down list of Take Free Space from. Then drag the blue block to decide how much space to occupy. After that, click OK.
- Click Apply to perform the pending operation.
- Select Restart Now to allow the computer to restart. When your computer successfully restarts, you will find that the C drive has been extended.

Method 6. Check for Malware
Malware and viruses can infect your Windows 11 system via online downloads or data transfers.
These infections can corrupt files and cause slow boot times in windows 10/11.
To protect your PC, regularly scan for threats using Windows Defender or a trusted antivirus program. Follow these steps:
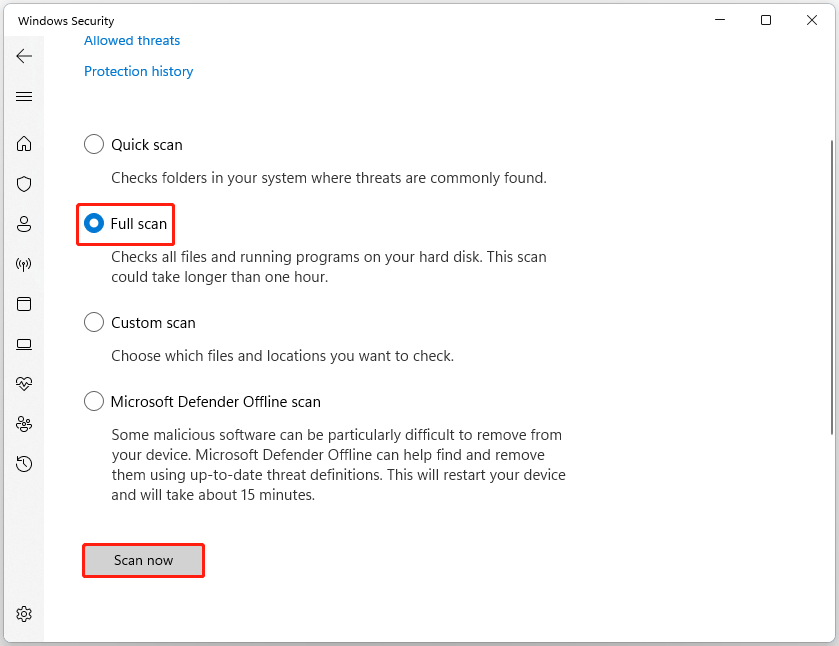
- Go to Settings > Privacy & security > Windows Security.
- Click Virus & threat protection from the right side.
- Click Scan options, select Full scan, and then click Scan now.
Method 7. Turn off Memory Integrity
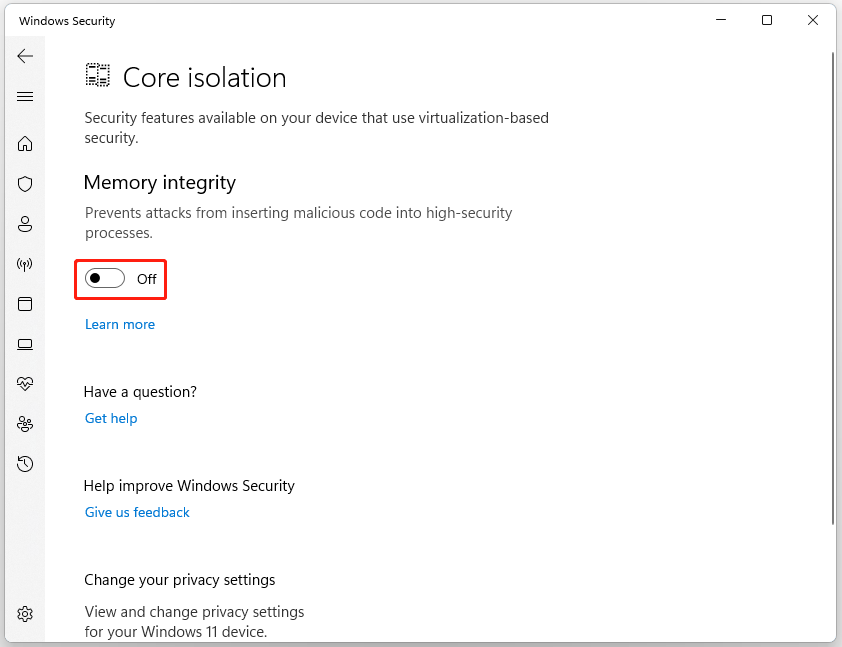
Core Isolation uses virtualization technology to enhance security. In some cases, it can impact performance. You can try disabling this feature to see if it resolves the Windows 11 slow boot.
- Go to Settings > Privacy & Security > Windows Security Center > Device Security.
- Click Core Isolation details.
- If the Memory Integrity switch is on, turn it Off.
- Restart your computer and check if the problem persists.
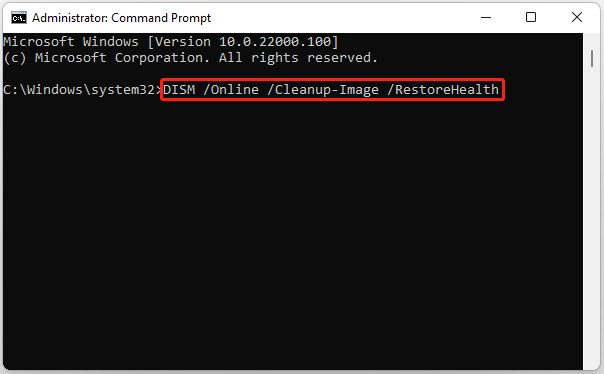
Method 8. Check for System Files
When system files are corrupted, your PC may experience slow boot times and reduced performance. Using DISM and SFC helps detect and fix these issues. Here’s how to do it:
- Type cmd in the search bar, right-click Command Prompt, and then select Run as administrator.
- Type DISM /Online /Cleanup-Image /RestoreHealth and press Enter. This command will scan and repair corrupted Windows system components by replacing them with healthy ones.
- After the DISM process finishes, type sfc /scannow and press Enter. This command will scan all protected system files and automatically repair any corrupted ones.
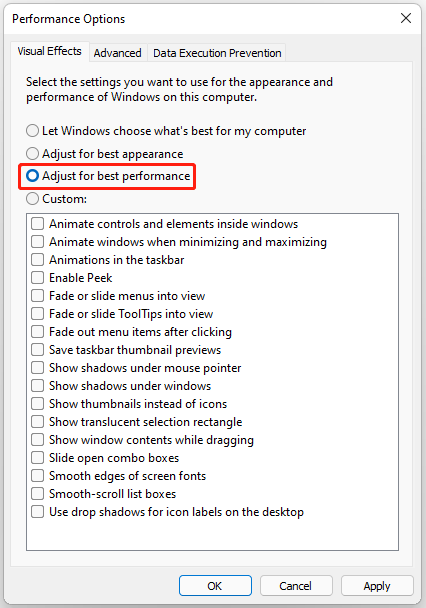
Method 9. Disable Visual Effects
Windows 11’s visual effects consume significant system resources. Disabling or reducing these effects can decrease CPU and memory load, thus shortening startup time.
- Open Settings, then go to System.
- Click About, then click Advanced system settings.
- In the System Properties window, go to the Advanced tab, then click Settings under the Performance section.
- Select Adjust for best performance to turn off everything, or choose Custom and uncheck specific visual effects.
- Click Apply > OK.
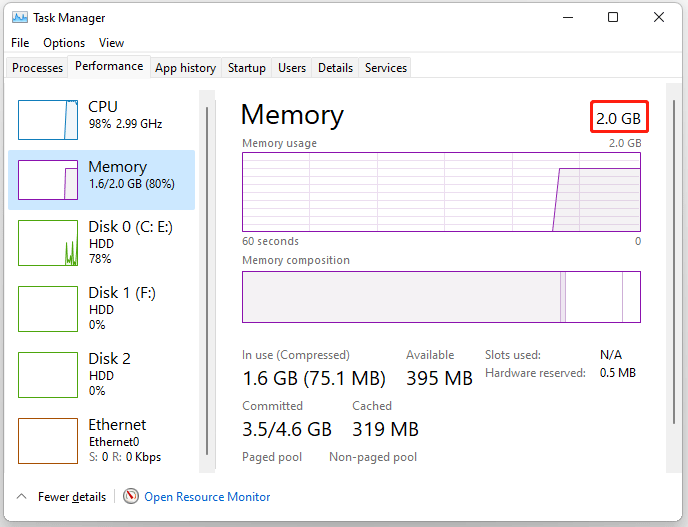
Method 10. Increase RAM
If your PC has less than 4GB of RAM (8GB is recommended for modern Windows 11 performance), adding more memory can improve overall speed and boot times.
To check RAM usage, open Task Manager, go to the Performance tab, and click Memory. Here, you can see the RAM information, including the total and used memory.
How to fix Windows 11 slow startup? This post provides 10 effective methods for you.Click to Tweet
Windows 11 Slow Startup FAQ
Bottom Line
Windows 11 slow startup is an annoying problem. You can follow the step-by-step approaches in this guide to resolve it.
If you have any questions or suggestions on how to use MiniTool Partition Wizard, do not hesitate to contact us via [email protected].
About The Author

Position: Columnist
Cecilia has been an editor at MiniTool for two years. She primarily focuses on disk and partition-related content, with particular expertise in disk cloning, partition recovery, and PDF document conversion. She is dedicated to providing users with clear and accurate solutions to help them efficiently resolve common computer problems.
User Comments :