
Should I partition my SSD for Windows 11? For most users, partitioning is optional rather than necessary. The article explains the standard Windows 11 partition structure, recommended layouts for different SSD capacities, and how to partition an SSD during or after Windows installation.
Quick Answer
You don’t need to partition your SSD just to install Windows 11. For most users, keeping one main partition is simpler and works well. However, partitioning can be useful if you want to separate Windows from personal files, organize a large SSD, or set up a dual-boot system.
Should I Partition My SSD for Windows 11?
Whether you should partition an SSD depends primarily on your specific circumstances and needs.
Standard Windows Partition Structure (Has Only One Partition for Data)
A typical Windows 11 installation on a modern UEFI/GPT system creates several partitions automatically. You normally don’t need to create these partitions manually.
| Partition | Typical Size | Purpose |
| EFI System Partition (ESP) | ~100–260 MB | Stores the UEFI boot files required to start Windows. |
| Microsoft Reserved (MSR) Partition | 16 MB | Reserved by Windows for GPT disk management and future use. |
| Windows Partition (C:) | Remaining space | Stores Windows, applications, user profiles, and most personal files. |
| Recovery Partition | ~500 MB–1 GB+ | Contains Windows Recovery Environment (WinRE) tools for troubleshooting and repairing Windows. |
Of these partitions, only the C partition is accessible to the user. Therefore, from the user’s perspective, there is only one partition. There are no other D, E, or F partitions.
In this case, you need to consider your actual needs to determine whether partitioning an SSD is necessary.
When Partitioning Is Worth Considering
Partitioning an SSD for Windows 11 is optional, but it can be useful in specific situations. For example:
- Separate Windows from personal files: Keep Windows and applications on the C: drive while storing documents, photos, videos, and other files on a separate partition.
- Organize a large SSD: A 1 TB, 2 TB, or larger SSD can be divided into separate areas for Windows, games, projects, or media.
- Prepare for Windows reinstallation: Keeping personal files on another partition can make it easier to reinstall Windows without mixing system and data files.
- Set up dual boot: If you want to run Windows 11 alongside Linux or another operating system, separate partitions are generally required.
- Use partition-specific backup strategies: Separate partitions can make it easier to organize system-image backups and file backups, although a partition on the same physical SSD is not a substitute for an external or cloud backup.
Consider creating separate partitions only when you have a clear need for better organization, easier data management, or multiple operating systems.
When You Shouldn’t Partition Your SSD
Partitioning an SSD isn’t necessary for most Windows 11 users. Keeping a single main partition is often simpler and provides more flexibility when managing your storage.
You may want to avoid creating additional partitions if:
- You have a small SSD: On a 256 GB or smaller drive, dividing the available space can leave individual partitions too small.
- You want a simple setup: One main partition is easier to manage and eliminates the need to monitor free space across multiple partitions.
- You don’t have a specific reason: Partitioning does not inherently make Windows 11 faster or improve SSD performance.
- You frequently run out of storage: Multiple partitions can make free space less flexible. One partition allows Windows and your files to share the available space.
- You rarely reinstall Windows: If you don’t need to separate system and personal files, additional partitions may provide little practical benefit.
- You already use separate physical drives: If your Windows installation and personal data are already stored on different SSDs, additional partitions may be unnecessary.
In a word, if you’re using a single SSD for normal Windows 11 tasks and don’t need dual booting or specific data organization, one main partition is usually the simplest choice.
![[Tutorial] How to Clone M.2 SSD to Larger M.2 SSD on Windows](https://images.minitool.com/partitionwizard.com/images/uploads/2024/09/clone-m2-ssd-to-larger-m2-ssd-thumbnail.png)
Recommended SSD Partition Layout for Windows 11
If you want to partition your SSD, you can refer to the following layouts.
| SSD Capacity | Recommended Layout | Best For |
| 512 GB or smaller | Only C: partition | General use |
| 1 TB | C: (Windows and apps) + D: (personal files) partitions | Gaming, work, and large file collections |
| 2 TB or larger | C: + D: (games) + E: (personal files or projects) partitions | Large libraries and multiple workloads |
Regardless of the partition layout you choose, it’s recommended to reserve enough free space for the C partition to accommodate data growth due to Windows updates or other reasons. Secondly, if the C partition has less than 20% free space, it may affect your computer’s performance.
How to Partition an SSD in Windows 11
You can partition an SSD in Windows 11 using Disk Management and MiniTool Partition Wizard.
Method 1. Use Disk Management
Disk Management is a built-in system tool in Windows used to manage hard drives, solid-state drives (SSDs), and their partitions.
To partition an SSD with it, you need to shrink the C drive and then create a new partition on the unallocated space. Here is the guide.
Step 1: Press Win + X and then select Disk Management.
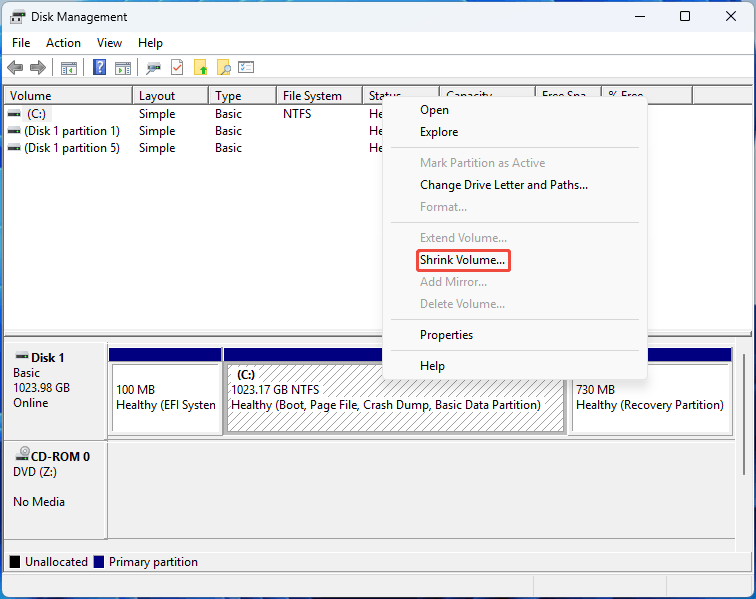
Step 2: Right-click the C drive and choose Shrink Volume.
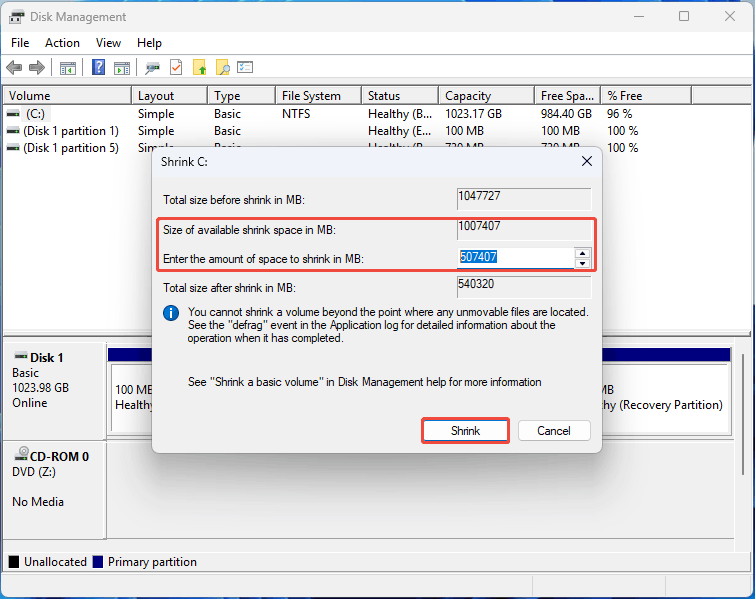
Step 3: Enter the amount of space to shrink in MB. The number should be no more than the size of available shrink space. Then, click Shrink.
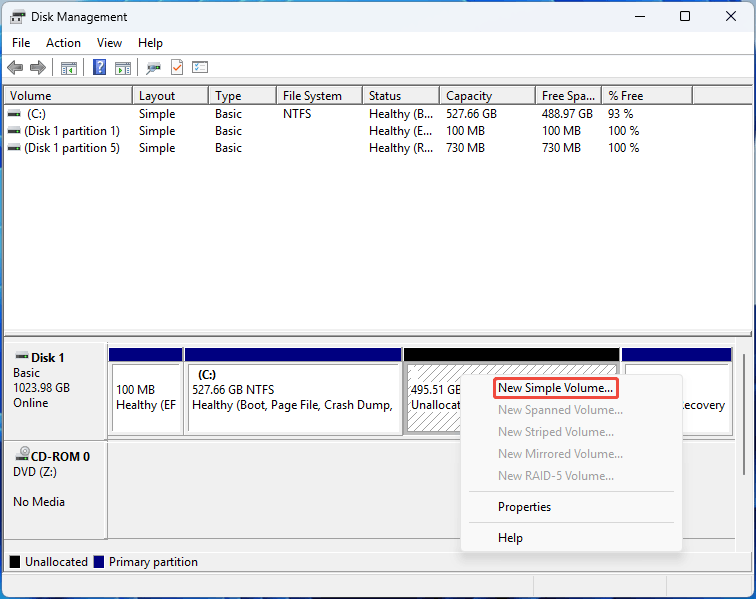
Step 4: Right-click the Unallocated space and choose New Simple Volume. Then, follow the on-screen guide to create a partition (you can click Next all the way).
Method 2. Use MiniTool Partition Wizard
MiniTool Partition Wizard is a feature-rich disk and partition management program for Windows. It helps users create, format, resize, move, copy, and wipe partitions, as well as migrate operating systems and recover lost data and partitions.
In addition, its Split Partition feature can help you split the C drive into C and D drives directly. Here are the steps.
MiniTool Partition Wizard FreeClick to Download100%Clean & Safe
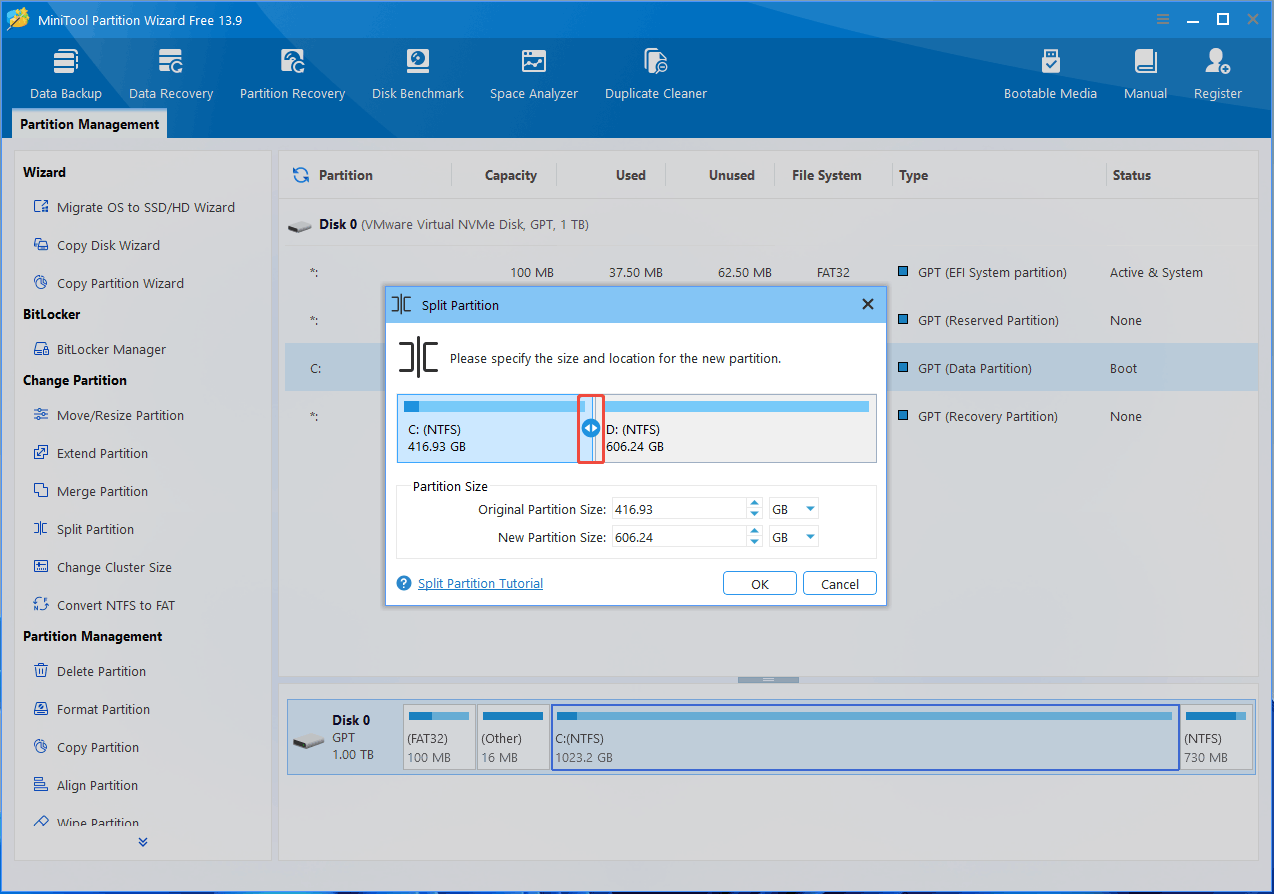
Step 1: Launch MiniTool Partition Wizard. Right-click the C drive and choose Advanced > Split.

Step 2: Drag the dividing line to adjust the size of partitions C and D. Then, click OK.
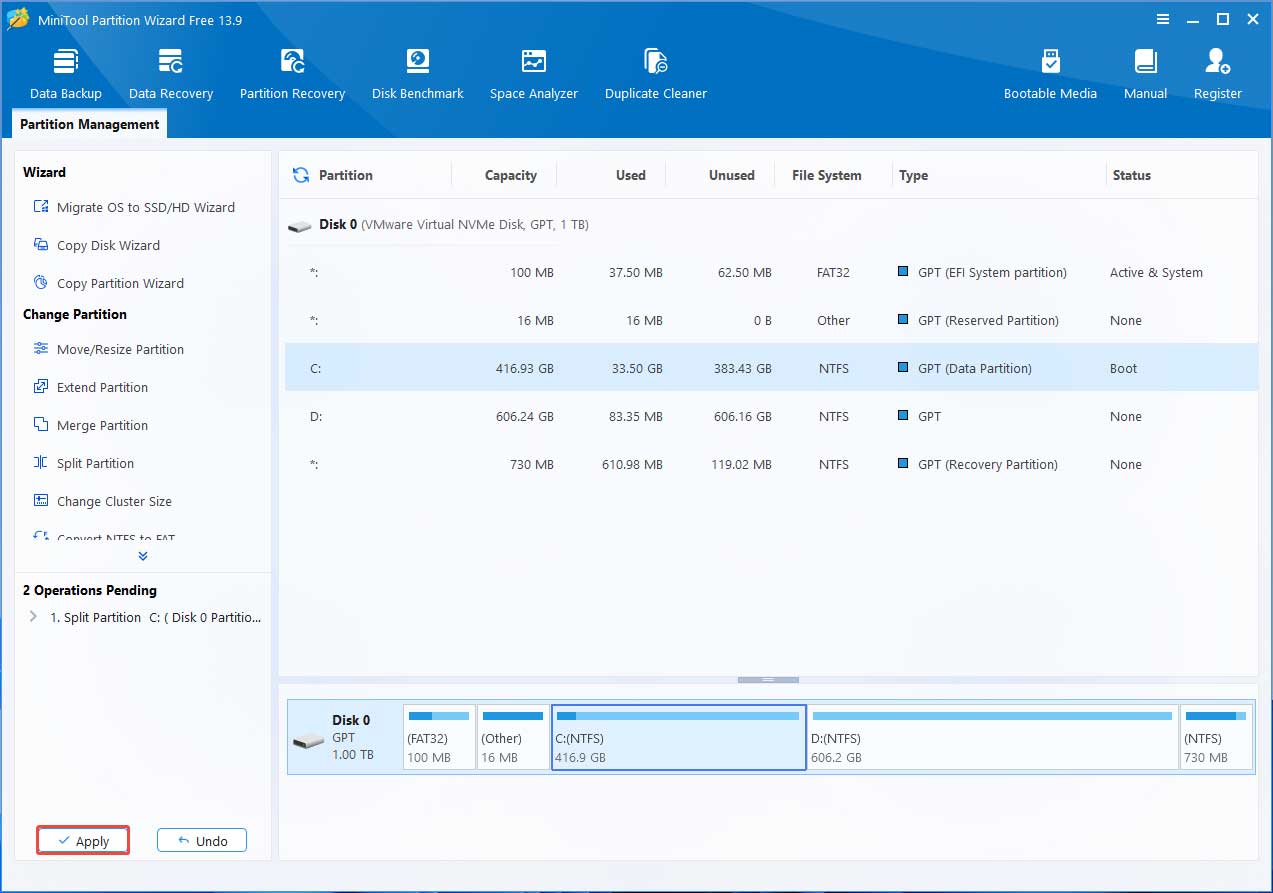
Step 3: Click Apply to execute the splitting operation.
How to Partition the SSD During Windows 11 Installation
You can partition an SSD while installing Windows 11 by using tools offered by Windows Setup. Just follow the guide below:
Step 1: Proceed with the Windows 11 installation process normally until it asks you to select a location to install Windows 11.
Step 2: If there are partitions, click them and select Delete Partition. Delete all partitions to turn the disk into unallocated space.
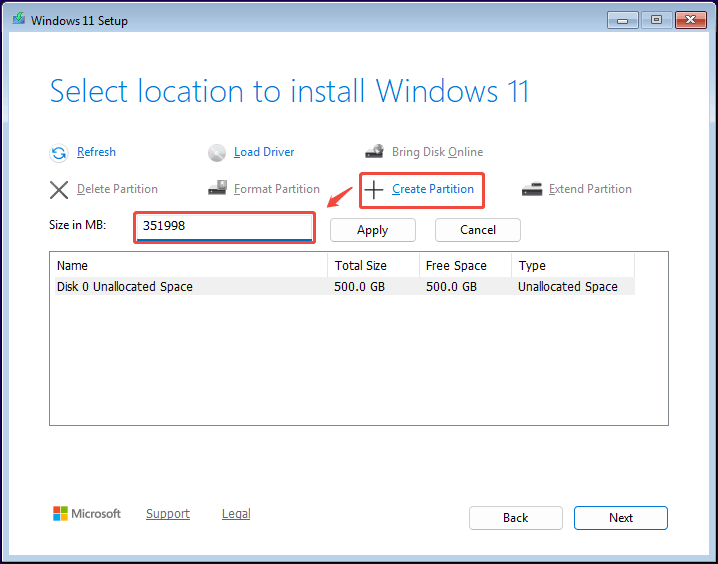
Step 3: Highlight the Unallocated Space and click Create Partition. Enter the size of the partition in MB and click Apply. Please pay attention to the partition size you enter, as this partition is usually the C drive.
Step 4: The future ESP partition (system) and MSR partition have been created along with the future C partition. Now, use the remaining unallocated space to create another partition. This partition is usually the D partition.
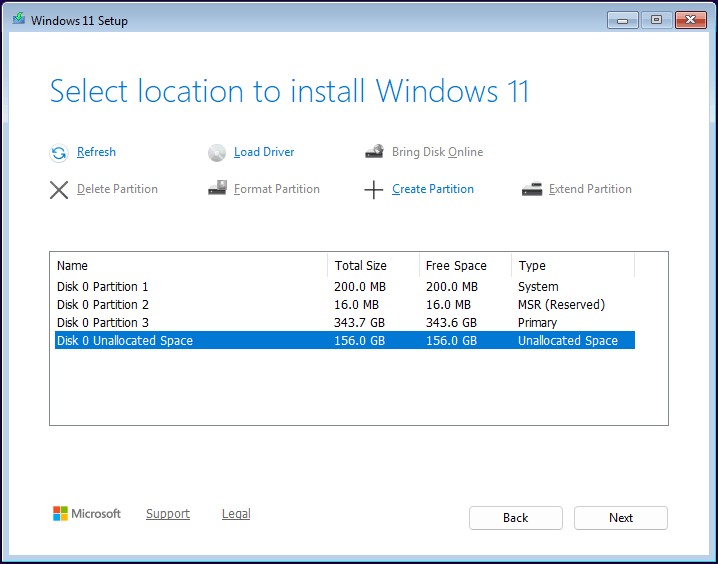
Step 5: Select the first primary partition to continue the Windows 11 installation.
Should I Partition My SSD for Windows 11 FAQ
Bottom Line
For most Windows 11 users, you don’t need to partition your SSD. A single main partition is simple, flexible, and sufficient for everyday use. Consider creating additional partitions only if you want to separate Windows from personal files, organize a large SSD, or set up a dual-boot system.
To partition an SSD in Windows 11, you can use MiniTool Partition Wizard. If you encounter issues when using this software, contact our support team via [email protected] for help.
About The Author

Position: Columnist
Linda has been an editor at MiniTool for seven years. She continuously learns about computers and puts her knowledge into practice. Moreover, she is particularly knowledgeable in disk management, data recovery, system installation, and PDF editing. Her articles typically reference multiple examples or are based on her own experience, providing users with the most suitable solutions.
User Comments :