You may get multiple recovery partitions on a Windows PC. Do you want to delete multiple recovery partitions to reclaim the space? This post tells you which recovery partition can be deleted and shows you how to delete it safely. During this process, you may need to use MiniTool Partition Wizard for convenience.
On Windows, if you open Disk Management, you will see a partition whose status is Healthy (Recovery Partition). That is the Recovery Partition.

The recovery partition is used to restore the system to factory settings or perform other recovery operations. To protect this partition, some restrictions are added. For example:
- No drive letter or label. No drive letter makes the recovery partition not show in File Explorer. No label lets users not know the content in it. As a result, users will treat this partition with caution. Hence, the data in it won’t be deleted or messed up.
- Invisible file system. It will only show in a third-party partition management tool like MiniTool Partition Wizard.
- Only a Help option. Right-click the Recovery Partition on Disk Management, and you will see only a Help option. Thus, you can’t format or delete this partition, add a letter to this partition, or shrink or extend this partition.
In most cases, a computer has only one recovery partition, but there are other situations.
I have noticed that my Windows 10 Pro has two Recovery Partitions, one of 450MB, the first partition, and another of 840MB as the last partition on my C: drive. I was just wondering why this might be?...https://learn.microsoft.com/en-us/answers/questions/3302537/i-have-multiple-recovery-partitions
Why do you get multiple recovery partitions? Can you delete them? How to delete the unused recovery partition? Keep reading to get the answers.
Why Do I Have Multiple Recovery Partitions?
If a computer has multiple recovery partitions, the possible reasons may be as follows:
#1. Your Computer Has the OneKey Recovery Feature
Why do I have two recovery partitions, or three? In most cases, this is because your computer has the OneKey Recovery feature, which allows you to quickly restore your computer to its previous normal state by pressing a specific key (e.g., F10, F11, or Novo) during startup.
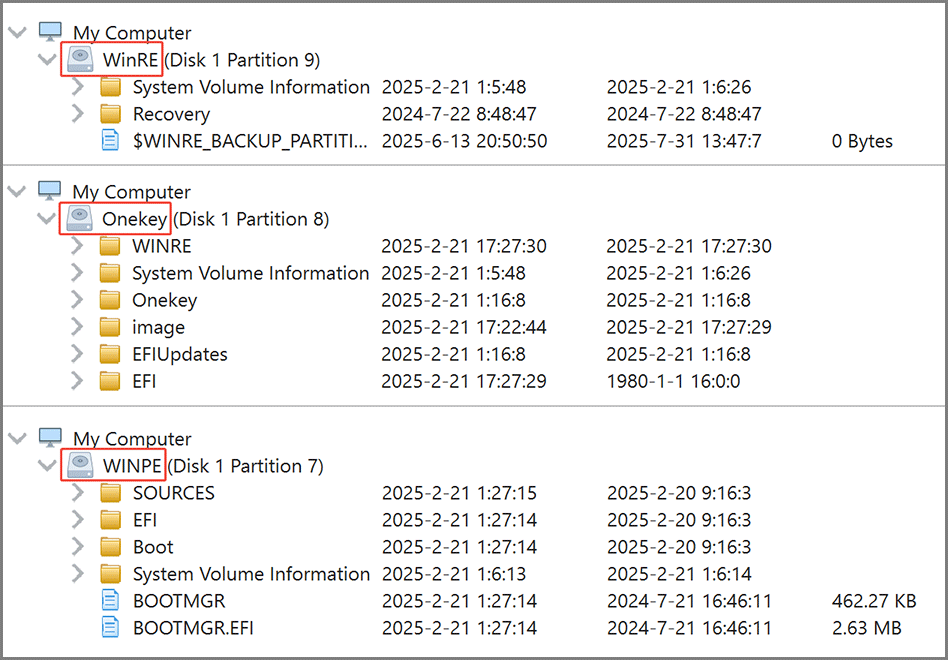
As we all know, Windows installation will create a Recovery Partition called WinRE (Windows Recovery Environment), which is based on WinPE (Windows Preinstallation Environment) and can repair common causes of unbootable operating systems.
However, if your computer has the OneKey Recovery feature, the PC manufacturer will also create a recovery partition to store the system image files and the OneKey Recovery system program files.
Moreover, some PC manufacturers may create two recovery partitions to store these files separately. For example, a OneKey partition stores system image files, and a WinPE partition stores files used to perform the OneKey recovery.

Look at the following picture to know the difference between recovery partitions created by Windows installation and PC manufacturers.
#2. The Automatic Failover Feature Doesn’t Work
A Windows update or upgrade may write data to the Recovery Partition. When the space of the recovery partition is not enough, Windows will use the automatic failover feature to enlarge it (delete the original WinRE partition, shrink the Windows partition, and then create a new WinRE partition).
However, this feature may not work when the Recovery Partition is not located immediately to the right of all the Windows partitions, because the WinRE partition can’t get the space released by shrinking the Windows partition.
The specific scenarios are as follows:
- The recovery partition is located on the left of the disk. On UEFI GPT disks, older versions of Windows and Windows unattended setup will create the Recovery Partition on the left of the disk by default.
- The recovery partition is located in the middle of the disk. On modern Windows, the recovery partition is on the right of the disk. If you upgraded the system disk to a larger one without partition resizing, there would be unallocated space behind the Recovery Partition. To use the free space, a data partition will be created. Then, the recovery partition’s location is changed.
In these cases, Windows will create a new recovery partition on the right of the disk, while keeping the original recovery partition.

Some unknown reasons may also cause the automatic failover feature not to work. As a result, you will get multiple recovery partitions Windows 11 after the update or upgrade.
#3. Reinstall Windows Without Formatting the Disk
Sometimes, you may reinstall Windows with a USB. If you just select an existing drive (C:, for example) to install Windows, without deleting or formatting the original recovery partition, you will get two recovery partitions after the Windows reinstallation.
That’s one of the reasons why you get multiple WinRE partitions on the right of the disk. Note that some unknown reasons may also result in this issue.

Can I Delete Recovery Partitions?
Recovery partitions are used to repair an unbootable computer. For example, WinRE offers tools like the Startup Repair, System Restore, Command Prompt, Reset This PC, System Image Recovery, etc., to repair the unbootable PC. The OneKey partition offers the OneKey Recovery feature to repair unbootable computers.
Therefore, it’s recommended that you do NOT delete the Recovery Partition. However, if you have multiple recovery partitions and some of them are unused, you can delete the unused recovery partitions to get more free space.
How to Identify the Unused Recovery Partitions?
In general, you need to use the process of elimination. You should first find which recovery partition is being used. Then, the rest of the recovery partitions are unused partitions that you can delete.
Follow the guide below to find out which recovery partition is being used:
Step 1: Find the enabled WinRE partition.
- In the Search bar, type “cmd”. From the result list, right-click Command Prompt and choose Run as administrator.
- Once Command Prompt opens, type “reagentc /info” and press Enter.
- Find the Windows RE location (in my computer, it is disk 1 partition 5).

Step 2: Find the OneKey recovery partitions if your computer has the OneKey Recovery feature. You can do that using MiniTool Partition Wizard. Here is the guide:
MiniTool Partition Wizard FreeClick to Download100%Clean & Safe
- Launch MiniTool Partition Wizard.
- Right-click a recovery partition and choose Explore from the menu.
- According to the directory structure, you can find out the WinPE partition and the OneKey recovery partition.

Now, you have found out all recovery partitions being used: the enabled WinRE partition and the OneKey recovery related partitions. You can then delete the rest of the unused recovery partitions.
How to Safely Delete Unused Recovery Partition
To delete multiple recovery partitions Windows 11, you can use the following 2 methods.
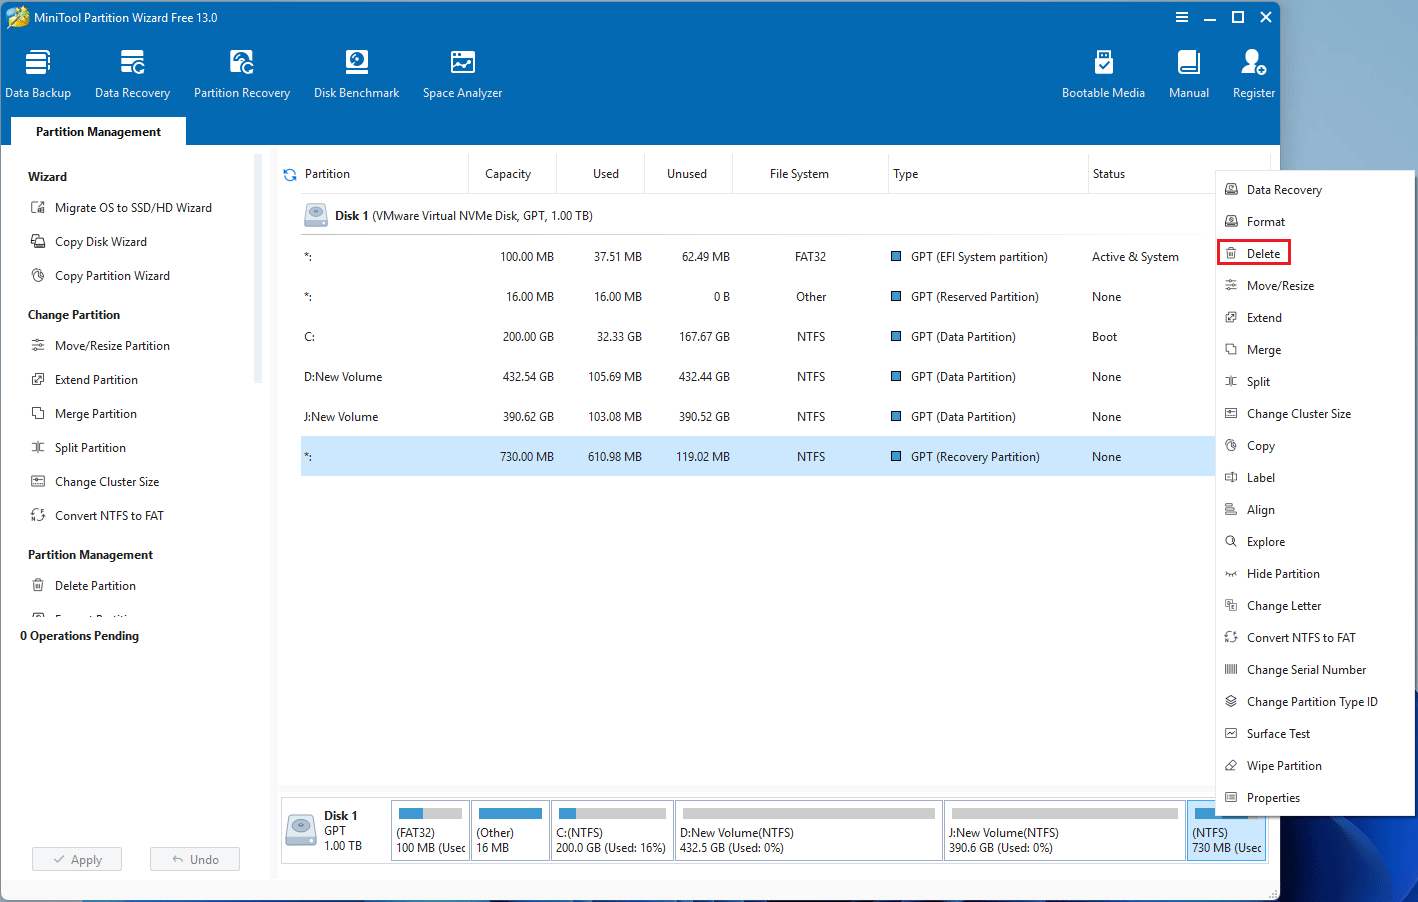
#1. Use MiniTool Partition Wizard
MiniTool Partition Wizard is a professional disk and partition tool. It can create/format/delete partitions, move/resize/extend partitions, convert partitions, recover lost partitions and data, etc. This software is worth trying.
Here is how to delete a recovery partition via MiniTool Partition Wizard.
MiniTool Partition Wizard FreeClick to Download100%Clean & Safe
- Launch this software.
- Right-click a recovery partition and choose Delete from the menu.
- Click Apply to start the deletion.
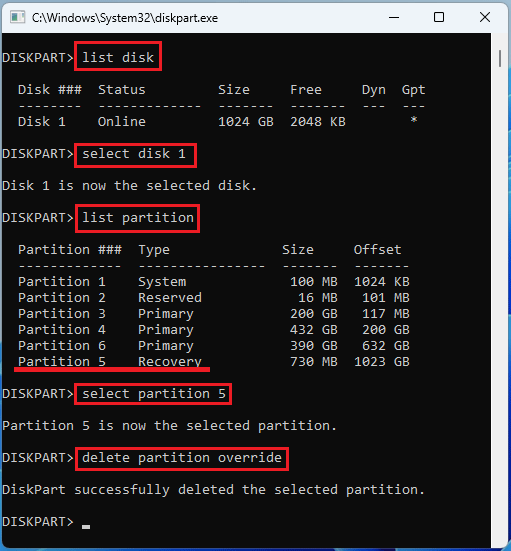
#2. Use Commands
You can also use commands to delete an unused recovery partition. To do that, you need to search for DiskPart and then run it as an administrator. Once it opens, execute the following commands one by one.
- list disk
- select disk * (replace * with the disk number that contains multiple recovery partitions Windows 11)
- list partition
- select partition n (replace n with the partition number of the unused recovery partition)
- delete partition override
Reclaim the Unallocated Space
Deleting the unused recovery partition will produce unallocated space. You can add it to an existing partition for reuse. Here are 2 approaches for you.
#1. Use MiniTool Partition Wizard
MiniTool Partition Wizard can extend a Windows partition by taking space from the unallocated space on the same disk, regardless of the location. Here is the guide:
MiniTool Partition Wizard FreeClick to Download100%Clean & Safe
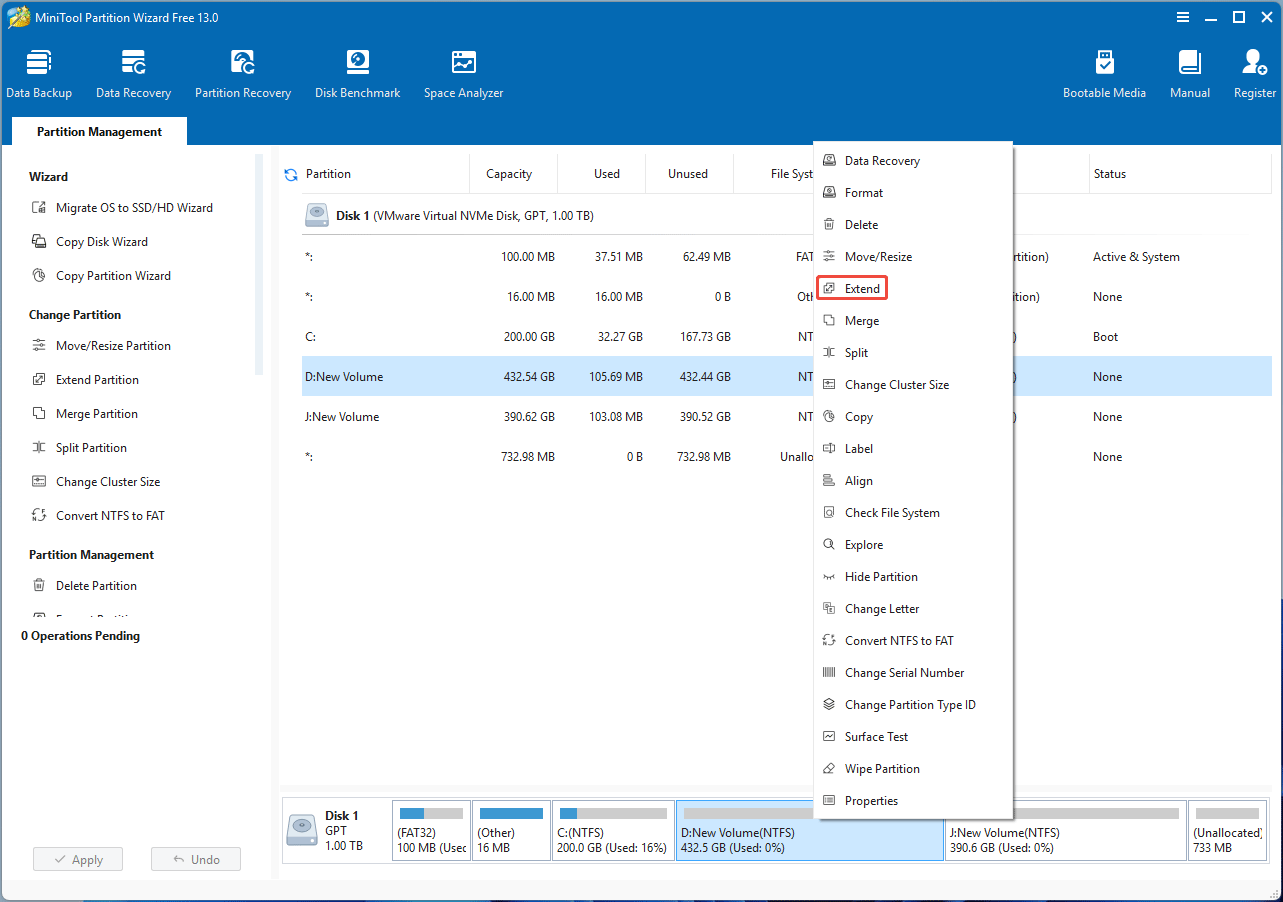
Step 1: Launch this software. Right-click on the partition that you want to extend, and then choose Extend from the menu.
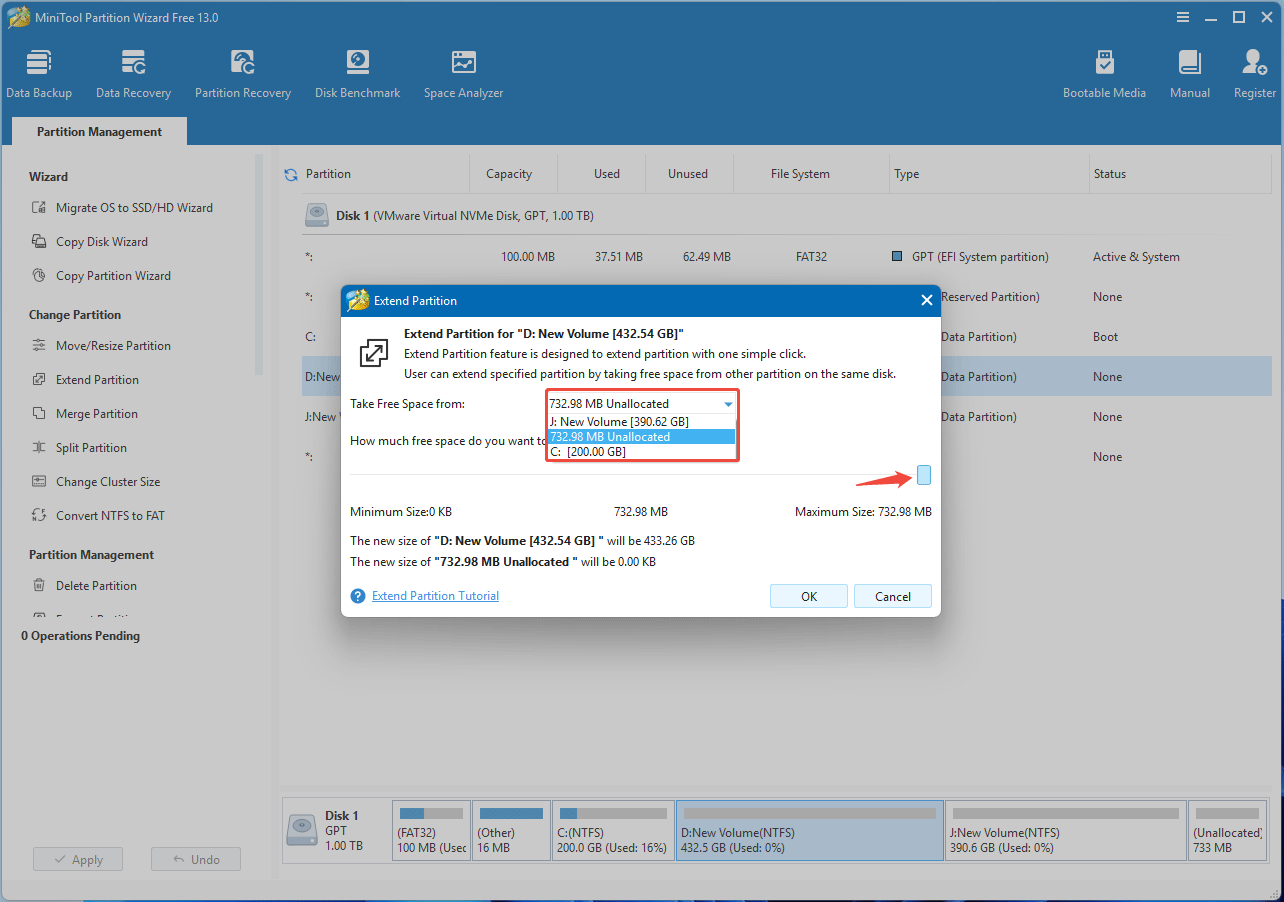
Step 2: Expand the drop-down menu to select the unallocated space and then drag the blue block to the right to select the maximum size of the unallocated space. Then, click OK.
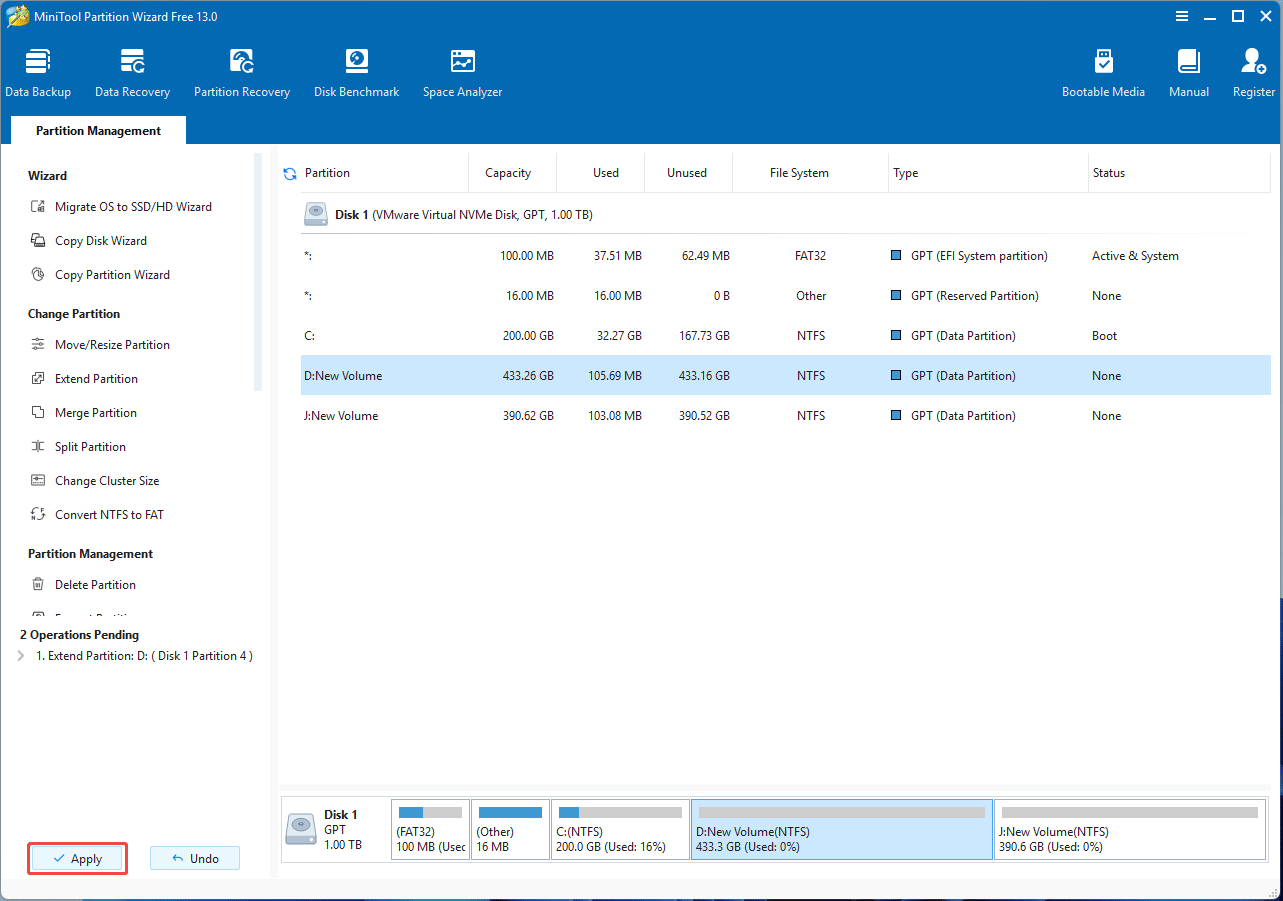
Step 3: Click Apply to add the unallocated space to the partition.
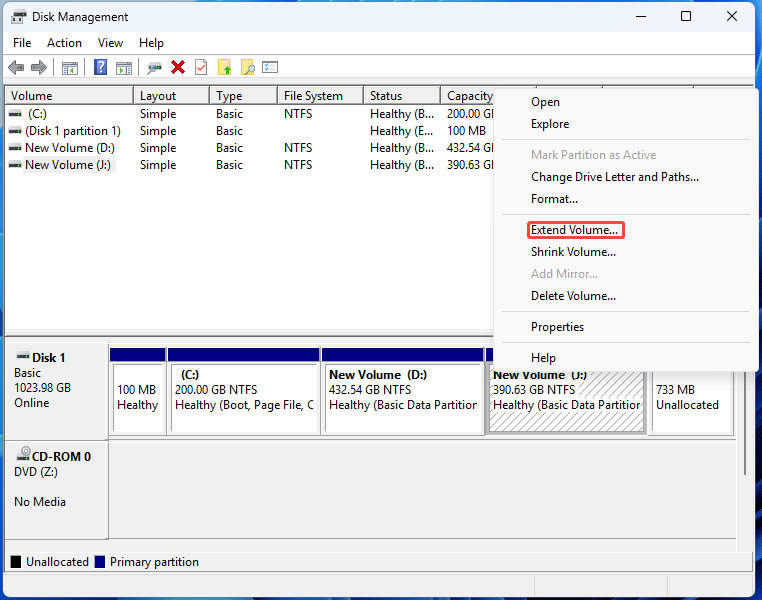
#2. Use Disk Management
Disk Management is a GUI tool built into Windows for managing disks and partitions. If the unallocated space is located immediately to the right of the partition, this tool can add the unallocated space to a partition directly. Here is the guide:
- Press the Windows logo key + X and then select Disk Management from the pop-up menu.
- Right-click the partition that you want to extend and then select Extend Volume from the menu.
- In the pop-up window, click Next.
- When Windows asks you to select disks and the amount of space, click Next to keep the default option.
- Click Finish to add unallocated space to the partition.
Multiple Recovery Partitions FAQ
Bottom Line
Except for the WinRE recovery partition and OEM recovery partitions, Windows may create other recovery partitions because of the automatic failover not working issue and improper Windows reinstallation.
This post shows you how to find unused recovery partitions to delete them safely. It also shows you how to reclaim the space produced by deleting recovery partitions.
In this post, MiniTool Partition Wizard is highly recommended and frequently used. If you encounter issues when using it, contact us at [email protected]. We will give you a reply soon.
About The Author

Position: Columnist
Linda has been an editor at MiniTool for seven years. She continuously learns about computers and puts her knowledge into practice. Moreover, she is particularly knowledgeable in disk management, data recovery, system installation, and PDF editing. Her articles typically reference multiple examples or are based on her own experience, providing users with the most suitable solutions.
User Comments :