Have you ever encountered Windows 10 update error code 0xc1900200? How to fix the error? To help you successfully install the latest Windows 10 update, this post from MiniTool will show you top 7 effective solutions to get rid of error code 0xc1900200.
When you are trying to update Windows 10 to the latest version, you may encounter the following error messages with error code 0xc1900200:
- Something went wrong. You can contact Microsoft Support for help with this error. Here is the error code 0xc1900200.
- Installation Failure: Windows failed to install the following update with error 0xc1900200.
- There were some problems installing updates, but we’ll try again later. If you keep seeing this and want to search the web or contact support for information, this may help – (0xc1900200).
This Microsoft error code 0xc1900200 usually appears when downloading process is finished and the update is 99% installed. This error can indicate that the device applying the update does not meet the minimum requirements for installing the update.
For example, when there is not enough available RAM, or available disk space to install the update, you may encounter the 0xc1900200 update error.
How to fix it? If you can’t apply update to Windows 10 with error code 0xc1900200, you can follow the steps below to troubleshoot Windows 10 update error 0xc1900200.
Solution 1. Disconnect All USB Devices
If there is an external hard drive or other USB device is connected to your PC when updating Window, you may encounter the update error 0xc1900200. And many users reported that they encountered the same error with the USB Bluetooth receiver for a wireless mouse.
In this case, you’d better disconnect all the unnecessary external USB devices such as Printer, controller during the update process. After removing all the external USB devices, check if the error 0xc1900200 gets fixed.
Solution 2. Check the Requirements for Windows 10 Update
To get the latest Windows 10 operating system successfully, you’d better check if your computer matches the minimum requirements for Windows 10 operating system. Make sure your computer matches the hardware and software requirements of Windows 10. So you need to check whether the CPU, RAM, and system disk space on your computer meet the Windows 10 requirements.
If there is no hardware issue affecting the Windows 10 update, it is possible that the error code 0xc1900200a is caused by a certain application, driver or firmware. If you cannot figure out which is preventing the Windows 10 upgrade, make sure that the disk space of system related partitions is enough and the drivers on your PC have been updated to the latest.
Solution 3. Extend System Reserved Partition
Some users reported that the Windows update error 0xc1900200 was caused by insufficient available space on the system reserved partition on your hard disk. To extend the partition can fix the issue. In this case, you should extend system reserved partition.
However, as we all know, Disk Management cannot help you resize system reserved partition. If you need to extend system reserved partition, you can utilize the professional partition manager MiniTool Partition Wizard to perform the operation.

MiniTool Partition Wizard Pro Edition is a reputable and reliable partition manager for Windows users. It can help you move/resize partition, extend partition, migrate OS to SSD/HD, convert MBR to GPT without data loss, convert NTFS to FAT and so on. If you need to manage disks and partitions on a Windows PC, MiniTool Partition Wizard will be your best choice.
Before we start, get MiniTool Partition Wizard Pro Edition by clicking the following button. And install it on your computer first. Then you can follow the steps below.
Step 1. Create a Bootable USB Drive
1. Prepare a blank USB drive and connect it to your computer.
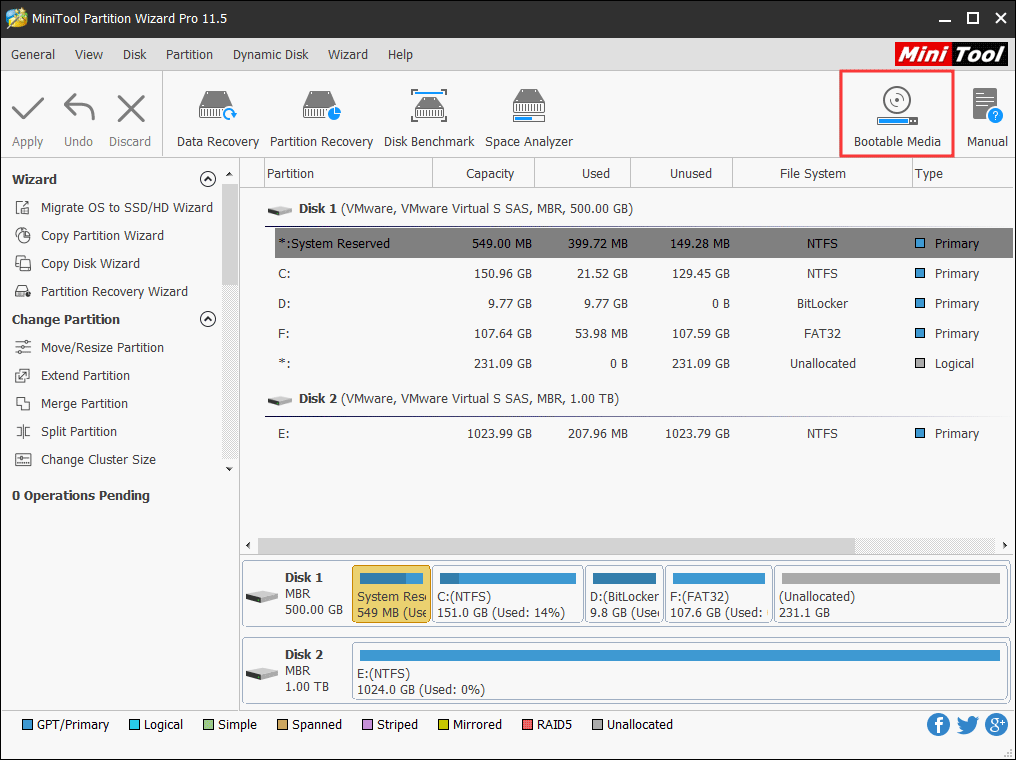
2. Launch MiniTool Partition Wizard and choose Bootable Media Builder from the main interface.
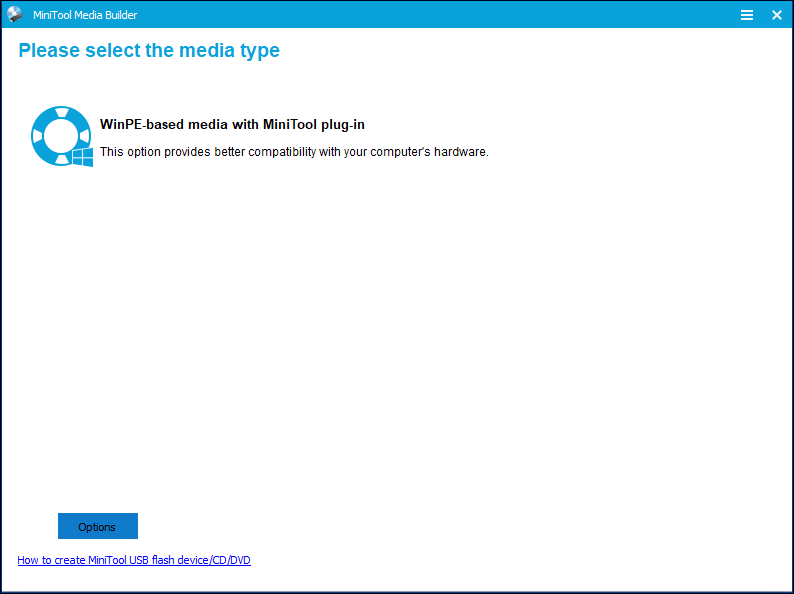
3. Select WinPE-based media with MiniTool plug-in to continue.
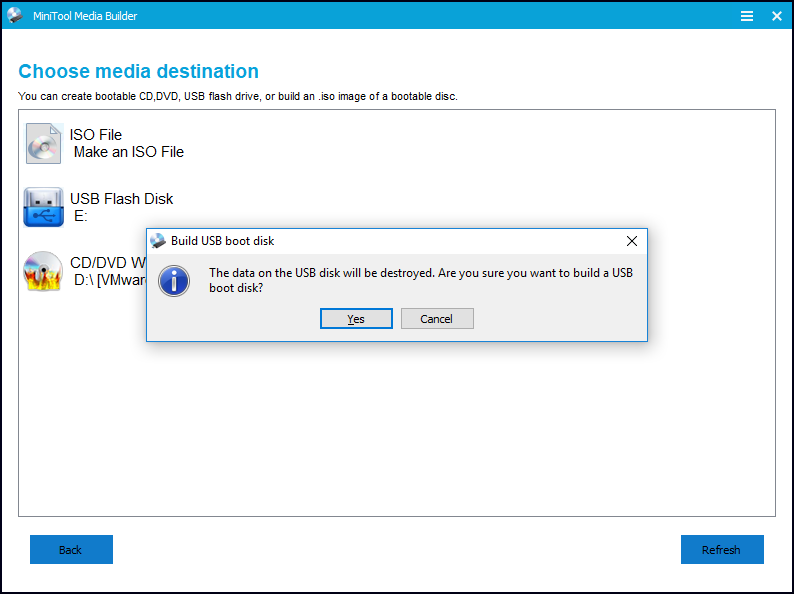
4. Select USB Flash Drive and click Yes to confirm that you want to burn the boot flash drive.
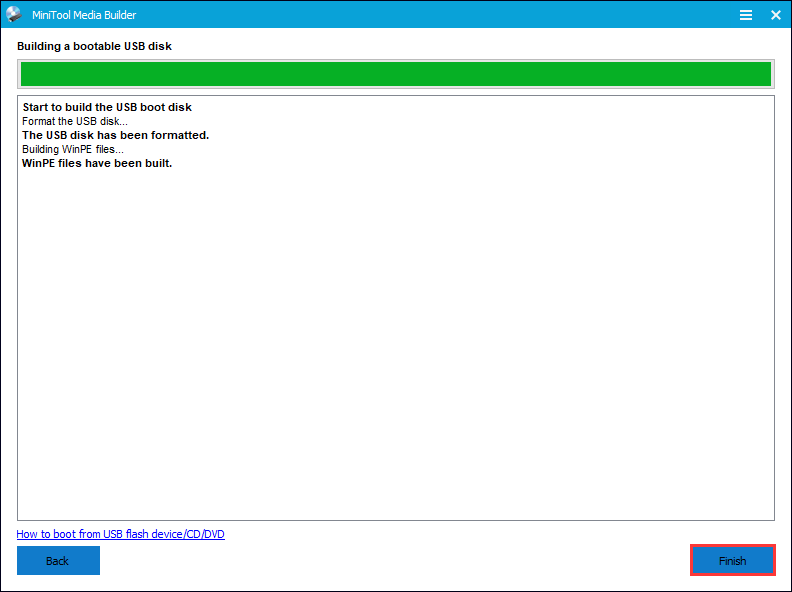
5. Wait patiently when it is generating boot files and click Finish after successful burning.
Step 2. Boot from the USB drive
Make sure the bootable USB drive is connected to your PC, and then follow the steps below to boot from the USB drive.
- Restart your PC and press a specific key to enter BIOS.
- Switch to the Boot tab by using the arrow keys and change the bootable USB drive as the first boot option.
- Press F10to save the changes and your computer will restart automatically from the USB drive.
Step 3. Extend System Reserved partition
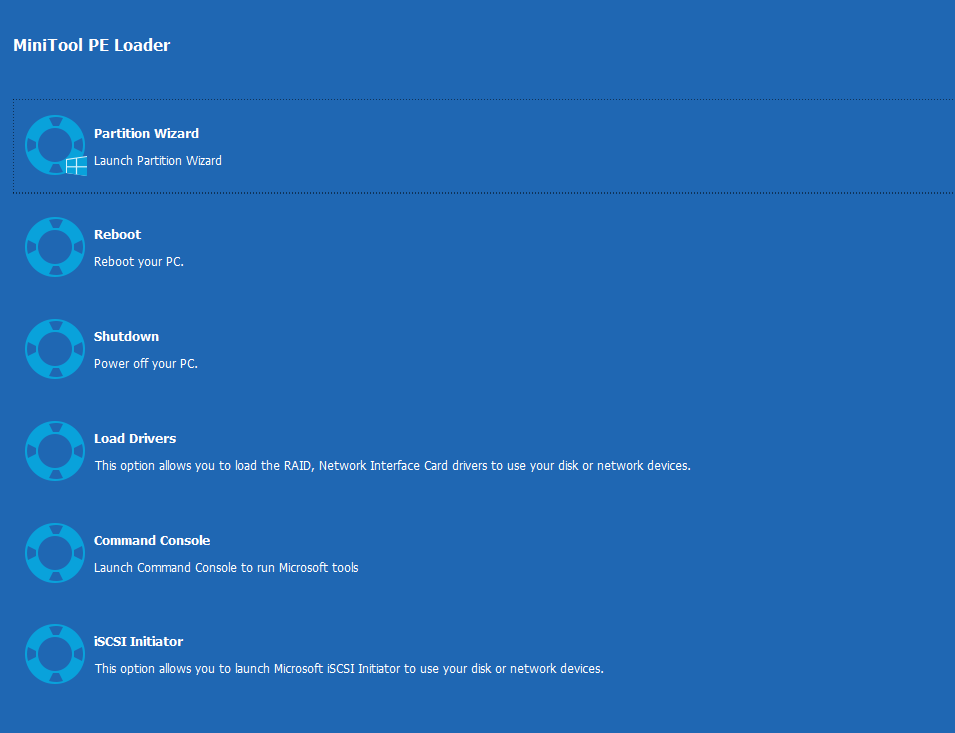
1. Then MiniTool Partition Wizard will be loaded automatically. If not, click Partition Wizard on the MiniTool PE loader interface.
2. Select the system reserved partition on the system disk.
3. Then choose Extend Partition from the left action panel.
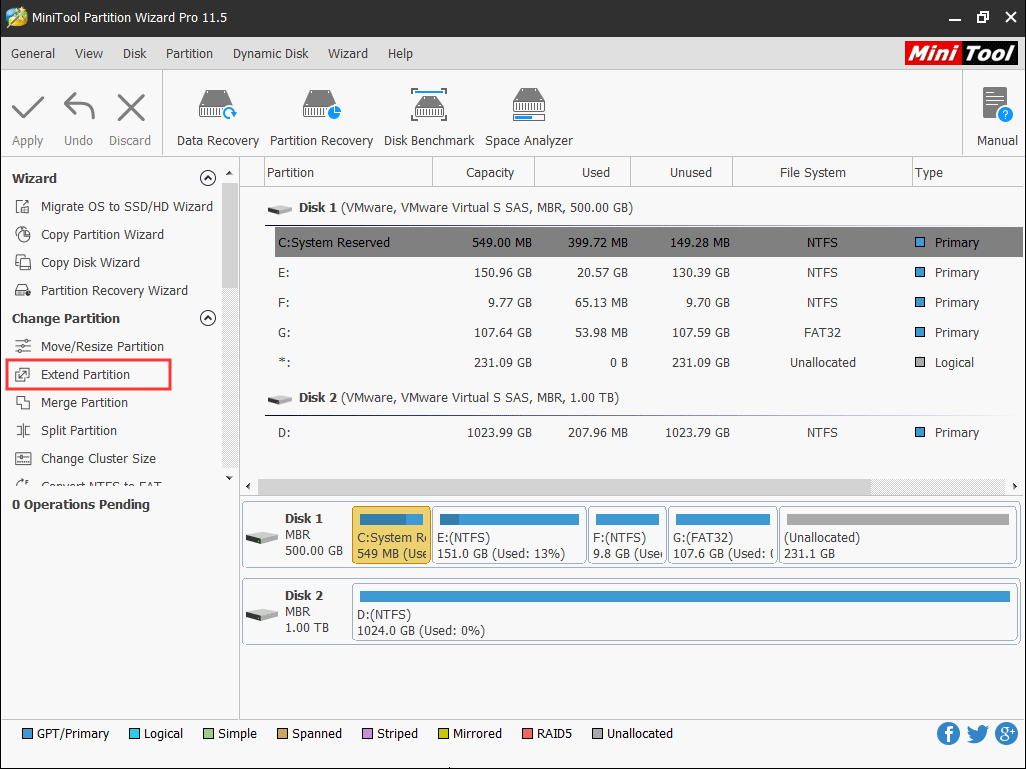
4. Choose a partition or unallocated space from the disk to take some free space. You can decide how much to take by dragging the sliding handle rightwards or leftwards.

Step 4. Apply the operation
1. Click the Apply button on the upper left corner.
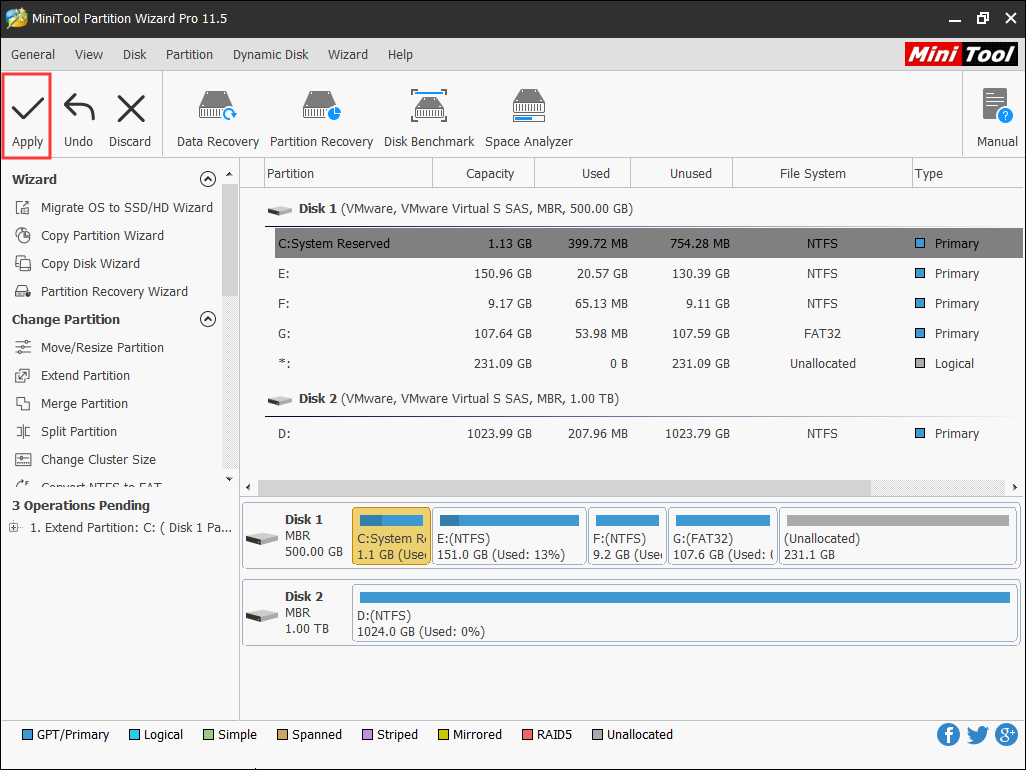
2. Then you can restart your PC and continue to update Windows 10.
Extending system reserved partition seems to be the most effective method to error 0xc1900200 according to the feedbacks from many users. So why not have a try? Just get MiniTool Partition Wizard Pro Edition and expand your disk space now!
Solution 4. Run System File Checker
If there are corrupted system files, you need to repair corrupted files first and then try updating Windows 10. System File Checker is a utility in Windows 10, which can help you scan and fix corrupted system files. If Windows fails to install the latest update, you can follow the steps below to troubleshoot Windows update issue such as error 0xc1900200.
Step 1. Launch Command Prompt
- Type cmd in the Windows search box.
- Right click the best match Command Prompt and choose Run as administrator.
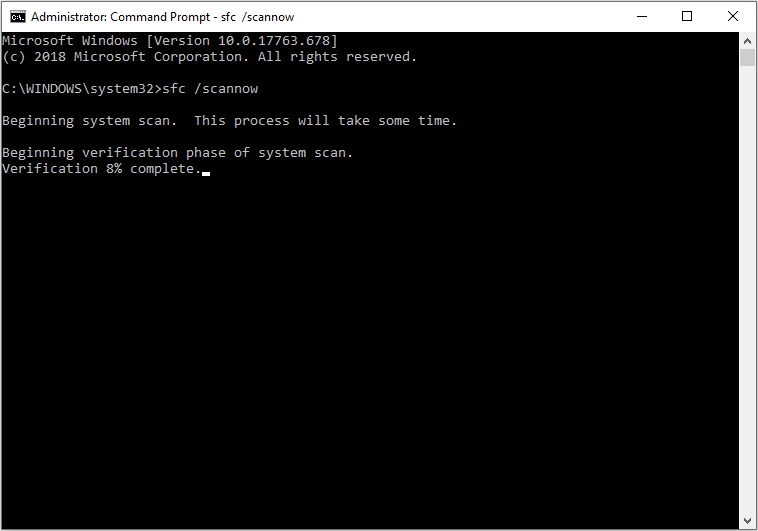
Step 2. Run the SFC command
- Type sfc /scannow in the Command Prompt window and hit Enter. (Note the space between “sfc” and “/”)
- Wait for scanning and repairing process finished.
- Exit Command Prompt.
If this method cannot help you get rid of the Windows Update error 0xc1900200, try the next method.
Solution 5. Reset Windows Update Components
Resetting the Windows 10 Update components is an effective fix to Windows 10 update issues. When you cannot download or install the latest Windows 10 update with various error codes such as 0xc1900200, 0x8007007e, 0x80240034 and so on, you can try resetting Windows update components.
Here are detailed steps.
Step 1. Launch Command Prompt (Admin)
- Type cmd in the Windows search box. You can also press Windows log key and S key to bring up the search box.
- Right click the best match Command Prompt and choose Run as administrator.
Step 2. Run the following commands to reset Windows update components
- Run the following commands to stop the BITS (Background Intelligent Transfer Service), Cryptographic, MSI Installer and the Windows Update Services.
- net stop wuauserv
- net stop cryptSvc
- net stop bits
- net stop msiserver
- Run the following commands to rename the Software Distribution and Catroot2 folders.
- Ren C:WindowsSoftwareDistribution SoftwareDistribution.old
- Ren C:WindowsSystem32catroot2 Catroot2.old
- Restart the BITS, Cryptographic, MSI Installer and the Windows Update Services with the following commands.
- net start wuauserv
- net start cryptSvc
- net start bits
- net start msiserver
After resetting the Windows 10 update components with the above commands, try updating Windows 10 again and check if the error code 0xc1900200 gets fixed.
Solution 6. Run DISM
Deployment Image Servicing and Management (DISM) is command-line tool which can help you repair Windows operating system issues. DISM is basically same as the SFC scan, but it is more powerful. So if SFC /scannow command does not resolve the Windows update error code 0xc1900200, you may run DISM command to fix Windows update issues.
Step 1. Launch Command Prompt (Admin)
- Type cmd in the Windows search box.
- Right click the best match Command Prompt and choose Run as administrator.
Step 2. Run DISM Command
1. In the command line, copy and paste the following command and hit Enter after each.
DISM /Online /Cleanup-Image /RestoreHealth
2. Wait until the process completed.
3. Restart your PC.
The /RestoreHealth parameter runs a scan for corruption and attempts to repair any issues that it finds. When it is finished, you can check if the Windows update error 0xc1900200 disappears.
Solution 7. Update BIOS
Some users reported that they get the Windows update error because of the BIOS version. After they updated the BIOS, the Windows 10 error 0xc1900200 got fixed.
However, you need to know that even if you have the latest version of BIOS installed, you may encounter the Windows update error code 0xc1900200. In this case, you might have to install it again to fix the 0xc1900200 error.
So if the above fixes do not work and you suspect that the error is caused by BIOS, you can follow the steps below to update Windows.
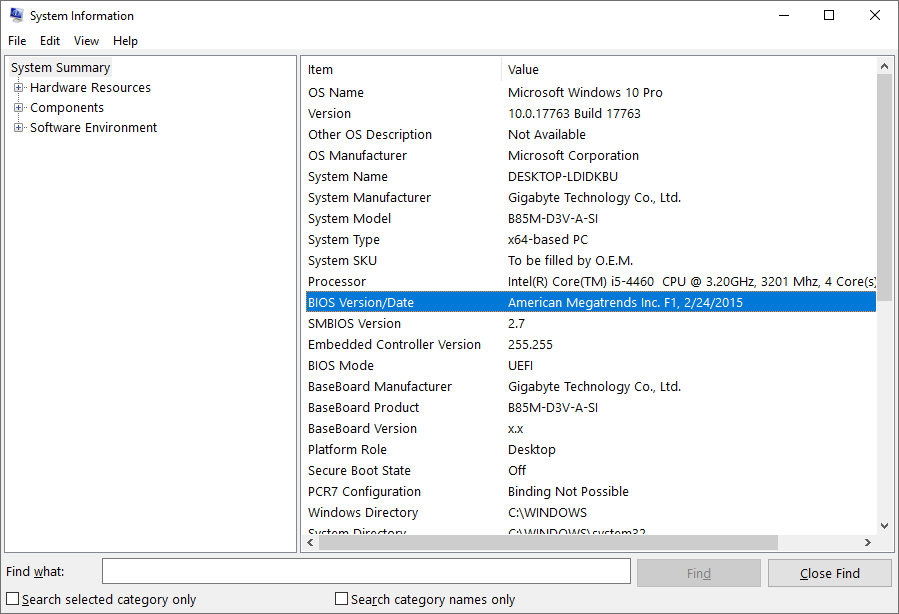
Step 1. Check your BIOS version
- Press Windows + R keys on the keyboard to bring up the Run box.
- Type msinfo32 into the Run box and then hit Enter.
- Find the item BIOS Version/Date from the list to check your BIOS version.
Step 2. Download BIOS update files
- Go to the motherboard manufacturer’s website and find the Downloads OR Support page for your specific model of motherboard.
- When you see a list of available BIOS versions, download the version to which you want to update, normally the newest.
- Unzip and extract the BIOS update file on your computer.
- Check out the readme file in the folder, which offers you instructions for updating to the new BIOS.

Step 3. Start updating BIOS
- Copy the BIOS update file to a blank USB flash drive on your computer.
- Restart your PC to get the BIOS screen by pressing a specific key at startup.
- Launch the BIOS/UEFI firmware update or BIOS-flashing tool.
- Select the BIOS file on the USB drive to start the BIOS update process.
Bottom Line
After trying the above solutions, have you fixed the Windows 10 error 0xc1900200? Which method works for you? We are glad to have you share your opinion with us.
If you have any question about how to fix Windows 10 update error 0xc1900200 or if you have other better solutions, you can leave a message in the following comment zone and we will reply as soon as possible. If you need any help when using MiniTool software, you may contact us via [email protected].
User Comments :