Are you struggling to cope with the error 0x80300024? Plenty of factors can lead to this Windows 10 installation error. MiniTool will analyze the possible causes and provide you with some solutions in this post.
What Causes Error 0x80300024
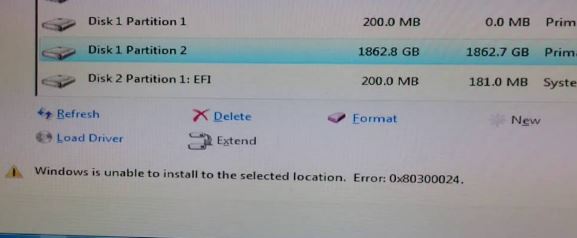
The error 0x80300024 is one of error codes occurring on computers when installing any version of Windows operating system. Besides the error code 0x80300024, you will receive a message “Windows is unable to install to the selected location” as the following picture shows.
Therefore, what causes this error? There are several reasons. Here, I will list all the possible known causes for your reference.
- The disk space on the target drive is not enough.
- The installation media is corrupted or damaged.
- The hard drive is dying or corrupted.
- There are some issues with software or hardware.
- You insert your USB drive into the wrong port or the USB port not working.
- There is an error between the driver application and the hard drive.
Read here, you can have a rough understanding of the causes of error 0x80300024 on your computer. If you want to know the detailed information about troubleshooting method, please read the following part carefully.
7 Methods to Fix Windows Couldn’t Be Installed Error 0x80300024
- Check the connection of accessories
- Remove unnecessary hard drives from the computer
- Try other USB ports
- Ensure that the boot order is correct
- Format the installation device
- Obtain enough disk space
- Install a new hard drive
Method 1: Check the Connection of Accessories
When the error code 0x80300024 occurs, the first thing you need to do is to check whether all the necessary accessories are connected and working properly. In particular, you need to make sure that the connection between the installation location (hard disk) and installation drive is stable.
There shouldn’t have any scratch on the cable that connects the two objects Windows OS cannot be installed successfully. Additionally, check whether the size of installation location is correct. You can try all these operations before rebooting your computer. After that, check if the error 0x80300024 is solved.
Method 2: Remove Any Unnecessary Hard Drives
When there are multiple hard drives connected to your computer during the installation, you may encounter Windows couldn’t be installed error. This is because other drives may interfere with the installation process and cause the error.
As a solution, you should unplug any unnecessary hard drives from your PC before attempting to install Windows. Then you can check whether the installation operation finishes smoothly.
Method 3: Try a Different USB Port
As mentioned earlier, plugging installation media into the wrong USB port can cause the error code 0x80300024. Therefore, you can switch a different USB port – try using USB 2,0 port if you are using the USB 3.0 before.
You may be interested in this: USB 2.0 vs. 3.0: What’s the Difference and Which One Is Better
Method 4: Make Sure the Boot Order Is Correct
Step 1: Boot or reboot your computer.
Step 2: Follow the instruction on the first screen that you see when your PC start up. In most cases, you can enter the BIOS/ Setup by pressing Delete, F1 or F2 key, but the situation varies according to your PC brand.
Step 3: After entering BIOS, go to the Boot tab to check your boot order.
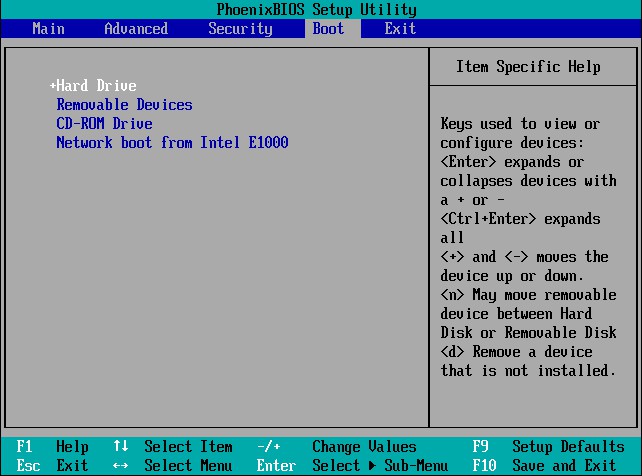
Step 4: Change the boot order – set the destination drive for Windows installation as the first boot order.
Step 5: Save the changes and exit BIOS.
Then reinstall Windows on your PC and check if the installation goes through successfully.
Method 5: Format the Installation Location
If the partition of the hard disk drive that you are trying to install Windows is not a newly created one, some data on the partition may interfere with the installation operation. That’ why it is suggested that you’d better format the installation location before installing Windows.
There’s something you need to know about format: What Does Formatting a Hard Drive Do? Here Are Answers.
If the data on the destination location is the cause of the error, formatting the installation location can fix the Windows couldn’t be installed error. Now, please follow this guide to fix the error.
Step 1: Plug the bootable Windows installation media into the computer and reboot it. If you don’t have the installation media, you can create one by following this guide.
Step 2: In the BIOS page, set the bootable Windows installation media as the first boot option.
Step 3: Then configure your language, keyboard layout and other preferences to go on.
Step 4: Choose the Custom (advanced) box when the notification appears.

Step 5: In the Windows Setup page appears, click on Drive options (advanced).
Step 6: Click the partition of the hard disk drive that you want to install Windows, and then click on the Format option.
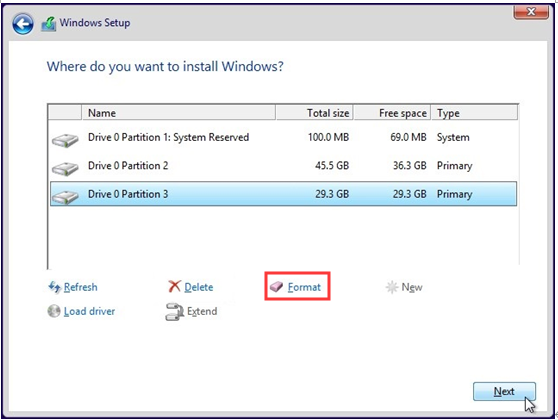
Step 7: Confirm the operation. Wait for the completion of the formatting process. Then click on Next to continue to install Windows.
Alternatively, you can choose third-party software to format the partition. MiniTool Partition Wizard is a wonderful choice for you, which enables you to format partition easily. More importantly, its Pro Edition boasts the Bootable Media feature allowing you to create a bootable USB/CD/DVD with ease.
It is obvious that you need MiniTool Partition Pro Edition or more advanced editions in here.
Here is the step-by-step guide to format partition in MiniTool Partition Wizard.
Step 1: Reboot your computer with the bootable media created by MiniTool Partition Wizard Pro or Pro Ultimate Edition, and then enter the BIOS page.
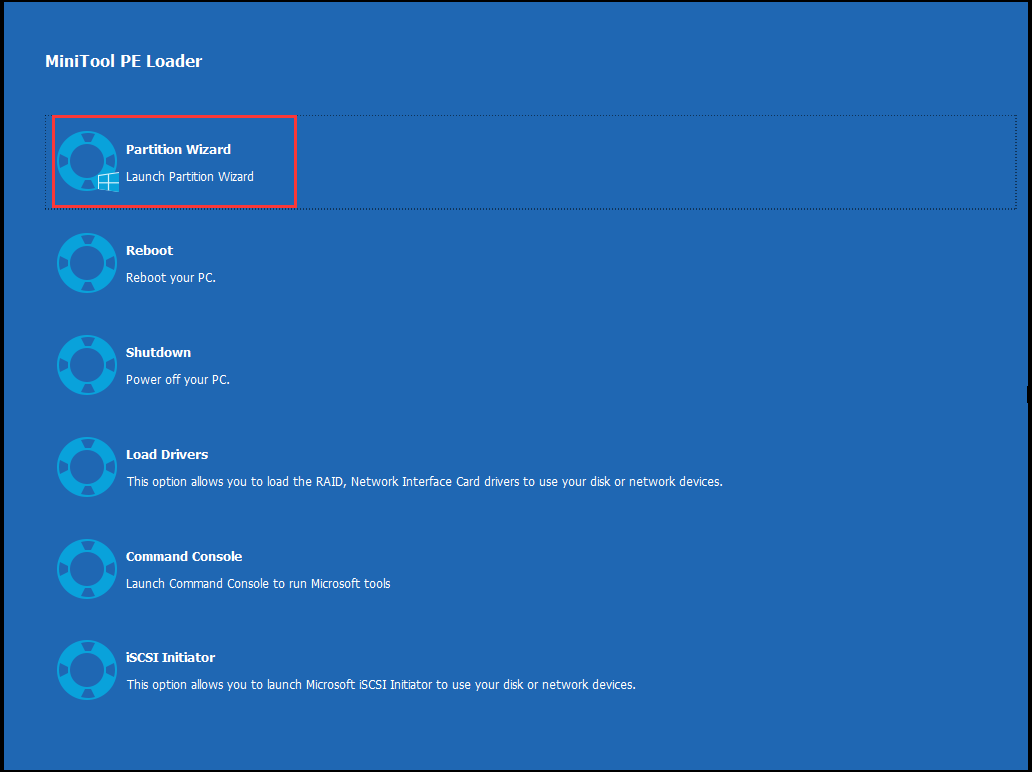
Step 2: Choose the bootable media as the first boot order in the Boot tab of the BIOS page. After entering the MiniTool PE Loader page, click on Partition Wizard.
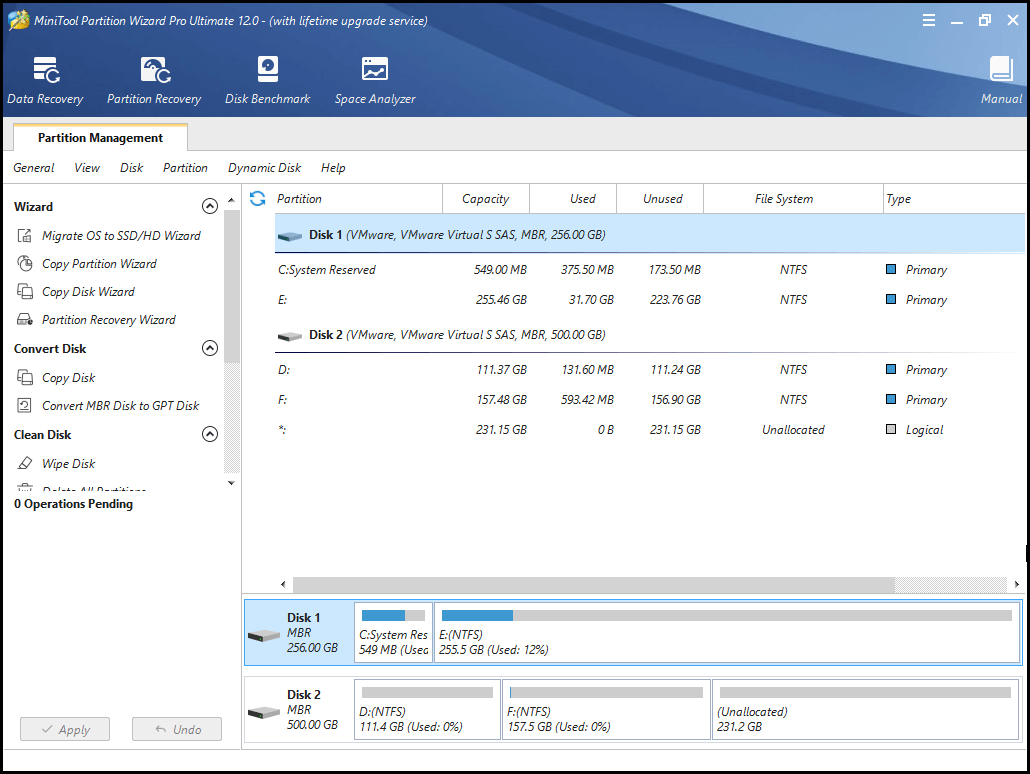
Step 3: Launch MiniTool Partition Wizard Pro Ultimate to enter its main interface.
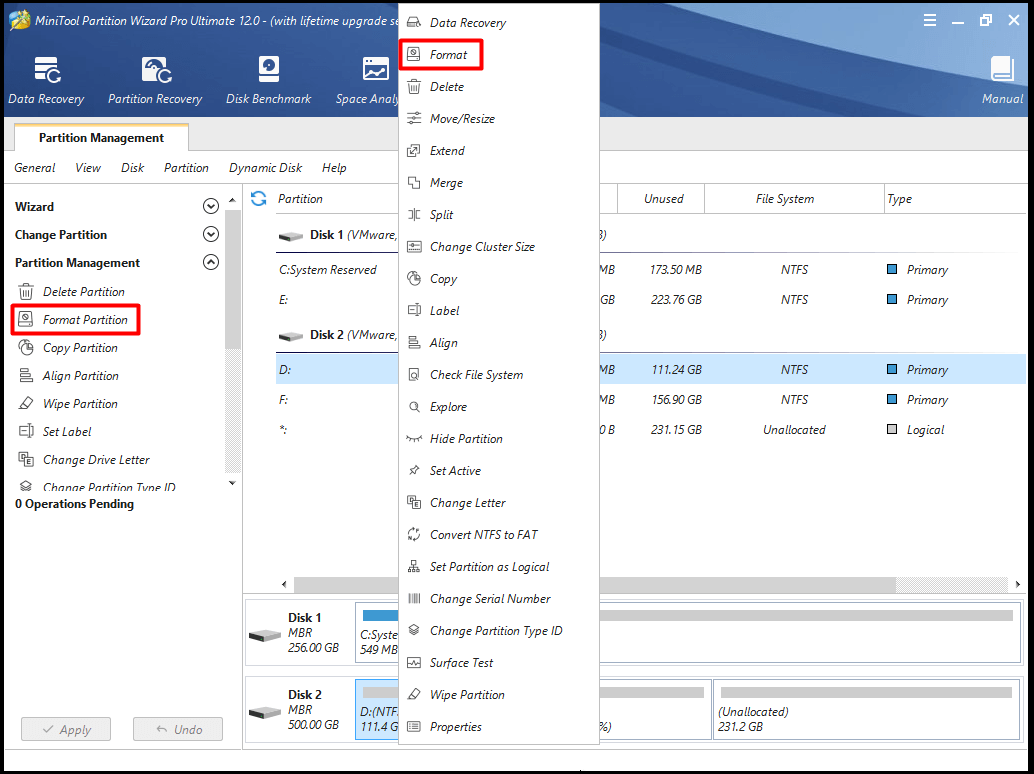
Step 4: Select the partition that you want to install Windows on, and then click the Format Partition feature on the left action panel. Alternatively, you can right click the target partition and choose the Format option from the menu.
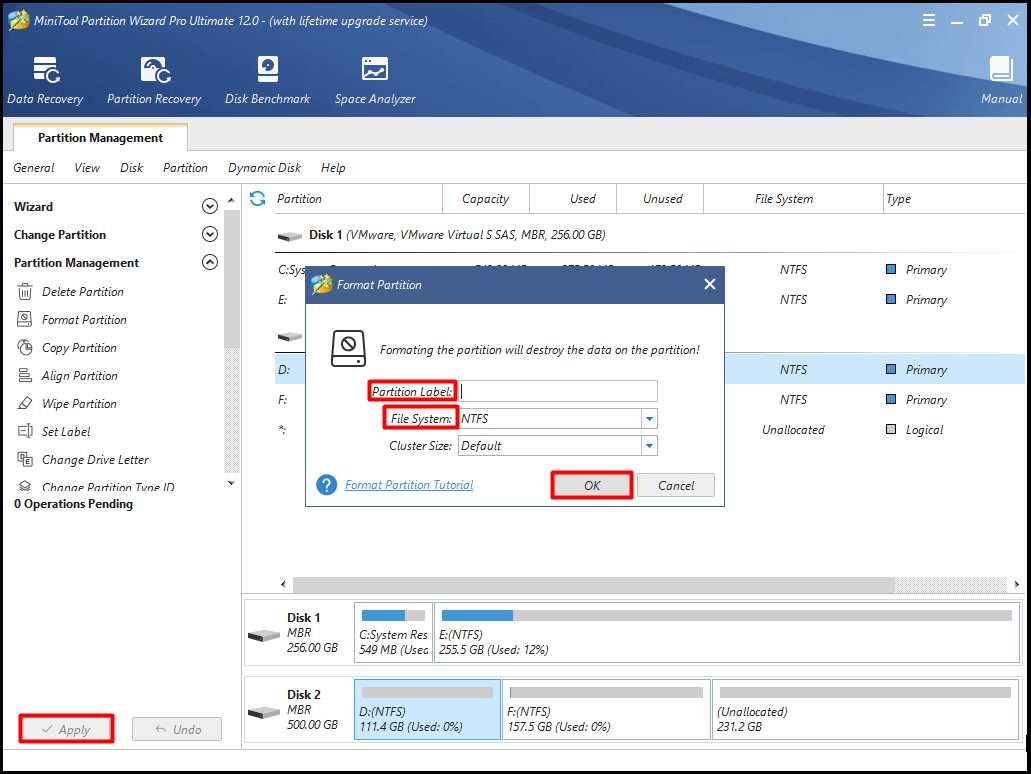
Step 5: Then set Partition Label and File System in the pop-up window. After that, click OK to save the changes. Finally, click Apply to execute the operation.
Method 6: Get Enough Disk Space
When the drive to install Windows has been occupied by data, you will encounter Windows cannot be installed on drive error because there’s not enough space for Windows installation files. In this case, you need to obtain more disk space.
First and foremost, you can free up disk space by deleting some unnecessary but space-consuming files or folders. To do so, you need to analyze what is taking up space on Windows 10 first. Here, the Space Analyzer feature of MiniTool Partition Wizard Free Edition enables you to do that operation.
This software is an excellent partition manager that allows you to Wipe Disk, Check File System, Migrate OS to SSD/HD Wizard, etc. Therefore, don’t hesitate to download this wonderful tool. You can get it right now by clicking the button below.
MiniTool Partition Wizard FreeClick to Download100%Clean & Safe
After downloading and installing MiniTool Partition Wizard Free Edition, follow this guide to analyze your disk space usage: What Is Taking up Space on Windows 10? Disk Space Analyzer Helps!
Then, you can right click these unnecessary and space-consuming files and folders and delete them. In this way, you can free up disk space for installing Windows.
Top recommendation: 6 Effective and Reliable Methods to Delete Files Permanently
Here are two approaches for you besides deleting unnecessary files or folders to get disk space. By resizing/extending partition, you are able to obtain more space for installing Windows. Actually, Move/Resize Partition and Extend Partition are two features of MiniTool Partition Wizard.
This software enables you to enlarge your disk space in few clicks. To resize or extend system partition, it is recommended to use MiniTool Partition Wizard Pro or more advanced editions. Click the button below to get one now.
Boot your PC from bootable media and enter the MiniTool PE Loader page. Click Partition Wizard to enter its main page. Then you can choose one from the following two approaches to enlarge disk space.
Approach 1: Move/Resize Partition
Make sure there is unallocated space in front of or behind the partition when you use the Move/Resize Partition feature of MiniTool Partition Wizard. Besides, the unallocated space must be contiguous to the partition that you want to move or resize.
If so, you can follow the tutorial to move/ resize partition on MiniTool Partition Pro more advanced editions now.
Step 1: Right click the target partition and select the Move/Resize option from the menu. It is also available that select the target partition and click on the Move/Resize Partition feature in the left action panel.
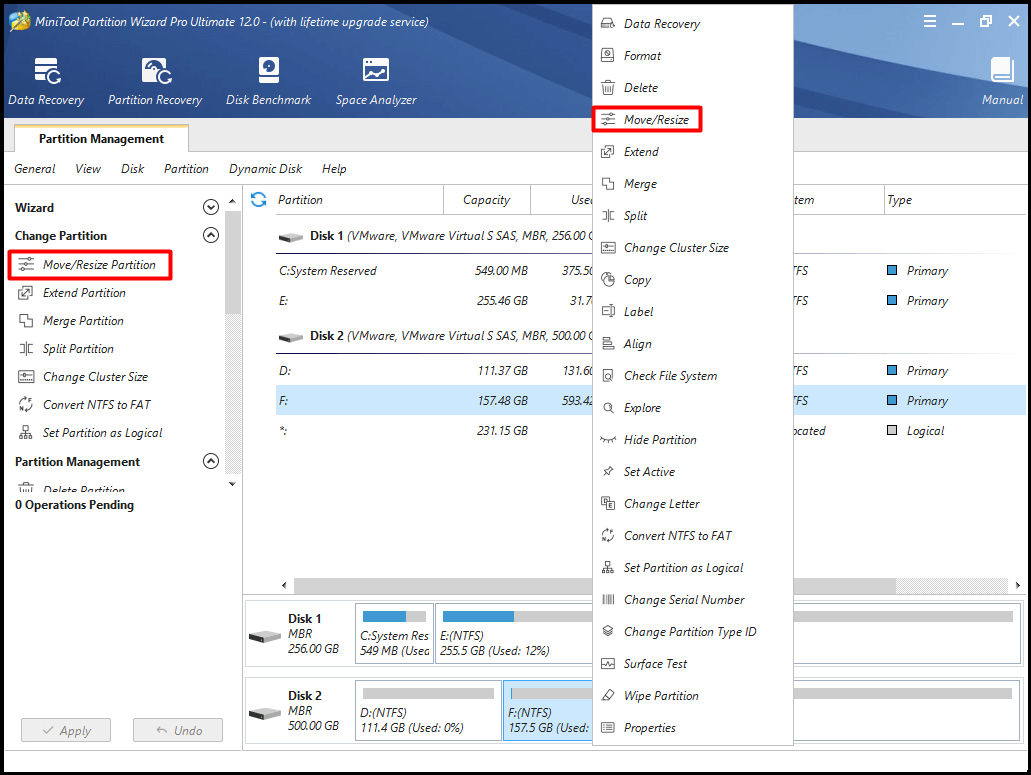
Step 2: You can decide the location and size of the target partition by moving the button to the left or right direction in the pop-up window. After that, click the OK button to go on.
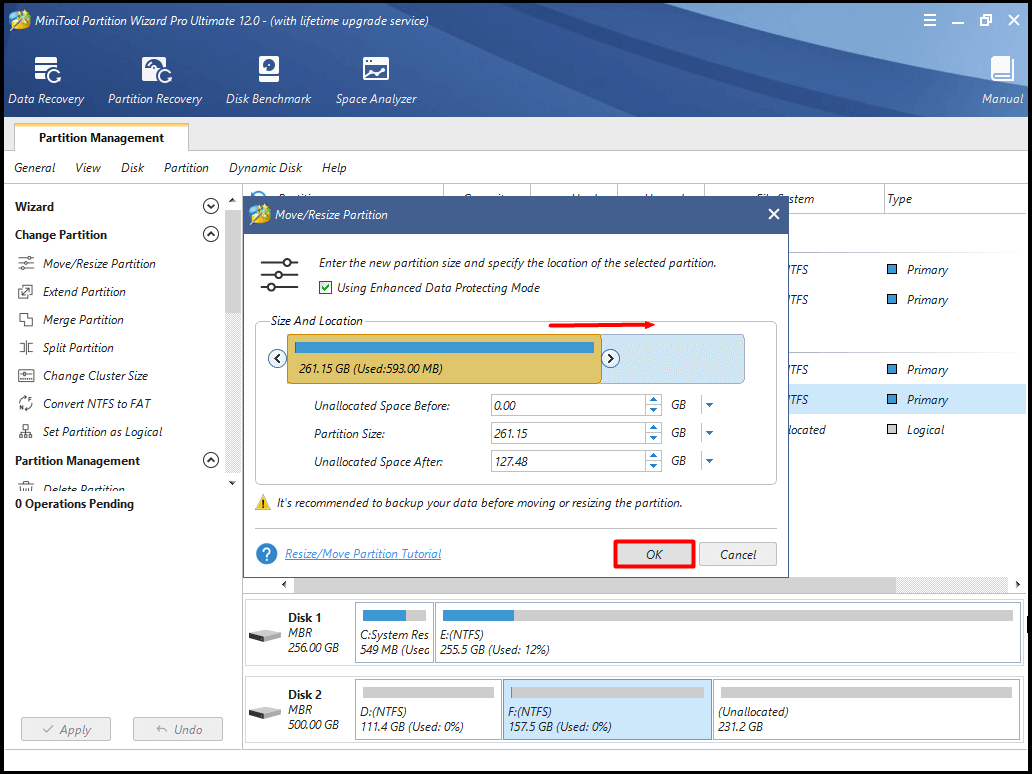
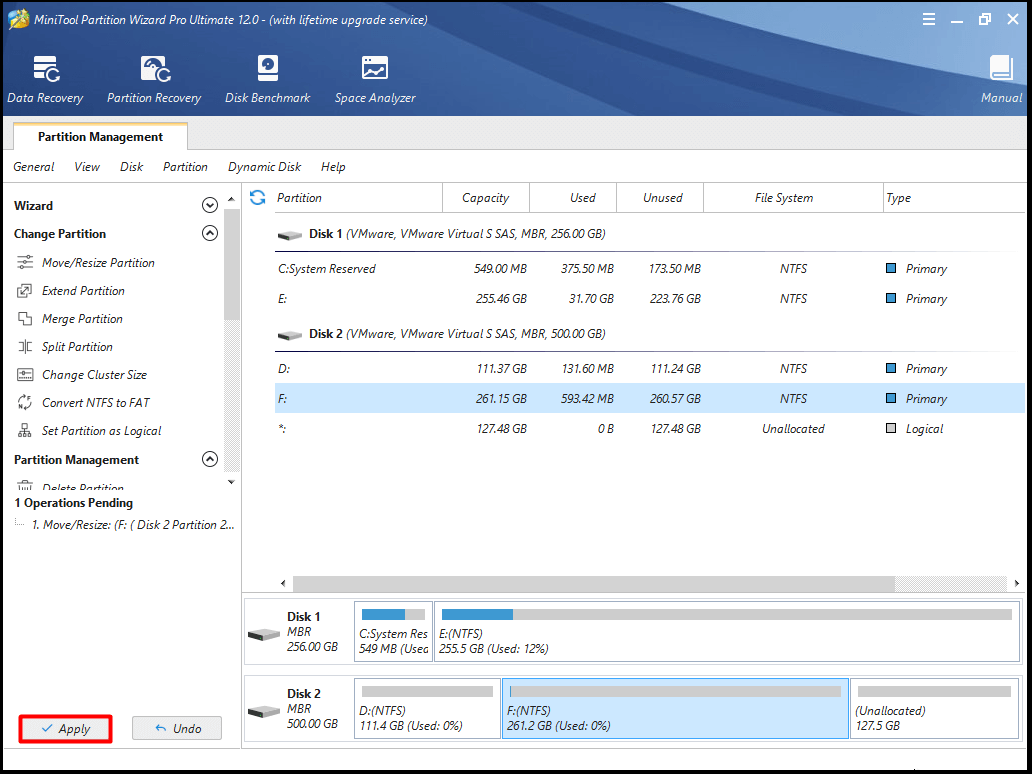
Step 3: Click Apply to carry out the operation.
Approach 2: Extend Partition
You can increase disk space by taking space from any other partitions or unallocated space on the same disk via Extend Partition feature of MiniTool Partition Wizard. When you are going to extend a partition to non-contiguous unallocated or free space, you’d better choose Extend Partition not Move/Resize partition feature.
Here are steps to extend partition.
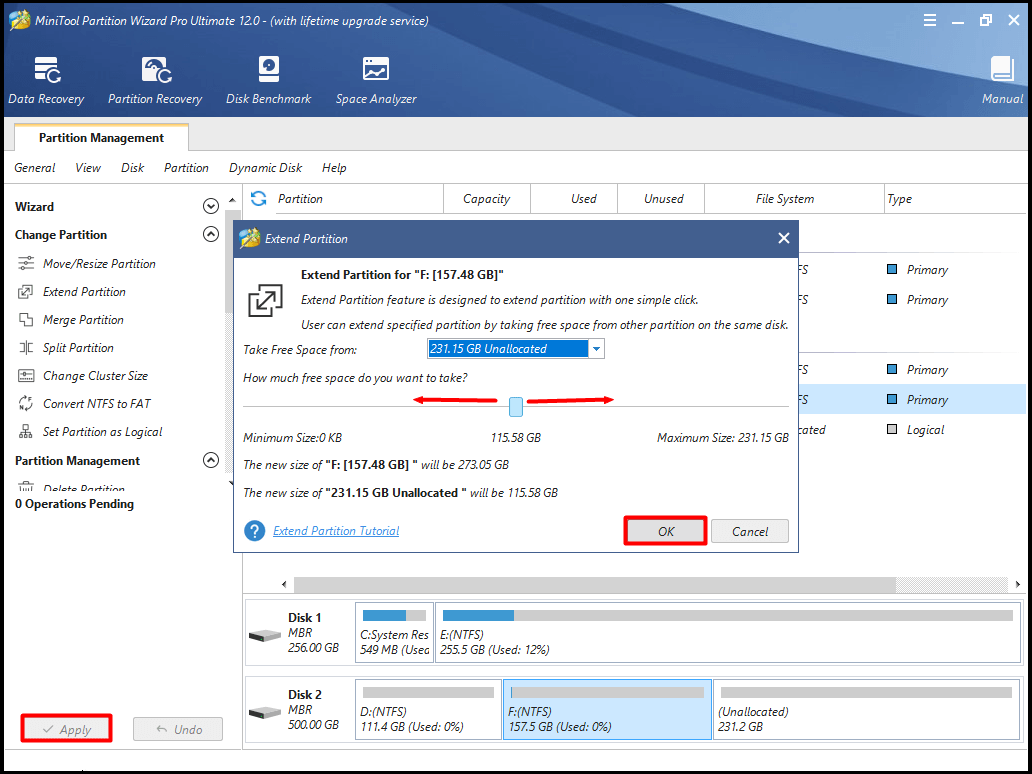
Step 1: After choosing the target partition, click the Extend Partition feature in the left feature list of the main interface. Alternatively, you can right click the target partition and select the Extend feature from the right menu.
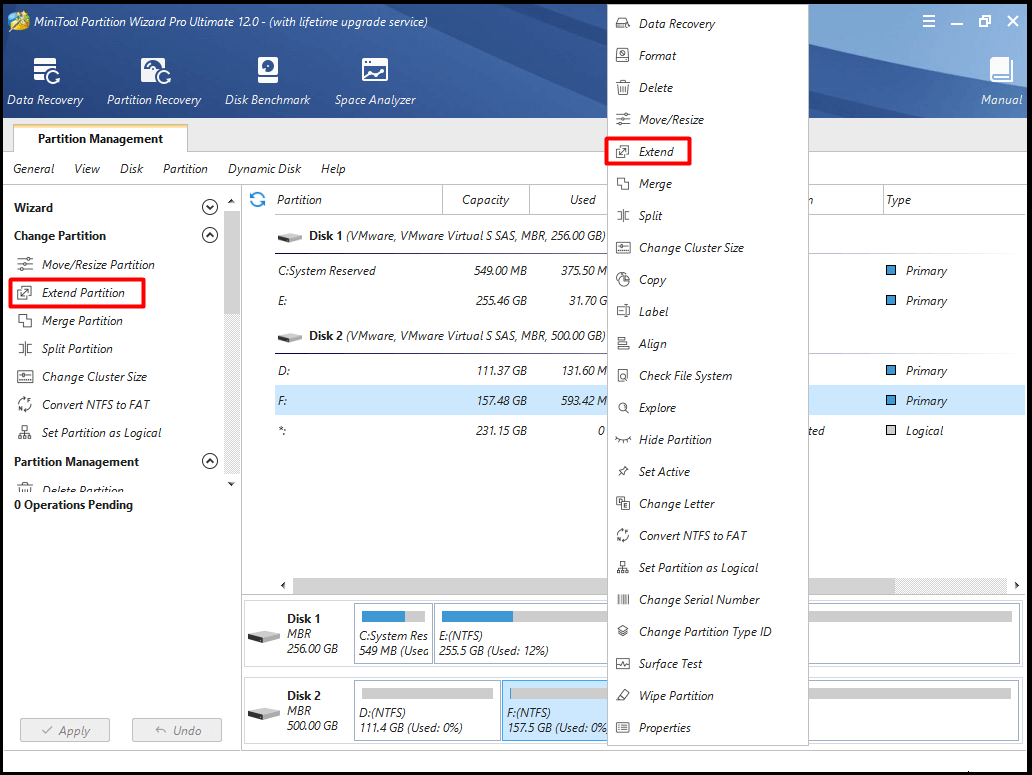
Step 2: In the pop-up window, choose the partition that you want to take free space from and decide the amount of free space you want to take from the selected partition.
Step 3: Then, click on OK to save the changes.
Step 4: Finally, click Apply to carry out the extending operation. You can clearly see that the above operations are shown in the following picture.
Method 7: Replace Your Hard Drive with a New One
Last but not least, you can replace your hard drive with a new one to fix the error 0x80300024. Since a faulty hard drive will prevent Windows operating system from being installed, you need to replace the old drive when all above methods not working.
To get more details about replacing hard drive, please reads this post: How to Replace Laptop Hard Drive Without Reinstalling Windows?
Conclusion
Do you encounter Windows cannot be installed on this drive issue with an error code 0x80300024? You are able to pick one method from the above according to your demand. If you have new thought about this error, please share with us in the comment area.
If you have any advice or doubt about MiniTool software, send us an email directly via [email protected].
User Comments :