You may get the “Windows cannot be installed to this disk” error when installing Windows using a USB. This post lists 5 common error messages and introduces their causes and corresponding solutions. Among these solutions, disk cleaning and disk type conversion with MiniTool Partition Wizard are recommended.
Why Windows Cannot Be Installed to This Disk?
If you clean install Windows with a USB drive, when you select where to install Windows, you may get the error “Windows cannot be installed to this disk.” This section lists common error messages and their corresponding causes.
Error 1: Windows cannot be installed to this disk. The selected disk has an MBR partition table. On EFI systems, Windows can only be installed to GPT disks.
- Cause: The computer uses the UEFI boot mode, while the disk on which Windows is to be installed is currently an MBR disk.
- Solution: Clean the disk with DiskPart commands, use third-party software to convert the disk to GPT without data loss, or change the boot mode to Legacy (not recommended).
Here is a video guide:
Error 2: Windows cannot be installed to this disk. The selected disk is of the GPT partition style.
- Cause: The computer uses the Legacy boot mode, while the disk on which Windows is to be installed is the GPT style.
- Solution: Change the boot mode to UEFI, clean the disk with DiskPart commands, or use third-party software to convert the disk to MBR without data loss. If your computer supports the UEFI boot mode, the latter two methods are not recommended.
Here is a video guide:
Error 3: Windows cannot be installed to this disk. This computer’s hardware may not support booting to this disk. Ensure that the disk’s controller is enabled in the computer’s BIOS menu.
- Cause: There is something wrong with the firmware or the disk.
- Solution: Reset the BIOS and then clean the disk.
Error 4: Windows cannot be installed to this disk. The disk may fail soon. If other hard disks are available, install Windows to another location.
- Cause: This error message was triggered by the SMART status, indicating that the disk is about to fail.
- Solution: It’s recommended to test the hard drive health and then replace the drive if necessary. If you don’t want to replace the disk, you can clean the disk and continue the installation, but you will have to bear the risk of system crashes and data loss yourself.
Error 5: Windows cannot be installed to this disk. Setup does not support configuration of or installation to disks connected through a USB or IEEE 1394 port.
- Cause: You are trying to install Windows onto an external drive, which is not supported by the default Windows Setup.
- Solution: Select an internal hard drive to install Windows. If you really want to install Windows on a USB drive, try using Windows to Go tools like Rufus, WinToUSB, etc.
Get Started
Before implementing the following solutions, please ensure:
- You have disconnected all other hard drives, leaving only the hard drive where you want to install Windows on the computer.
- Reset BIOS first, making sure the firmware has not been tampered with.
- Select an internal drive to install Windows.
Then, refer to the table below to understand which solutions correspond to which types of errors.
| Solutions | Windows Cannot Be Installed to This Disk Errors |
| Clean the disk | 1. The selected disk has an MBR partition table. 2. The selected disk is of the GPT partition style. 3. This computer’s hardware may not support booting to this disk. 4. The disk may fail soon. |
| Convert disk to MBR/GPT | 1. The selected disk has an MBR partition table. 2. The selected disk is of the GPT partition style. |
| Change the boot mode | 1. The selected disk has an MBR partition table. 2. The selected disk is of the GPT partition style. |
| Check hard drive health | The disk may fail soon. |
Solution 1. Clean the System Disk via DiskPart
This method will delete all data on the disk. You can use it if there is no important data on the disk. Here are the steps:
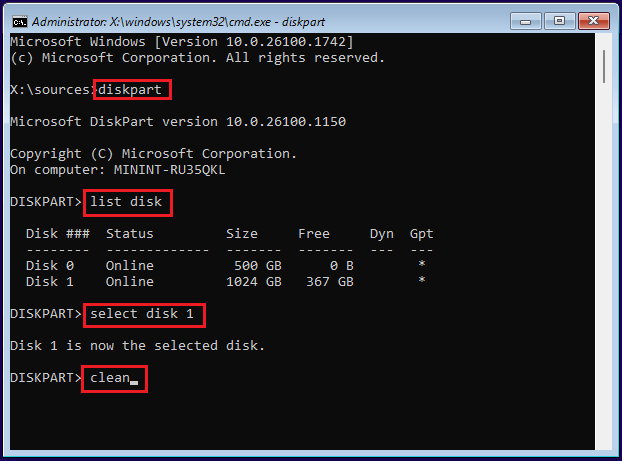
- Press Shift + F10 to open Command Prompt in the Windows installation environment.
- Type “diskpart” and press Enter.
- Type “list disk” and press Enter.
- Type “select disk *” and press Enter. * is the number of the disk where Windows is to be installed.
- Type “clean” and press Enter. This command will delete all partitions on the disk and remove the disk type (MBR/GPT) information.
- Close the Command Prompt and go back to the Windows installation interface.
- Select the unallocated space to continue the Windows installation. Then, Windows setup will initialize the disk automatically for the installation (MBR for Legacy boot mode or GPT for UEFI boot mode).
Solution 2. Convert the System Disk to GPT/MBR Without Data Loss
This method is usually used when you reinstall or upgrade Windows. In this case, you may just want to select one partition or unallocated space on the disk for Windows installation. There are other partitions that you want to keep.
Then, try MiniTool Partition Wizard. It can convert the disk type without data loss. Here is the guide:
MiniTool Partition Wizard DemoClick to Download100%Clean & Safe
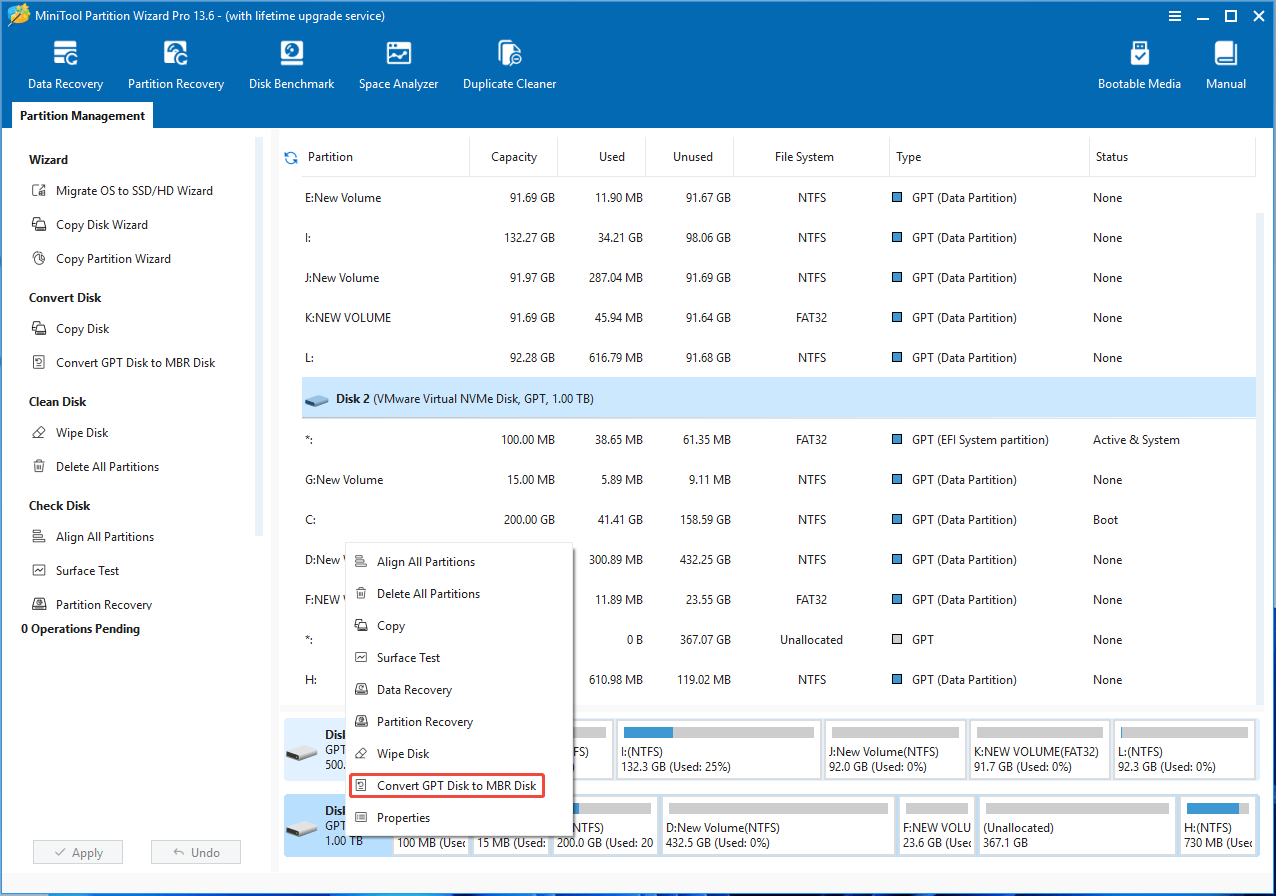
- Terminate the Windows installation and boot into the old Windows system.
- Install MiniTool Partition Wizard and launch it.
- Right-click the disk where Windows is to be installed and choose Convert MBR Disk to GPT Disk or Convert GPT Disk to MBR Disk. The specific choice depends on what boot mode you want to use.
- Click Apply to execute the operation. Note that if you have changed the system disk’s type, the system may become unbootable if the boot mode is not adjusted accordingly.
- After the conversion, change the boot mode and then install Windows.
Solution 3. Change the Boot Mode
UEFI is a newer boot mode that offers more boot features. Meanwhile, GPT is a newer disk type that overcomes many limitations of MBR disks, such as allowing the use of more than 2TB of space and the creation of more than four primary partitions.
Therefore, when a conflict occurs between the boot mode and the disk type, aligning UEFI with GPT is recommended in most modern systems.
For example, for the “Windows cannot be installed to this disk MBR” error, it’s recommended to clean the disk or change the disk type. However, for the “Windows cannot be installed to this disk GPT” error, changing the boot mode is recommended. Here is the guide:
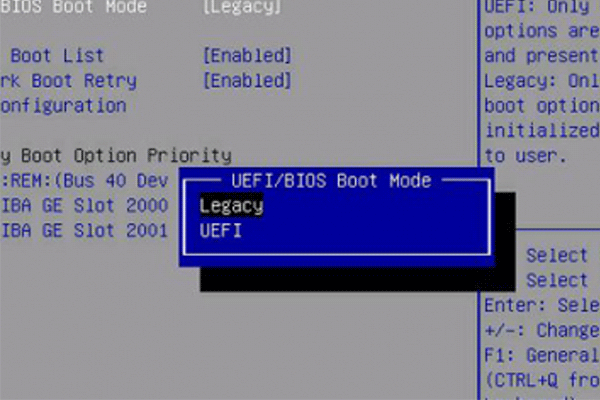
- Make sure your computer is shut down completely.
- Power on your computer and then immediately and repeatedly press the manufacturer’s BIOS key (F2, F12, Del, F1, or Esc) before the Windows logo appears.
- Use the arrow keys to navigate to the Boot or System Configuration tab.
- Look for “Boot Mode”, “UEFI/BIOS Boot Mode”, “Secure Boot”, or similar items.
- Select it to switch between Legacy and UEFI as needed.
- Press F10 to save your changes and exit.
Solution 4. Check Hard Drive Health
Is your hard drive really failing? To get the answer, you can check the hard drive health. Here are a few methods you can try.
- Use the WMIC Command: If the computer can boot up, you can open Command Prompt as Administrator, type “wmic diskdrive get status” and press Enter. It should return “OK” or “Pred Fail” to indicate the hard drive’s health.
- Use PC Hardware Diagnostics Tools: Many computers from brands offer such tools, for example, HP PC Hardware Diagnostics UEFI, Dell SupportAssist’s Enhanced Pre-boot System Assessment tool, ASUS System Diagnostics, and Lenovo UEFI Diagnostics. They can run when the PC fails to boot to check the hard drive health.
- Use Third-Party Software: Many users may use CrystalDiskInfo to check the hard drive health. It reads S.M.A.R.T. data to display status, temperature, and wear-and-tear metrics. After launching the software, check the “Health Status” indicator: Blue means “Good,” Yellow indicates “Caution” (potential impending failure), and Red signals “Bad” or imminent failure.
If the hard drive is healthy, you can clean the disk and then continue the Windows installation. If the hard drive is failing, replace it.

Bottom Line
The “Windows cannot be installed to this disk” error is commonly caused by boot mode and disk type conflicts, hardware faults, or other factors. The solutions above address these scenarios with practical methods such as disk cleaning, disk conversion, and boot mode adjustment.
If you have problems with MiniTool Partition Wizard, send an email to [email protected] for help.
About The Author

Position: Columnist
Linda has been an editor at MiniTool for seven years. She continuously learns about computers and puts her knowledge into practice. Moreover, she is particularly knowledgeable in disk management, data recovery, system installation, and PDF editing. Her articles typically reference multiple examples or are based on her own experience, providing users with the most suitable solutions.
User Comments :