A 64GB flash drive only showing 32GB is likely due to a partitioned drive or a formatting issue. To solve this issue, you can try extending the partition using MiniTool Partition Wizard or deleting existing partitions and then creating a new one with full capacity.
USB drives, as portable storage devices, have long been essential tools for transferring files in our daily lives and work. However, it can be confusing to see a 64GB USB drive showing only 32GB capacity when inserted into a Windows computer.
This is a user who reported that he encountered this problem.
I have a SanDisk Cruzer 64GB USB that I used a couple of weeks ago to create a Recovery Disk, and after using it, I erased everything on it so I could store files for personal use. However, when I go to File Explorer, it shows that the 64GB USB only has 32GB of space.https://superuser.com/questions/1396435/sandisk-cruzer-64gb-showing-only-32gb-availible-space
What should you do if you encounter the same issue? Here, this article will detail common causes of a 64GB USB drive showing only 32GB in Windows and provide practical solutions.
Why Is My 64GB Flash Drive Only Showing 32GB?
A 64GB flash drive showing only 32GB of space is often due to incorrect partitioning or formatting issues. The following are detailed explanations:
Cause 1. Only the First Partition on the USB Flash Drive Is Visible
Before Windows 10 version 1703, Windows only displayed the first partition of a USB drive.
The USB drive may be divided into multiple partitions, but Windows only recognizes the first partition, leaving the remaining space invisible. This situation is often caused by the following:
- When creating an installation or a recovery disk, the USB drive may be divided into multiple partitions.
- When manually partitioning, the capacity is mistakenly allocated as a 32GB primary partition, leaving the remaining space unallocated.
To check for multiple partitions, right-click Start and select Disk Management, and locate your 64GB flash drive in the list of storage devices. If you see multiple partitions (e.g., a 32GB partition and an unallocated area), it indicates a partitioning issue.
Cause 2. FAT32 File System Limitations
File system mismatch is another major cause. The USB flash drive might be formatted with a file system that doesn’t support the full capacity (e.g., FAT32, which has a 32GB limit).
FAT32, as an older file system, is highly compatible, supporting multiple devices such as Windows, macOS, and smart TVs.
But it has a significant limitation: the maximum capacity of a single partition is limited to 32GB. If a 64GB USB drive is formatted as FAT32, Windows might show the visible space as 32GB.
Cause 3. Counterfeit and Substandard Products
Counterfeit USB drives with inflated capacity are prevalent on the market. Unscrupulous vendors modify the firmware to sell 32GB drives disguised as 64GB.
These drives may initially display 64GB, but the actual physical storage capacity is only 32GB. When data is written beyond the actual capacity, files may become corrupted, lost, or even suddenly shrink to 32GB.
Therefore, please purchase through reputable channels and choose reputable brands (such as SanDisk, Samsung, and Kingston). Avoid low-priced, unbranded products.
Further reading:
It’s normal for a storage device’s nominal capacity to differ slightly from the capacity displayed on your computer. Manufacturers use decimal notation (1GB = 1000MB), while Windows uses binary notation (1GB = 1024MB).
Therefore, a 64GB USB drive typically displays as approximately 59GB on your computer. The approximately 59GB you see is the USB drive’s “actual usable capacity,” while the 64GB advertised by the manufacturer is its “nominal capacity.”
How to Fix a 64GB Flash Drive Only Showing 32GB?
To fix the 64GB USB only showing 32GB issue, here are 2 methods you can try.
- Use MiniTool Partition Wizard to extend the partition to full capacity.
- Use Windows tools (Disk Management or DiskPart) to restore the 64GB flash drive to its original capacity.
Compared with Windows tools, MiniTool Partition Wizard has the advantage that it can solve this problem without data loss. However, Windows tools require you to delete the existing partition and then recreate a new one.
Way 1. Extend the Partition to Full Capacity
To extend the partition to full capacity, you can try MiniTool Partition Wizard. It provides the Extend Partition feature to directly take free space from other existing partitions or unallocated space to enlarge a partition.
Here is the guide to extend the partition to full capacity on a USB flash drive with MiniTool Partition Wizard.
MiniTool Partition Wizard FreeClick to Download100%Clean & Safe
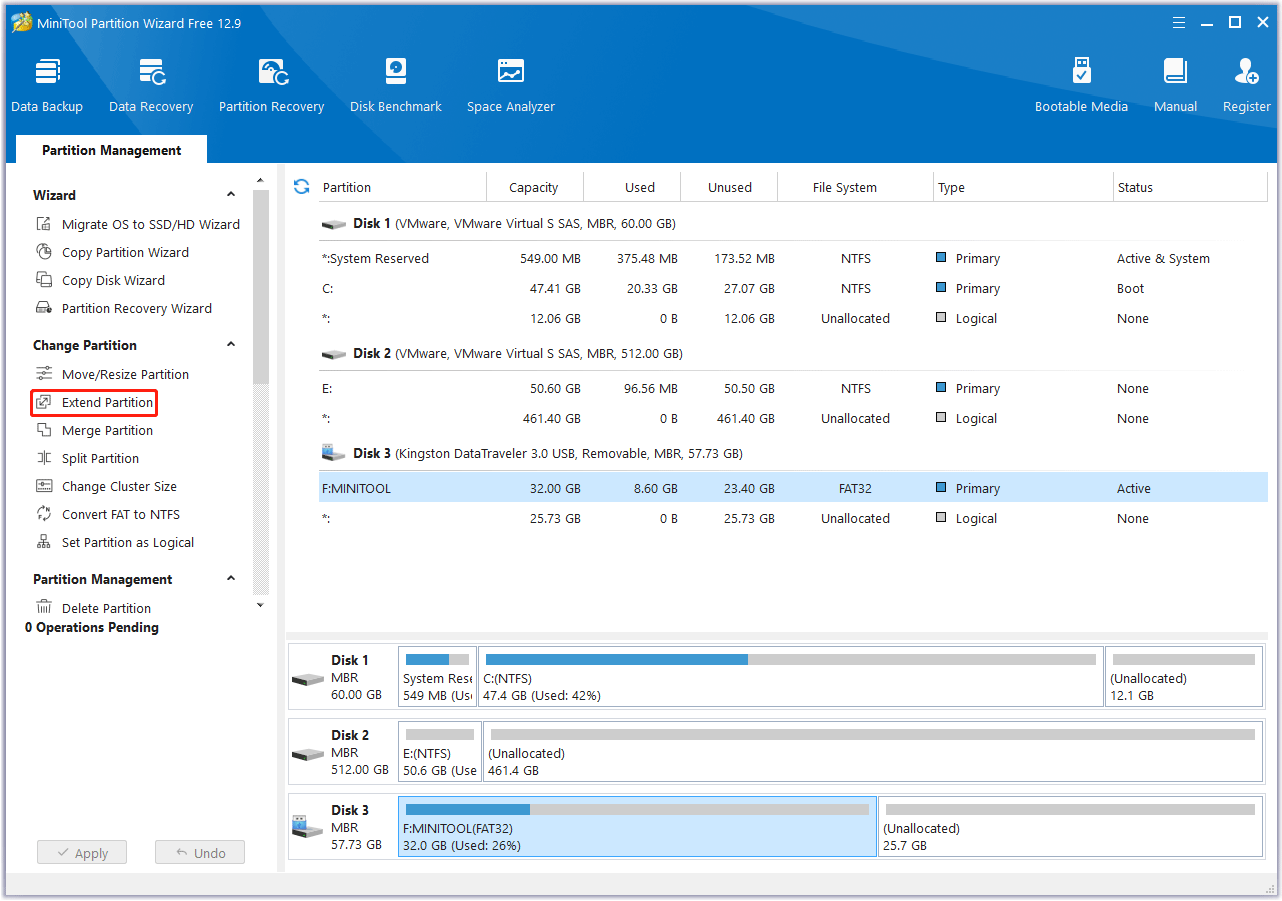
Step 1. Download and install this free partition manager on your computer. Then enter its main interface.
Step 2. Highlight the target partition and then select Extend Partition from the left action panel.
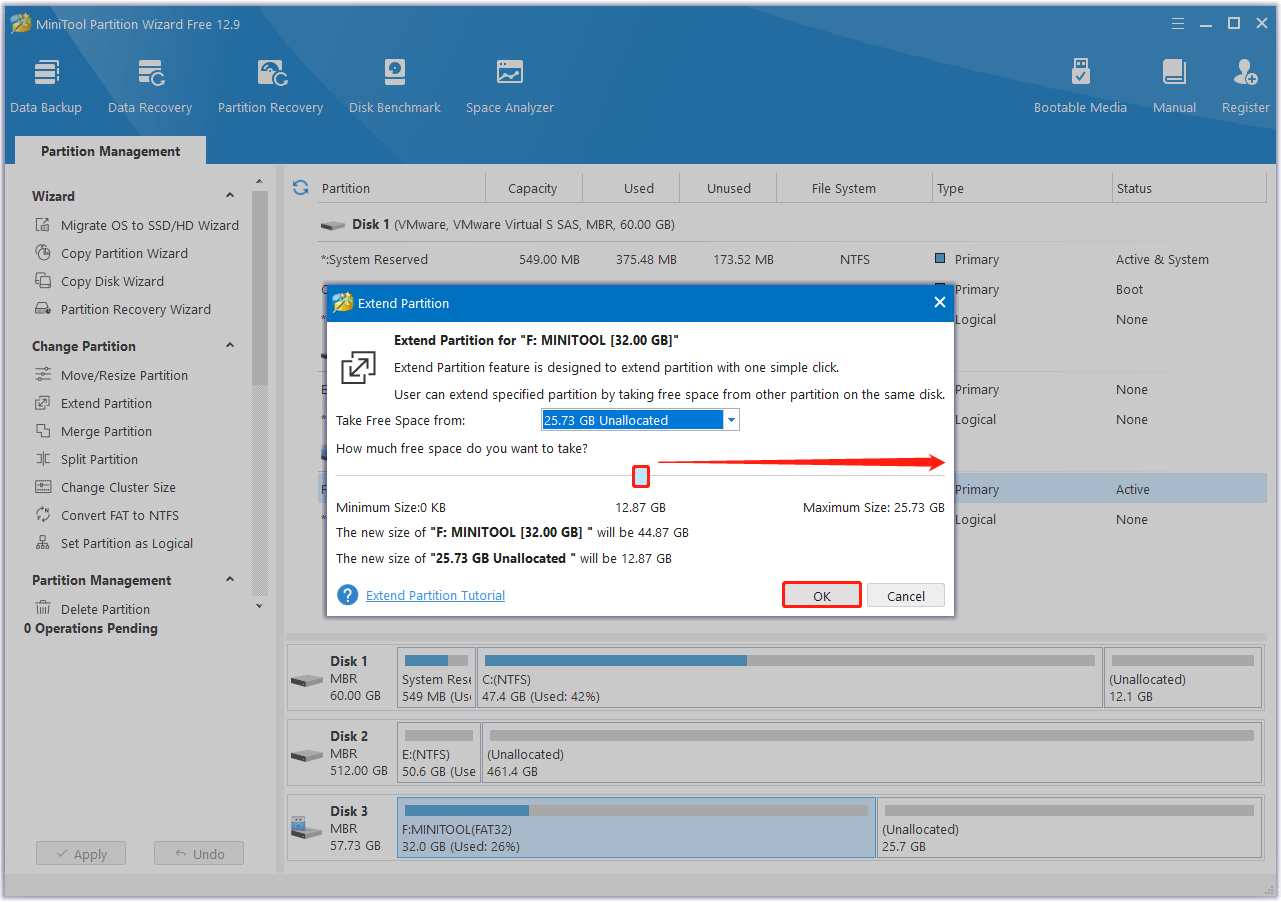
Step 3. Open the drop-down menu of Take Free Space from and choose the unallocated space to take space. Then drag the blue slider to the right to fill the USB drive. The partition size will change visually. After that, click OK.
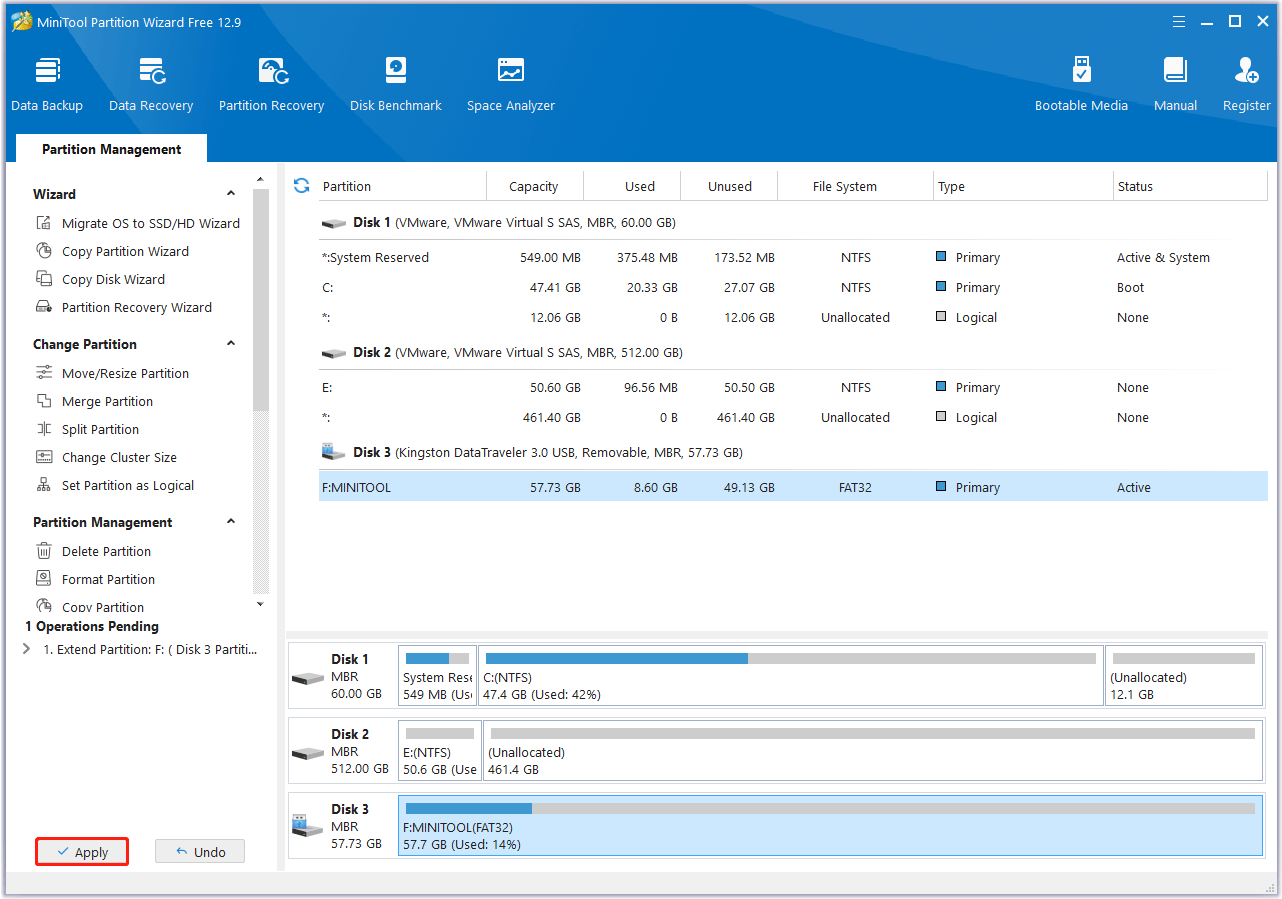
Step 4. Once get back to the main interface, you can preview that the USB flash drive has been extended. Then click the Apply button to perform the pending operation.
Besides, this software brings a range of features that can help you convert FAT32 to NTFS without data loss, rebuild MBR, clone a hard drive, recover data from USB drives, partition a hard drive, convert MBR to GPT without data loss, etc.
Way 2. Restore the 64GB USB to Its Original Capacity
To restore the 64GB USB to its original capacity, you can use Windows Disk Management or DiskPart to delete the existing partition and create a new, single partition using the full capacity of the drive.
Now, follow the steps below to restore the 64GB USB flash drive to its original capacity:
Use Disk Management
Step 1. Right-click Start and choose Disk Management.
Step 2. In the Disk Management window, right-click on the existing partitions on the USB flash drive and select Delete Volume.
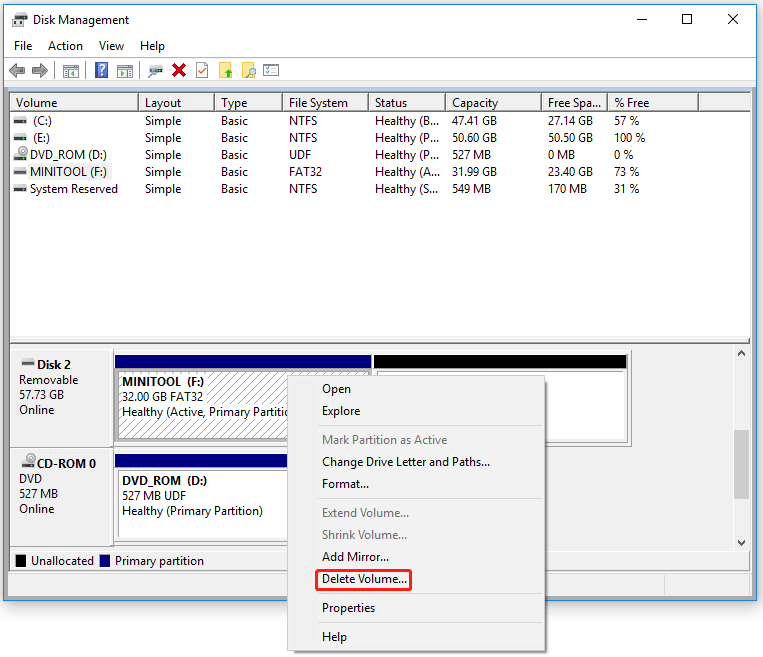
Step 3. Confirm that you want to delete the partition, as this will erase all data on that partition.
Step 4. Now, right-click on the unallocated space and select New Simple Volume.
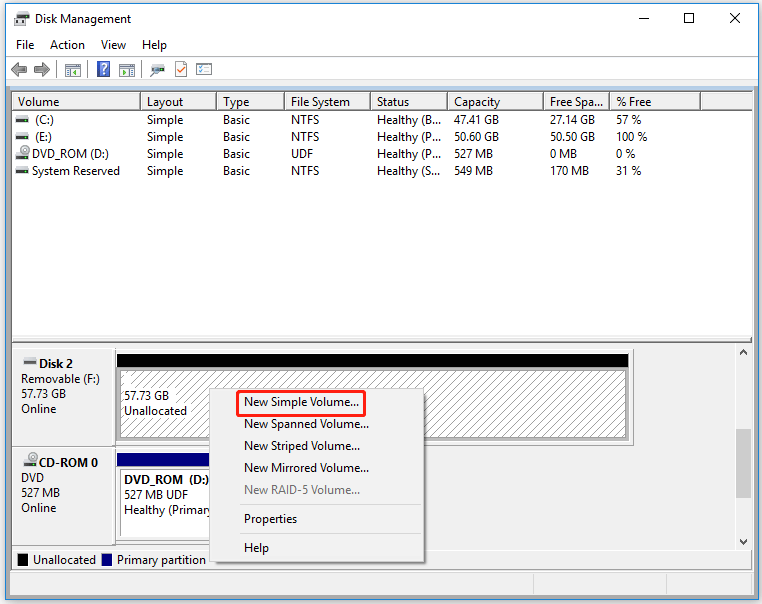
Step 5. Follow the wizard, making sure to assign the entire unallocated space to the new volume and choose the NTFS file system, as it supports larger partitions.
After that, the USB flash drive should now display the full 64GB capacity in File Explorer.
Use DiskPart
You can also use DiskPart to clean and format the USB drive if Disk Management doesn’t resolve the issue. Here is the guide:
Step 1. Press the Win + R key to open the Run dialog box, and then type diskpart in the box and hit Enter.
Step 2. Then type the following commands in the command prompt and hit Enter after each command.
- list disk
- select disk * (replace * with the 64GB USB flash drive)
- clean
- create partition primary
- format fs=ntfs quick

From the three methods above, it’s clear that using MiniTool Partition Wizard is the easiest and won’t delete any data. It’s worth trying.
Bottom Line
If a 64GB USB drive displays as 32GB in Windows, this is often due to partition errors or file system limitations. Restore to full capacity by merging partitions or reformatting.
Certainly, if you have any questions or suggestions on how to use MiniTool Partition Wizard, please do not hesitate to contact us via [email protected].
64GB USB Only Showing 32GB FAQ
Step 1. Run MiniTool Partition Wizard.
Step 2. Right-click the USB drive and choose Format.
Step 3. Choose the FAT32 file system and click OK.
Step 4. Click Apply to execute the operation.
To resolve this issue, you can enable hidden file viewing, scan for viruses, check for errors using tools like CHKDSK, or run an antivirus scan.
About The Author

Position: Columnist
Vega enjoys helping people with computer problems, including disk management, data recovery, data backup, and more. She is constantly expanding her knowledge in related fields. And she will continue to bring more easy-to-understand professional articles to help people solve various problems on the PC.
User Comments :