In the digital age, data security has become a core concern for individuals and businesses. When disposing of old SSDs, transferring devices, or handling sensitive information, simply deleting or formatting them is insufficient to ensure data security.
In these situations, you need to securely erase your SSD. This article will explain the principles and methods of secure erasure of SSDs, helping you completely eliminate traces of data and prevent potential information leaks.
What Is Secure Erase?
Secure Erase is a data sanitization method used to completely and permanently erase data from an SSD, making it difficult to recover. It’s the safest way to wipe an SSD when you want to dispose of it or prepare it for reuse.
Unlike traditional hard drives, SSDs don’t require multiple overwrites for secure deletion. Secure Erase leverages the SSD’s firmware to reset it to a factory state, often improving performance.
How Does Secure Erase Work?
SSD Secure Erase is a technology that completely erases all data from an SSD using dedicated firmware-level commands.
Its operating principle is fundamentally different from the erasure method used on mechanical HDDs. It relies primarily on the characteristics of the SSD’s flash memory and controller functionality.
SSD Secure Erase works by sending a specialized command, often the ATA Secure Erase command or NVMe Secure Erase command, to the drive’s firmware, instructing it to reset all memory cells to their factory state.
ATA Secure Erase is a command for SATA drives that erases data by destroying the mapping table and all user data stored on the drive.
NVMe Secure Erase is a similar command defined for NVMe drives that uses the Format NVM or Sanitize commands to securely wipe all data from the device.
What is ATA Secure Erase?
ATA Secure Erase, an industry standard by the International Committee for Information Technology Standards (INCITS), is a firmware-level command.
According to the ATA standard, securely wiping data from hard drives and SSDs involves resetting the device to a factory state, thereby overwriting all user data.
What is NVMe Secure Erase?
NVMe Secure Erase is an NVMe drive sanitization command embedded in most current storage drives. As defined in the NVMe specification, NVMe Secure Erase is part of the Format NVM command and allows the storage drive to erase all user data areas.
The erase process typically runs at the firmware level, as most NVMe-based storage media currently on the market have this command built in. NVMe Secure Erase securely erases user data from the drive and protects it from malicious attacks.
Why Use Secure Erase?
Here are some benefits of using secure erase:
- Data Security: Secure Erase ensures that deleted data is highly unlikely to be recovered, protecting your privacy when selling or disposing of an SSD.
- Performance Improvement: By resetting the SSD to its factory state, Secure Erase can sometimes restore optimal performance, especially after heavy use.
- No Overwrites: Unlike traditional hard drives, SSDs don’t need multiple overwrites for secure deletion. Secure Erase is designed to work efficiently with SSD technology, preserving the drive’s lifespan.
When Do You Need to Secure Erase SSD?
Secure Erase isn’t just necessary when discarding an SSD. It’s also necessary in several scenarios where data privacy is crucial.
#1. Sell or Donate the SSD
Before handing an SSD to a new owner, a Secure Erase ensures that sensitive data (such as financial records, personal photos, and work documents) cannot be recovered.
#2. Reuse the SSD
If reusing an SSD in another device or as secondary storage, a Secure Erase removes data from previous use and security risks.
#3. Disposal of a Failed Drive
If an SSD fails and is still operational, a Secure Erase can prevent data exposure during disposal or recycling.
#4. Troubleshoot Performance Issues
Over time, an SSD can slow down due to various reasons. A Secure Erase resets the drive, often restoring performance to near-factory levels.
Clone Data to a Safe Location Before SSD Secure Erase
Before performing any secure erase operation, it’s crucial to clone important data from the SSD to a safe location, as the process is irreversible.
To do that, you can try MiniTool Partition Wizard. Its Copy Disk feature can help you clone a hard drive to a safe location.
Now, follow the steps below to clone the SSD using MiniTool Partition Wizard.
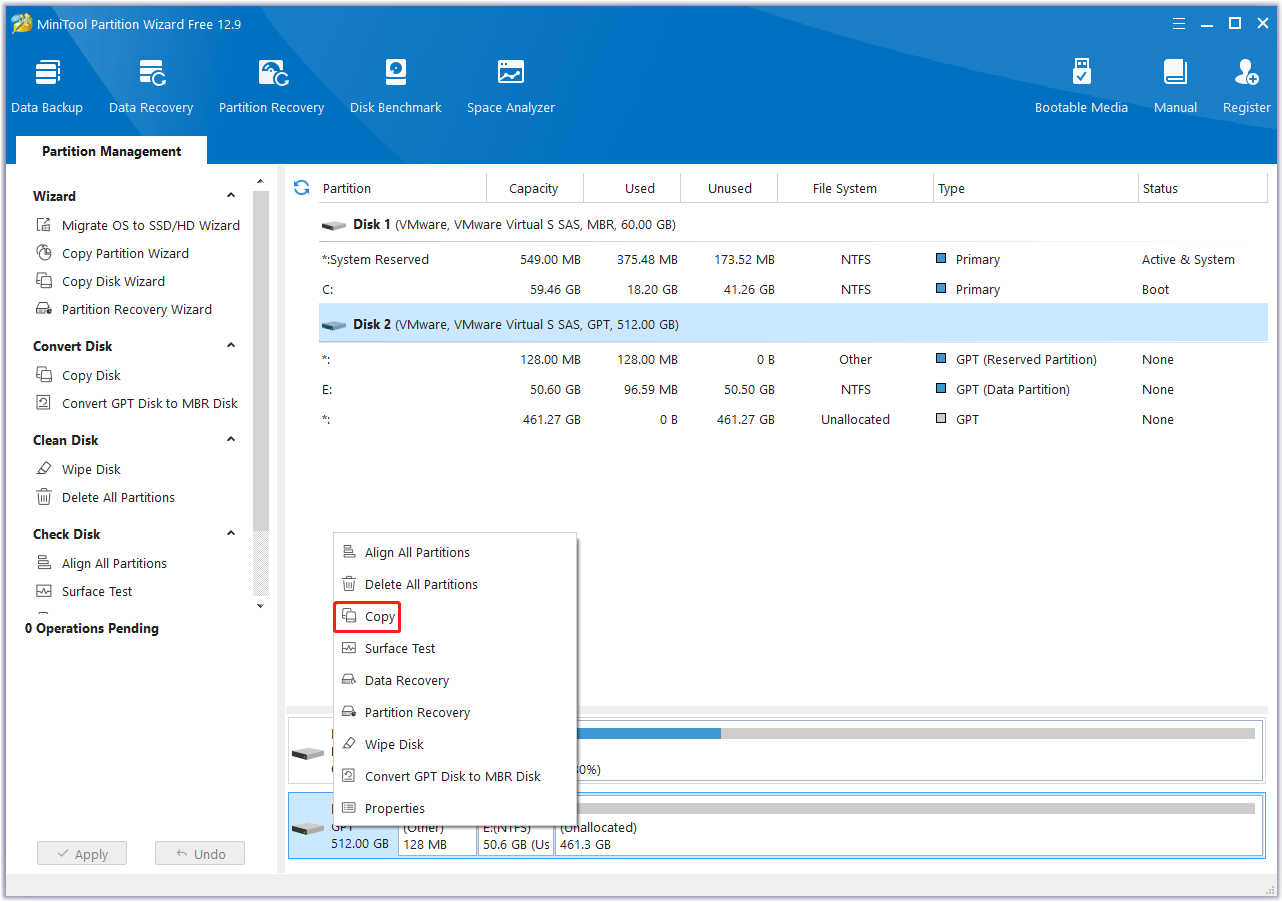
Step 1. Download and install MiniTool Partition Wizard on your computer. Launch this software and right-click on the SSD that will be copied. Then choose Copy.
MiniTool Partition Wizard FreeClick to Download100%Clean & Safe
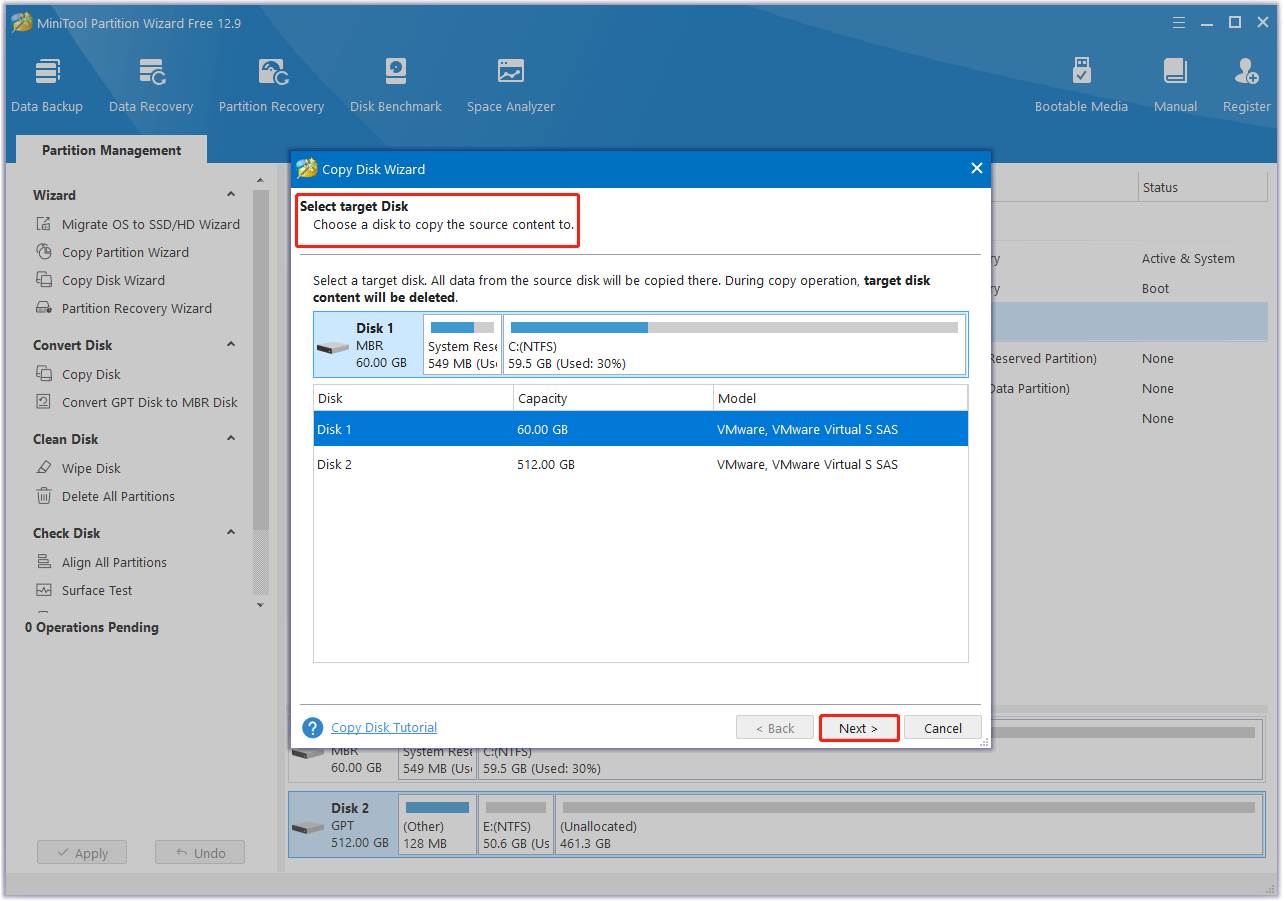
Step 2. Choose a target disk where the copy will be stored and click Next to continue. A warning window will pop up, telling you that all the data on the target disk will be destroyed. Click Yes.
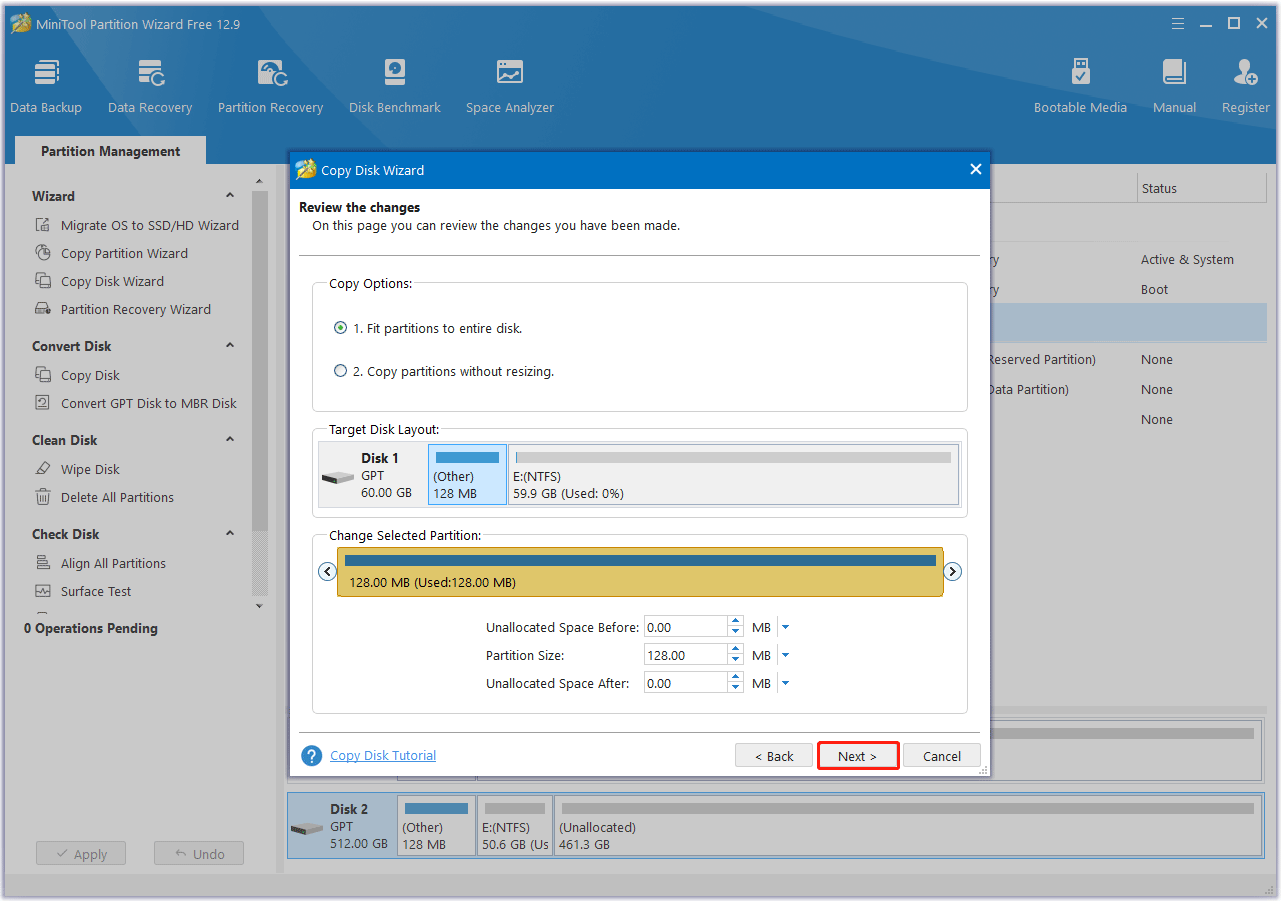
Step 3. Review the changes. You can keep the default options and layout, or adjust them accordingly. Then click Next.
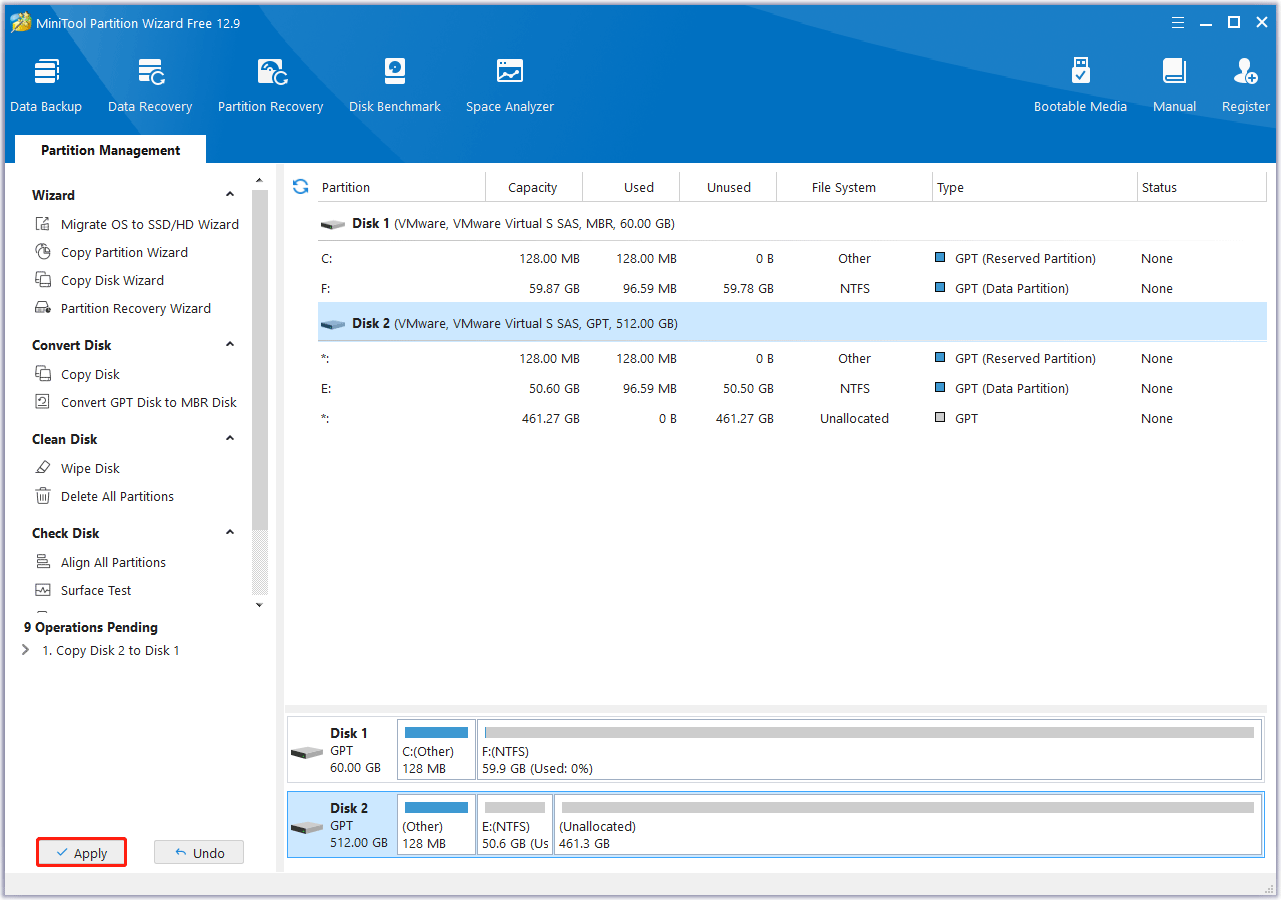
Step 4. Click Finish. Then click the Apply button to execute the pending operation.
As a professional partition/disk manager, MiniTool Partition Wizard can help you create/format/resize/delete partitions, wipe disks, partition a hard drive, convert MBR to GPT without data loss, recover data from hard drives, etc.
How to Perform SSD Secure Erase?
Performing a Secure Erase requires specialized tools or software that communicate with the SSD’s firmware. The method you choose depends on the drive’s manufacturer, and whether the drive is working. The following are the methods:
Way 1. Use SSD Toolboxes
Many SSD manufacturers offer proprietary software that simplifies the secure erase process and often includes additional features such as health monitoring and firmware updates. These SSD secure erase tools are optimized for their drives to ensure compatibility and effectiveness.
- Samsung Magician
- Crucial Storage Executive
- Western Digital SSD Dashboard
- Intel Memory and Storage Tool
- Seagate SeaTools
Samsung Magician
Samsung Magician works with Samsung SSDs. Its Secure Erase feature works with both internal and external drives.
To securely erase a Samsung SSD using Samsung Magician, you need to create a bootable USB drive. Here’s a step-by-step guide:
- Get the latest version of Samsung Magician from the official website and install it on your computer.
- Open the software and navigate to the Data Management section.
- Select the Secure Erase option.
- Samsung Magician will guide you through creating a bootable USB drive. This process will format the USB drive, so make sure it doesn’t contain any important data.
- After creating the bootable USB drive, restart your computer and boot from the USB drive. You may need to change the boot order in your BIOS settings.
- Samsung Magician’s Secure Erase utility will guide you through the remaining steps, which may include confirming the drive to be erased and starting the process.
- Then the software will securely erase the data from your Samsung SSD.
Crucial Storage Executive
Crucial Storage Executive supports Crucial SSDs. This tool offers a Sanitize Drive function to erase an SSD’s contents. To erase an SSD with this tool, here are the steps;
- Download the Crucial Storage Executive software from the Crucial website.
- Launch the application and ensure your Crucial SSD is recognized by the software.
- Navigate to the Tools or Maintenance section within Storage Executive.
- Choose the Crucial SSD you wish to erase from the list of connected drives.
- Follow the prompts to start the secure erase process. Be aware that this will erase all data on the drive.
- Carefully review the warnings and confirm the operation. The secure erase process may take some time.
Western Digital SSD Dashboard
Western Digital SSD Dashboard is compatible with Western Digital SSDs. The Secure Erase tool can permanently destroy all user data. Here is the guide:
- Launch the WD SSD Dashboard application on your computer.
- Locate and click on the Tools tab within the dashboard.
- Find and click on the Secure Erase option within the Tools section.
- Carefully read and follow the on-screen instructions to initiate the secure erase process.
Intel Memory and Storage Tool
Intel Memory and Storage Tool is for Intel SSDs. It provides a Secure Erase feature to securely erase the drive.
- Download and install the Intel Memory and Storage Tool on your PC.
- Go to the Intel Memory and Storage Tool main screen. Choose the Intel SSD from the left side.
- Then click on Features and select Secure Erase. Click Erase.
- You will get a warning prompt, then click Yes to erase.
Seagate SeaTools
To securely erase a Seagate SSD, the most effective method is to use the manufacturer’s recommended tool, Seagate SeaTools. To use it to secure a Seagate SSD, you should have a Seagate Self-Encrypting Drive (SED) and connect it to a computer via a SATA-to-USB cable.
- Download and install Seagate SeaTools for Windows from the Seagate website.
- Launch the application and select your Seagate SSD from the list of connected drives.
- Go to the Advanced Test section within the SeaTools interface and then select the SED Crypto Erase option.
- A dialog box will appear prompting you to enter the 32-character PSID number from the drive’s label.
- Press F8 to confirm the operation.
Way 2. Use BIOS/UEFI
Some motherboards include a Secure Erase feature directly within the BIOS/UEFI settings, allowing users to erase the drive without booting into the operating system. To securely erase SSD from BIOS/UEFI, the steps are as follows:
Step 1. Restart the computer and enter the BIOS/UEFI (press Del, F2, or F1 during startup).
Step 2. Navigate to the storage or drive management section.
Step 3. Locate the SSD and look for the Secure Erase option. On some systems, the option can be Data Wipe, ASUS Secure Erase, or others.
Step 4. Follow the on-screen prompts to start the process.
Step 5. After that, press F10 > Enter to save the changes and exit BIOS/UEFI.
Bottom Line
Secure Erase is the standard for permanently erasing data from SSDs. Unlike traditional erase and formatting methods, this method ensures that all data cannot be recovered, making it essential for anyone selling, discarding, or repurposing an SSD.
If you have any questions or suggestions on how to use MiniTool Partition Wizard, please do not hesitate to contact us via [email protected].
SSD Secure Erase FAQ
This process includes the operating system, meaning that after a Secure Erase, the system will not boot unless a fresh install of the operating system is performed.
About The Author

Position: Columnist
Vega enjoys helping people with computer problems, including disk management, data recovery, data backup, and more. She is constantly expanding her knowledge in related fields. And she will continue to bring more easy-to-understand professional articles to help people solve various problems on the PC.
User Comments :