What Is GameBar Presence Writer?
The GameBar Presence Writer is an executable process for carrying out the functionality of the Game Bar. The latter is a built-in feature in Microsoft Windows 10/11 for recording Xbox gameplay. The “gamebarpresencewriter.exe” will be enabled automatically if you open the Game Bar and play a video game.
What Issue Does GameBar Presence Writer Cause?
Though the GameBar Presence Writer is necessary when you need to record your gaming, it is useless if you don’t want to capture anything. Yet, a great many of users complain that the service keeps popping up error messages and keeps launching itself whenever they open a game.
The following is a list of some common issues that are caused by the GameBar Presence Writer service:
- Taking up bandwidth
- Taking up too much CPU
- Taking up memory
- Eating up framerate and dropping down FPS
- Lagging the game speed
This is extremely annoying. Then, how to disable GameBar Presence Writer? Usually, you should disable Game Bar or Game DVR to indirectly disable the GameBar Presence Writer. Watch this video to learn the solutions.
Solution 1. Disable Game DVR and Game Bar in Registry Editor
Registry Editor is a powerful tool yet somehow complex. If it is edited incorrectly, a big bad effect will be caused on the computer. Therefore, be careful when do settings with it. And, it is recommended to take a backup of the original registry file before making any change to it.
Step 1. Open the Run box with Windows + R hotkeys.
Step 2. Enter “regedit” and click OK to launch the Registry Editor.
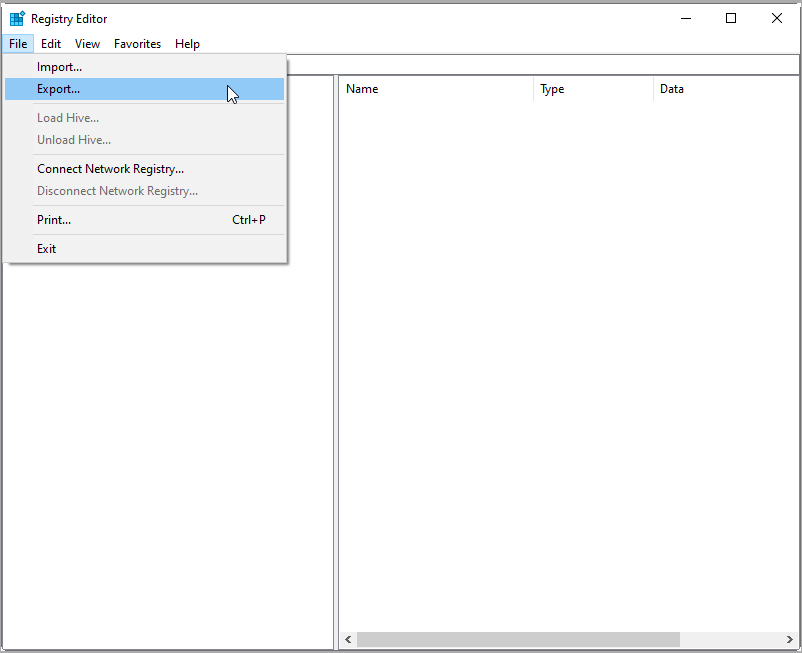
Step 3. Click on the File on the top menu and select Export to export an original version of the registry settings. This is the step to make a backup of registry file.
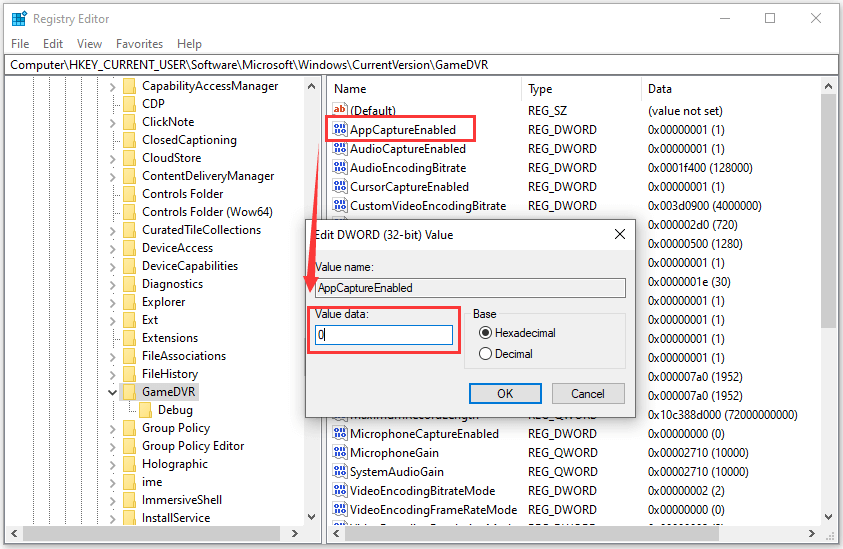
Step 4. Go to HKEY_CURRENT_USERSoftwareMicrosoftWindowsCurrentVersionGameDVR.
Step 5. Find the item AppCatureEnabled, double click on it and change the value data to “0” in the pop-up window.
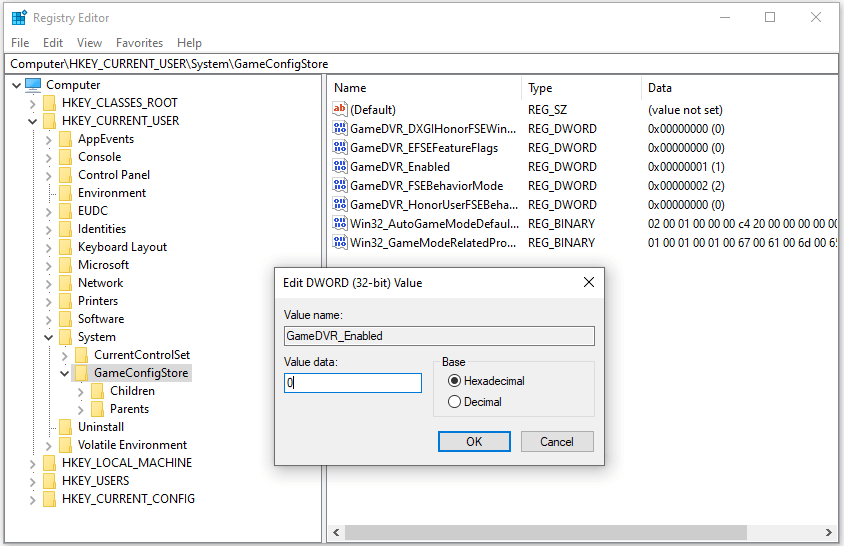
Step 6. Move to HKEY_CURRENT_USERSystemGameConfigStore and change the value of GameDVR_Enabled to “0”.
Step 7. Move to HKEY_LOCAL_MACHINESOFTWAREPoliciesMicrosoftWindowsGameDVR and set value “0” to AllowGameDVR file.
Step 8. Go to HKEY_CURRENT_USERSoftwareMicrosoftGameBar and change the value of AutoGameModeEnabled to “0”.
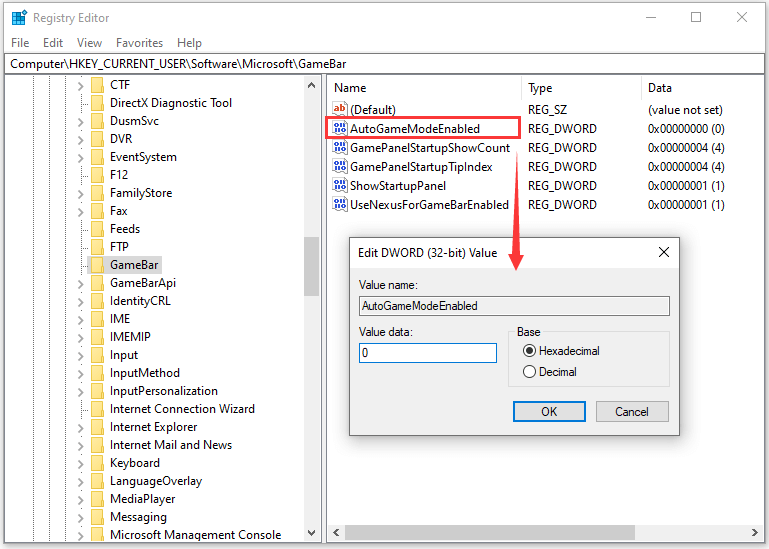
Step 9. Restart PC to save changes.
Solution 2. Disable Xbox Game Monitoring
Step 1. Open Registry Editor following the guidance in above solution 1.
Step 2. Go to this path: HKEY_LOCAL_MACHINESYSTEM CurrentControlSetServicesxbgm.
Step 3. Right click on the Start file (file type is REG_DWORD) and select Modify.
Step 4. Change the Value data from “3” to “4” and click OK.
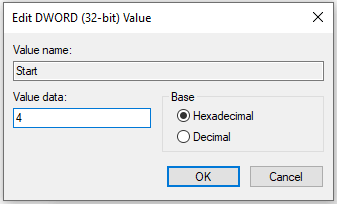
Therefore, the Xbox Game Monitoring service is disabled. To re-enable it, just change the value back to “3”.

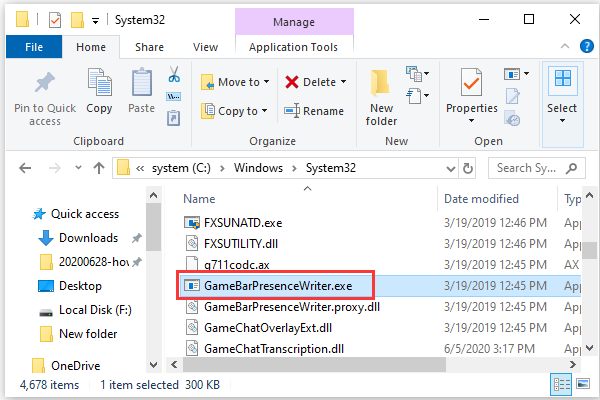
Solution 3. Take Ownership and Remove GameBar Presence Writer Related Files (from Reddit)
Step 1. Search for the folder of gamebarpresencewriter.exe in Taskbar Search. Usually, the folder address is C:WindowsSystem32GameBarPresenceWriter.exe.
Step 2. Right click on the executive file, choose Properties and move to Security tab.
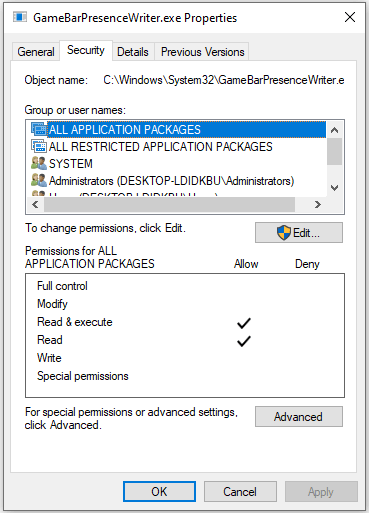
Step 3. Select Advanced and click Change next to the TrustedInstaller in the pop-up window.
Step 4. Input the admin username of Windows system, click OK and then Apply in the bottom right.
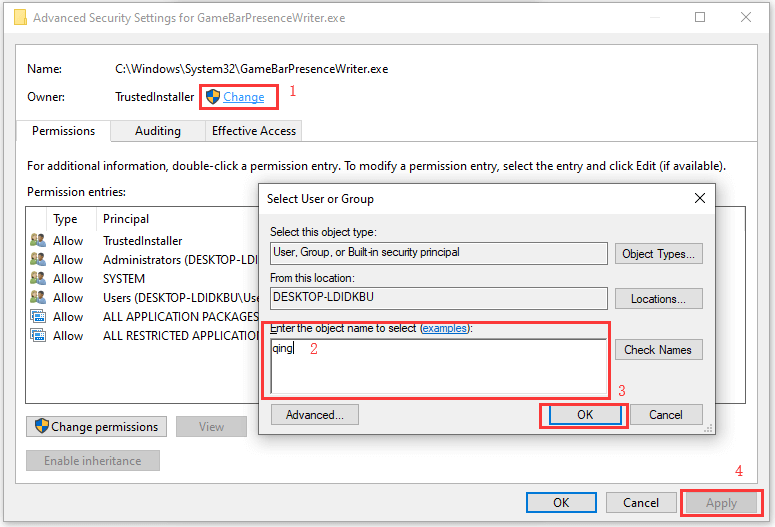
Step 5. Read the notification and click Yes. Finally, click OK to exit the Advanced Security Settings window.
Step 6. Next, click Edit button in Properties -> Security window, click Add in the pop-up Permissions window, and key in the admin username in the pop-up Select Users or Groups window. Click OK to close Select Users or Groups window; then, the admin username will appear in the Group or user names list in Permissions window.

Step 7. Click on the added username to make it active, move to below Permissions for <username> part and tick the Allow column in the Full control row. Finally, click Apply and then OK. Read the warning message and click Yes to save the change.
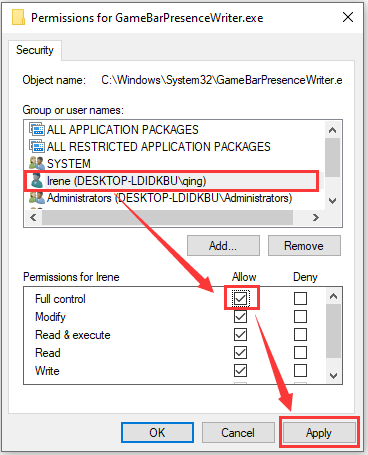
Step 8. Close all the setting windows and now you have full control of the .exe file. Finally, delete the gamebar.exe file that keeps bothering you.
- You can take the ownership of Game Bar or Game DVR related files or folders in the same way as above and delete them once for all.
- Do not touch any file in the folder for AMD.
- There are 4 gamebar presence writer files in total including one in AMD folder (leave this one untouched).
Solution 4. Turn off The Game Telemetry Program File
This solution is derived from the discuss in TenForums.
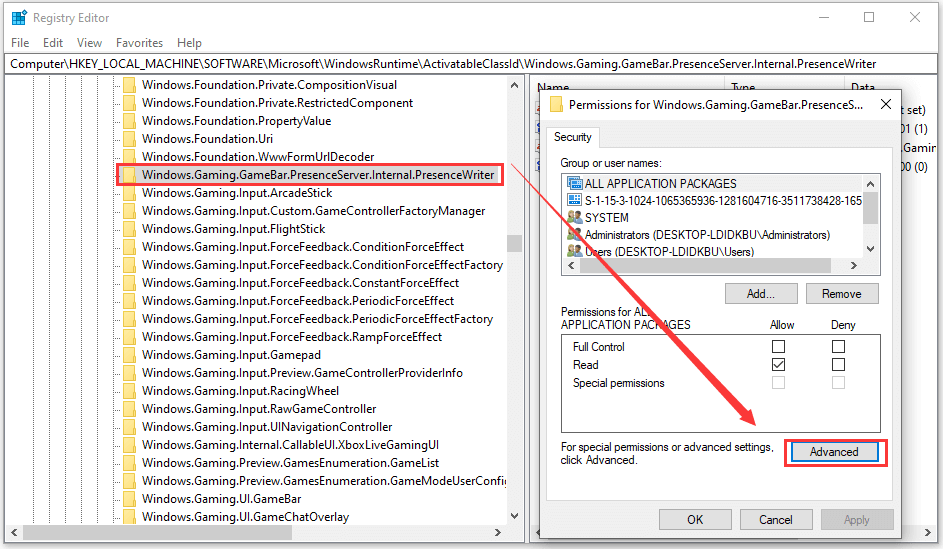
Step 1. Go to HKEY_LOCAL_MACHINESOFTWAREMicrosoftWindowsRuntimeActivatableClassIdWindows.Gaming.GameBar.PresenceServer.Internal.PresenceWriter in Registry Editor.
Step 2. Right click on the Windows.Gaming.GameBar.PresenceServer.Internal.PresenceWriter folder and select Permissions. Then, just click Advanced to change the owner from TrustedInstaller to your username and assign full control to your username following the tutorials in above solution 3.
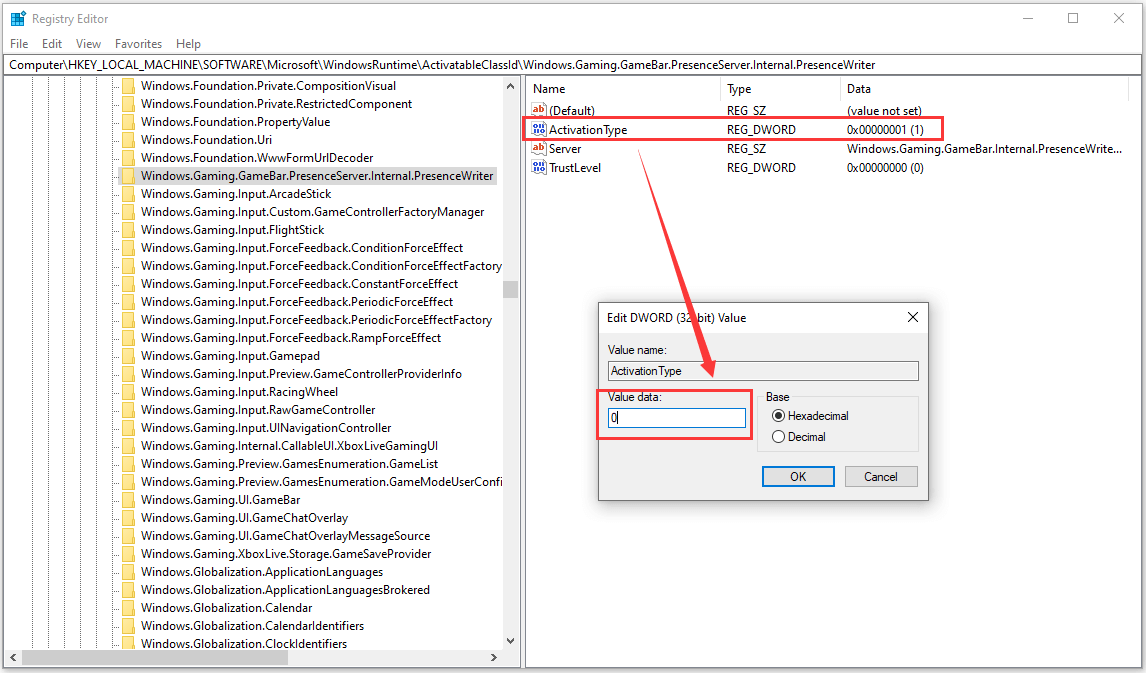
Step 3. Go back to the Windows.Gaming.GameBar.PresenceServer.Internal.PresenceWriter folder in Registry Editor, find the ActivationType file and set its value data to “0”.

Solution 5. Disable Game DVR Service in Services.msc
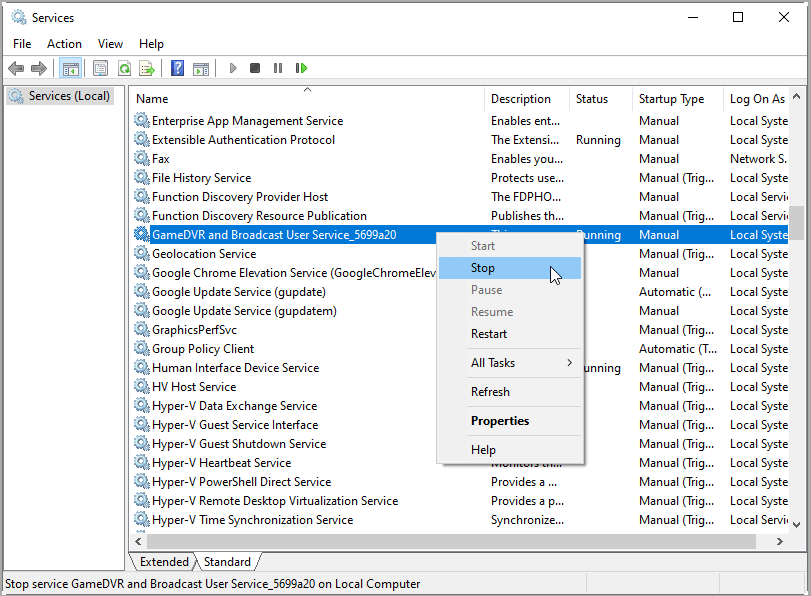
Step 1. In Windows Run box, input “services.msc” and click OK to launch the Services window.
Step 2. Find the GameDVR and Broadcast User Service, right click it and select Stop.
Solution 6. Manually Shut Down GameBar Presence Writer Process in Task Manager
This solution is concluded from the answer in Answers Microsoft.
Step 1. Right-click on the taskbar and select Task Manager.
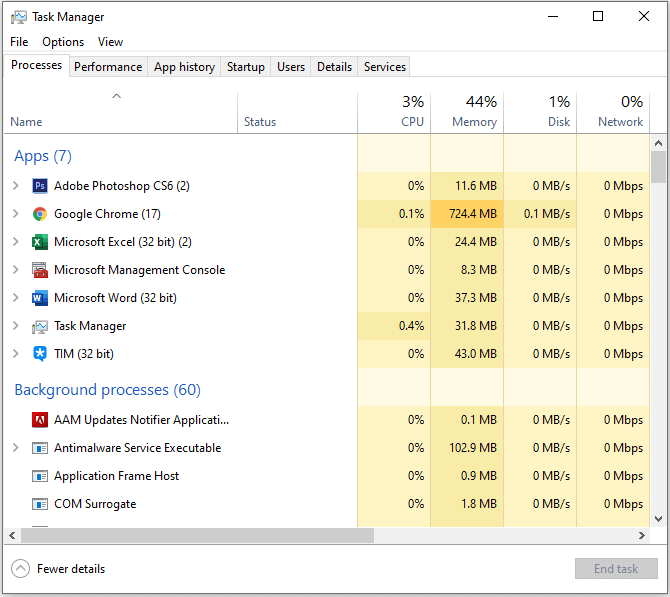
Step 2. In the default Processes tab, find the GameBar Presence Writer and click End task in the bottom right corner.
Solution 7. Disable Windows Game Bar/Game DVR in Its Pop-up Settings
When the Game Bar is on, there will be a pop-up (overlay) when you are gaming. Then, you are able to disable the presence write process from the overlay settings.
Step 1. Open whatever a game to launch the Game Bar. If the Game Bar doesn’t launch together with the game, just use Windows + G shortcut to launch it.
Step 2. Click on the Settings (the gear icon).

Step 3. Uncheck all the options especially the following ones:
- Record game in the background
- Open Game bar using (Xbox) on a controller
- Show Game bar when I play full-screen games Microsoft has verified
- Remember this as a game
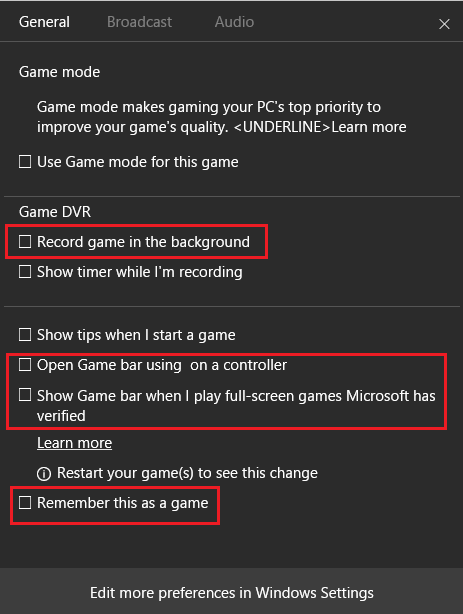
Step 5. Restart computer to save changes.
Solution 8. Turn Off Game Bar in Xbox App
How to turn off Xbox Game Bar? See the following steps.
Step 1. Search “Xbox” next to Start menu, find and open Xbox application.
Step 2. Go to Settings (the gear icon).
Step 3. Select Captures and go to Windows Settings to turn off background recording.

Step 4. Reboot the PC for the changes to take place.
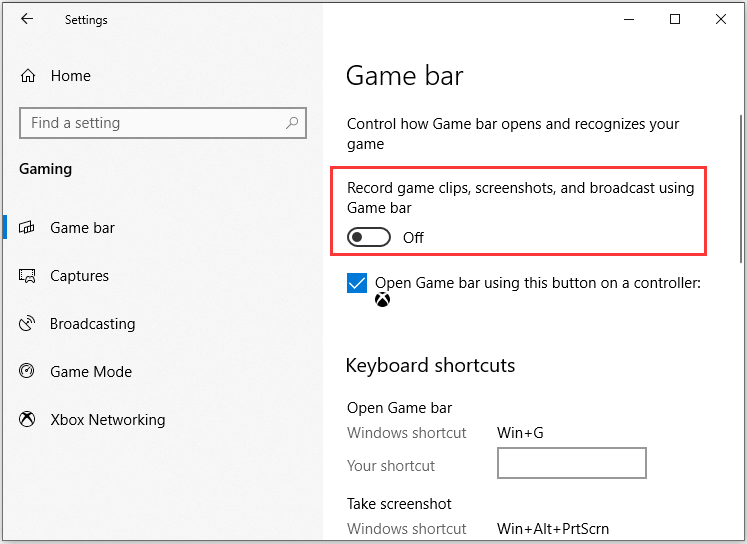
Solution 9. Switch off Game Bar in Windows Settings
Step 1. Go to Windows Settings and choose Gaming.
Step 2. In the default Game Bar tab, turn off “Record game clips, screenshots, and broadcast using Game bar”.
Related article: How To Disable Xbox Game Bar On Windows 10/11: 3 Ways
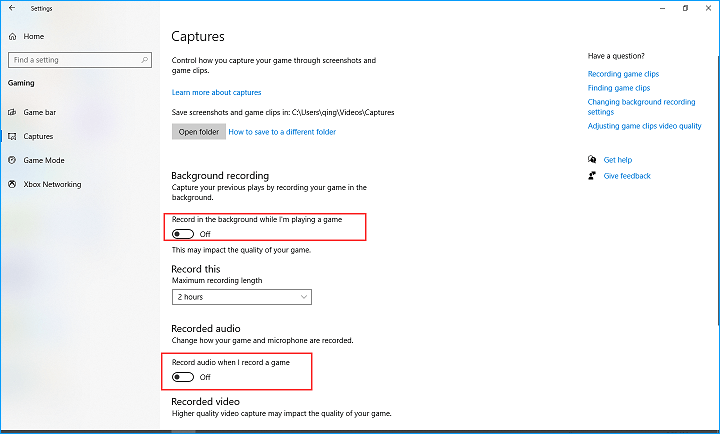
Solution 10. Turn off Game DVR in Windows Options Menu
(From Microsoft Answers) Be similar to above solution 9, reach Windows game settings and select Captures on the left menu. In the Captures settings, switch off both “Record in the background while I’m playing a game” and “Record audio when I record a game”.
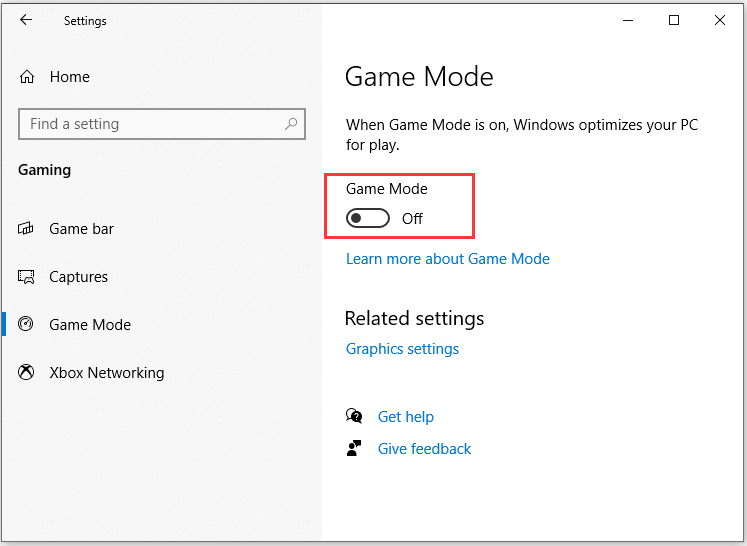
Solution 11. Turn off Game Mode in Windows Settings
Choose Game Mode in the left panel of game settings in Windows, and turn off Game Mode.
The Bottom Line
Besides the above 11 solutions, there are other fixes that may solve your GameBar Presence Writer keeps loading problem, like uninstall the presence writer, uninstall Xbox Game Bar or Xbox app; keep Windows OS up-to-date; limit the network usage of presence writer, rely on third-party tool to prevent presence writer from starting or to delete the service, etc.
Related Articles
About The Author

Position: Columnist
Helen is a tech writer with over 10 years of experience. She specializes in creating easy-to-follow guides for video editing, media file conversion, and computer performance. Helen doesn't just write—she tests every software herself and listens to feedback from users and experts. Her goal is to make complex programs simple so that everyone can solve their tech problems with confidence.
User Comments :