Disk management is necessary to enhance computer performance and better manage data saved in hard drives. While some users do not know how to manage hard drive using disk management command, we show you the most commonly used Diskpart commands to help you reorganize hard drive easily in the Windows operating system.
Diskpart Create Partition
To keep data stored in a certain order, users need to partition hard drive reasonably. There are times that you need to create more partition to save kinds of files. However, it is not easy to create partition using diskpart commands.
See also: Disk Already Contains Maximum Number of Partitions
Here is the simple Diskpart commands guide:
Step 1. Press Win + R keys to call out the Run box where you need to type diskpart and then hit Enter.
Step 2. Allow user account control and then in the new diskpart.exe window, input the following commands sequentially and end up each one with the Enter key:
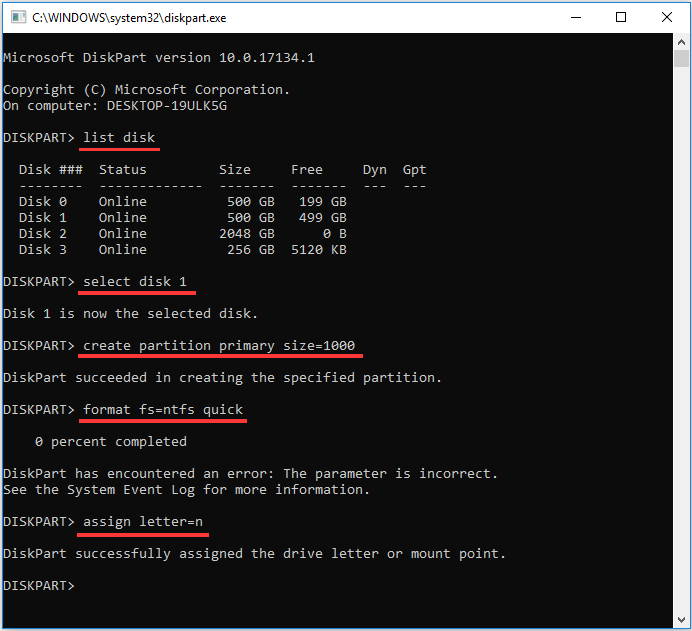
- List disk
- Select disk n (n should be replaced using the correct disk number)
- Create partition primary size=10000 (change primary to extended so as to create a logical partition further; the size of the new partition is in MB, replace 10000 with desired partition size; if not specified, continuous unallocated space will be totally used)
- Format fs=ntfs quick
- Assign letter=n (n can be replaced with any drive letter not occupied starting from D)
- exit
Diskpart Delete Partition
Sometimes you may need to delete unwanted partitions. In this case, you just need to run the following Diskpart commands:
Step 1. Also, run Diskpart and allow its user account control.
Step 2. Run the commands in order:
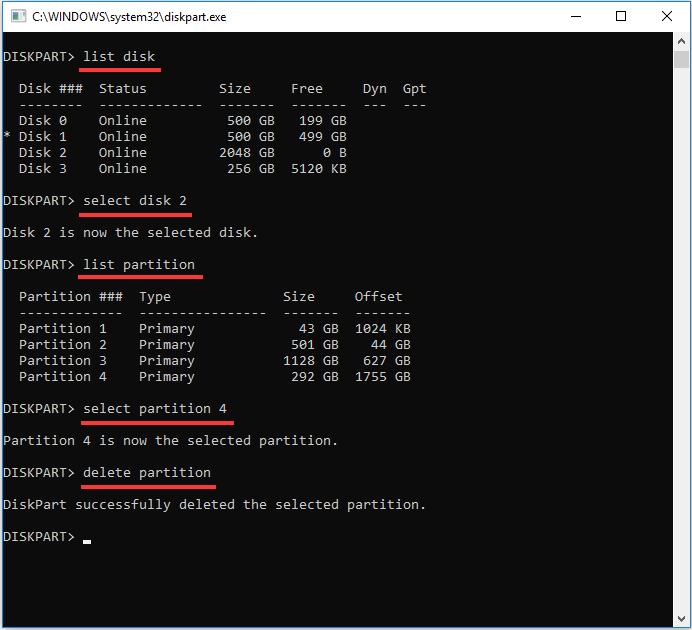
- List disk
- Select disk n (replace n with the correct disk number)
- List partition
- Select partition n (replace n with the correct partition number)
- Delete partition
- exit
Diskpart Format Command
It is always easy to format a partition in Diskpart. Here is the tip for this disk management command:
Step 1. Run diskpart and allow it to make changes to this user account.
Step 2. Run these commands n sequence.
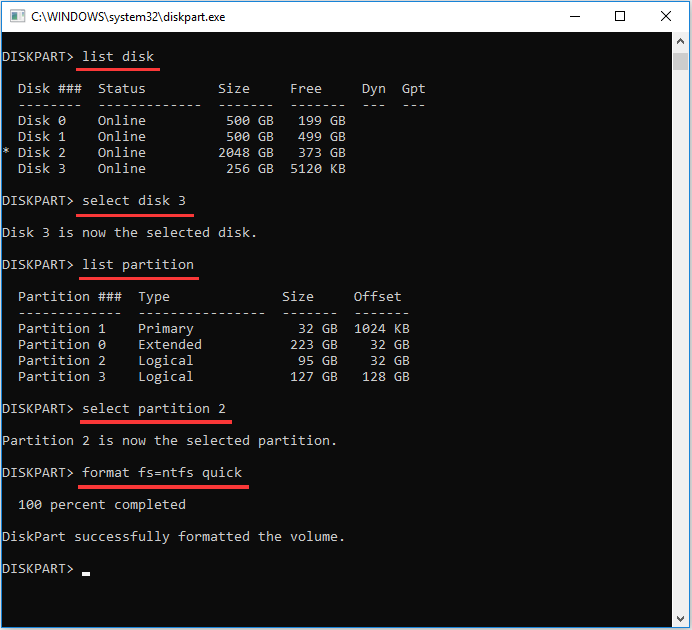
- List disk
- Select disk n (replace n with the correct disk number)
- List partition
- Select partition n (replace n with the correct partition number)
- Format fs=ntfs quick (ntfs can be replaced with fat32; quick is not essential)
- exit
Note: You cannot format a partition larger than 32GB to FAT, the virtual disk service error will appear. See reference The Best Ways to Fix Diskpart Virtual Disk Service Errors.
Diskpart Clean and Clean All
To erase a disk leaving it unallocated and disk unknown not initialized, you can use the clean or clean all Diskpart command options.
- The cleancommand removes all partitions on the drive. On MBR disks, only the MBR partitioning information and hidden sector information are overwritten. On GPT disks, there is no hidden sector information, the GPT partitioning information including the Protective MBR, is overwritten. The clean command only marks the data on the disk as deleted, and will not zero (secure erase) the hard drive.
- The clean allcommand not only performs the same actions as the clean command does but also zero (secure erase) every sector on the disk, which completely deletes all data contained on the disk and data recovery is not available. It takes long to finish running the “clean all” command on a disk.
This tutorial will show you how to use the clean or clean all to erase a disk in Windows 7, Windows 8, and Windows 10.
Step 1. Run diskpart and allow its changes to your computer.
Step 2. Type the following commands one by one and execute each one with the Enter key.
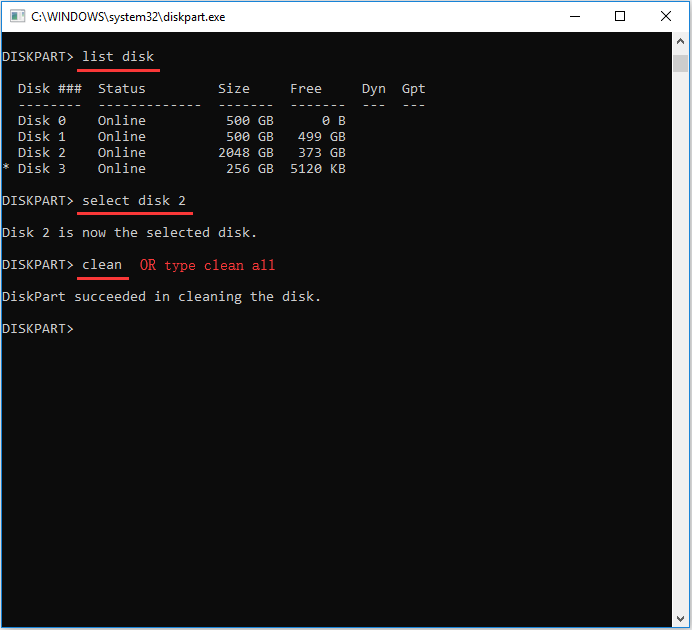
- List disk
- Select disk n (n needs to be replaced with the correct disk number)
- Clean (OR type clean all)
- Exit
See also: Clean on Wrong Disk? Undo Diskpart Clean Command Now!
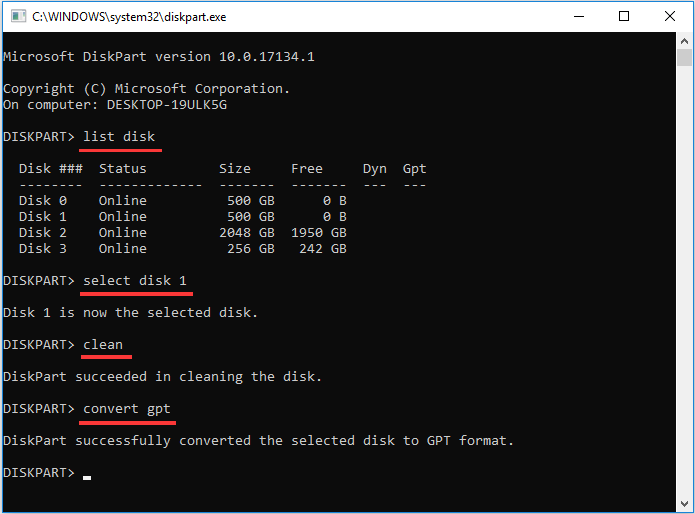
Diskpart Convert MBR to GPT
Diskpart also makes it possible for you to convert a non-system disk from MBR to GPT and vice versa. However, you need to know that all partitions need to be deleted before the conversion. So, you may need to perform a disk backup before the conversion.
When all the preparations have been completed, you can do these Windows disk management command line:
Step 1. Run diskpart to get the command line window.
Step 2. Type these commands in order.
- List disk
- Select disk 1
- Clean
- Convert gpt (if you clean a GPT disk, type convert MBR)
- exit
See also: Diskpart Windows 10 makes it possible to convert MBR system disk to GPT disk. See How to Convert Disk from MBR to GPT with MBR2GPT Tool.
MiniTool Partition Wizard Covers All Diskpart Commands
If you are not that interested in disk management command, MiniTool Partition Wizard is suggested here for you to perform disk management Windows 10/8/7. Its wizard-like interface and flexible operations make it well-rated all around the world.
Simply put, MiniTool Partition Wizard is an all-in-one disk partition manager that is capable of doing the followings (some features are available only in the paid editions):
- Create/delete/format partition easily.
- Resize partition including the system partition.
- Migrate OS to SSD/HD and copy disk/partition.
- Recover lost partition and lost files
- Manage dynamic disk easily.
- Change cluster without data loss.
- Make conversion between MBR and GPT, NTFS and FAT; primary and logical.
- Rebuild MBR.
- Check and fix the file
- Analyze disk space usage.
- Measure the read/write speed of an SSD/HDD.
- Check for bad sectors on a partition or hard drive.
- Align partitions for SSD.
- Totally erase a hard drive to prevent data leakage.
- Create a bootable media to fix errors.
- More…
We will show you how easy it is to use as an alternative to disk management command. But before that, you need to download this partition magic and install it on computer.
MiniTool Partition Wizard FreeClick to Download100%Clean & Safe
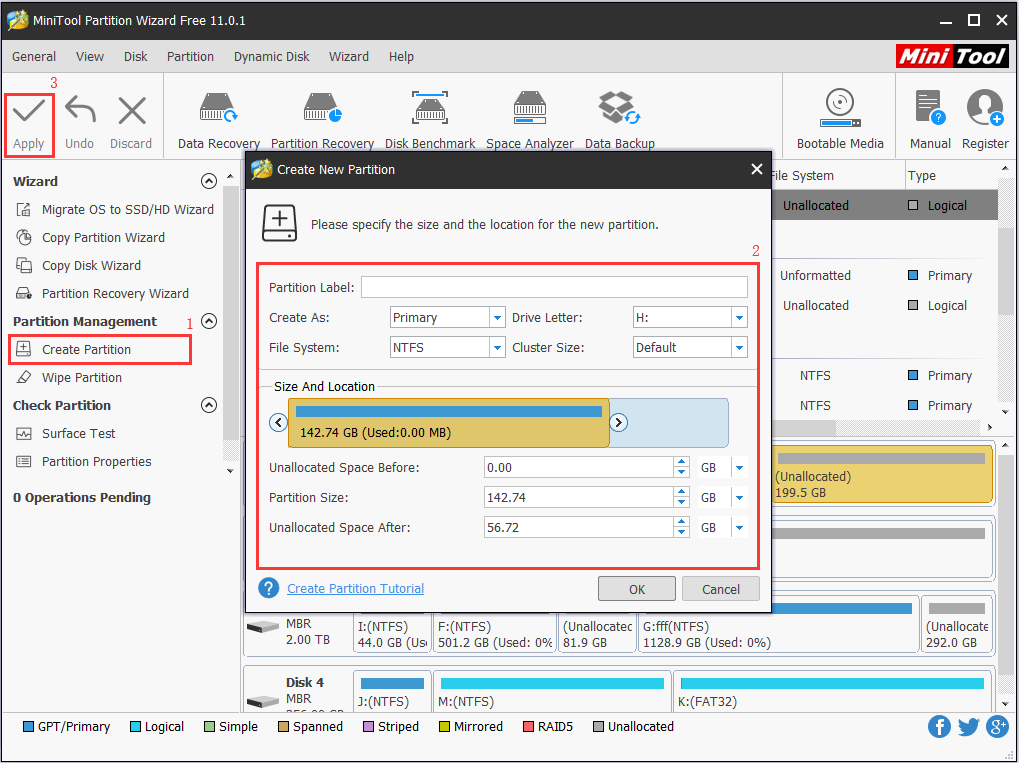
MiniTool Partition Wizard Create Partition
The steps of using Partition Wizard to create a new partition can be summarized as below:
Step 1. When you are in the main interface, find the target disk from the disk map area, select the unallocated space where you want to create partition and choose Create Partition feature form the action panel.
Step 2. In the new pop-up window, you need to determine the partition size and file system (you can also specify the partition label, partitions type, drive letter, and cluster size). Then click the OK button.
Step 3. When you are back to the main interface, hit the Apply button located on the toolbar.
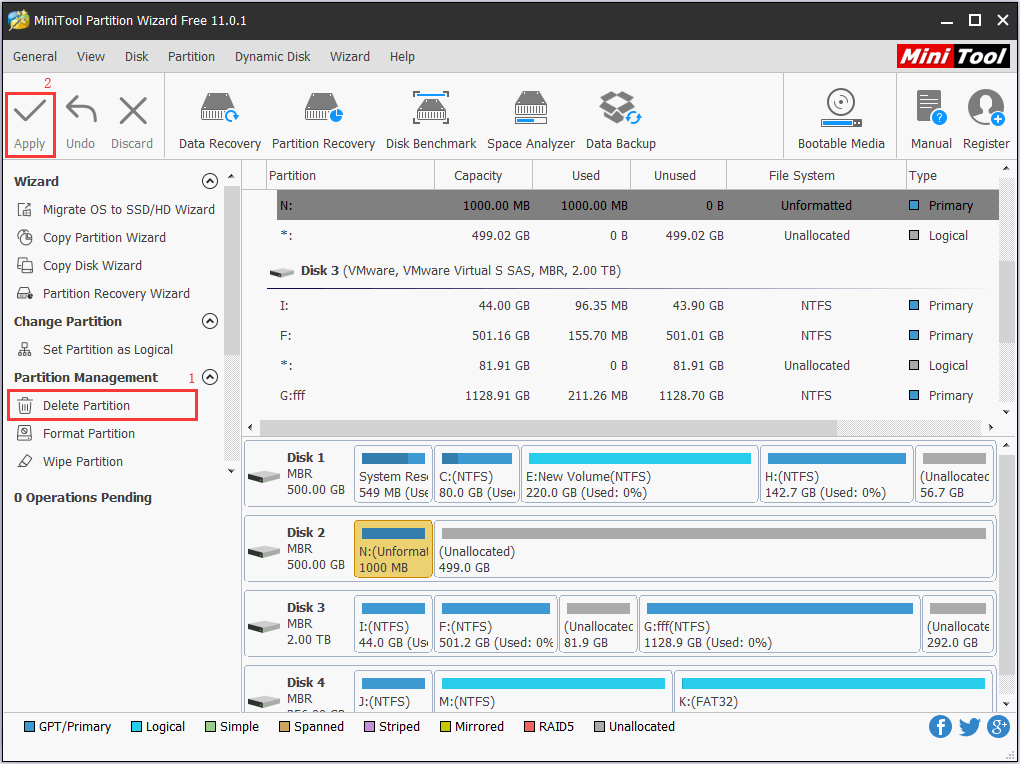
MiniTool Partition Wizard Delete Partition
When there a need to remove a partition, you can delete that partition in a few clicks, and the steps are:
Step 1. Select the partition that is no longer needed and choose Delete Partition from the action panel. (To delete all partitions on that drive, click the disk icon and choose Delete All Partitions.)
Step 2. Click the Apply button to confirm your operation.
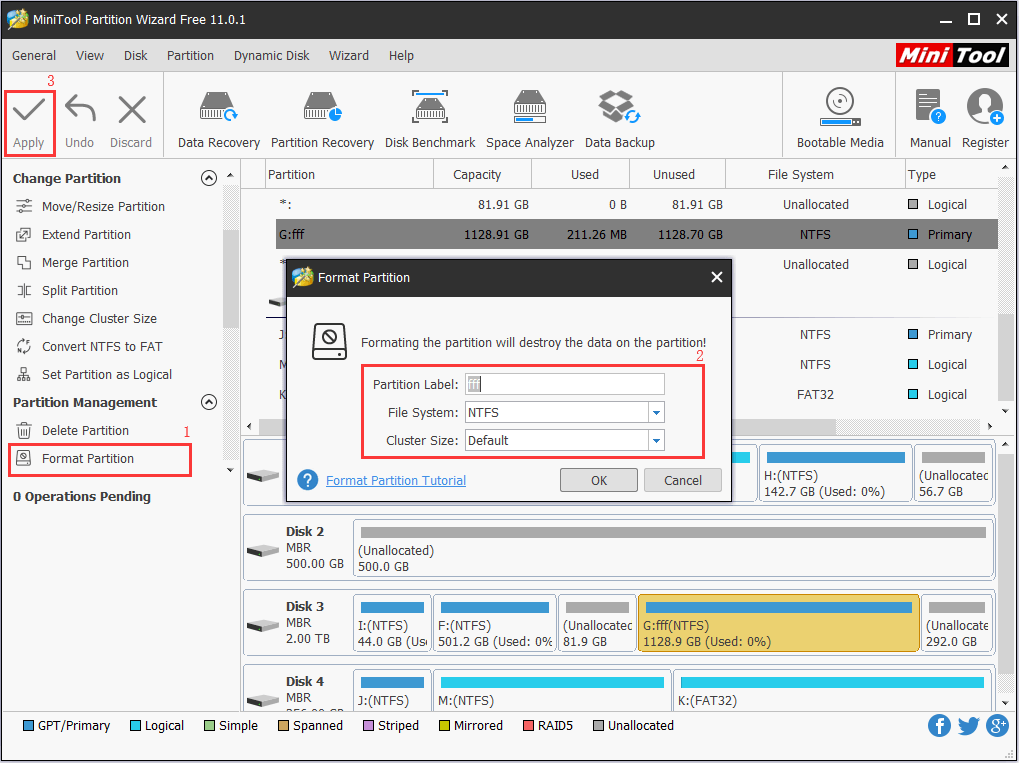
MiniTool Partition Wizard Format Partition
It is rather convenient using MiniTool Partition Wizard to format HDD, SSD, external hard drive and USB flash drives. This Windows 10 partition manager offers more file system options than Disk Management does.
Step 1. Select the partition that needs to be formatted and choose Format Partition option from the action panel.
Step 2. In the pop-up window, choose your desired file system. You may change the partition label and cluster size as well. Then click OK.
Step 3. Now hit the Apply button.
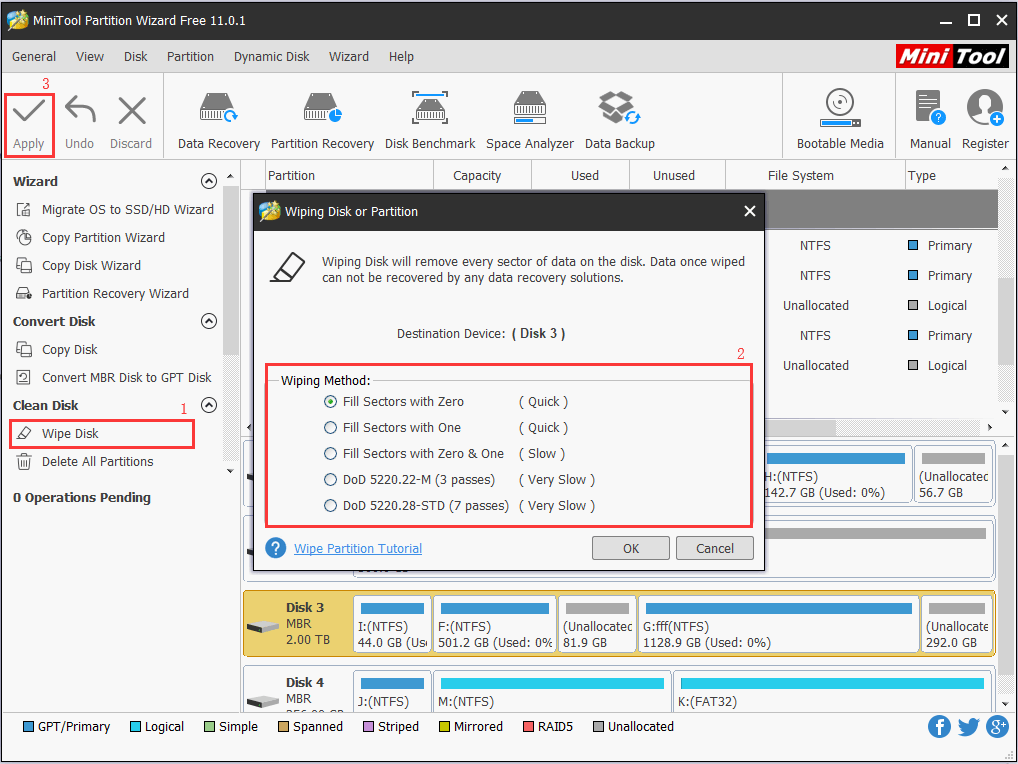
MiniTool Partition Wizard Wipe Disk
Partition Wizard offers the way to prevent your data from leakage. Usually, when you are about to abandon or sell a computer, data safety is always the first concern. How to destroy all data on the hard drive so as to make it unrecoverable?
Here is the deal:
Step 1. Select the disk that needs to be erased and choose Wipe Disk from the action panel.
Step 2. Choose a wiping method from the pop-up window and then click OK. Note that different wiping methods bring different wiping effect and take uneven time.
Step 3. Finally, click the Apply button.
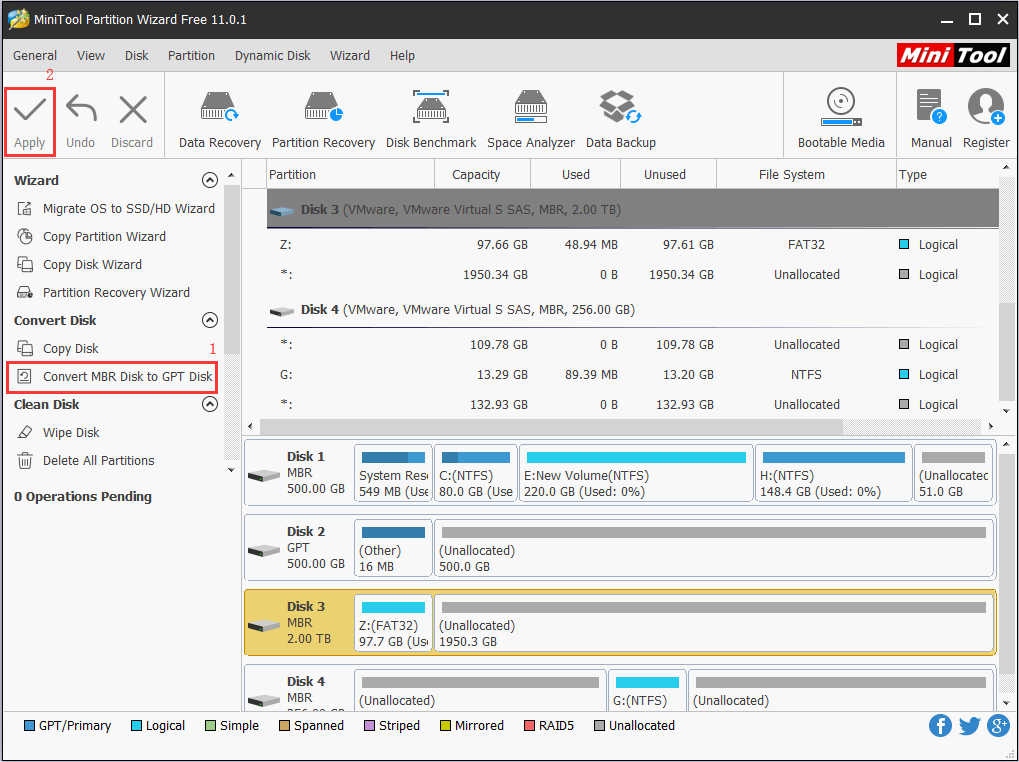
MiniTool Partition Wizard Convert MBR to GPT
With MiniTool Partition Wizard, you can convert non-system disk between MBR and GPT without data loss. And, the Pro Edition even enables you to convert the system disk from MBR to GPT.
Here is how you can do the conversion without data loss.
Step 1. Select the MBR disk you want to convert and choose Convert MBR Disk to GPT Disk. Or select the GPT disk you want to convert and choose Convert GPT Disk to MBR Disk.
Step 2. Click Apply.
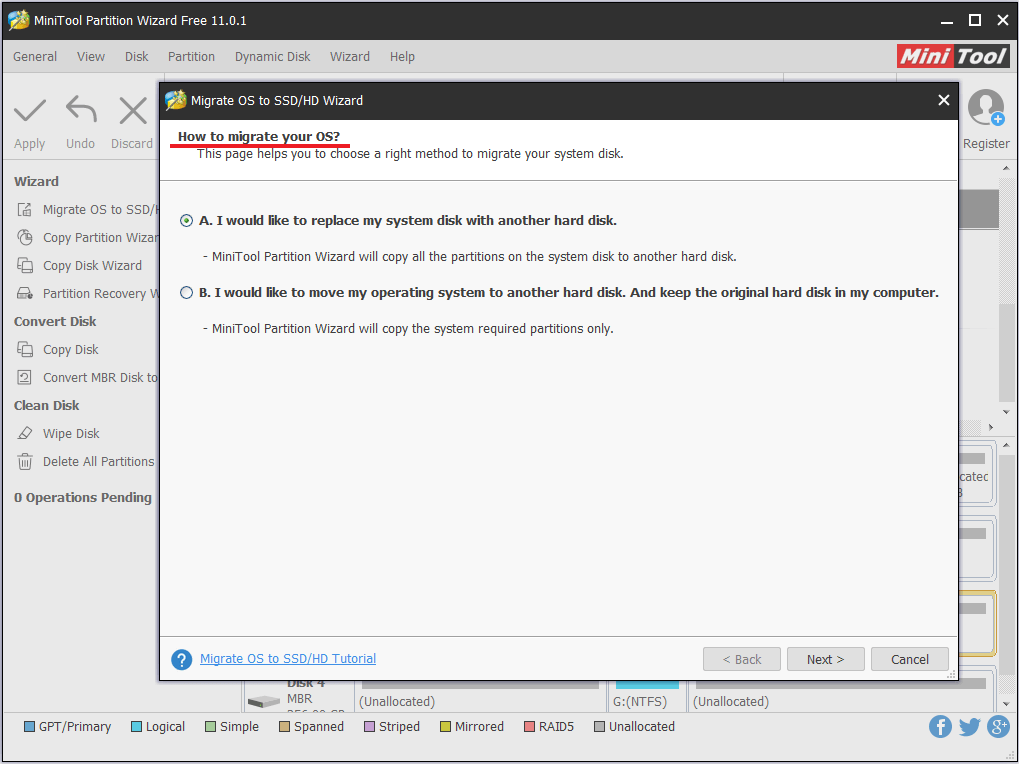
MiniTool Partition Wizard Migrate OS to SSD
If your computer runs slow on HDD, you may consider upgrading to SSD for better performance. And it is good to have a system migration tool to help you. MiniTool Partition Wizard is such a partition magic that not only helps OS migration (use Migrate OS to SSD/HD) but also assists in disk cloning (use Copy Disk).
See how to migrate OS to SSD below:
Step 1. Make sure the system disk is selected and then choose Migrate OS to SSD/HD from the Wizard group.
Step 2. Choose a migrate option. Do you want to migrate the system required partitions only or would you like to migrate all partitions on the disk?
Step 3. Choose the target disk and then choose the copy options.
Step 4. Read how to boot from the target disk and then don’t forget to click Apply.
See also: The Best Way to Clone MBR to GPT without Boot Issue
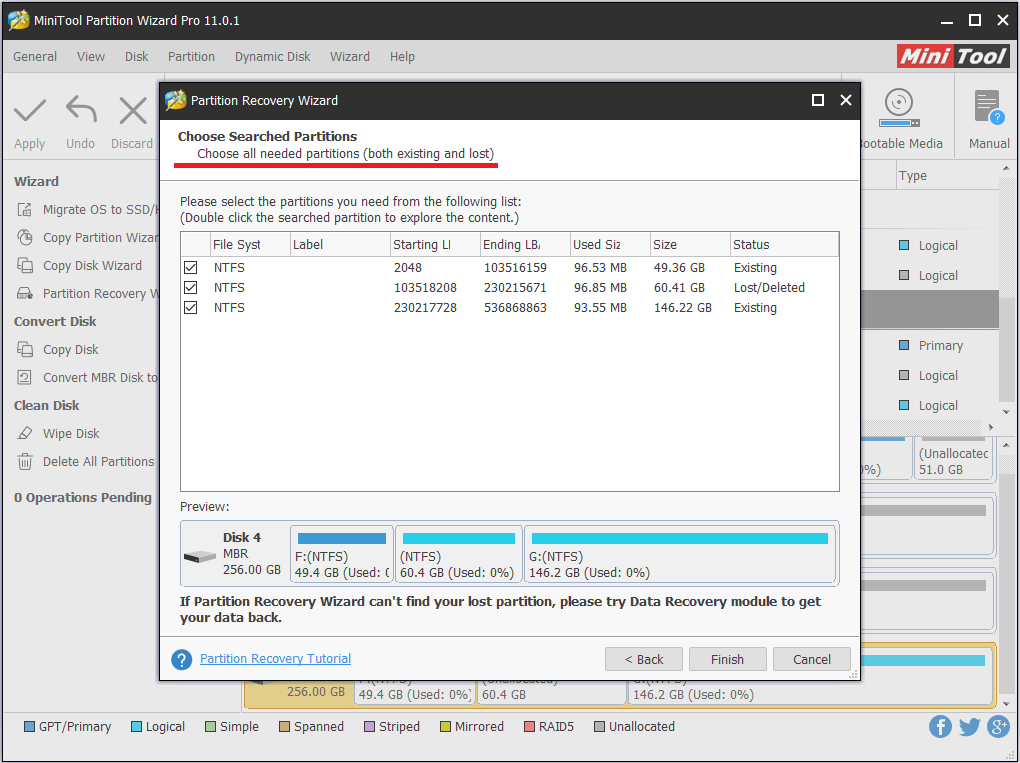
MiniTool Partition Wizard Partition Recovery
When you have got some partitions accidentally deleted and want to restore, Partition Recovery feature is recommended to recover lost partitions from unallocated space provided that no further operations are made.
*Note that this is a paid feature in the Pro edition.
Here is what you need to do:
Step 1. Select the disk which needs partition recovery and select Partition Recovery Wizard.
Step 2. Set a scanning range and then the scanning method.
Step 3. Choose all the partitions you need and then click Finish.
Step 4. Add drive letter to the found partitions and finally hit Apply button.
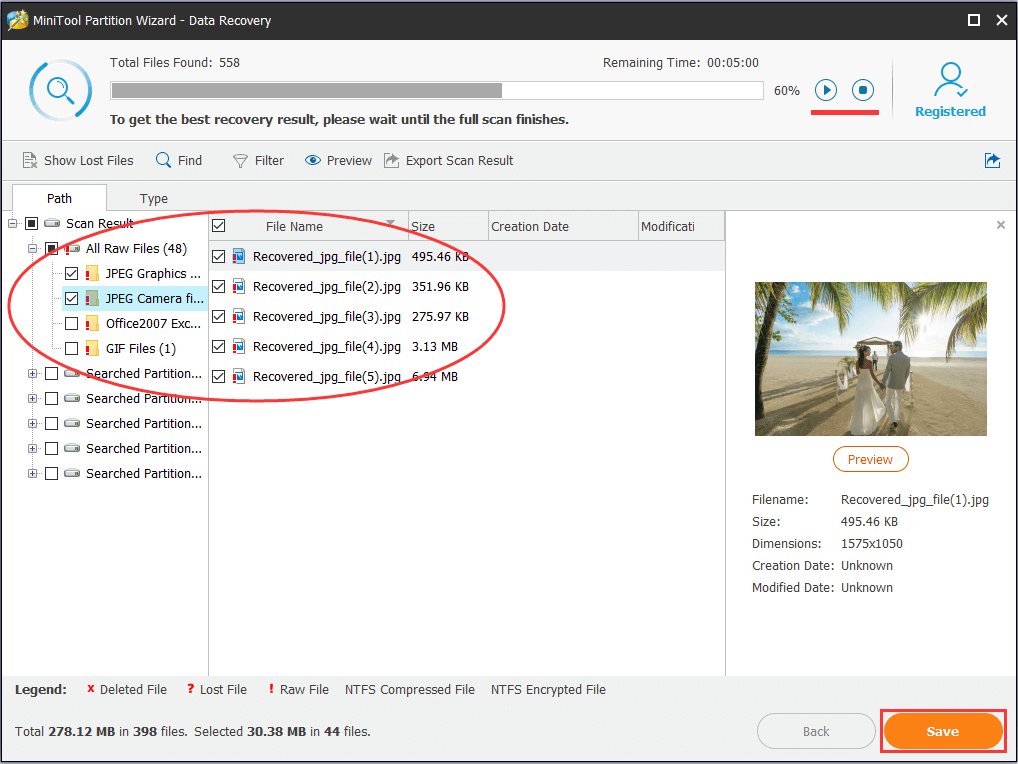
MiniTool Partition Wizard Data Recovery
If you accidentally deleted some files permanently or you find a partition is inaccessible, you can turn to the Data Recovery feature of MiniTool Partition Wizard.
Generally speaking, this feature is specially designed to recover files no mater it is lost due to wrong deletion, virus attack, partition table damage, or system crash. Works for HDD, SSD, external hard drive, USB flash drive, and memory card.
*Note that this is a paid feature in the Pro Ultimate edition.
Step 1. Go to Data Recovery module from the toolbar.
Step 2. Select the device (which can be the whole disk, a logical drive, a lost partition or unallocated space) to have a full scan.
Step 3. Wait for the scanning process to finish and then open each partition from the left panel to check for wanted files.
Step 4. Choose the files you need to then save them to a location which should be different from the one where data loss happens.
MiniTool Partition Wizard Offers Bootable Media
The bootable disk management media is necessary when you are performing some risky operations, or when the operating system is unbootable. MiniTool Partition Wizard offers the way to create its own bootable media for you to do disk management safer.
Follow the guides below to create one and then boot your PC:
- How to Build Boot CD/DVD Discs and Boot Flash Drive with Bootable Media Builder?
- How to Boot from Burned MiniTool Bootable CD/DVD Discs or USB Flash Drive?
Above are not the whole stories. There are more useful features for you to discover like dynamic disk management, change cluster size, etc. If you are interested, you can download the Trial Edition to have a try first.
MiniTool Partition Wizard DemoClick to Download100%Clean & Safe
Now It Is Your Turn
Reading here, guess you know how to use Diskpart commands to do Windows 10 disk management. Now it is your turn to have a try. If you prefer using a professional disk management tool, you may just download MiniTool Partition Wizard to have a try.
MiniTool Partition Wizard FreeClick to Download100%Clean & Safe
Should you have any suggestions on this subject, you can leave us comment below. For any difficulty in using MiniTool software, you can contact us via [email protected].
About The Author

Position: Columnist
Rodin is an enthusiastic IT writer focusing on Windows trends, disk partition management and data recovery. She loves to write and share her idea about the useful tips and tricks on personal computers' maintenance. If you are looking for methods to improve your computer performance, manage hard drives and recover data from different devices, Rodin can provide reliable solutions for data management.
User Comments :