What Is Block Size
In computer file systems, the block is a logical concept like a cluster. It refers to the smallest logical unit of disk space that can be allocated to hold a file. A block can only store one single file no matter if the file size is large or small.
To some degree, the block size will influence the disk space utilization efficiency and read/write speed. If you save a very small file in a large block, you will cause a waste of disk space. On the other hand, using a small block size for a large file may lead to a slow read/write speed. As a result, it takes lots of time to access the specific file.
In addition, an improper block size can also result in disk fragmentation issues and increase file system overhead.
Usually, a block consists of a specific number of sectors (like 2, 4, 8…2 ⁿ sectors). The size of each sector is too small (only 512B), making it hard to address and allocate data sector by sector. Therefore, the file system combines contiguous groups of sectors to form blocks for better disk data management.
Often, the block size of a storage device is set by default to best fit within its size and current file system during formatting. Different file systems have different default block sizes. For instance, Windows will typically format an NTFS disk with a default 4KB block size. For FAT32, the default block size used in most systems is also 4KB.
If necessary, you can change the block size according to your needs.
Related articles:
Why Need to Change Block Size from 4K to 64K
Considering the disk performance and space efficiency, it’s important to choose a suitable block size based on file systems and types of stored files. If you plan to save game files, videos, and other large files, it’s better to change the block size to 64K. 64K is much larger than the standard block size of 4K and is always used to store big files.
Why do you need to change block size from 4K to 64K for large files? Below, we summarize the main reasons for changing the 4K block size to 64K.
- Improve Disk Performance: When dealing with large files, a large block enables the disk to read or write more data in a single operation. So, you can access a file faster with an enhanced sequential read/write speed.
- Reduce the Risk of Disk Fragmentation: With a large block size, you just need a few blocks to store the large file, which may help you avoid issues related to disk fragmentation.
- Reduce File System Overhead: As mentioned earlier, the block size also impacts the file system overhead. Each block offers some space for metadata to track and manage file information. The larger the block size is, the fewer blocks and less metadata overhead on the disk will be.
After knowing the benefits of changing block size from 4K to 64K, let’s get down to the details on how to change the block size.
Change Block Size from 4K to 64K Without Formatting
In this section, we discuss how to change block from 4K to 64K with a wonderful block size changer – MiniTool Partition Wizard. It’s a professional and comprehensive disk partition manager that enables you to directly change the block size without formatting.
Besides, this program offers many other features related to partition or disk management. You can use it to partition/resize/clone hard drive, convert MBR to GPT and vice versa, check disk health, test disk speed, recover data from hard drive, and more.
To learn how MiniTool Partition Wizard helps change block size from 4K to 64K without formatting, you can take a look at the following content.
Step 1: Download and install MiniTool Partition Wizard on your PC. Then launch it to enter the main interface.
MiniTool Partition Wizard DemoClick to Download100%Clean & Safe
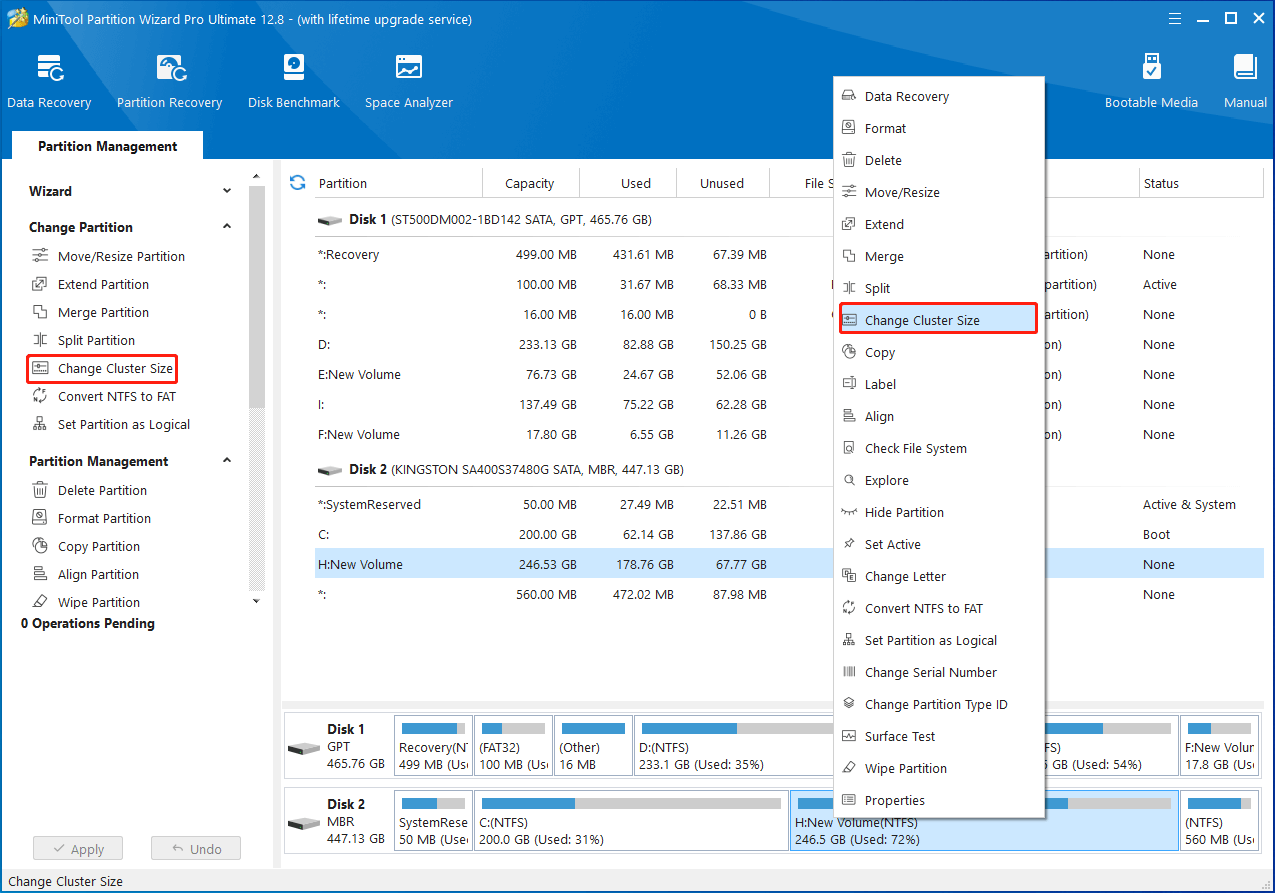
Step 2: To change block size from 4K to 64K without formatting, right-click the target partition and select Change Cluster Size directly. Alternatively, you can highlight the target partition and then choose Change Cluster Size from the left action panel.
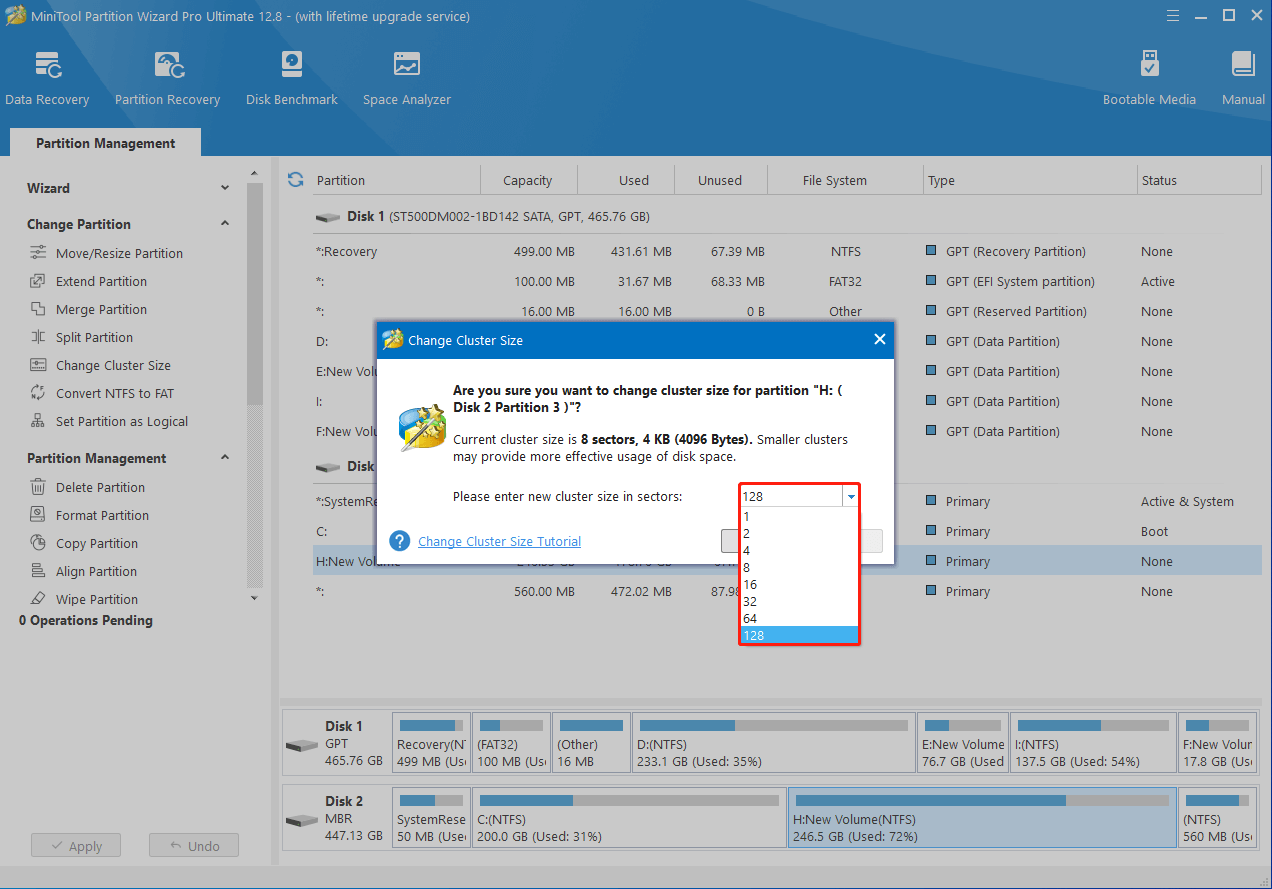
Step 3: In the pop-up box, decide the new cluster size in sectors by selecting a desired number from the drop-down menu. Here, we select 128 to change the cluster size to 64KB.
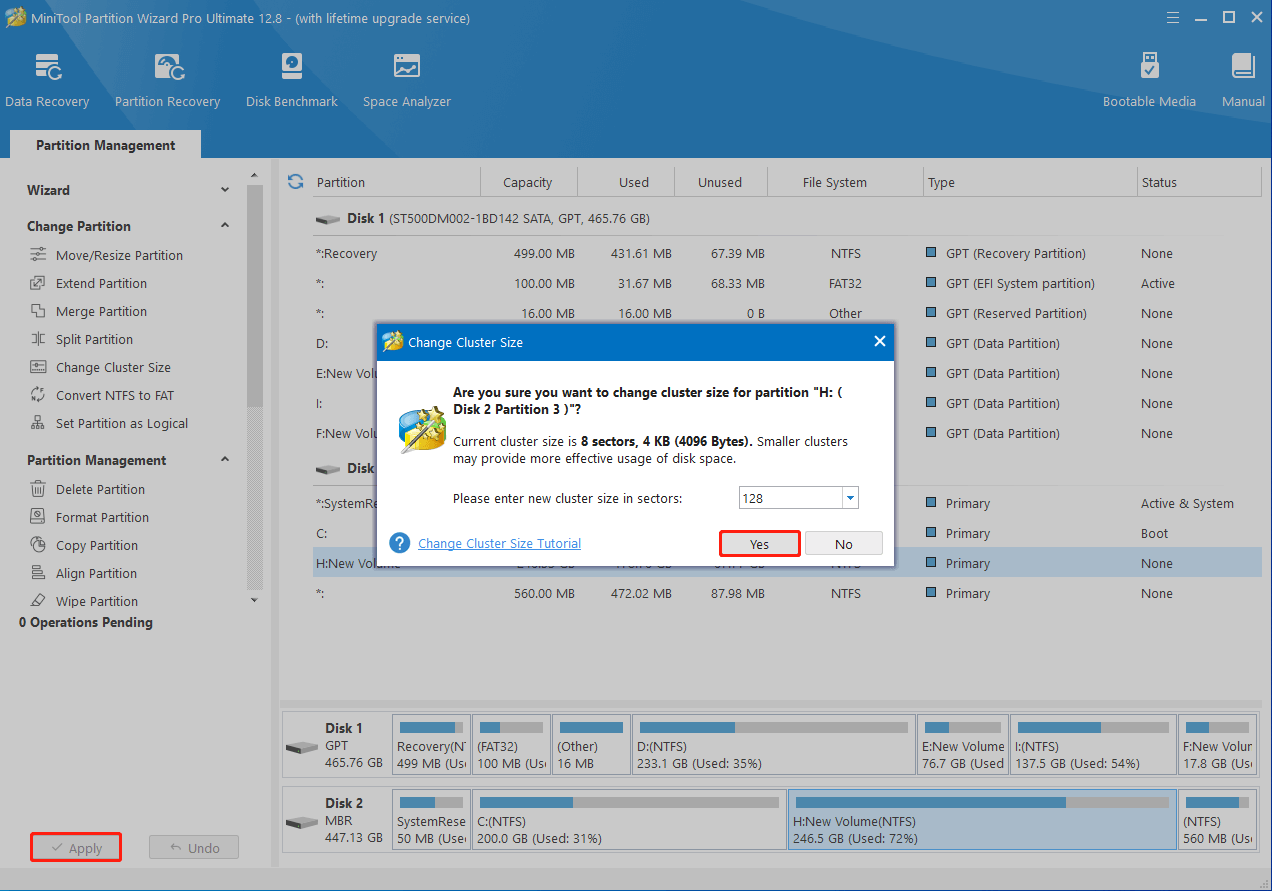
Step 4: After that, click Yes to go back to the main interface of the cluster size changer.
Step 5: Finally, don’t forget to click Apply to execute the pending operation.
Change Block Size from 4K to 64K with Formatting
Is there any way else to change block size from 4K to 64K? Well, as you can know from the above, it’s also possible to change the block size while formatting the specified hard drive. To help change block size from 4K to 64K with formatting, there are 4 ways available. You can pick one according to your preference.
Way 1: Use MiniTool Partition Wizard
In addition to the Change Cluster Size feature, MiniTool Partition Wizard also enables you to change the block size for free with its Format Partition feature. You can try it with the following guide.
Step 1: Download, install, and launch MiniTool Partition Wizard on your desktop.
MiniTool Partition Wizard FreeClick to Download100%Clean & Safe
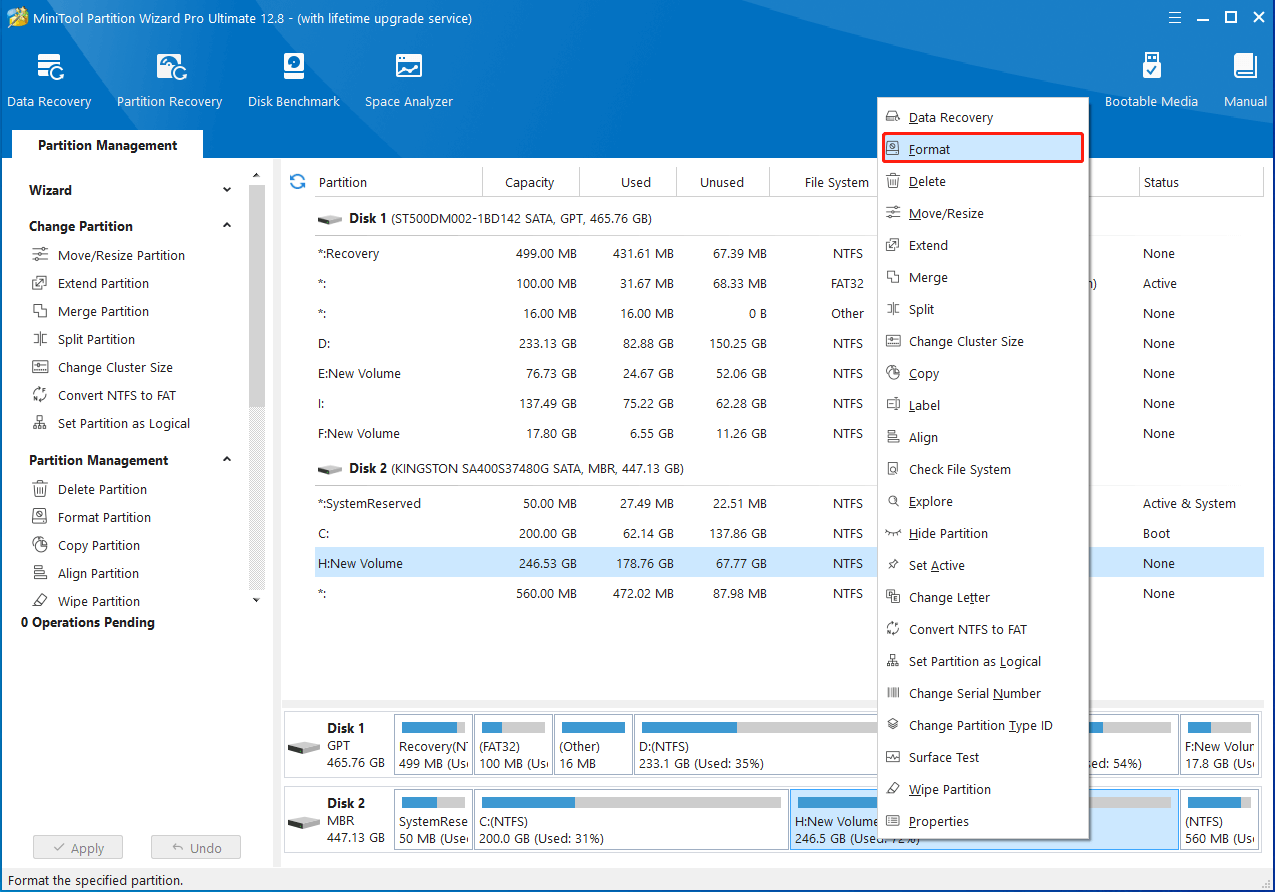
Step 2: Right-click the target partition and select Format to proceed.
Step 3: Choose 64KB from the Cluster Size drop-down menu and click OK. Meanwhile, you can expand the File System menu and select a different file system according to your preference.
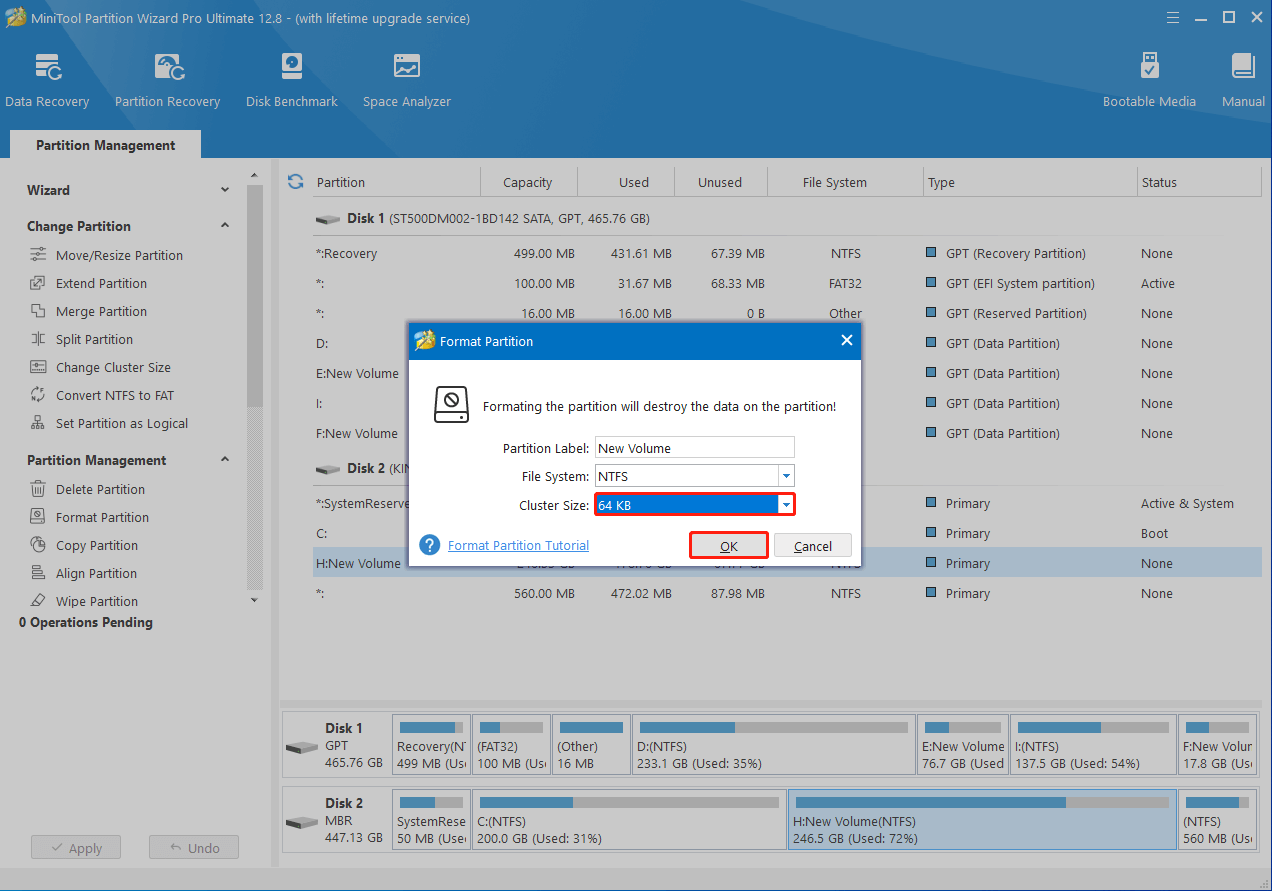
Step 4: At last, click Apply to save the change.
Way 2: Use Disk Management
Disk Management is a Windows built-in utility that includes basic features for managing disks and partitions. You can use it to easily change block size from 4K to 64K with formatting. Here’s how to do this.
Step 1: Right-click the Start icon and select Disk Management.
Step 2: After opening Disk Management, right-click the partition to change block size. Then select Format from the context menu.
Step 3: Select 64K as the size of the Allocation unit. Then tick the checkbox next to the Perform a quick format option and click OK.
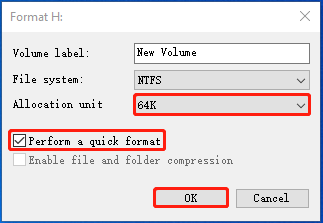
Step 4: When prompted, click OK to confirm the process of changing cluster size.
![[Fixed] Win10 Disk Management Not Loading/Responding/Working?](https://images.minitool.com/partitionwizard.com/images/uploads/2023/05/disk-management-not-loading-windows-10-thumbnail.png)
Way 3: Use File Explorer
File Explorer is another Windows built-in utility that can help change block size from 4K to 64K with formatting. To do this, follow the steps below.
Step 1: Press Windows + E at the same time to open File Explorer.
Step 2: Go to This PC. Then right-click the target hard drive in the right panel and select Format.
Step 3: Select 64 kilobytes under the Allocation unit size section and then check Quick Format.
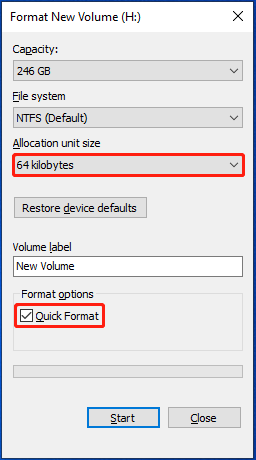
Step 4: Once done, click Start to begin the formatting process. When a warning box shows up, click OK for confirmation.
Way 4: Use Diskpart
Diskpart is a disk partitioning utility for Microsoft Windows. With this tool, you can finish various disk/partition tasks by using corresponding command lines. The following are details on how to change block size with formatting via Diskpart.
Step 1: Press Windows + R to open the Run dialog.
Step 2: Type cmd in the text box and then press Ctrl + Shift + Enter to run Command Prompt as an administrator.
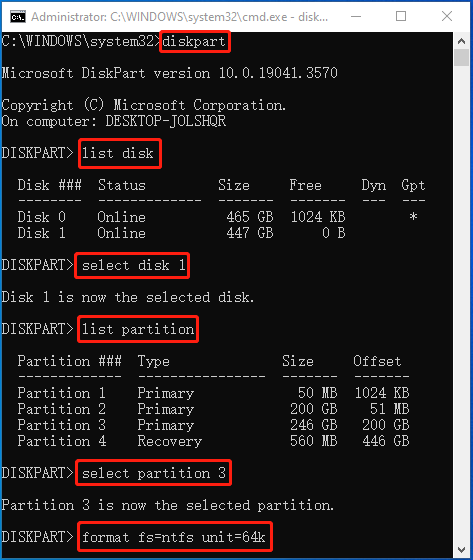
Step 3: In the elevated Command Prompt, input the following commands one by one and press Enter after each.
- diskpart
- list disk
- select disk 1 (1 represents the number of the disk including the target partition)
- list partition
- select partition 3 (3 refers to the number of the partition you want to change block size)
- format fs=ntfs unit=64k (You can replace NTFS with another file system based on your needs)
Bottom Line
This post guides on how to change block size from 4K to 64K with/without formatting. When you plan to change the block size of your hard drive, you can make use of MiniTool Partition Wizard to complete the operation directly. Or, you can try to change it during formatting.
If you have any problems with changing the block size, you can leave a message in our comment part below. For any issues associated with MiniTool Partition Wizard, feel free to contact us via [email protected]. We’ll make a reply as soon as possible.
User Comments :