When it comes to repairing the corrupted BIOS on Dell computers, lots of people may be heard about the BIOS auto recovery tool. However, most of them don’t know how to use Dell BIOS recovery, like the user from the Reddit forum:
Dell laptop bios auto recovery. I got a laptop from my company and I booted it up and it said BIOS auto recovery. BIOS corruption has been detected and auto recovery is triggered. Power status: ok. Then that’s it no way to click off of it or fix it. What should I do?
https://www.reddit.com/r/Dell/comments/mnteqy/dell_laptop_bios_auto_recovery/
About BIOS Auto Recovery
Before you use Dell BIOS auto recovery, it’s necessary to have a basic understanding of the tool. Here we summarize several frequently asked questions associated with Dell BIOS recovery.
What Is BIOS
BIOS, also known as Basic Input Output System, is firmware embedded on the chip of your motherboard. It can help facilitate the hardware initialization and perform POST (Power-On Self-Test) on your computer before the OS takes over. It plays an important role in the booting process.
Sometimes, however, the BIOS image may get corrupted due to a failed BIOS update, power outage, and even virus attacks. Once corrupted, your computer won’t boot normally. Meanwhile, you may receive various error messages like “Boot Guard verified failed”, “BIOS corruption has been detected and auto recovery is triggered”, etc.

Under such circumstances, you can use the Dell BIOS auto recovery tool to repair the corrupted BIOS images on Dell laptops. What is BIOS auto recovery? How to use the Dell BIOS recovery tool? Let’s keep reading.
What Is BIOS Auto Recovery
BIOS auto recovery is an automatic recovery process that can repair a corrupted BIOS when the BIOS image integrity has failed during booting. It mainly provides BIOS Recovery 2 (BR2) and BIOS Recovery 3 (BR3) features to recover BIOS on Dell.
The BR2 tool can be used to recover a BIOS image file from the computer’s primary hard drive or an external USB drive, while the BR3 tool adds a start-up check that can be enabled in the BIOS to have an automatic recovery capability to the Dell BIOS recovery. To know more differences between BR2 and BR3, you can read the following content:
BIOS Recovery 2 (BR2):
- It supports BIOS auto recovery Dell from the primary hard disk and an external USB drive.
- The recovery from the hard disk is enabled by default within the BIOS setup. Well, it can be disabled if you want, but it’s not recommended.
- The recovery from the external USB drive cannot be disabled in the BIOS setup.
- If the external USB drive is present, the default search location of the BIOS image is the USB drive. On the contrary, if the USB drive is not connected or the image can’t be found on the drive, then the Dell BIOS auto recovery will search from the primary hard drive for the BIOS recovery image.
- It can be performed using the integrated/standard USB keyboard on Dell computers but is not supported external keyboard.
- It can be performed using the physical buttons on Dell tablets.
- It can be performed on Dell convertible or detachable computers using either physical buttons or external keyboards, but cannot be performed using the touch screen of your computers.
BIOS Recovery 3 (BR3):
- As an improvement on BR2, the BR3 has all same features and adds the auto recovery check during boot.
- If the integrity check enabled in the BIOS (disabled by default) fails and the BIOS recovery image is on the hard drive, you can perform the BR3.
- The BIOS auto recovery Dell cannot be initiated from other media.
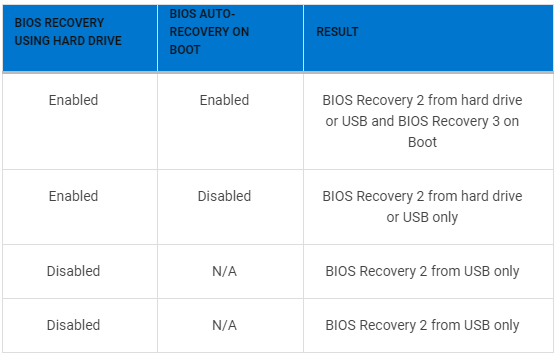
As for the difference between BIOS recovery using a hard drive and BIOS auto recovery during boot, you can refer to the table provided by Dell support.
Which Dell Computers Support BIOS Auto Recovery
The BIOS auto recovery tool can be used to recover a Dell computer from the POST or boot issues caused by a corrupted BIOS. However, it is not supported on all Dell computers. Here are the supported series of Dell desktops, laptops, all-in-one, tablets, and convertible computers:
The Dell computers, shipped after December 2015, have the Intel SkyLake chipset support BR2, while the Dell computers shipped after August 2016 or with Intel Kaby Lake chipset support BR3.
- Alienware: X51 R3, Echo 13 R2, Echo 15 R2, Echo 17 R3
- Inspiron: 3059 All-in-one, 3459 All-in-one, 5459 All-in-one, 7459 All-in-one, 3158 / 3153, 3250 / 3153, 3459 / 3559, 5457 / 5557, 5459 / 5559 / 5759, 7359 / 7353, 7559, 7568
- Vostro: 5450 All-in-one, 3250 / 3650 / 3653, 3459 / 3559, 5459
- Latitude: 3470 / 3570, 3640 / 3560, 5175 / 5179, 7370, E5270, E5470, E5570
- OptiPlex: 3040, 3240, 5040, 7040, 7440
- Precision: Mobile 3510/ 5510/, Mobile 7510 / 7710, Workstation 3420/ 3620
- Tablet: Venue 10 Pro 5056, Venue 8 Pro 5855
- XPS: XPS 12 9250, XPS 13 9350, XPS 15 9550, XPS 8900
How to Check If My Computer Supports Dell BIOS Auto Recovery
If you are not sure whether your computer supports the BIOS auto recovery Dell, you can follow the steps below to check that:
Step 1. Restart your computer and press the F2 key several times before the computer is booted to enter BIOS.
Step 2. In the BIOS Setup window, navigate to the Advance tab. If you find an option named BIOS Recovery from Hard Drive, it indicates that your computer supports BR2. If the BIOS Auto-Recovery option is enabled here, your computer supports BR3.
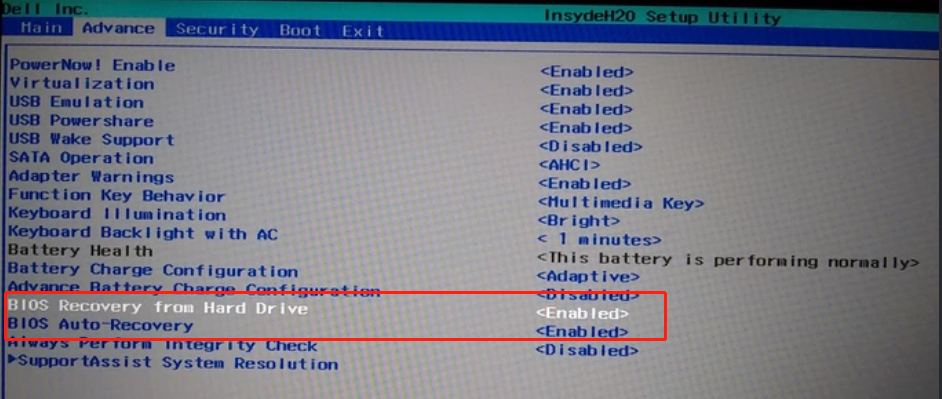
–image from the imgur website
How to Run BIOS Auto Recovery Dell from the Primary Hard Drive
After reading the above information, you should have an overall understanding of the Dell BIOS recovery tool. Let’s see how to perform a BIOS recovery on Dell laptops.
Before you do, make sure that the battery is charged up to at least 10%.
Step 1. Turn off your Dell laptop and disconnect the AC adapter.
Step 2. Press and hold the Ctrl + Esc keys and reconnect the AC adapter.
Step 3. Release the Ctrl + Esc keys until the BIOS Recovery Menu screen pops up.
Step 4. Select the Reset NVRAM option if available and press Enter. Then select Disabled and press Enter to save the current BIOS settings.
Step 5. Select Recover BIOS under the BIOS Recovery Options and press Enter to start the BIOS recovery process. Then your laptop may restart a few times during the recovery process.
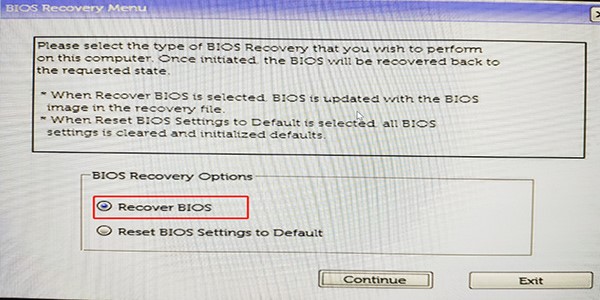
–image from dell community
How to Run BIOS Auto Recovery Dell from an External USB Drive
If the BIOS image is not located in your primary hard drive, you can create an external USB drive to run the BIOS recovery on Dell computers. To do this work, you need a working computer, an empty USB drive, and the latest BIOS of your Dell computer. Here is a tutorial:
# 1. Format the USB Drive to FAT32
First of all, you need to prepare an empty USB drive and format it to FAT32. You can use Windows built-in tools like Diskpart or Disk Management to do this work, but they have limitations in formatting a drive larger than 32GB.
If you have a large USB drive or encounter some issues like “Windows was unable to complete the format”, we highly recommend you use a professional formatter like MiniTool Partition Wizard. It is a trusted partition manager that can format/extend/resize/wipe/create partitions, migrate OS, convert NTFS to FAT32 without data loss, etc.
All data on the external USB drive will be deleted. So, make sure you back up them before creating the BIOS recovery drive.
MiniTool Partition Wizard FreeClick to Download100%Clean & Safe
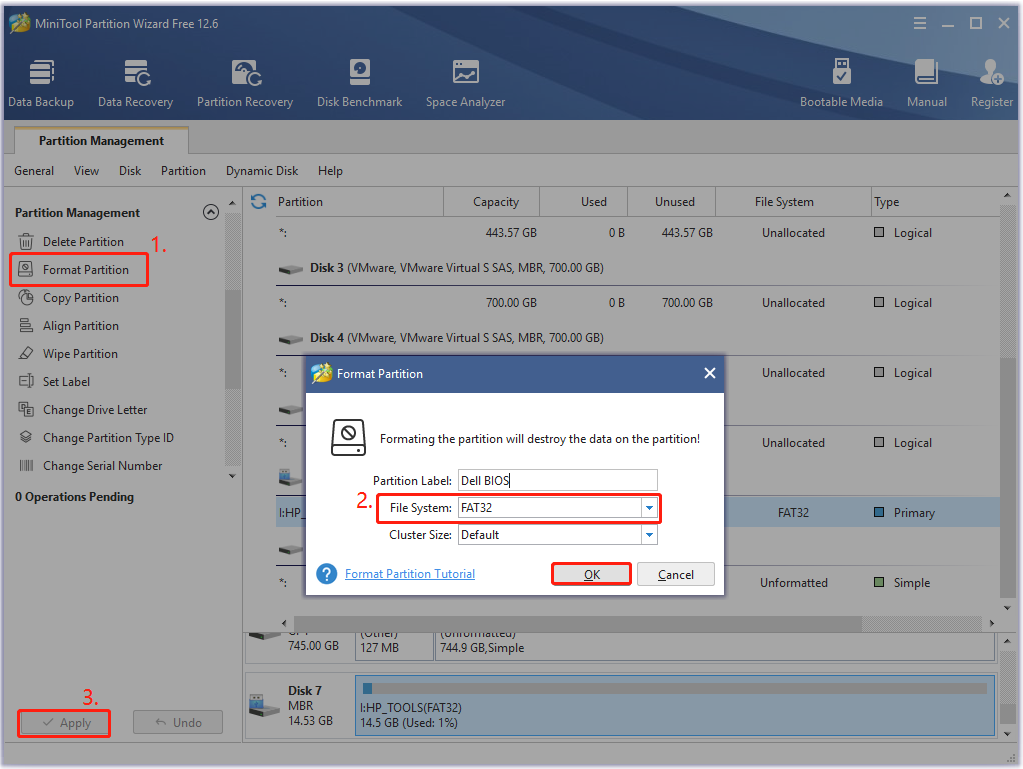
Step 1. Launch the MiniTool program to enter its main interface, select the USB drive from the disk map and click on Format Partition from the left action panel.
Step 2. In the pop-up dialog box, select FAT32 from the File System drop-down menu and click on OK to save the change. Here you can set the Partition Label and Cluster Size according to your needs.
Step 3. Click on Apply to execute the pending changes. After that, you can use the USB to install the Dell BIOS update.
# 2. Download the Latest BIOS of Your Dell Laptop
In addition, you need to download the latest BIOS according to your Dell computer and save it to the USB drive.
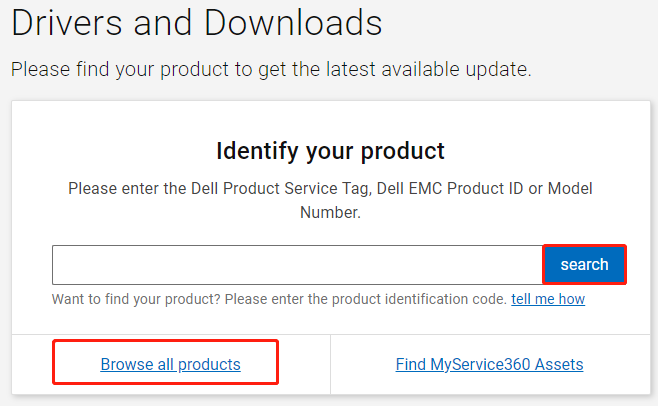
Step 1. Click here to open the Dell support official website, and then enter your Dell Product service tag in the box and click on Search. Also, you can click on Browse all products and select your system and drivers manually.
Step 2. Select your working system, go to the Category tab, and select BIOS from the drop-down menu.
Step 3. Tick the checkbox next to the latest version of Dell BIOS that you want to get and click on Download. Then select the USB drive as the save location and note down the exact name of the file.

# 3. Use the USB Drive to Recover BIOS on Dell
Now, you can perform a Dell BIOS recovery using the USB drive. Make sure the USB drive is connected to your Dell computer properly and the BIOS file is stored in the drive.
Step 1. Type cmd in the Search box, and then right-click the Command Prompt app and select Run as administrator. Then click on Yes to access the Command Prompt window with admin access.
Step 2. In the elevated Command Prompt window, type cd x: and press Enter. Replace x with the actual drive letter of your USB drive.
Step 3. Type dir and hit Enter to see the name of the BIOS recovery file.
Step 4. Type the following command and hit Enter to start recovering the BIOS from the USB drive. You need to replace the xxxxx with the actual name of the BIOS file you downloaded.
ren xxxxx.exe BIOS_IMG.rcv
How to Enable Dell BIOS Auto Recovery (BR3) If Available
If your computer supports the Dell BIOS auto recovery (BR3) option, you can follow the steps below to enable it.
The Auto-Recovery option is only available on BIOS Recovery from Hard Drive. In addition, if the BIOS Recovery from hard drive option is disabled, the Auto-Recovery is disabled too.
Step 1. Enter BIOS as we explained above and navigate to the Advance tab in the BIOS setup.
Step 2. Make sure the BIOS Recovery from hard drive is enabled.
Step 3. Change the status of BIOS Auto-Recovery to Enabled.
Step 4. Change the Always perform Integrity check option to Enabled too.
Step 5. Press Enter to save the changes. Then your computer will automatically recover BIOS if some errors like “BIOS auto recovery power status inadequate” or “BIOS auto recovery power status OK” happen during the boot.
What’s Your Option
This post focuses on the introduction of the Dell BIOS auto recovery tool. You can follow the full guide as we explained above to recover BIOS on Dell computers. If you have any other opinions or suggestions about this topic, you can share them in the comment area below.
Also, you can send us an email to [email protected] if you have any problems with the MiniTool software.
User Comments :