Sometimes when you are trying to upgrade Windows 10/11, you receive the error that says "We couldn't update the system reserved partition" and then the upgrade discontinues. If you are also bothered by this issue, you can find the best solutions here from MiniTool.
When upgrading to Windows 10 from Windows 7 or Windows 8.1, or upgrading Windows 10 to Windows 11, you may receive the annoying error message “We couldn’t update the system reserved partition” that stops the upgrading progress.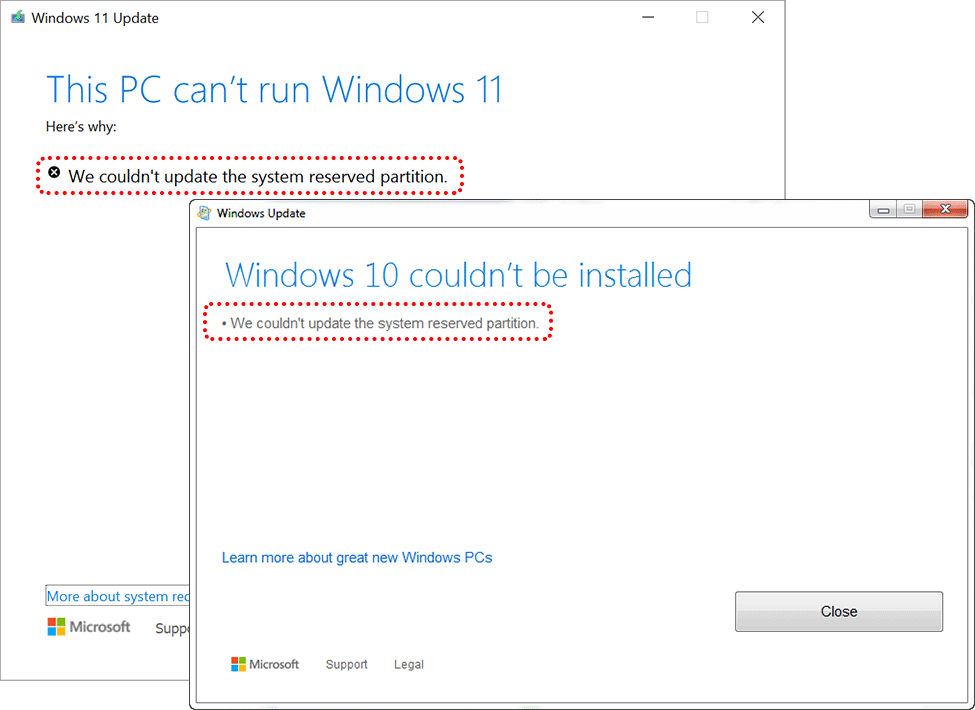 Well, what exactly cause(s) for this error, and how to clear the very roadblock for successful upgrade? If you haven’t got any good idea, just read this post. We will tell you the reason(s) along with 2 solutions which have been proved to work flawlessly.
2 Causes for “We Couldn’t Update System Reserved Partition” Error in Windows 10/11
After a series of tests and researches we found 2 causes for this error, including:- The system reserved partition is full. Microsoft says some third-party anti-virus and security apps write to the system reserved partition, which could fill the partition up.
- File system of system reserved partition runs in error.
How to Fix “We Couldn’t Update System Reserved Partition” Error on Win 10/11
First and formost, it is very necessary to indentify, view and check out which is the system reserved partition. Here MiniTool Partition Wizard shows partition properties clearly. Just download and install this partition manager on your computer.MiniTool Partition Wizard FreeClick to Download100%Clean & Safe
Then, run and launch the freeware to get its main interface. From the following screenshot we can see the first partition is marked as System Reserved, and it is always the one we are looking for.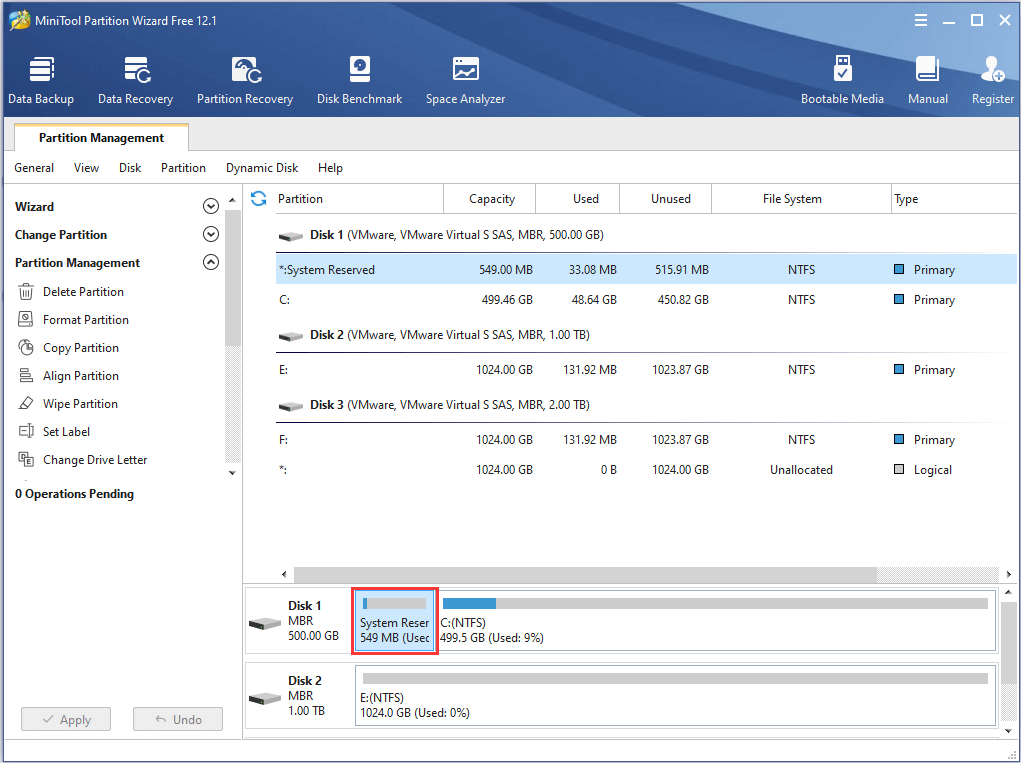 Nevertheless, there are exceptions. Sometimes the system reserved partition is not shown as System Reserved but with other labels. Let’s see the following example.
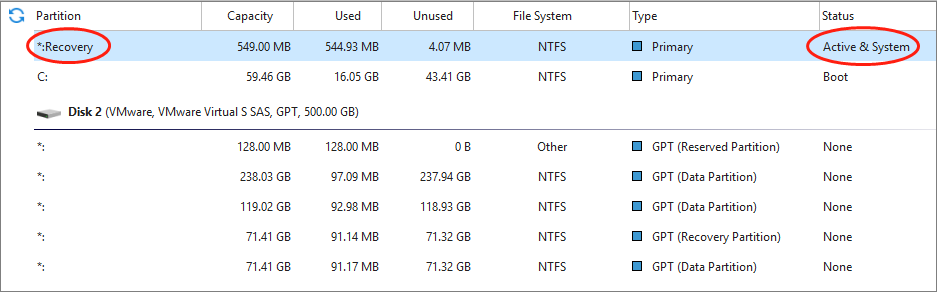 We can see no partition is labeled as system reserved. Well, does it mean there is no such partition on this computer? Of course not. Actually, users had better check partition status rather than label to distinguish system reserved partition from other partitions, and the partition shown as Active is always the one we are looking for. Therefore, in the screenshot above the partition labeled with RECOVERY is the system reserved partition.
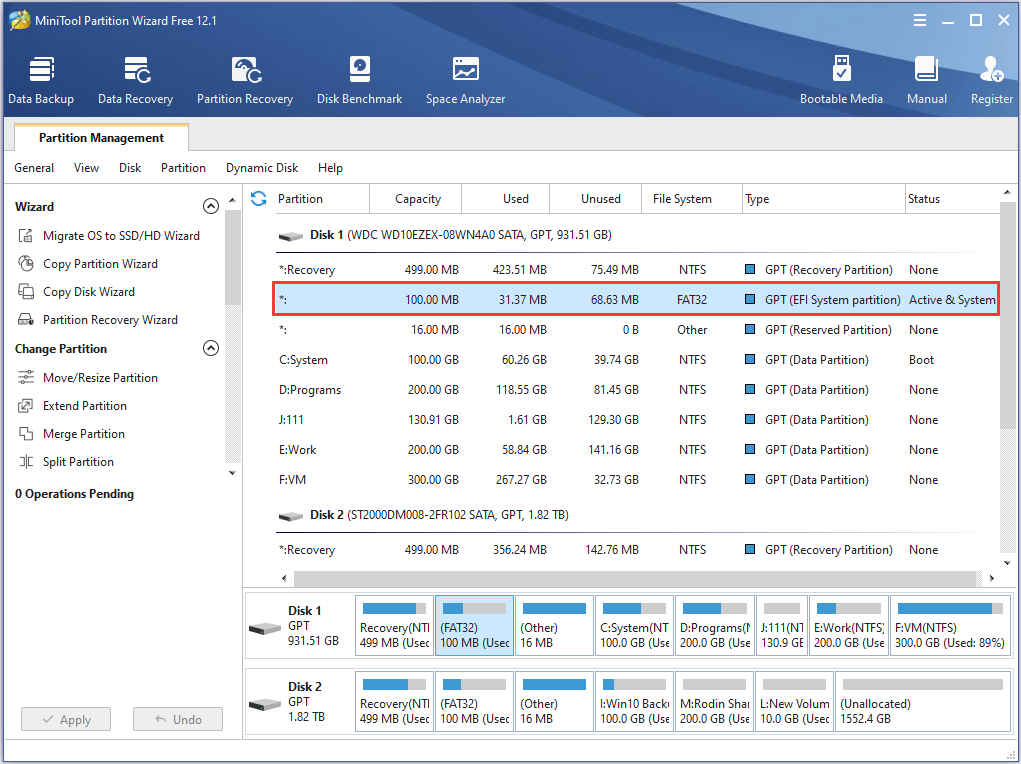
Tip: On GPT disk, this partition is not called system reserved partition but called EFI system partition (abbreviated as ESP). Please see the image below.
 After the correct partition is found, please view unused space of this partition.If there is little or no free space left in this partition, “Windows 10 upgrade couldn’t update system reserved partition” error is largely caused by low disk space of system reserved partition or ESP. Under this situation, to enlarge the partition is the best solution rather than delete unless files.Next, let’s start fixing the Windows 10 upgrade error.
Fix Win 10/11 Upgrade Error by Increase System Reserved or EFI System Partition Size
Here is a video guide:
Tip: Nowadays, Legacy BIOS + MBR and UEFI + GPT are 2 most commonly seen boot modes on Windows platform. Under different mode operations of extending system reserved partition are little bit different so that we will show detailed steps on both modes.
Extend System Reserved Partition Under Legacy BIOS + MBR Boot Mode
If you are booting Windows from MBR disk, please take the following operations:Buy MiniTool Partition Wizard Pro so as to create MiniTool Partition Wizard Bootable media. (Here we just use the Pro Edition in the running Windows OS to demonstrate the process.)Step 1: Create a bootable CD/DVD, or USB flash drive. For instructions, please see How to Build Boot CD/DVD Discs and Boot Flash Drive with Bootable Media BuilderStep 2: Boot computer from MiniTool Partition Wizard Boot Disc.Step 3: When you are in the main interface of MiniTool Partition Wizard, select the System Reserved partition and choose “Extend Partition” feature from the left action panel.Step 4: Extend the target partition by taking free space from other existing partitions on the same disk and click “OK“.Step 5: Click “Apply” button on the top to perform all changes.After these steps, increasing space for system reserved partition has been completed. For more details, please see Extend Partition. And then, you should be able to upgrade to Windows 10.Enlarge EFI System Partition Under UEFI + GPT Boot Mode
For users who are running Windows on GPT disk, they can increase EFI system partition (ESP) size by taking the following steps.Buy MiniTool Partition Wizard Pro so as to create MiniTool Partition Wizard Bootable CD.Step 1: Create MiniTool Partition Wizard Boot Disc.Step 2: Boot Computer via MiniTool Partition Wizard Boot Disc to get partition layout: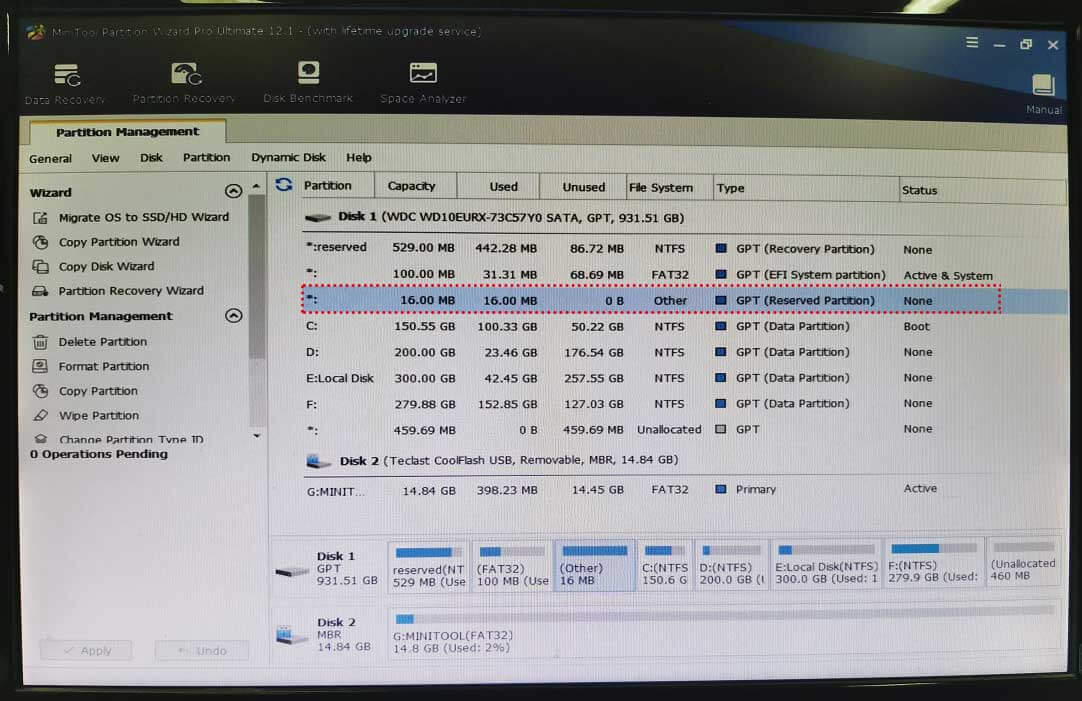 Here the 100MB ESP partition marked as Active is the very partition we need to enlarge, and now it has not much free space available. But fortunately, we can enlarge it by taking free space from any other existing partitions with recognizable file system (FAT or NTFS) on the same hard disk. For example, we can extend the ESP partition by taking free space from partition C since this partition has half unused space left. Of course, we can also enlarge it by making use of unallocated space if there is such a kind of space.Step 3: Delete Microsoft Reserved PartitionHowever, in the case above, if we want to extend the EFI system partition (ESP) by borrowing free space from partition C, we need to delete the 16MB Microsoft Reserved Partition (MSR partition) at first since Partition Wizard can’t recognize its file system.Well then, does it mean users must delete the MSR partition when they plan to enlarge EFI system partition? Of course not. Actually, only when the MSR partition is located between the EFI system partition and the partition we want to take free space from, it should be deleted. If not, the extending process will be stopped. For detailed steps to delete an existing partition, please see Delete Partition.
Tip: Deleting the Microsoft reserved partition does no harm to both data and system, so users can do it without any worries.
Tip: Lots of users have consulted us with the same problem via email, telephone, or online chat, and they finally fixed the error by increasing system reserved partition size of Windows 7 or 8.1, so you can also have a try. It brings no damage to both data and system.
Fix File System of System Reserved Partition in Windows 7/8.1
Step 1: Download and Install MiniTool Partition Wizard Free EditionTo check and fix file system of the system reserved partition in Windows 7/8.1, please download and install MiniTool Partition Wizard Free Edition.MiniTool Partition Wizard FreeClick to Download100%Clean & Safe
Step 2: Assign a Letter for System Reserved or EFI System PartitionAs “Check File System” can only be used when the selected partition has a drive letter, please select the system reserved partition or EFI system partition (ESP) and click “Change Drive Letter” function from the action panel. Then assign it a drive letter and click “OK” to go back to the main interface. Finally, click “Apply” button on the top to make this change performed.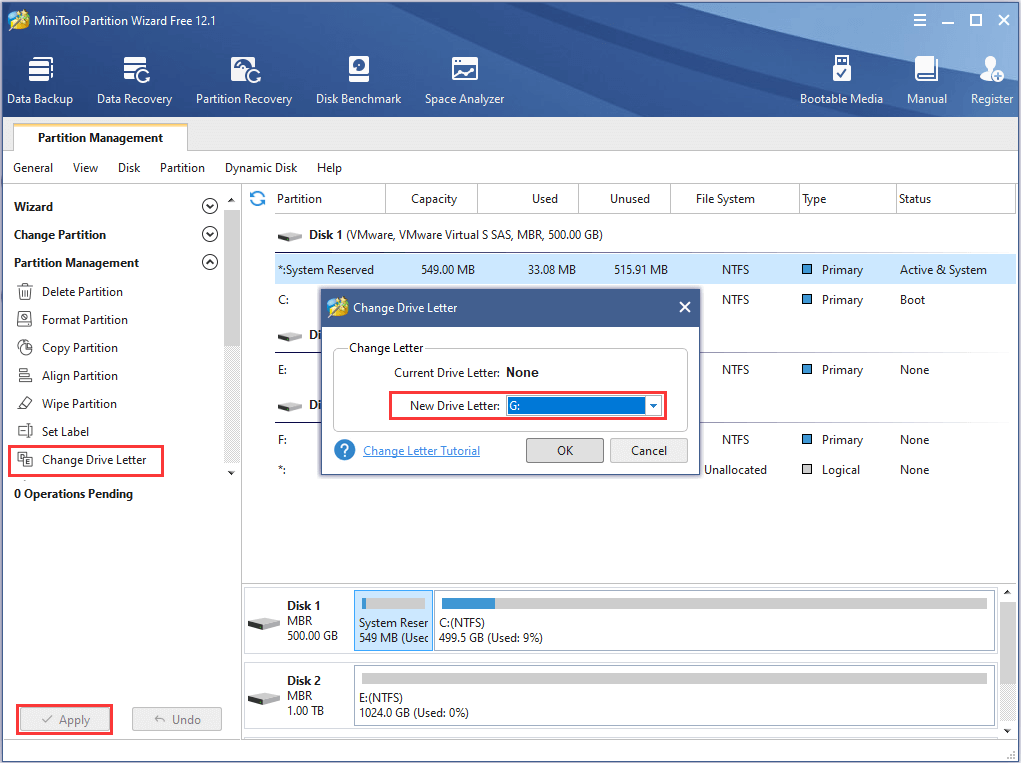 Step 3: Check and Fix File System of System Reserved or EFI System PartitionReselect the system reserved or EFI system partition and choose “Check File System” feature. Then, choose “Check & fix detected error” since this feature will detect all file system errors and then fix them one after another, and next click “Start” button to start checking and fixing.
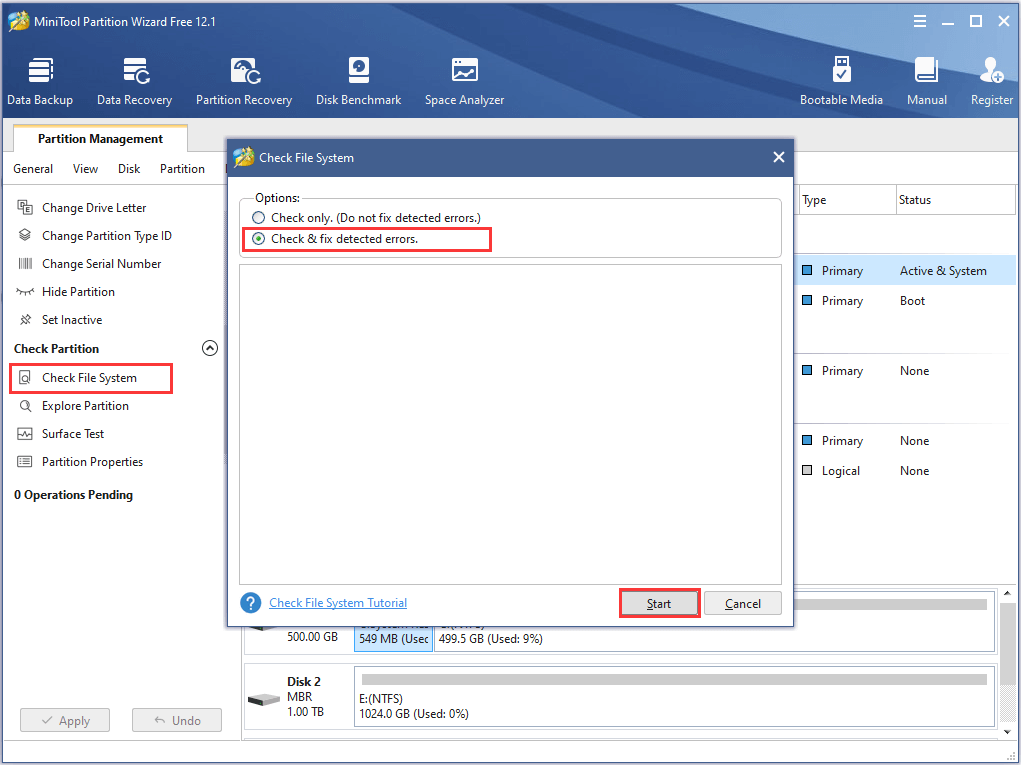 If there are file system errors found and fixed, users can try upgrading to Windows 10 again, and this time the “Windows 10 upgrade couldn’t update system reserved partition” error shouldn’t emerge.Quick video guide:
Summary
Are you troubled by the error “We couldn’t update the system reserved partition” when upgrading Windows 7 or 8.1 to Windows 10? If yes, now try taking one of our solutions to fix it. If our solutions are proved to be useful for your case, can you please share it so as to help more people who are troubled by the same issue? Or if you have any other good idea, can you please share it with us. Much appreciated!About The Author

Position: Columnist
Rodin is an enthusiastic IT writer focusing on Windows trends, disk partition management and data recovery. She loves to write and share her idea about the useful tips and tricks on personal computers' maintenance. If you are looking for methods to improve your computer performance, manage hard drives and recover data from different devices, Rodin can provide reliable solutions for data management.
User Comments :