
Quick Answer
If your SSD is write-protected, you may be unable to create, delete, modify, or format files on the drive. The problem is commonly caused by a read-only attribute, Windows storage policies, file-system errors, permissions, connection issues, or SSD failure.
To remove write protection, first use DiskPart to clear the SSD’s read-only attribute with the attributes disk clear readonly command. If that doesn’t work, check Windows Registry and Group Policy settings, SSD permissions, file-system errors, and the drive’s health.
What Does “SSD Write Protected” Mean?
“SSD write protected” means that the SSD is preventing Windows or another device from changing, deleting, or adding data to it. You may still be able to open and copy files from the SSD, but write operations are blocked.
When an SSD is write-protected, you may encounter messages such as “The disk is write protected” or find that the drive appears as read-only in Windows Disk Management.
#1. Common Symptoms of a Write-Protected SSD
A write-protected SSD may show one or more of these symptoms:
- You cannot copy new files to the SSD.
- You cannot delete, rename, or modify existing files.
- Windows refuses to format the SSD.
- Disk Management cannot make certain changes to the drive.
- DiskPart reports the SSD as read-only.
- Windows displays “The disk is write protected.”
- The SSD suddenly changes to read-only mode.
#2. SSD Write-Protected vs. SSD Read-Only
SSD write-protected and SSD read-only both mean that you cannot write data to the SSD, but they describe slightly different situations. Write protection usually refers to a restriction that blocks write operations, while read-only describes the SSD’s current state in which data can be read but not modified.
Generally speaking, SSD read-only is one form of SSD write protection. However, the issue is usually more severe than standard SSD write protection and may indicate an SSD failure.
Why Is My SSD Write Protected?
An SSD can become write-protected for several reasons, ranging from a simple read-only setting to file-system problems or SSD hardware failure. The most common causes are shown in the following table.
| Possible Cause | Typical Symptom | What to Try |
| Read-only attribute | SSD cannot be written to | Clear the read-only attribute with DiskPart |
| Windows policy | Writing is blocked on one PC | Check Registry/Group Policy |
| Permissions | Only certain files/folders are inaccessible | Check permissions and ownership |
| File-system errors | Files cannot be modified | Check and repair the file system |
| Cable/USB/enclosure | External SSD behaves abnormally | Change the connection or test another PC |
| SSD failure | Read-only state persists | Back up data and check SSD health |
How to Remove Write Protection from an SSD
A write-protected SSD may be annoying. Then, you can try the following methods to solve it.
Fix 1. Remove the SSD’s Read-Only Attribute Using DiskPart
If Windows recognizes your SSD but prevents you from writing, deleting, or modifying files, the drive may have its read-only attribute enabled. You can use the built-in DiskPart utility to check and clear this attribute without formatting the SSD.
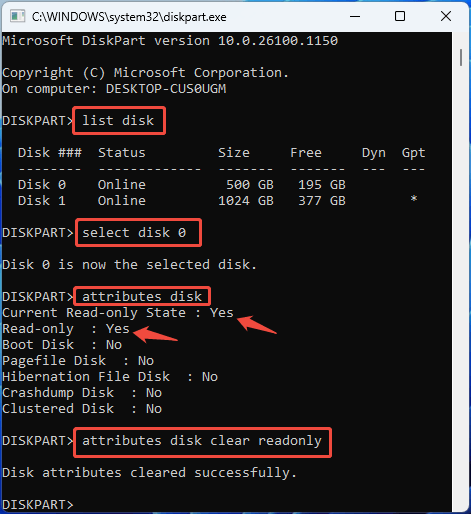
Step 1: Press Win + R, type “diskpart”, and then press Enter to open it.
Step 2: Check and clear the SSD read-only attribute using the following commands.
- list disk
- select disk * (* is the disk number of the write-protected SSD)
- attributes disk (check if the Current Read-only State and Read-only are Yes. If so, run the next command to clear read-only)
- attributes disk clear readonly
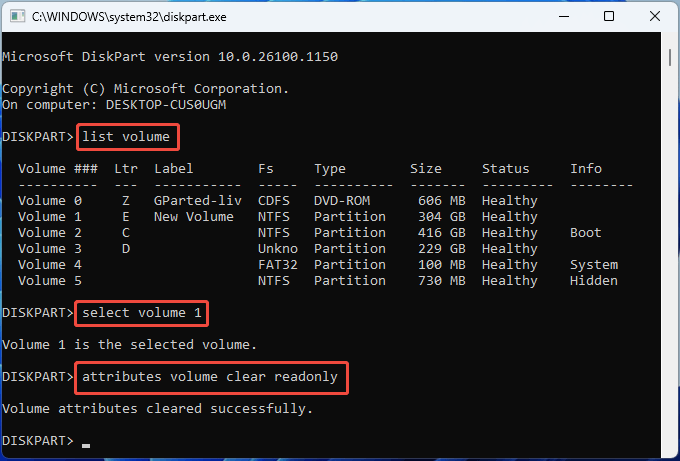
Sometimes, the SSD is not set to read-only, but a volume on the SSD is set to read-only, causing the write protection issue. In this case, open DiskPart and then clear the volume read-only attribute using the following commands.
- list volume
- select volume # (# is the volume number of the write-protected SSD partition)
- attributes volume clear readonly
Fix 2. Check the Windows Registry for Write Protection
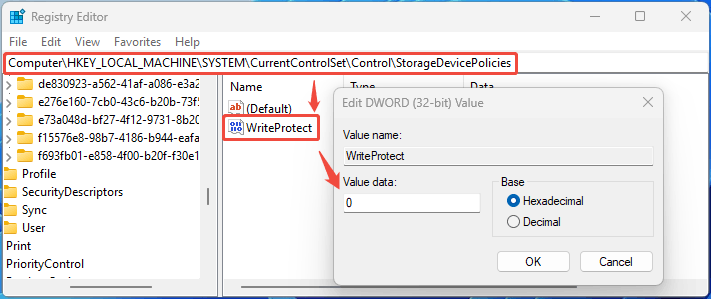
If your SSD is still write-protected after clearing the read-only attribute with DiskPart, check whether a Windows Registry setting is preventing write operations. This method is particularly useful when an external SSD is write-protected on one Windows computer but works normally on another.
Here are the steps.
- Press Win + R to start Run, and type “regedit” to open Registry Editor.
- Navigate to the following path: Computer\HKEY_LOCAL_MACHINE\SYSTEM\CurrentControlSet\Control\StorageDevicePolicies.
- Double-click “WriteProtect” and change the Value Data from “1” to “0”.
- Click “OK” to save and reconnect your SSD to the computer.
Fix 3. Disable Write Cache Policy
The primary function of write caching is to temporarily store data destined for a hard drive or storage device in high-speed memory, thereby significantly boosting system write speeds, reducing latency, and minimizing disk wear.
However, if the disk is forcibly removed, power is lost, or a hardware failure occurs while write caching is enabled, the system’s protection mechanism will be triggered.
To remove the write protection from the SSD, you can do as follows.
Step 1: Disable write caching on the device and in Windows.
- Press Win + X and then select Disk Management to open it.
- Right-click the write-protected SSD and choose Properties.
- Go to the Policies tab.
- Select the Quick removal option and click OK.
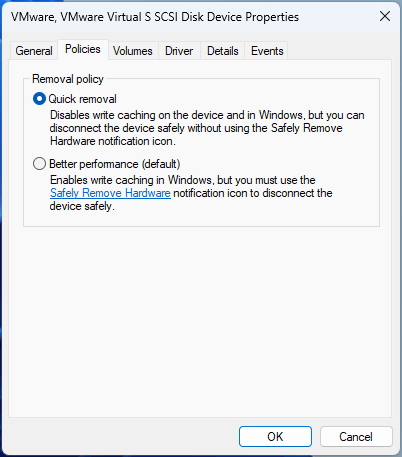
Step 2: Right-click the write-protected SSD and choose Offline. Then, bring it back Online. The write protection should be removed.
Fix 4. Check Group Policy Settings
Windows Group Policy settings may also prevent write access. This is more common with external or removable SSDs, especially on computers managed by an organization. Here is how to disable this policy.
Step 1: Press Win + R to open Run. Then, type “gpedit.msc” and press Enter to open Local Group Policy Editor.
Step 2: Go to Computer Configuration > Administrative Templates > System > Removable Storage Access.
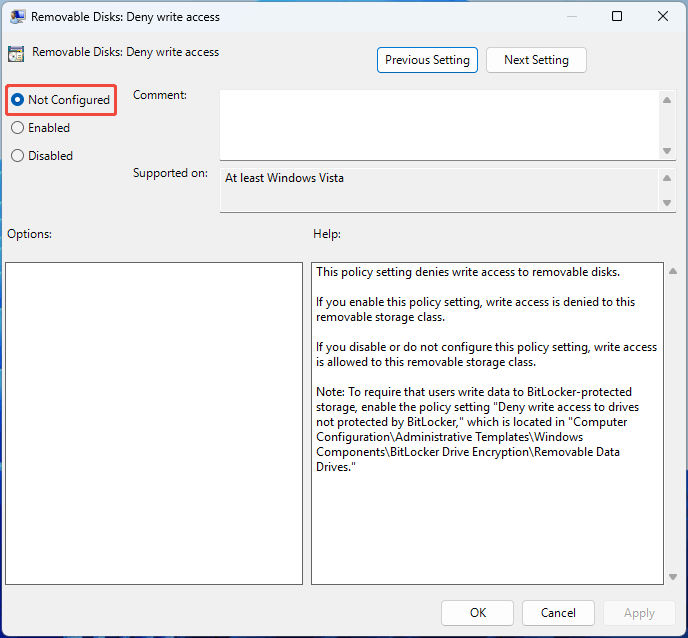
Step 3: Find the two settings: Removable Disks: Deny write access and All Removable Storage classes: Deny all access.
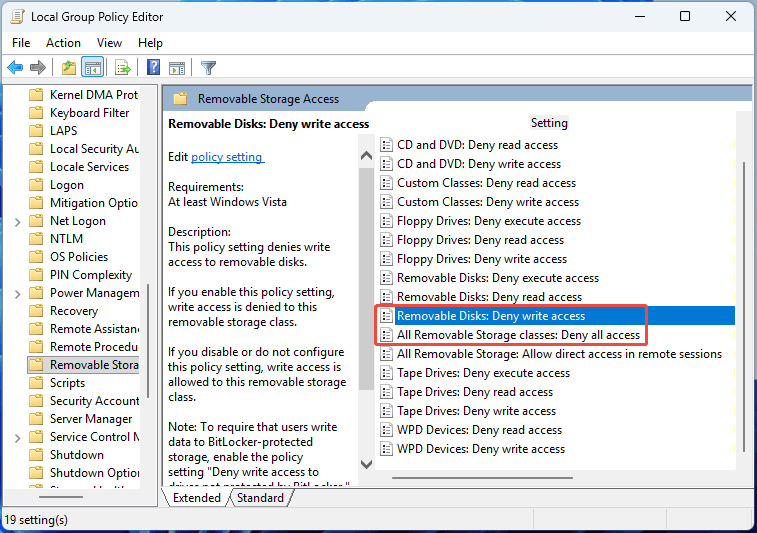
Step 4: Double-click them and make sure the Not Configured option is selected. Click OK to save changes.
Fix 5. Check SSD Permissions
If you can open files on the SSD but cannot modify, delete, or create files in a particular folder, the problem may be caused by Windows file and folder permissions rather than actual disk-level write protection.
Here is how to check and modify the SSD partition’s permissions.
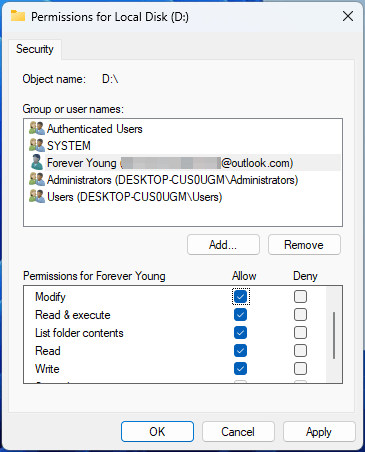
Step 1: Press Win + E to open File Explorer. Select This PC. Right-click the write-protected partition and choose Properties.
Step 2: Go to the Security tab. Under Group or user names, select your Windows account and then check if the Modify and Write permissions are allowed. If not, click Edit.
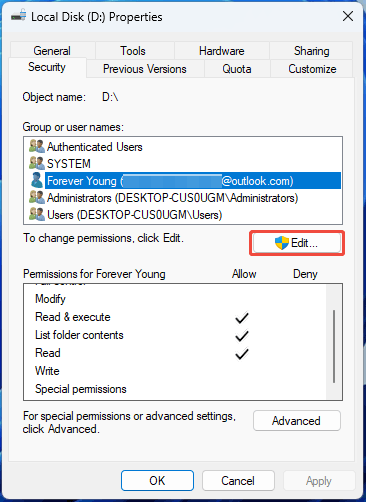
Step 3: On the pop-up window, select your account and then tick the Modify and Write permissions under Allow. After that, click OK to save changes.
Fix 6. Check and Repair the SSD File System
File-system errors can sometimes cause an SSD to behave as read-only or write-protected. This can happen after an improper shutdown, interrupted file transfer, system crash, or other disk-related errors.
You can check and repair the file system errors through the following steps.
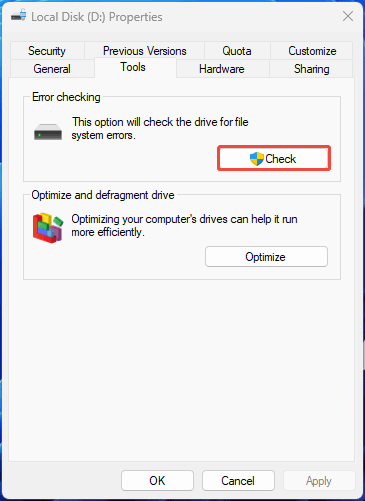
- In Windows File Explorer, right-click the write-protected partition and select Properties.
- Open the Tools tab.
- Under Error checking, click Check.
- Follow the on-screen instructions if Windows detects errors.
If you wish to further investigate disk issues, you can use the CHKDSK command, with caution.
Fix 7. Update the SSD Firmware and Driver
Outdated or corrupted SSD firmware, storage drivers, or chipset drivers can sometimes cause communication and compatibility problems that prevent an SSD from working correctly. Updating them may help solve the SSD write protection issue.
Step 1: Update the SSD driver.
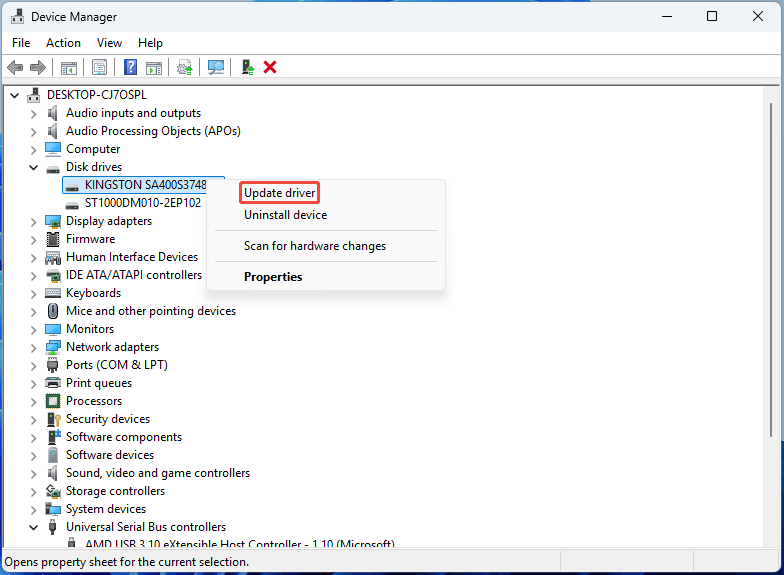
- Press Win + X and select Device Manager.
- Expand Disk drives.
- Right-click the write-protected SSD and choose Update driver.
- Follow the on-screen instructions to complete the update.
Step 2: Update the SSD firmware.
- In Device Manager, you can see your SSD’s brand and model name.
- Download the SSD management utility from the SSD manufacturer’s official website.
- Run this tool to update the SSD firmware.
Fix 8. Format the SSD with MiniTool Partition Wizard
If your SSD is write-protected, MiniTool Partition Wizard can help you remove the write protection by formatting the SSD. Even if the SSD is in read-only mode, the formatting may also succeed. Here is the guide.
MiniTool Partition Wizard FreeClick to Download100%Clean & Safe
Step 1: Back up data on the SSD.
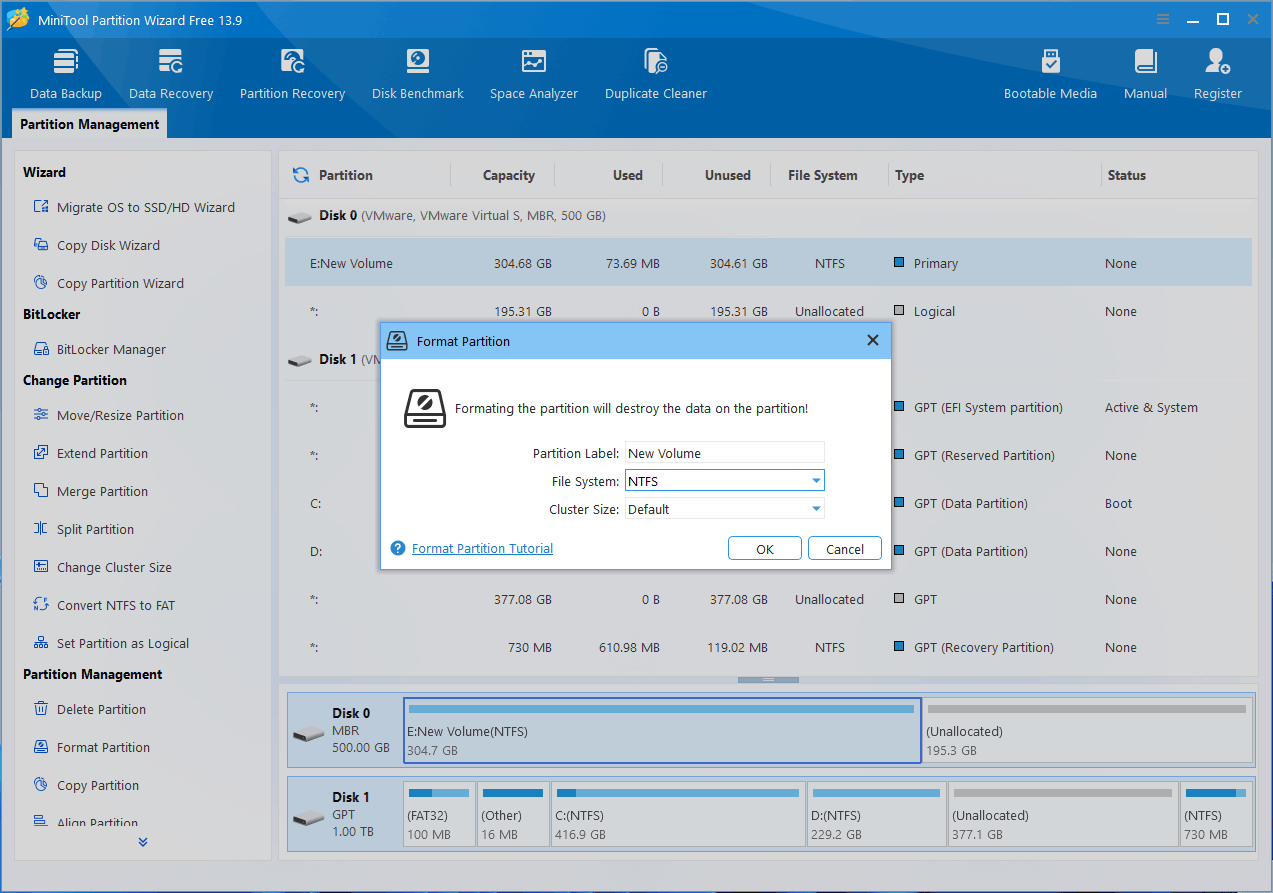
Step 2: Launch MiniTool Partition Wizard Free. Right-click the SSD partition and choose Format.
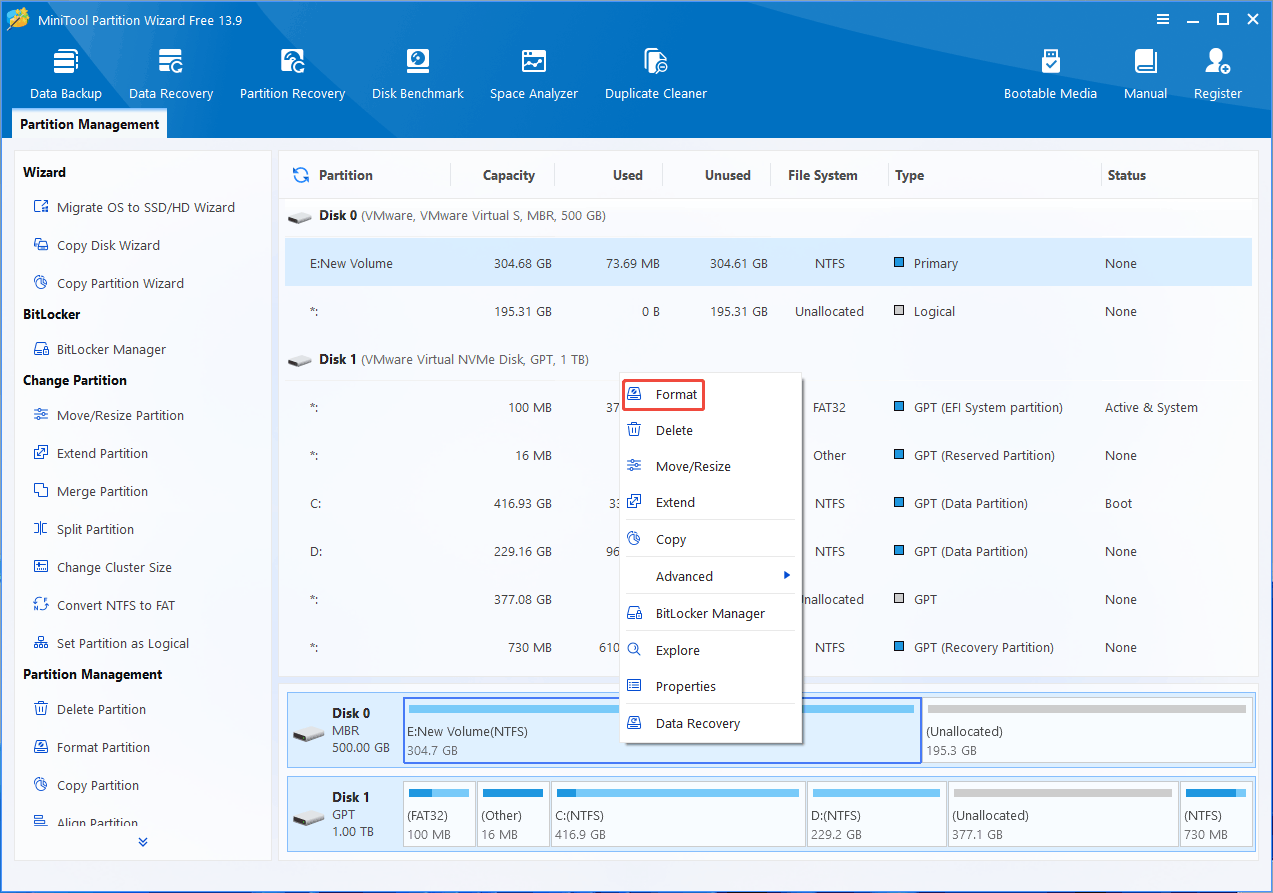
Step 3: On the pop-up window, choose a file system, and then click OK.
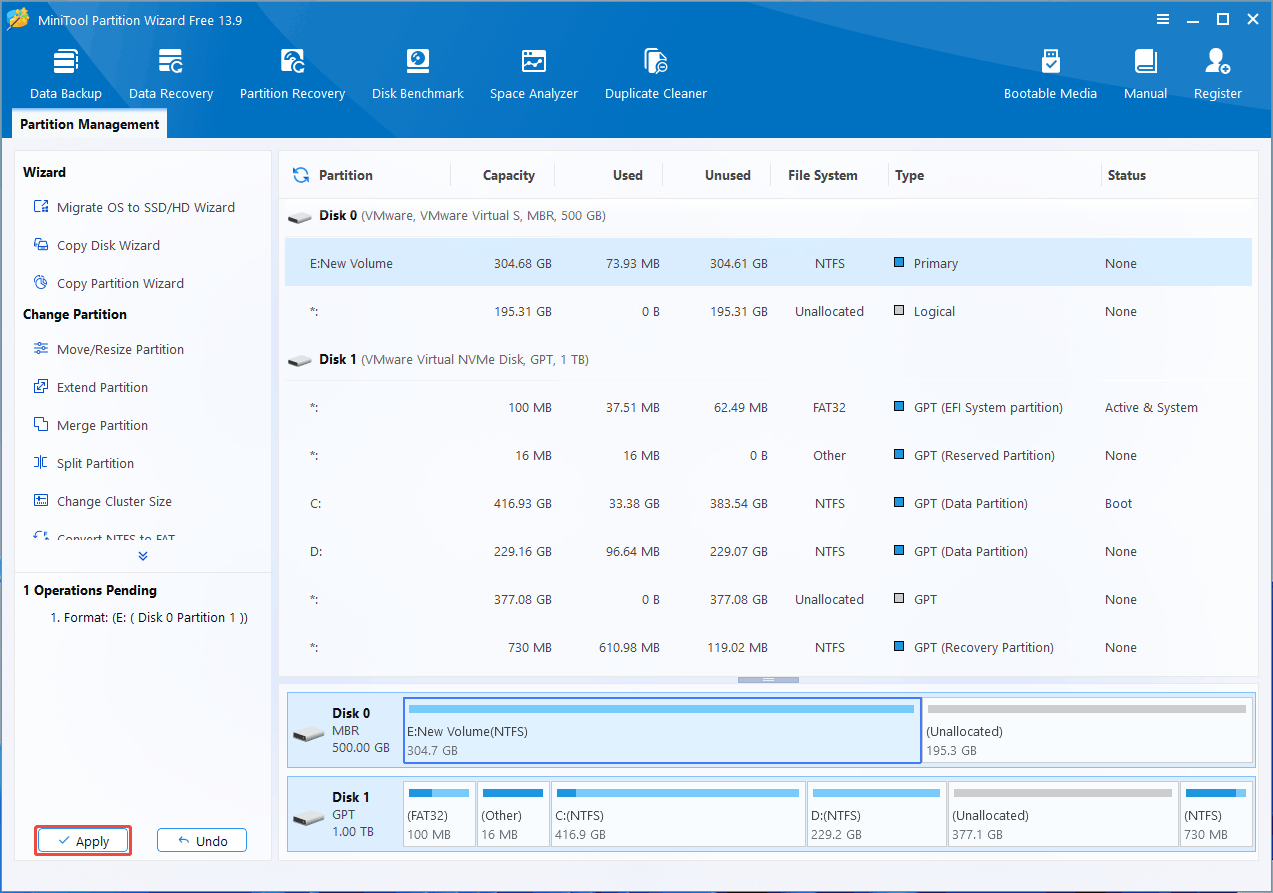
Step 4: Click Apply to execute the formatting operation.
Fix 9. DiskPart Clean All
The DiskPart clean all command will delete all partitions and securely wipe every sector on the drive by writing zeros to the entire storage space. This should turn the write-protected SSD back to normal.
Before performing this method, back up important files in advance. Then, open DiskPart and run the following commands.
- list disk
- select disk * (* is the disk number of the write-protected SSD)
- clean all
If you want to clean the system disk, you need to perform it in WinPE. To know more information, read this post: A Comprehensive Guide to DiskPart Clean VS Clean All Commands.
Fix 10. Check SSD Health
A failing SSD may automatically switch to a read-only state to protect existing data from further corruption. If all the above methods fail, checking SSD health is necessary. You can try third-party software like CrystalDiskInfo.
If the SSD is failing, back up data and then replace it.
SSD Write Protected FAQ
If the SSD continues to reject formatting after the read-only attribute has been cleared, check for hardware or firmware problems instead of repeatedly attempting to format it.
Bottom Line
An SSD write-protected problem can be caused by a read-only attribute, Windows settings, file-system errors, permissions, connection issues, or SSD failure.
Start with non-destructive solutions such as clearing the read-only attribute with DiskPart, checking Windows settings, and testing the SSD connection. If the SSD remains read-only, check its health for signs of hardware failure.
When you troubleshoot this problem, you may use MiniTool Partition Wizard. If you have questions about this software, send an email to [email protected] for help.
About The Author

Position: Columnist
Linda has been an editor at MiniTool for seven years. She continuously learns about computers and puts her knowledge into practice. Moreover, she is particularly knowledgeable in disk management, data recovery, system installation, and PDF editing. Her articles typically reference multiple examples or are based on her own experience, providing users with the most suitable solutions.
User Comments :