If your SSD becomes read-only on Windows, it may result from hardware damage, file system errors, or manual write protection. To resolve the issue, you can try clearing the read-only attribute, checking the file system, or formatting the drive to normal using MiniTool Partition Wizard.
What Does SSD Read Only Mean?
An SSD in read only mode means you can only view and copy data from the drive, but cannot add, delete, or modify any files. This is often a safety feature the drive uses when it detects a critical error.
It indicates that the drive is near the end of its life. To protect your data from loss caused by file system corruption, firmware errors, or hardware degradation, the drive automatically enters read-only mode. Ignoring the issue or forcing writes can lead to permanent data loss.
How to check if SSD is read only? You can use the DiskPart command to inspect the drive’s attributes. Here are the steps:
Step 1. Type cmd in the search bar, right-click Command Prompt, and choose Run as administrator.
Step 2. Type the following commands and press Enter after each one.
- diskpart
- list disk
- select disk # (# represents the drive number)
- attribute disk
Step 3. Next, check the output. If the drive is read-only, it will show Current Read-only State: Yes.
In this state, you can open and copy files from the drive, but cannot edit, delete, or save new data. This will disrupt work, gaming, and daily tasks.
When encountering a read-only SSD, you need to back up your data first and then attempt to clear the read-only attribute.
How to Rescue Your Data
If your SSD suddenly becomes read-only, rescue your important files immediately.
Many SSDs enter read-only mode when:
- NAND flash is wearing out
- The SSD controller detects failure
- Firmware errors occur
A permanently read-only SSD may indicate hardware failure.
To perform the SSD data recovery, you can make use of a professional data recovery tool. MiniTool Partition Wizard is a great choice. It enables you to recover data from formatted/corrupted SSDs.
In addition to SSD data recovery, the Data Recovery feature of MiniTool Partition Wizard enables you to recover data from various storage devices, including HDD/SD card/USB drive.
MiniTool Partition Wizard DemoClick to Download100%Clean & Safe
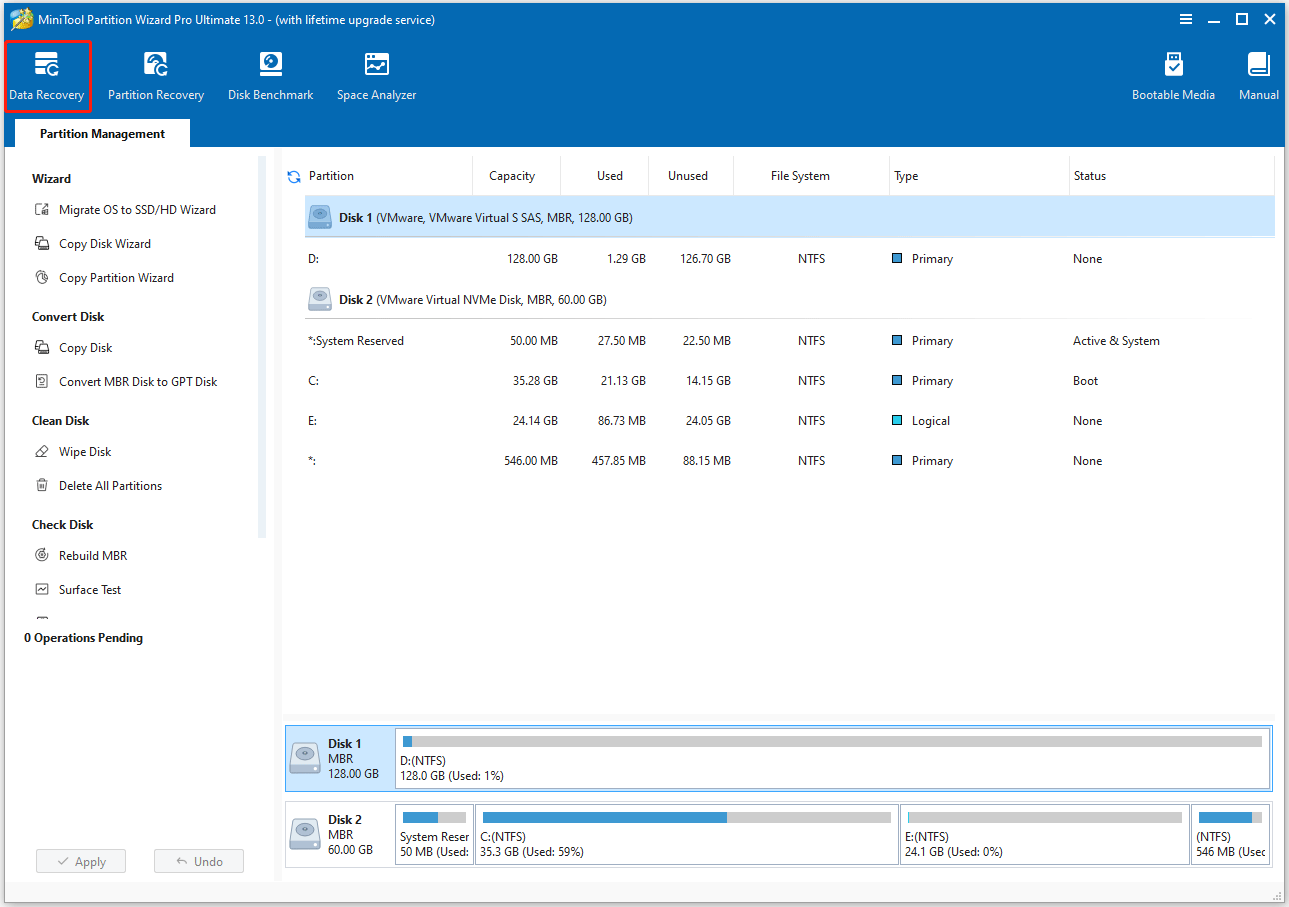
Step 1. Launch Data Recovery.
- Launch MiniTool Partition Wizard to enter its main interface.
- Click Data Recovery from the top menu.
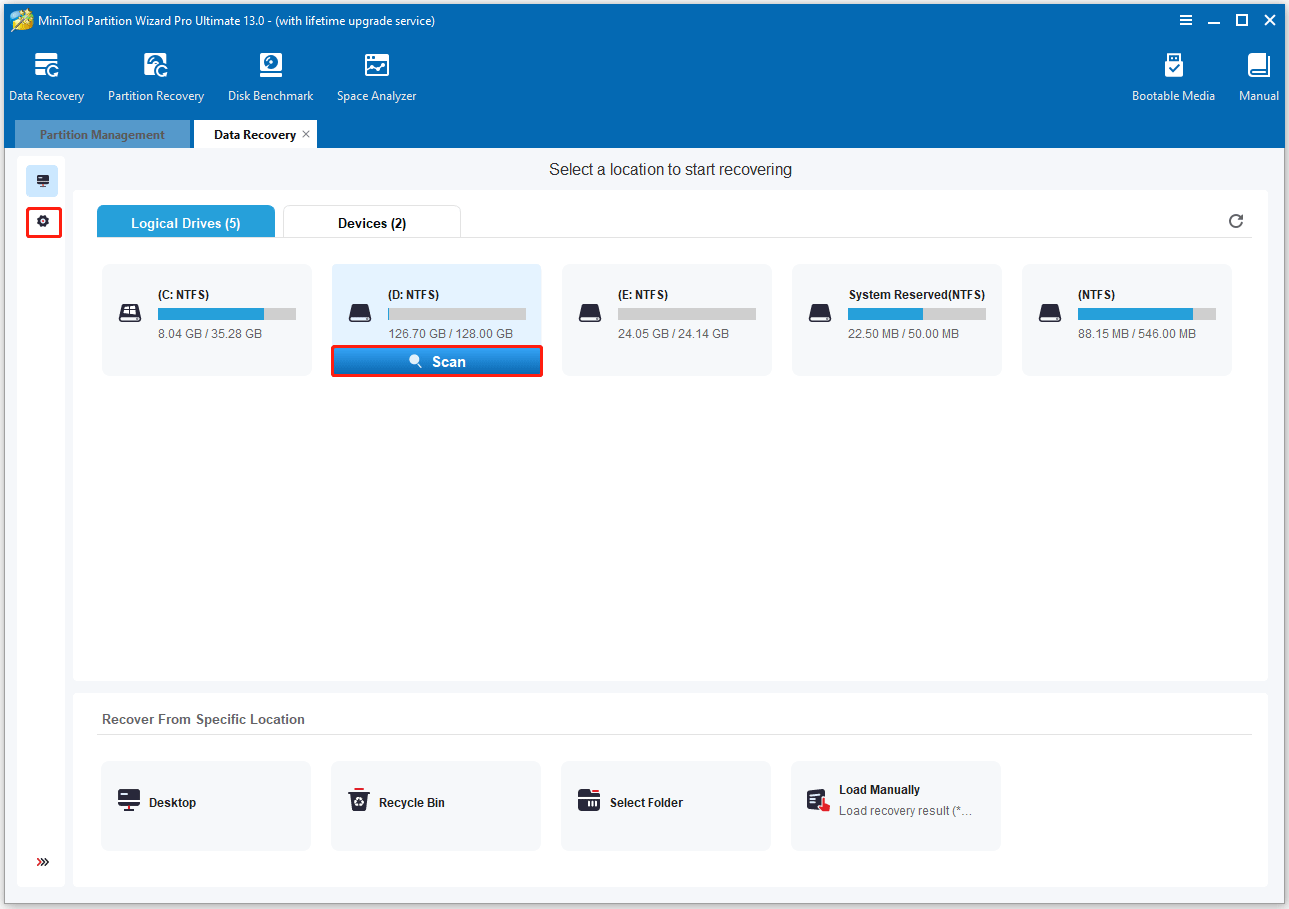
Step 2. Scan the SSD.
- In the Data Recovery window, move your cursor to the SSD partition and click Scan.
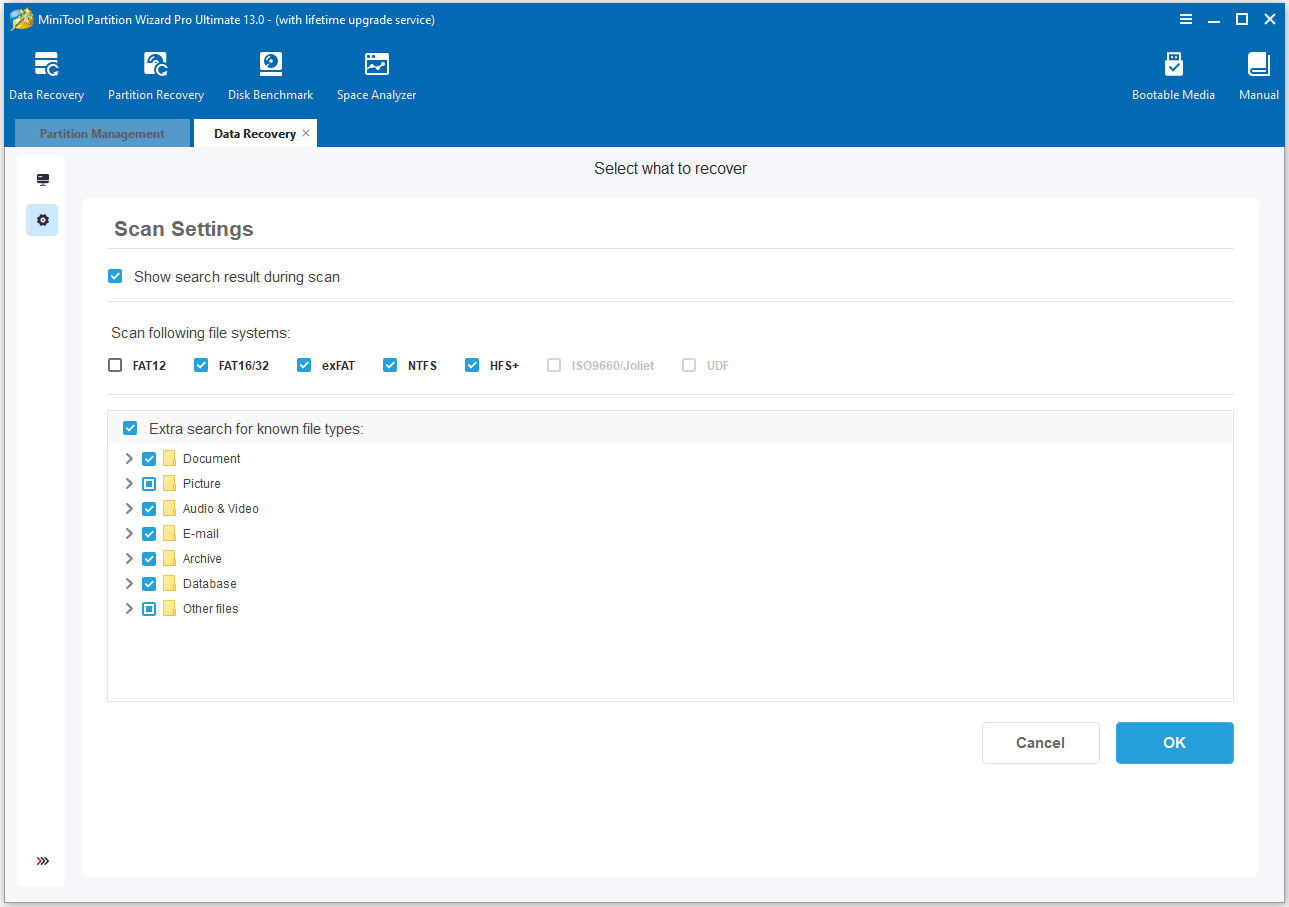
- To optimize the scan, you can select the specific file systems like FAT, NTFS, or exFAT, and choose the file types you want to search for (e.g., documents, pictures, videos) in Settings (gear-shaped icon).
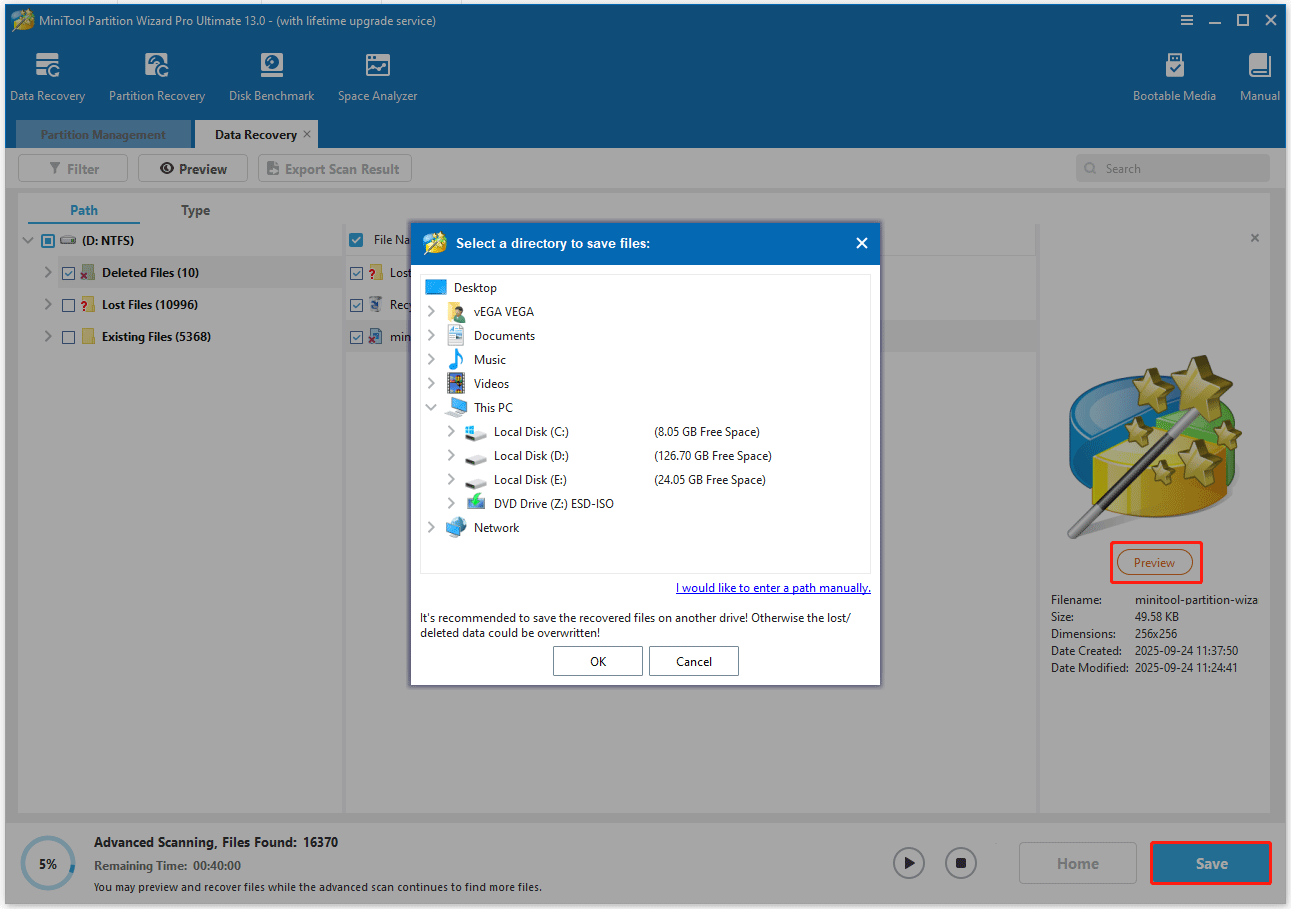
Step 3. Recover and save the files.
- Wait for the scan to complete. If the desired data is found, you can click the Pause or Stop icon to get instant data recovery.
- After the scan, use the filter, search, and type options to locate your files.
- Double-click a file to preview it and verify it is the one you need.
- Select the files you want to recover by ticking the box next to them, then click Save.
- Choose a different storage device (not the original SSD) to save the recovered files to avoid overwriting.
- Click OK to complete the save process.
MiniTool Partition Wizard is not only a data recovery tool but also a free partition manager. It can help you create/format/extend/resize/wipe partitions, and provide some advanced features – clone a hard drive, migrate OS to SSD/HDD, convert MBR to GPT without data loss.
How to Remove SSD Read Only
Now, it’s time to remove the SSD read only. Here are several methods below you can try.
| Problem | Most Likely Cause | Recommended Fix |
| SSD suddenly becomes read-only | SSD failure protection | Backup data immediately |
| External SSD is read-only | USB/adapter issue | Change the cable or port |
| Cannot remove write protection | Firmware problem | Update firmware |
| DiskPart attributes fail | Hardware issue | Check hardware health |
| Files cannot be modified | File system corruption | Check for file system errors |
Method 1. Verify the Physical Write Protection Switch
If you have an external SSD in an enclosure, you can take the following steps to verify the physical write protection switch:
- Locate the small write-protection switch on the drive (usually labeled “Lock” or “Write Protect”).
- Ensure the switch is in the “Unlocked” position. Check the drive’s manual if you are unsure. Some switches use “On/Off” or icons like a padlock.
- Reconnect it to your PC, and then check if you can write to the drive.
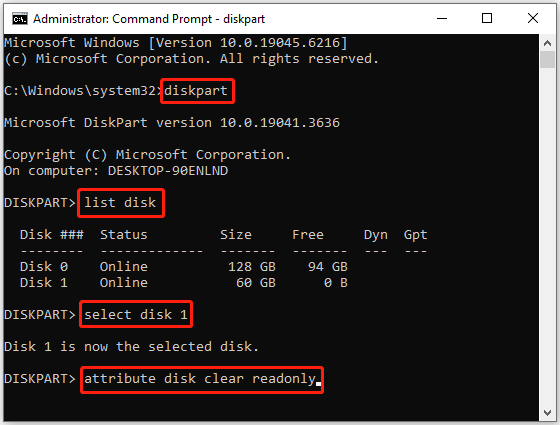
Method 2. Clear the Read Only Attribute with DiskPart
DiskPart can remove software-based write protection. If your SSD state is “current read only state yes”, you can use DiskPart to clear the read only attribute.
Here are the steps:
- Type Command Prompt in the Windows search bar, right-click it, and select Run as administrator.
- Type diskpart and press Enter.
- Type list disk and press Enter. Identify your SSD by its size and number.
- Type select disk # (replace # with your SSD’s number) and press Enter.
- Type attributes disk clear readonly and press Enter.
- Restart your computer and check if the drive is now writable.
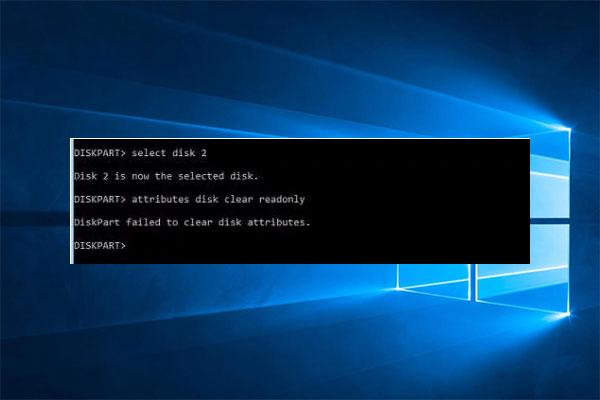
If DiskPart says: “Cannot clear read-only state” or “Media is write protected”, the SSD may have firmware issues, hardware failure, or a permanent controller lock.
Method 3. Check for File System Errors
A corrupted file system can cause the operating system to lock the drive in a read-only state to prevent further damage. This can be fixed with a file system check with two free tools on Windows.
Option 1. Use CHKDSK
CHKDSK (Check Disk) is a Windows utility that scans for and fixes file system errors. Here’s how to use it:
Step 1. Open Command Prompt as administrator again.
Step 2. In the Command Prompt window, type the “chkdsk D: /f /r” command (replace D: with your SSD’s drive letter. You can find the drive letter in File Explorer under “This PC”.
- The /f flag fixes detected errors.
- The /r flag locates bad sectors on the SSD and recovers readable data.
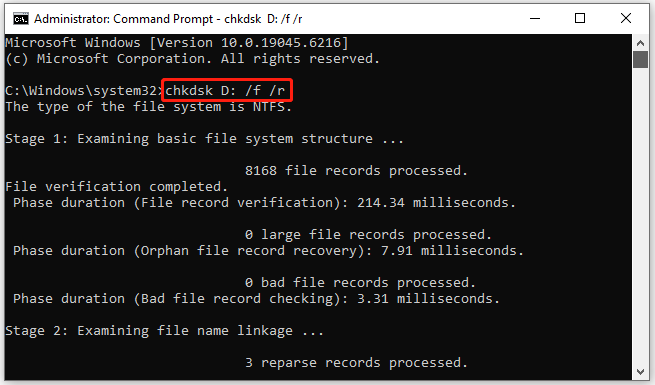
Step 3. If the SSD is in use (e.g., it’s your system drive), CHKDSK will ask if you want to schedule the scan for the next restart. Type Y and press Enter, then restart your PC.
Step 4. Wait for the scan to complete. Afterward, check if the SSD is no longer read-only.
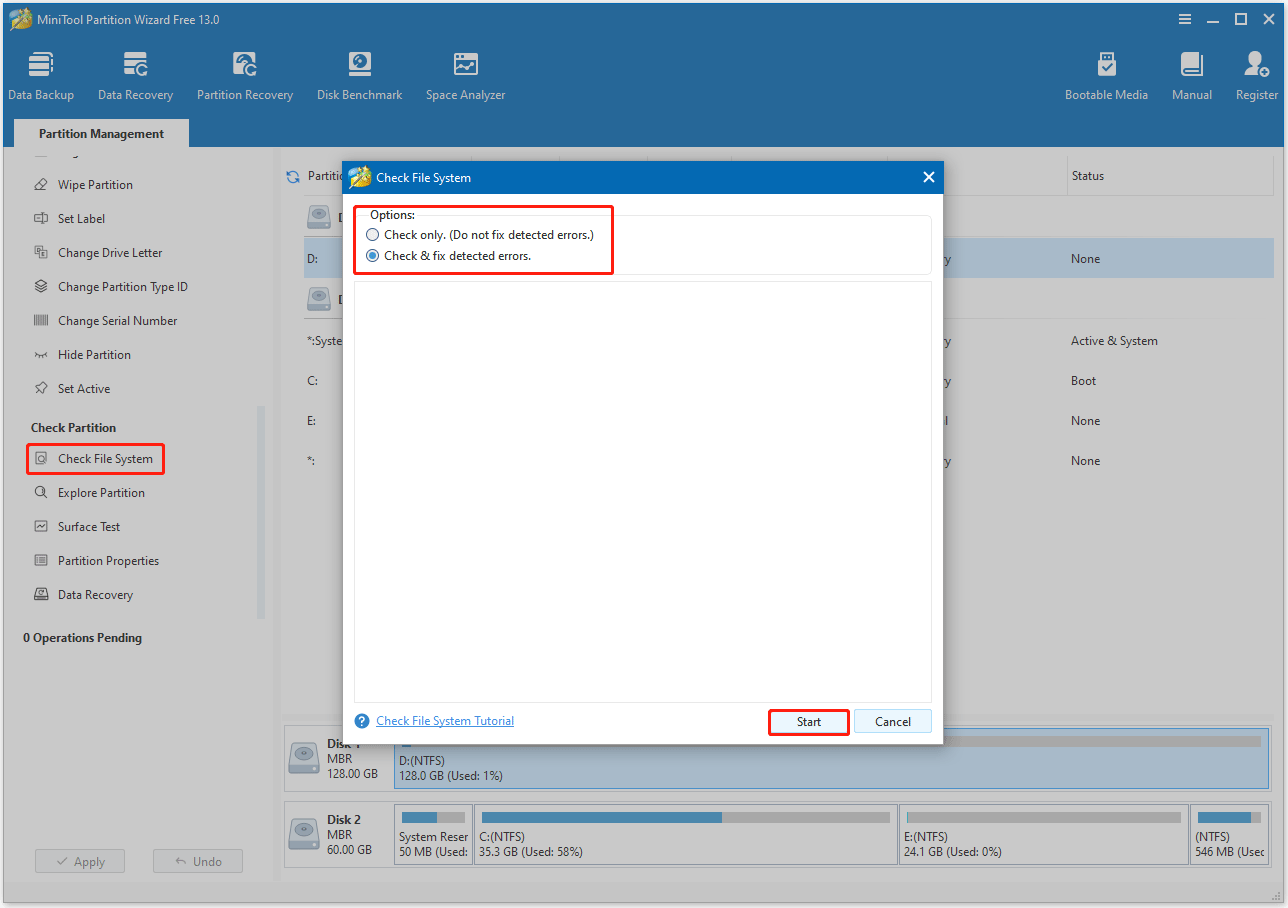
Option 2. Use MiniTool Partition Wizard
MiniTool Partition Wizard offers a Check File System feature to help you detect and fix file system errors on the SSD. The steps are as follows:
MiniTool Partition Wizard FreeClick to Download100%Clean & Safe
Step 1. Launch this free partition manager to enter its main interface.
Step 2. Highlight the SSD’s partition and select Check File System from the left action panel.
Step 3. A dialog box will appear with options for checking the file system. Choose Check & fix detected errors and click the Start button.
- Check only: This option will scan the file system for errors but will not attempt to fix them.
- Check & fix detected errors: This option will scan for errors and, if found, this tool will attempt to repair them.
In addition, you can check if there are bad sectors on the drive via its Surface Test feature.
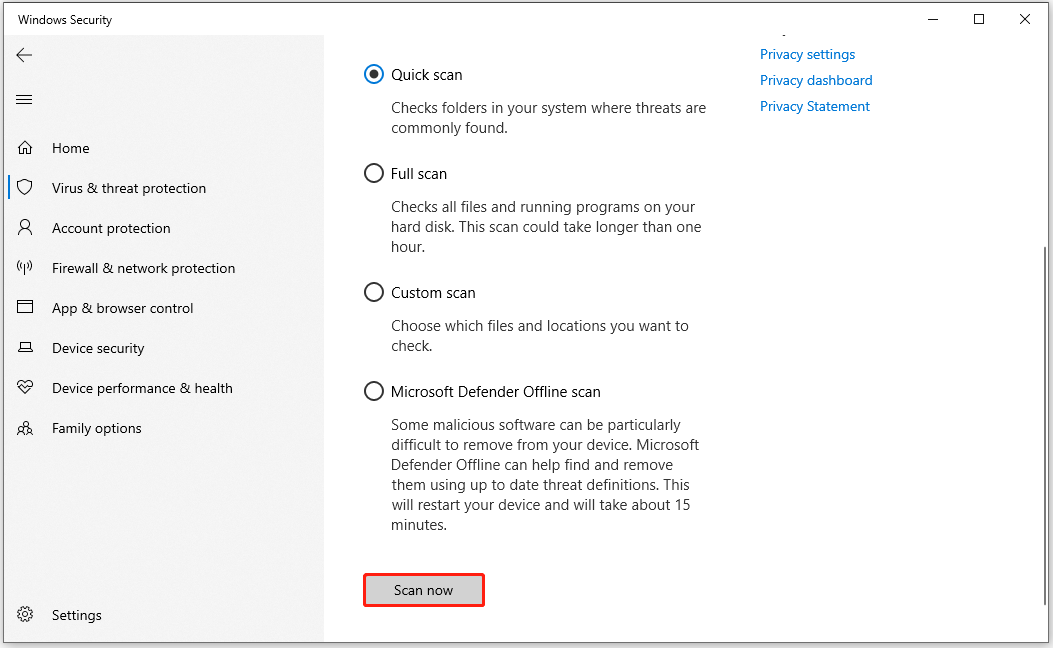
Method 4. Run a Malware Scan
You should run a virus scan since a virus or malware can intentionally put the drive into a read-only state. Either Windows Security or third-party antivirus software helps you scan the computer for malware.
Here, we show you the steps to run Windows Security.
Step 1. Press the Win + I key to open Settings.
Step 2. Go to Update & Security > Windows Security > Virus & threat protection.
Step 3. In the next window, click Scan options. Then pick a scan option and click the Scan now button.
Method 5. Edit the Windows Registry
Editing the Windows Registry key is another effective approach to remove SSD read only. You can follow the steps below to do that.
Step 1. Press the Win + R key to open the Run dialog box. Then type regedit in the box and click OK.
Step 2. Once the Registry Editor window opens, navigate to the following path:
HKEY_LOCAL_MACHINE\SYSTEM\CurrentControlSet\Control\StorageDevicePolicies
Step 3. If the StorageDevicePolicies key doesn’t exist, right-click Control and select New > Key and name it StorageDevicePolicies.
Step 4. In the right pane, double-click WriteProtect and change the Value data from 1 to 0. If it doesn’t exist, right-click the white space, select New > DWORD (32-bit) Value, and name it WriteProtect.
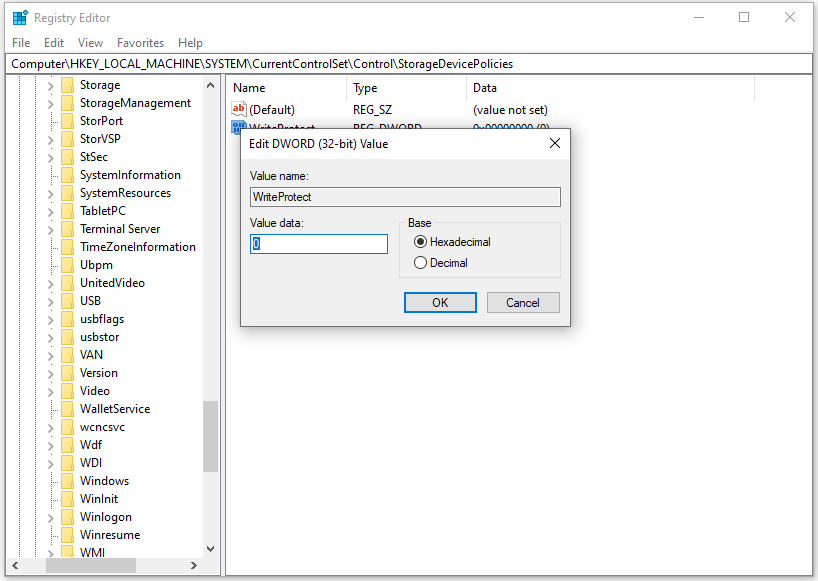
Once done, restart your computer and then check if the SSD is not read only.
Method 6. Update SSD Firmware
SSD firmware controls NAND management, error correction, wear leveling, and read/write operations. Firmware bugs can incorrectly lock SSDs in read-only mode.
Updating SSD firmware may fix:
- Write protection bugs
- Stability issues
- Compatibility problems
Method 7. Try Another USB Port or Adapter
A faulty USB cable, SATA adapter, or enclosure controller may incorrectly trigger write protection.
This is especially important for external SSDs, USB enclosures, and portable SSDs.
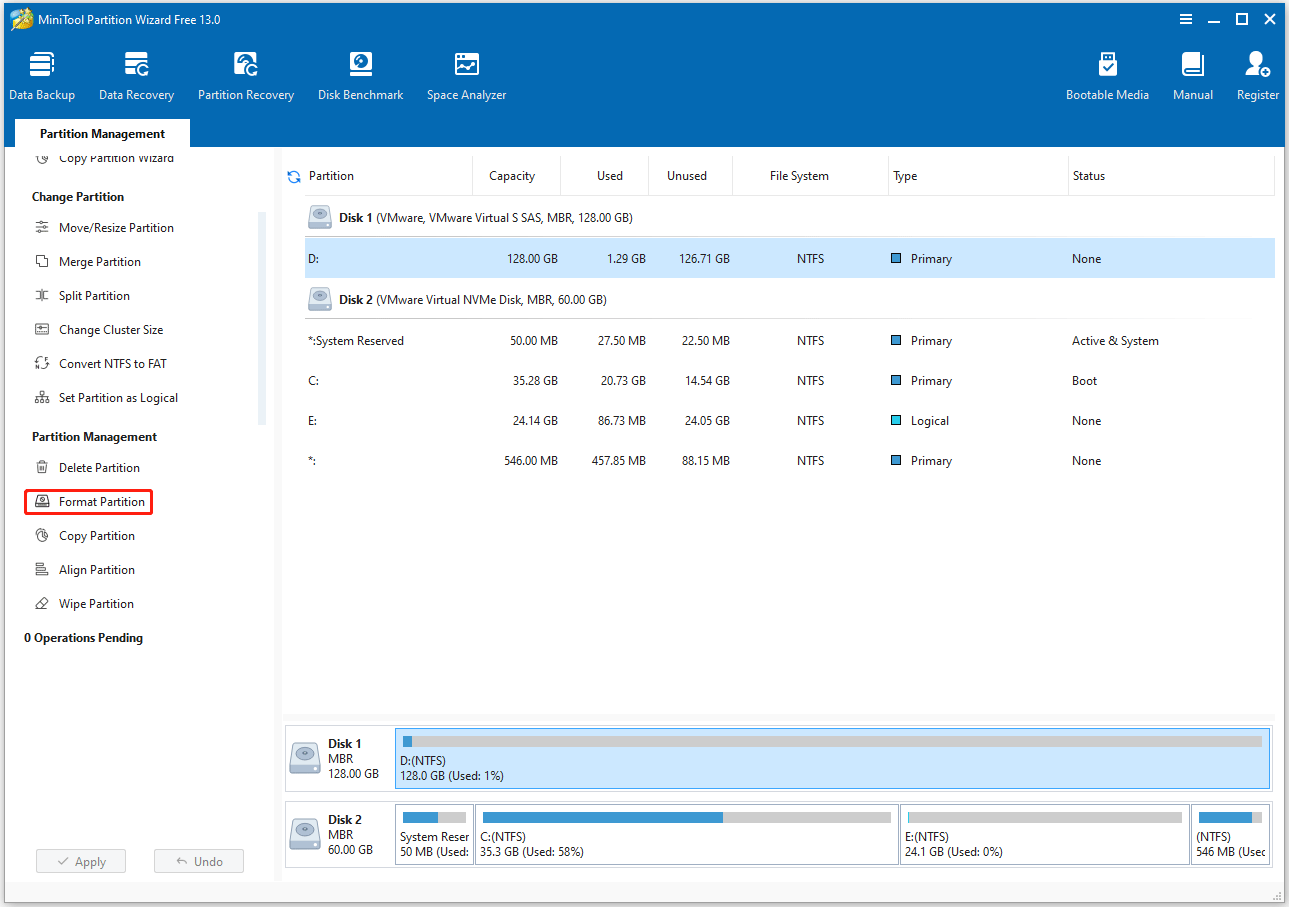
Method 8. Format the SSD
If all else fails to resolve the “SSD is read only” issue, you can try formatting the drive directly.
You can use Disk Management, Diskpart, and MiniTool Partition Wizard to perform the format. If you encounter issues like the format option grey out in Disk Management or Diskpart format stuck at 0, we recommend using MiniTool Partition Wizard to format your SSD.
This is free disk partitioning software that makes it easy to format your SSD. Furthermore, it overcomes the 32GB limit of FAT32, meaning you can format SSDs larger than 32GB in FAT32.
You can also use MiniTool Partition Wizard as a USB formatter, SD card formatter, FAT32 formatter, and more.
To format your SSD using MiniTool Partition Wizard, try the following steps.
MiniTool Partition Wizard FreeClick to Download100%Clean & Safe
Step 1. Choose the partition on the SSD.
- Run MiniTool Partition Wizard to enter its main interface.
- Choose the partition on the SSD.
- Select the Format Partition feature from the left action panel.
Step 2. Configure the formatting settings.
In the pop-up Format Partition window, you need to configure the settings:
- Partition Label: Give the drive a name.
- File System: Select a file system.
- Cluster Size: Leave the default setting.
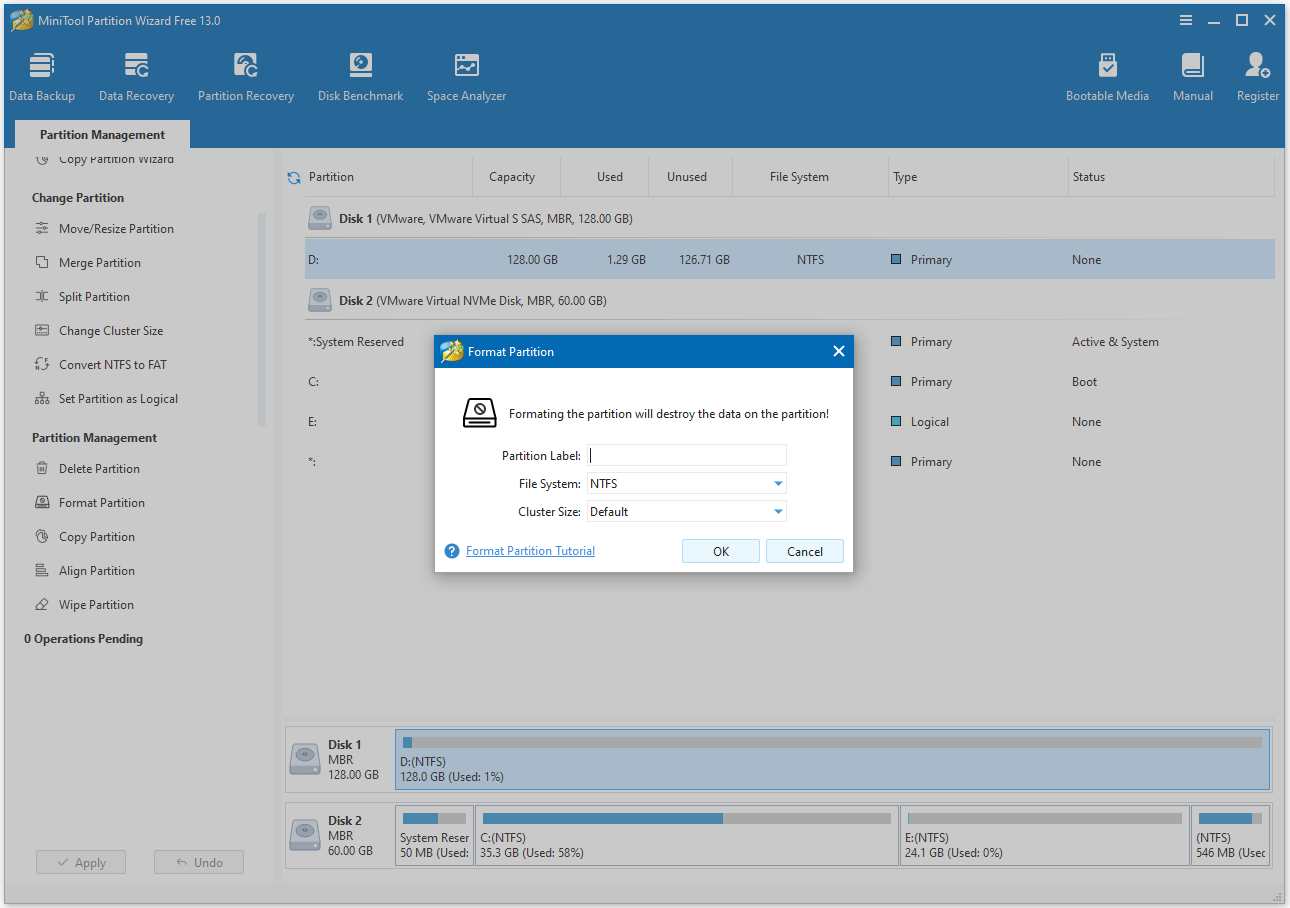
Step 3. Apply the changes and confirm.
- Click OK on the Format window.
- Then click Apply to start the formatting process.
- Click Yes to proceed when this tool prompts.
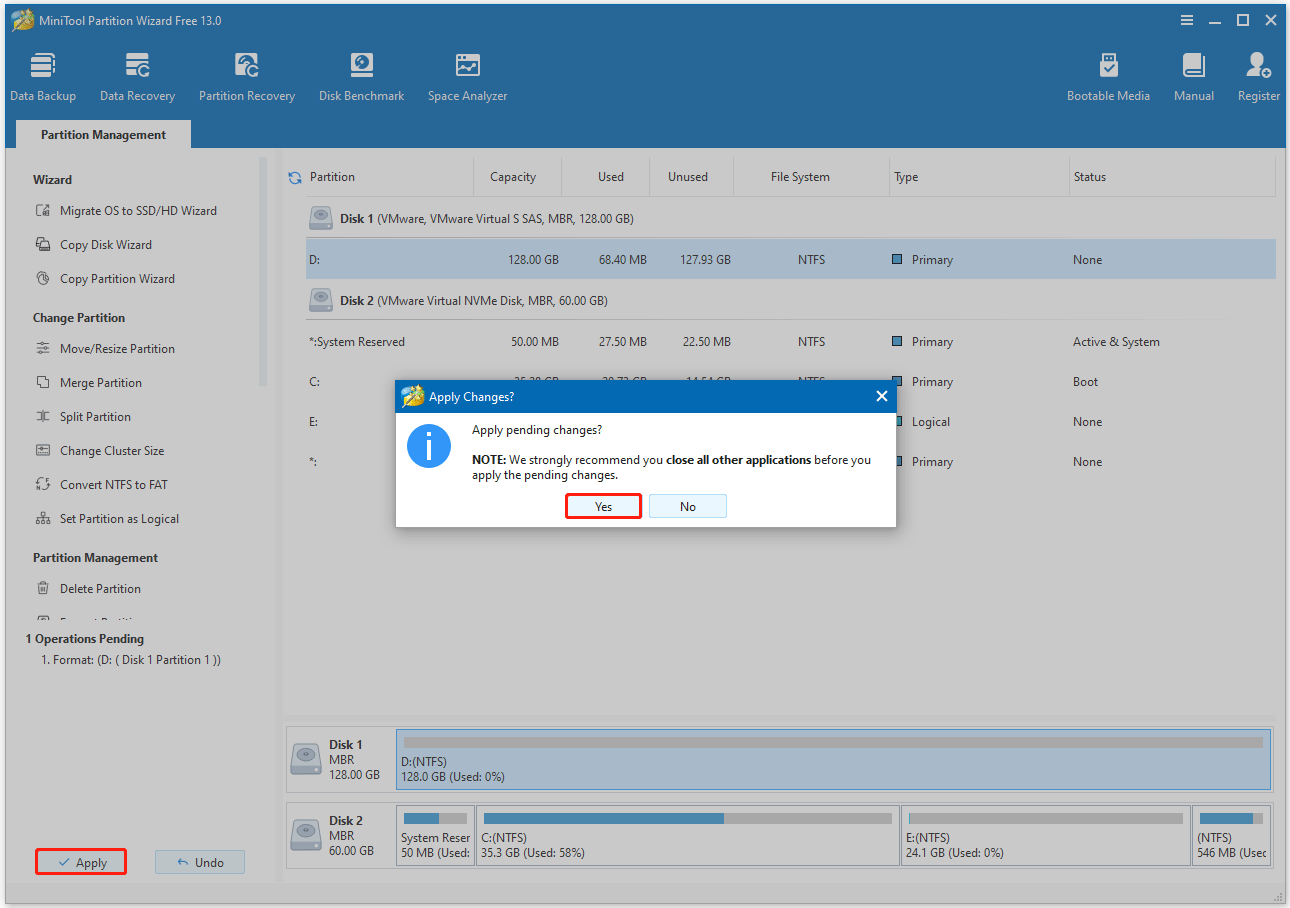
After formatting the drive, you can check if the SSD read-only issue disappears.
Why Is My SSD Read Only?
Several factors can contribute to this state. Knowing the causes of the issue can help you remove it. Here are the main causes:
#1. Manual write protection
The read-only state might have been manually set by you or a previous user. This can be done with software or by editing system settings.
#2. Approach end-of-life
Unlike HDDs, which gradually wear out, SSDs can fail suddenly. When an SSD’s controller detects that the drive can no longer reliably write data, it switches to read-only mode as a last-ditch effort to protect the integrity of the remaining data on the drive.
#3. Hardware damage
A power failure, power surge, or other hardware failure can cause bad blocks to form on an SSD, triggering the protective read-only state.
#4. File system errors
Sometimes, file system errors or corruption can cause the operating system to mount a drive as read-only. This isn’t a physical failure and is usually repairable.
#5. Viruses or malware infection
Malware can sometimes infect the drive and activate write protection.
Preventive Measures to Avoid SSD Read-Only Error
Once you resolve the issue, take these steps to prevent the SSD from entering read-only mode again:
#1. Regularly Back Up Data
The best way to mitigate data loss from read-only mode is to back up files regularly. You can use the following tools to do that.
- Windows Backup: It is a built-in Windows tool that can set up automatic backups to an external drive.
- Cloud storage: Services like Google Drive, Dropbox, or Microsoft 365 for important files.
- Disk backup: Tools like MiniTool ShadowMaker to create a full copy of the SSD. This allows you to restore the drive quickly if issues arise.
#2. Monitor SSD Health
Track your SSD’s health to detect issues before they lead to read-only mode. Use:
- Manufacturer tools: Samsung Magician, Crucial Storage Executive, etc. These tools display metrics like TBW (Total Bytes Written), remaining lifespan, and bad blocks.
- CrystalDiskInfo: A popular and free tool that provides a clear health status percentage and other details.
Replace the SSD when its health drops below 10% or when the manufacturer’s tool warns of end-of-life.
#3. Avoid Sudden Power Loss
Sudden power outages are a leading cause of file system corruption. To avoid this issue, you can try:
- Uninterruptible Power Supply (UPS): For desktops, this provides backup power during outages, allowing you to shut down Windows safely.
- Proper ejection: Always safely eject external SSDs via File Explorer (right-click > Eject) before unplugging them. This ensures all write operations are completed.
SSD Is Read Only FAQ
Step 1. Open Command Prompt as administrator.
Step 2. Type the following commands and press Enter after each one.
diskpart
list disk
select disk X
attributes disk set readonly
Step 1. Open Command Prompt as administrator.
Step 2. Type wmic diskdrive get status and press Enter.
Step 3. The status will be displayed. If it says “OK”, your SSD is working fine. A result of “Pred Fail” indicates a potential failure.
1. The SSD repeatedly enters a read-only state.
2. The system displays S.M.A.R.T. warnings.
3. The DiskPart tool is unable to clear the protection settings.
4. Formatting operations fail.
When an SSD's controller detects critical hardware or media errors (such as bad blocks wearing out or firmware failure), it triggers a failsafe to lock the drive, preventing data loss.
Bottom Line
An SSD read only mode on Windows is a warning sign. By following the troubleshooting steps in this guide, starting with simple checks of the physical switch and advanced solutions (edit registry or check SSD), you can use the drive normally. However, it’s better to prioritize data recovery first.
Read-only mode is designed to protect your data, so never ignore it. With regular backups, health monitoring, and proper care, you can extend your SSD’s lifespan and avoid future read-only issues.
If you have any questions or suggestions on how to use MiniTool Partition Wizard, please do not hesitate to contact us via [email protected].
About The Author

Position: Columnist
Vega enjoys helping people with computer problems, including disk management, data recovery, data backup, and more. She is constantly expanding her knowledge in related fields. And she will continue to bring more easy-to-understand professional articles to help people solve various problems on the PC.
User Comments :