This article covers how to check hard drive health using WMIC, CHKDSK, PowerShell, and MiniTool Partition Wizard. It also includes key indicators of disk health, recommended actions after checking the health, and tips for maintaining disk longevity.
“Hey friends, can anyone tell me how to check my hard drive health? What do you use to monitor your drives and know when they need replacing? Is it even possible to check a drive’s health? Any suggestions are appreciated.”quora.com
In data storage forums, discussions about hard disk health checks often arise. Many users mistakenly believe that health checks are required only after disk errors occur.
However, hard drives are precise mechanical devices used to store critical data, including operating systems, applications, and personal files. Hard disk failures can lead to significant risks, such as data loss and system instability.
In many cases, warning signs appear before serious damage occurs. However, some of these signals may not be immediately visible to you.
Regular health checks help identify these underlying warning signals, ensuring data security and maintaining system stability.
In the next section, we will explain in detail why monitoring disk health is significant.
Why Checking Hard Disk Health Is Important
Regular hard drive health checks help prevent data loss, improve PC performance, and reduce repair costs.
Prevent Data Loss or Corruption
Data security should always be the top priority. Disk failures may lead to the corruption or permanent loss of important files, including work documents, study materials, and entertainment files.
Disk health issues are sometimes difficult to detect. For example, a disk may function normally without obvious errors or accessibility issues. However, files on the drive may still unexpectedly disappear or become hidden.
Performing regular health checks helps identify potential issues early, thereby preventing data loss or file corruption.
Maintain Disk Performance
Bad sectors or file system corruption can significantly slow down the read and write speeds of the disk. Health checks can help identify and isolate bad sectors, preventing the system from writing to faulty areas continuously. This helps improve hard disk performance.
Repair Disks or Recover Data Cost-Effectively
Most minor disk errors can be easily fixed using Windows built-in repair tools or free third-party disk repair programs.
However, without regular disk health checks, minor issues may develop into more serious problems that standard repair software cannot fix.
Sending a hard drive to a professional repair service can be expensive, sometimes costing several times the price of a new drive. It may also expose your personal data to potential leakage risks.
If you need to recover data from the corrupted disk, the cost can typically reach several hundred dollars, depending on the recovery technology used.
Maintain System Stability
If the system disk has health problems, such as bad sectors or reduced read/write speed, it can cause frequent system crashes, restarts, or freezes.
In severe cases, a damaged system disk can prevent the computer from booting. This usually requires a complete Windows reinstallation on a new disk, which is time-consuming and complicated.
For example, the following errors are usually caused by failures on the system disk:
- No bootable devices found.
- Disk boot failure, insert system disk and press Enter.
- Operating system not found.
Early detection of hard drive errors helps prevent these problems from affecting system performance and normal operation.
Extend the Disk Lifespan
Running disk health checks using tools such as CHKDSK can help repair existing errors and reduce further damage caused by repeated write operations. This extends the lifespan of the disk and reduces the need for frequent device replacements.
In addition, it can help reduce costs and operational effort, especially for non-technical users. Furthermore, extending disk lifespan helps decrease electronic waste, thereby protecting the environment.
In conclusion, checking your disk’s health status is vital for ensuring data security, system stability, and environmental sustainability.
In the next section, we will outline the main indicators used to evaluate disk health.
Key Indicators of Disk Health
Indicators used to assess disk health typically include internal disk data and visible symptoms.
S.M.A.R.T. Status
S.M.A.R.T., short for Self-Monitoring, Analysis and Reporting Technology, is a monitoring system built into HDDs and SSDs.
It is a widely used standard for assessing disk health. Many disk monitoring tools can read both the overall S.M.A.R.T. status and detailed attribute values.
Abnormal S.M.A.R.T. values may indicate potential problems before actual disk failure occurs.
Disk Performance
Disk performance is also an important indicator of hard disk health.
A disk benchmark is a common method used to measure the drive performance, including sequential and random read and write speeds.
A healthy disk should reach the manufacturer’s specified speed, or at least remain within the expected range.
If the measured speeds are significantly lower than expected, the disk may have underlying issues.
Physical Condition
The physical condition is an observable indicator of disk health. It does not rely on technical data such as S.M.A.R.T. values, which require disk monitoring tools for evaluation.
Common physical signs include unusual noises, visible damage, or frequent disconnections. Physical damage may indicate a high risk of failure, even if S.M.A.R.T. values appear normal.
Overall, disk health indicators include both numerical data and visible symptoms.
In the next section, we will describe the common signals that indicate a failing disk.
Signs Your Hard Drive May Be Failing
Main symptoms of a deteriorating hard disk include abnormal behavior of the drive itself, files contained, and the operating system. Here are the common ones.
- Slow performance. The storage device may perform slowly, including slow file access, boot times, and program loading.
- Frequent disk errors. The disk may frequently report errors related to the file system or bad sectors, which may prevent you from accessing the files.
- Corrupted or missing data. Files on the drive become unreadable or even disappear. The system may report errors when you try to open or copy the files contained.
- S.M.A.R.T. errors. Disk monitoring tools may report an unhealthy status or warning values. This is a direct sign that the disk may be failing.
- Strange noises. The hard drive may produce unusual noises, such as clicking or buzzing sounds.
- System crashes or freezing. The computer randomly restarts or freezes. This may indicate disk failure, especially if the system reports errors related to the drive, such as “SMART Failure Predicted on Hard Disk”.
Now, the importance of regular disk health checks and common scenarios where your drive is malfunctioning have been explained in detail. Next, we will describe how to check your hard drive health.
How to Check Hard Drive Health on Windows 11/10
The health conditions of a disk can be divided into two types: physical health and logical health. In this section, we will describe the differences between them and how to check each of them separately.
“Physical Health” VS “Logical Health”
Physical health and logical health are not standardized terms in disk health checks. They are not entirely opposites, but they differ in terms of their behavior and the methods used to examine them in practice.
Physical health typically focuses on the hardware condition of the disk, including the physical appearance, S.M.A.R.T. status, and unusual noises.
On the other hand, logical health usually concentrates on the integrity of the file system and “soft” bad sectors.
Physical issues usually cause the drive to fail to function or even become completely unrecognizable by the system.
Logical issues typically result in unreadable files or even data loss. The disk may still be recognized, but it may not be accessible.
The physical health check mainly focuses on the S.M.A.R.T. status and its details, while the logical health check examines the file system and bad sectors.
Continue reading to learn more about the corresponding checking methods for each health type.
Method 1. Check File System Corruption
File system corruption is an aspect of a drive’s logical health. A corrupted file system may lead to read/write errors, inaccessible files, or low performance.
Windows provides several methods to detect and repair such issues, including CHKDSK and the error-checking tool.
Additionally, third-party utilities like MiniTool Partition Wizard offer advanced features for scanning file system errors and read/write issues.
Option 1. Employ MiniTool Partition Wizard
MiniTool Partition Wizard is a free disk management tool that provides a wide range of disk-related features.
Its Surface Test feature scans each sector of the disk to detect bad sectors, and the Check File System feature helps identify and repair file system errors. Both features are available for free.
It has a graphical interface where each feature is clearly displayed, allowing even non-technical users to easily monitor disk health.
Download and install MiniTool Partition Wizard to monitor disk health.
MiniTool Partition Wizard FreeClick to Download100%Clean & Safe
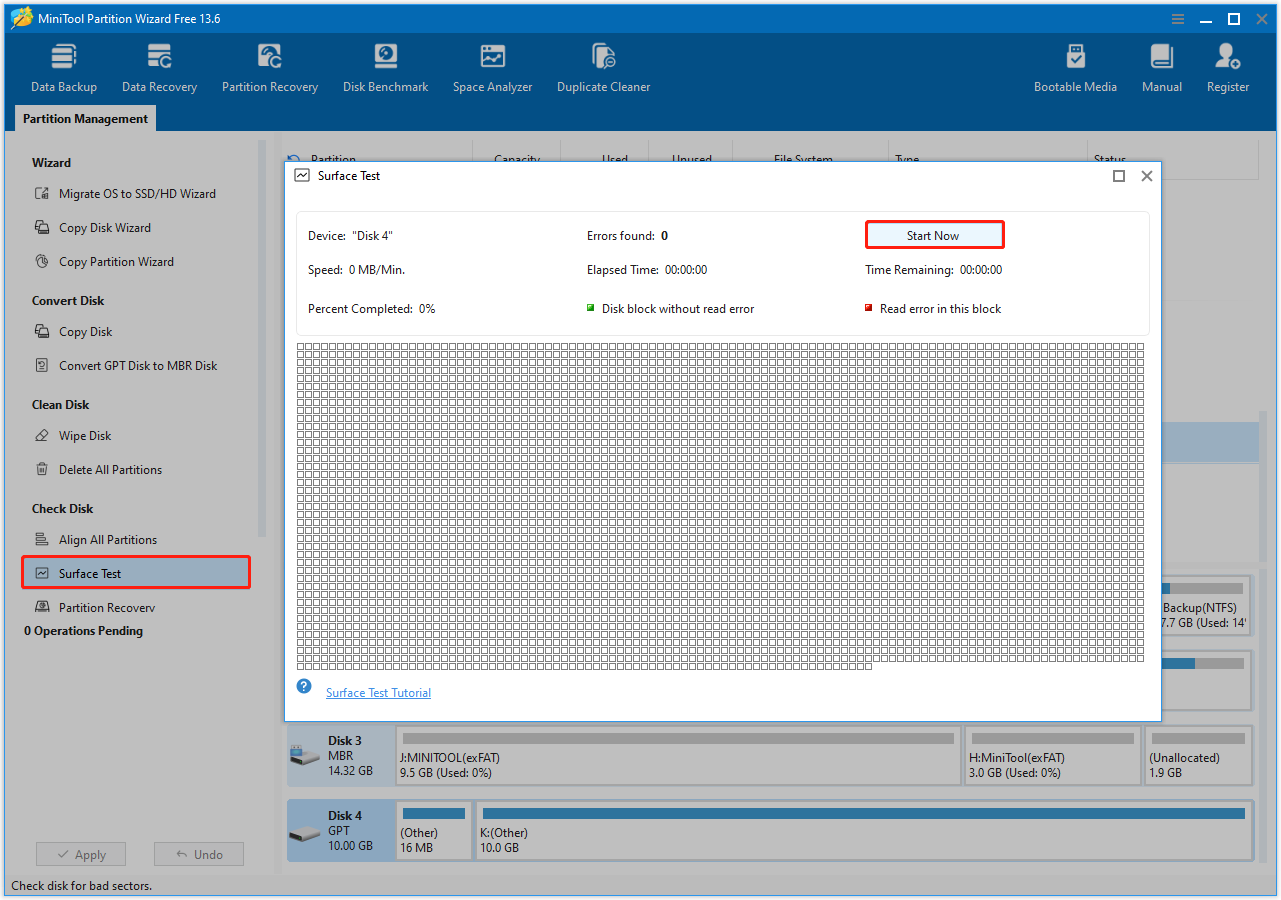
Surface Test:
Step 1. Launch this free partition magic to enter its main interface. Select the target disk and choose Surface Test from the left sidebar.
Step 2. In the new window, click Start Now to scan disk blocks for read and write errors.
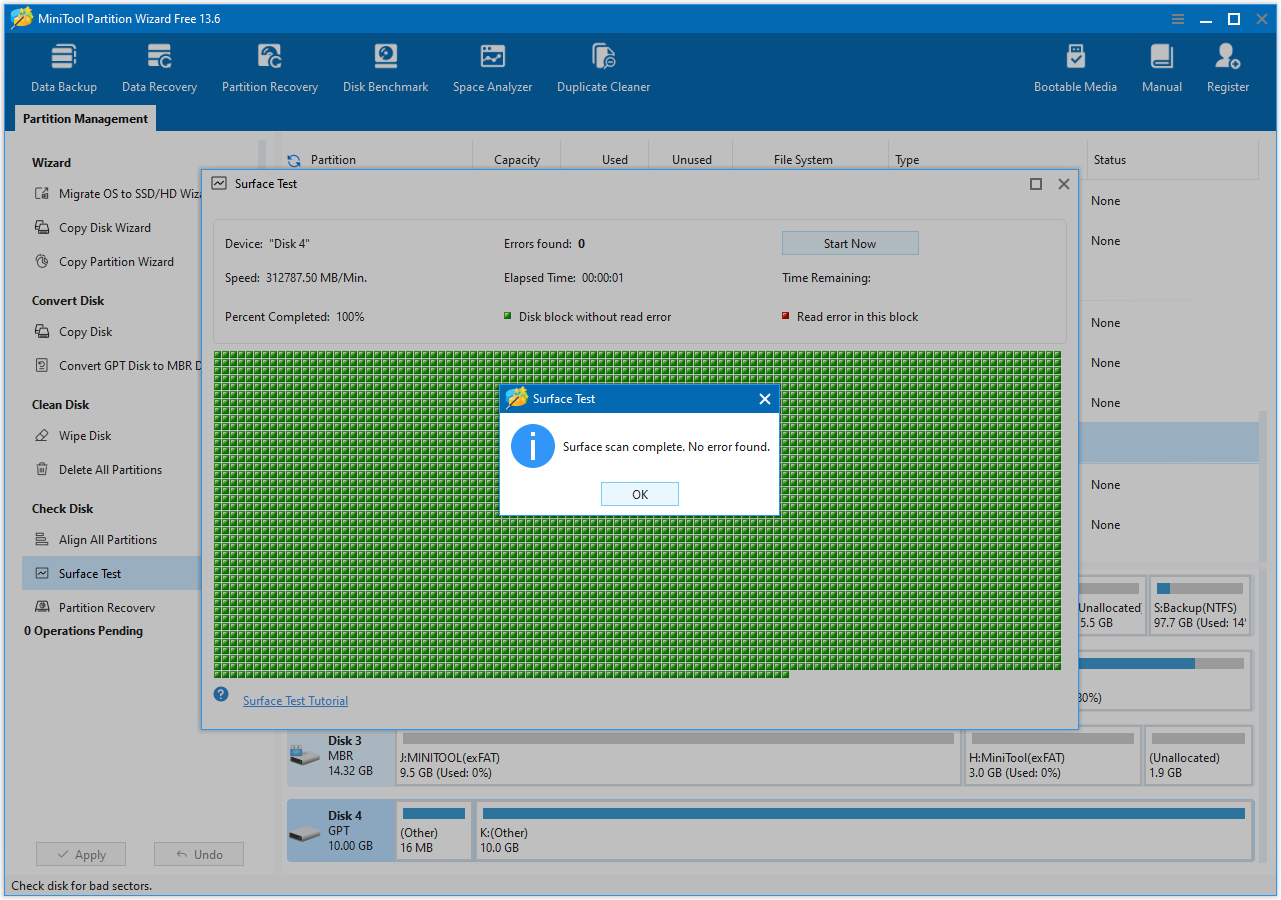
Step 3. After the scan is complete, the Surface Test results will be displayed. Bad sectors are marked in red, while healthy sectors are marked in green.
If errors are detected, use a professional disk repair tool such as DiskGenius to isolate the affected sectors.
Check File System:
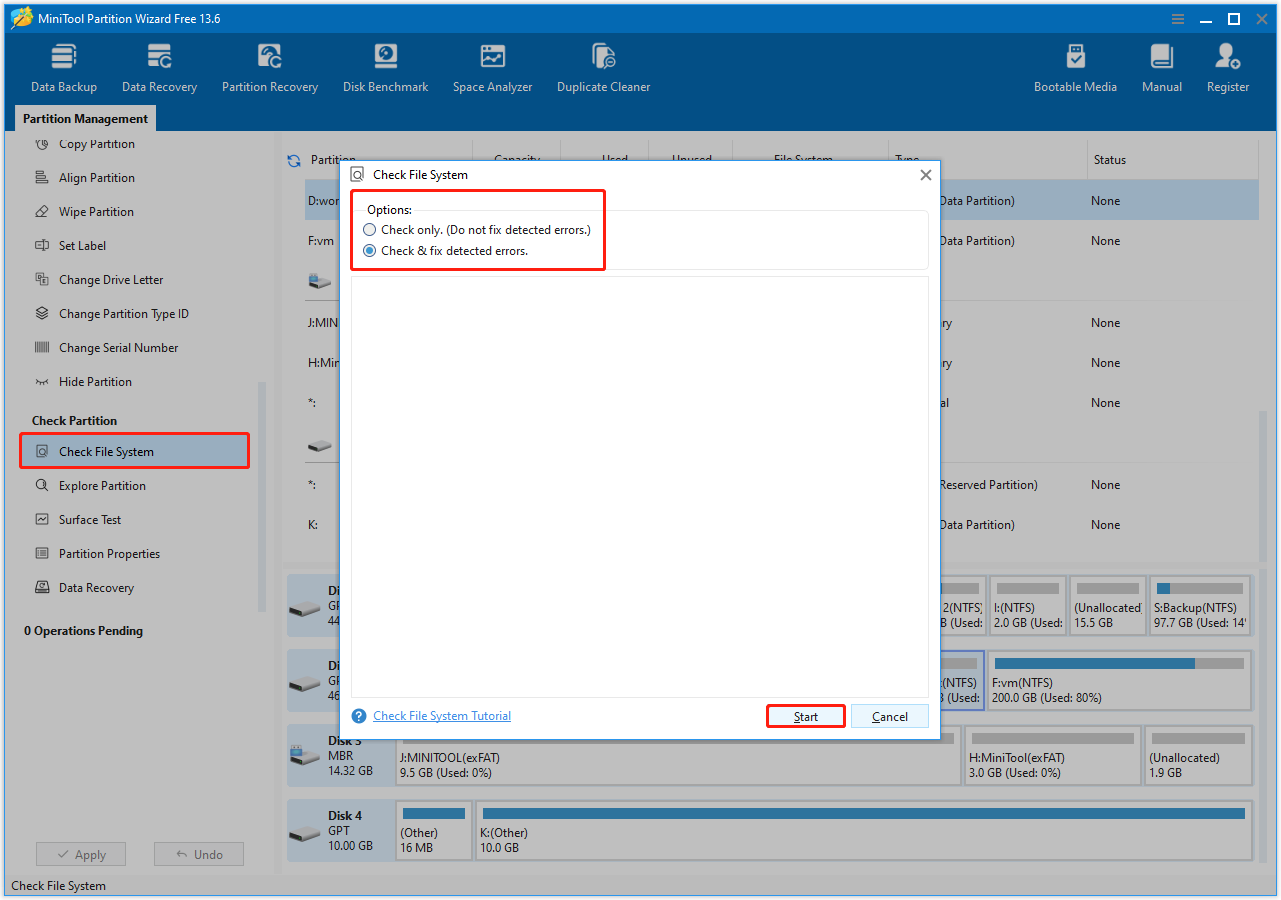
Step 1. On the main interface of this partition manager, select the disk partition and click Check File System.
Step 2. Select an option from Check only or Check & fix detected errors, and then click Start.
Option 2. Run CHKDSK
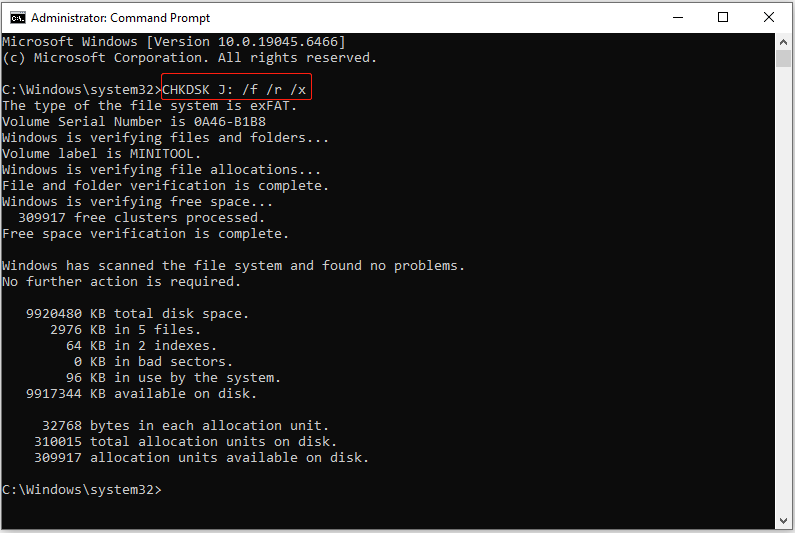
CHKDSK is a utility designed to examine the file system metadata of a disk partition for both logical and physical errors. It can be used with various parameters, such as /f, /r, or /x, to not only detect errors but also repair them.
Step 1. Run Command Prompt as an administrator.
Step 2. Type CHKDSK J: /f /r /x and press Enter.
- J: Represents the drive letter of the target drive. Replace it with the actual letter of the drive you want to check for errors.
- /f: Fixes errors found on the disk.
- /r: Identifies bad sectors on the disk and attempts to recover any readable data. It includes the functionality of /f.
- /x: Forces the specified partition to dismount if necessary, as CHKDSK must lock the drive to perform its checks. This parameter also includes the functionality of /f.
Option 3. Use Error-Checking
The error-checking tool is actually a graphical interface for the CHKDSK utility. It is less flexible than CHKDSK, as it does not provide options such as forcibly dismounting the drive, but it is easier to use.
Step 1. In File Explorer, right-click the drive and choose Properties.
Step 2. Go to the Tools tab and click Check in the Error checking section.
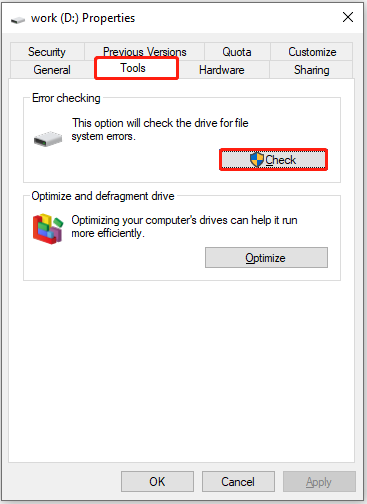
Step 3. Click Scan drive to check for errors. If any errors are found, click Repair drive to fix them.
Method 2. Check S.M.A.R.T. Status
The S.M.A.R.T. status reflects the physical health and performance of a drive.
Several Windows built-in tools, such as Command Prompt and PowerShell, allow you to verify disk condition. Additionally, third-party tools like CrystalDiskInfo are commonly used to access detailed S.M.A.R.T. information.
Option 1. Use the WMIC command
Follow the steps below to check hard disk health with Command Prompt.
Step 1. Type cmd in the Windows search box. When the Command Prompt option appears, right-click it and choose Run as administrator.
Step 2. In the User Account Control window, select Yes to continue.
Step 3. Type wmic diskdrive get model,status and press Enter.
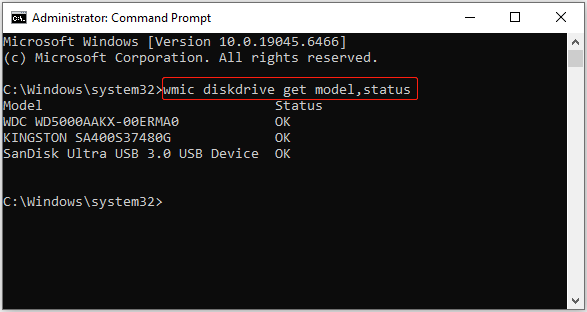
The disk model and health status will be displayed in the execution outcome window.
- If the status shows OK, the drive is healthy.
- If it returns Bad, Caution, Pred Fail, or a similar status, the drive is likely to fail.
- If the status is Unknown or similar, the drive cannot report its health status.
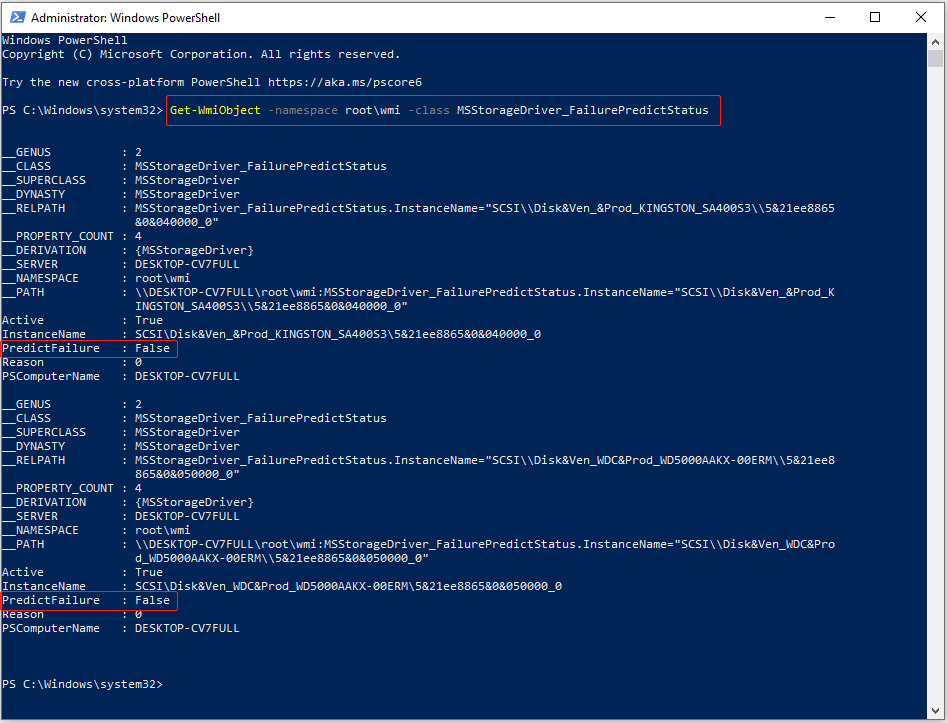
Option 2. Run Windows PowerShell
PowerShell can help check disk status using WMI and S.M.A.R.T. information and provide a prediction of whether the disk may fail in the future.
Step 1. Right-click the Start button and choose Windows PowerShell (Admin).
Step 2. Type the following command and press Enter:
Get-WmiObject -namespace root\wmi –class MSStorageDriver_FailurePredictStatus
- If the PredictFailure value is False, the disk is currently considered healthy, and no failure is predicted.
- If it is True, the drive is predicted to fail in the near future.
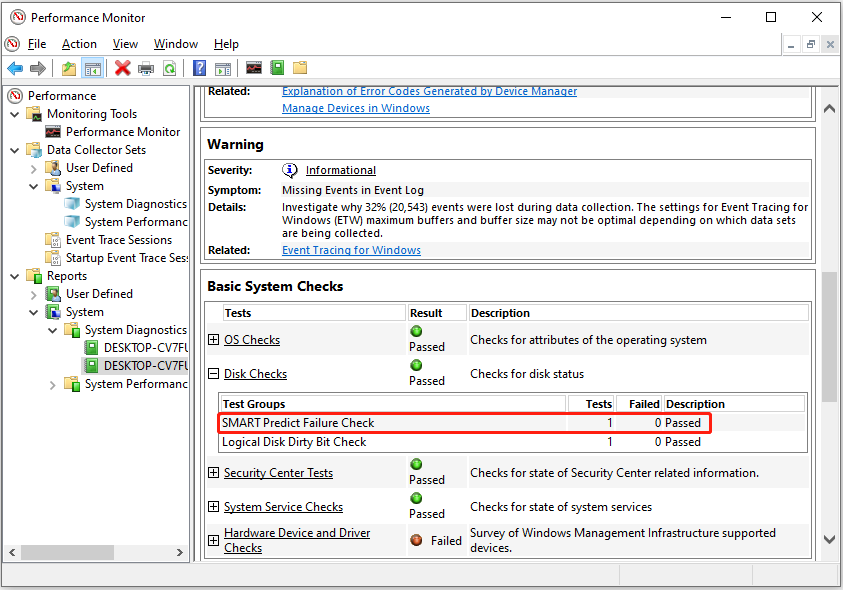
Option 3. Utilize Performance Monitor
Performance Monitor is a graphical alternative to PowerShell that can also identify warning signs before actual damage occurs on your disk.
Step 1. Search for Performance Monitor in Windows search and open it.
Step 2. Expand Data Collector Sets > System.
Step 3. Right-click System Diagnostics and select Start.
Step 4. Expand Reports > System > System Diagnostic.
Step 5. In the Warnings section, expand Disk Checks.
Verify the SMART Predict Failure Check status. If the Failed value is 0 and the Description shows Passed, the hard drive is functioning normally. Any other values indicate that the disk may be at risk of failure.
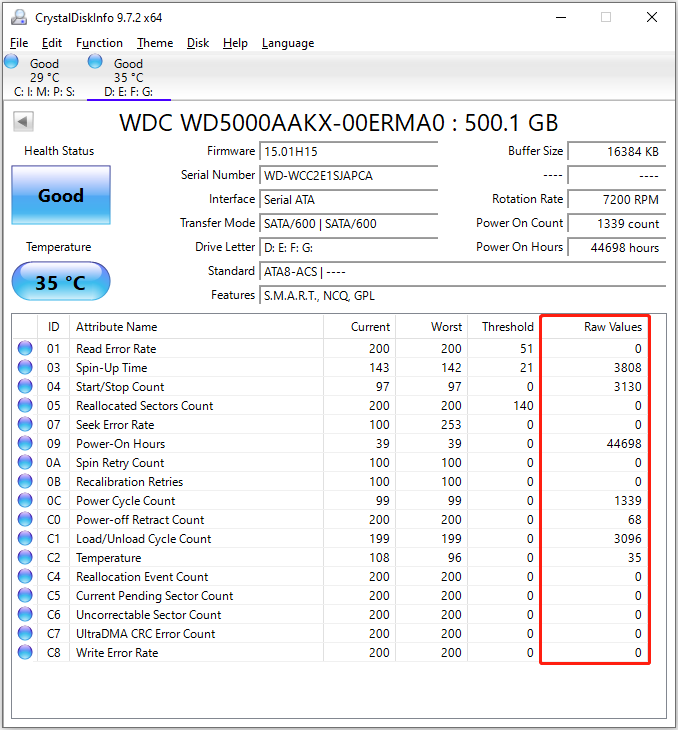
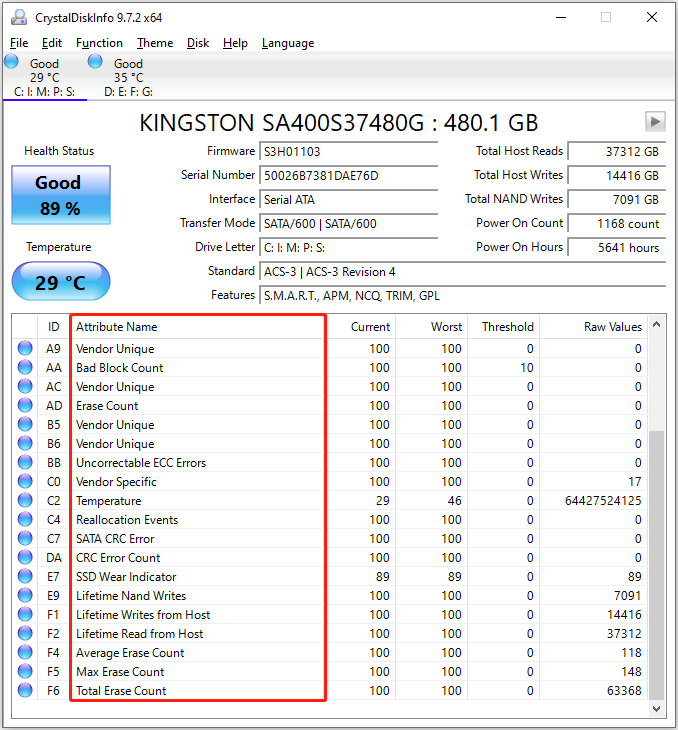
Option 4. Use CrystalDiskInfo
CrystalDiskInfo is a free disk health monitoring tool that uses S.M.A.R.T. data to detect potential drive failures.
Compared to the command tools and Performance Monitor, it offers a more intuitive interface and provides key S.M.A.R.T. values, rather than just the status.
Step 1. Open the Microsoft Store to download and install CrystalDiskInfo.
Step 2. Run CrystalDiskInfo. The physical disks connected to your computer are displayed on the main interface of the tool.
The Health Status indicator usually shows three statuses:
- Good (blue or green) indicates that the disk is functioning normally.
- Caution (yellow) means the drive is degrading, often due to increased Reallocated Sectors Count or other abnormal S.M.A.R.T. values.
- Bad (red) suggests the drive is likely failing and requires immediate data backup and device replacement.
In addition to the overall health status, CrystalDiskInfo lists detailed attribute names and their corresponding raw values. Next, we will describe how to interpret these attributes.
How to Interpret S.M.A.R.T. Results
The key values of S.M.A.R.T. include Reallocated Sectors Count, Read Error Rate, Power-On Hours, Uncorrectable Sector Count, and more. Here are the explanations.
| Attribute name | Description | Expected |
| Reallocated Sectors Count | Number of bad sectors that have been remapped to spare sectors. | 0 (an increase indicates potential disk issues) |
| Read Error Rate | Frequency of hardware read errors when reading data from the disk surface. This value varies by vendor. | Low |
| Spin Retry Count | Number of retries needed for the drive to spin up to normal speed after a failed attempt. | 0 (an increase indicates potential mechanical issues) |
| Power-On Hours | Total number of hours the hard drive has been powered on. | No standard limit |
| End-to-End Error | Count of parity errors in data transferred through the disk’s cache RAM. | 0 |
| Reported Uncorrectable Errors | Number of errors that cannot be recovered using hardware ECC. | 0 |
| Command Timeout | Number of operations that were aborted due to disk timeout. | 0 (an increase may indicate connection or power problems) |
| Reallocation Event Count | Total number of sector reallocation attempts (including both successful and failed attempts). | Low |
| Uncorrectable Sector Count | Total number of uncorrectable errors during sector read/write operations. | Low |
This is a summary table comparing the disk health check tools mentioned above.
| Tools | Type | Scan scope | Outcome | Repair capability | Ease-of-use | Recommended use cases |
| WMIC | Command | SMART values | Status only | No | Medium | Check health status only |
| PowerShell | Command | SMART values | Status only | No | Medium | Check health status only |
| Performance Monitor | Graphical | SMART values | Status only | No | Low | Monitor whether the drive is likely to fail |
| CHKDSK | Command | File system errors and bad sectors | Simple report | Yes | Medium | When disk errors or file access issues occur |
| Error-Checking | Graphical | File system errors | Simple report | Yes | High | Regular health checks |
| MiniTool Partition Wizard | Graphical | File system errors and bad sectors | Simple report | Yes | High | When disk errors occur or for regular surface testing |

What to Do if Your Hard Drive Health Is Bad
After the health check, the drive may either function properly or show errors. If issues are found, you should repair or replace the disk depending on the failure severity.
This section outlines the appropriate actions to take when disk failures are detected to ensure data security and extend the disk’s lifespan.
Action 1. Back Up Your Data Immediately
Prevention is better than cure. As long as the drive remains accessible, you should back up important data immediately.
Regardless of the hard disk health check software used, unfavorable SMART results or file system issues may lead to drive failure and data inaccessibility.
In addition, research by Google (https://static.googleusercontent.com/media/research.google.com/en//archive/disk_failures.pdf) suggests that relying solely on SMART parameters is not sufficient to accurately predict individual drive failures.
This statement means that even when SMART values appear normal, your disk may still fail unexpectedly.
Therefore, it is strongly recommended to back up data to the cloud or another storage device, regardless of whether the drive shows signs of failure.
For automated data backups on a regular basis, consider using MiniTool ShadowMaker, which offers a 30-day free trial.
MiniTool ShadowMaker TrialClick to Download100%Clean & Safe
Action 2. Repair the Hard Disk
Once your data is secured, you can take action to make the drive usable again.
Some health check tools, such as CHKDSK and MiniTool Partition Wizard, can fix errors automatically during the checking process. However, tools like WMIC only display the disk status and do not fix any issues.
To repair logical errors, run CHKDSK with the /f and /r parameters to fix file system errors and block bad sectors.
If the inaccessible disk contains important files, it is not recommended to format or clean it, as this results in data loss. Refer to Action 3 to recover files first, and then proceed to repair or replace the drive.
If the disk has physical damage, you need to contact a professional repair service.
Action 3. Recover Files and Replace the Disk (if Necessary)
For an inaccessible drive, there is still a chance to recover data using the Data Recovery feature in MiniTool Partition Wizard.
It supports scanning disks with logical errors and can locate files that have not been overwritten, allowing you to save them to another disk.
Supported file types include documents, photos, videos, emails, audio files, and more. Supported storage devices include HDDs, SSDs, and other types of storage media.
Follow the steps below to recover your files by using MiniTool Partition Wizard:
Step 1. Scan the drive.
On the main interface of MiniTool Partition Wizard, click Data Recovery.
Under Logical Drives, select the problematic partition and click Scan to scan for lost, deleted, and existing files. Alternatively, you can switch to the Devices module to scan an entire disk.
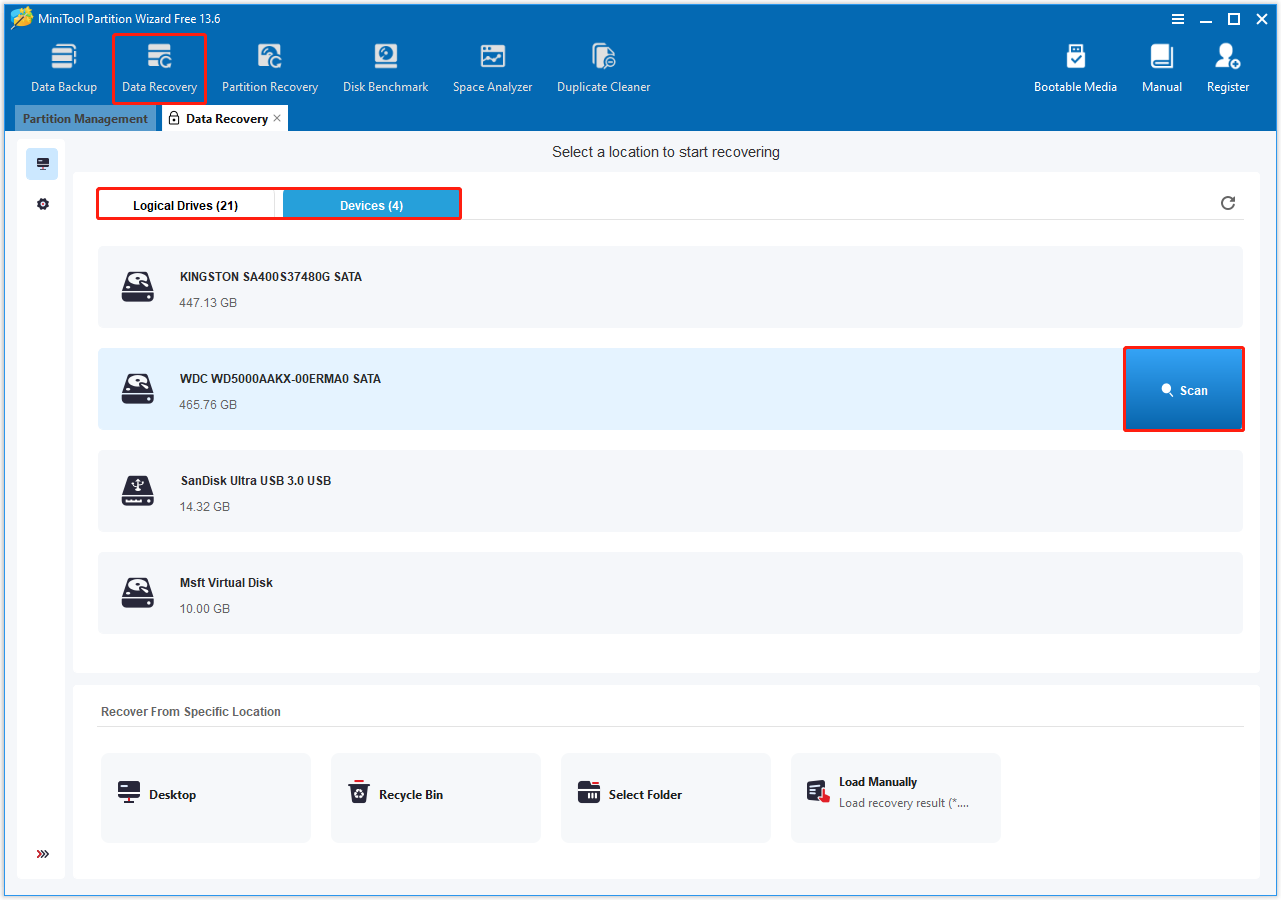
Once the scan starts, wait until it is complete to get optimal scan results.
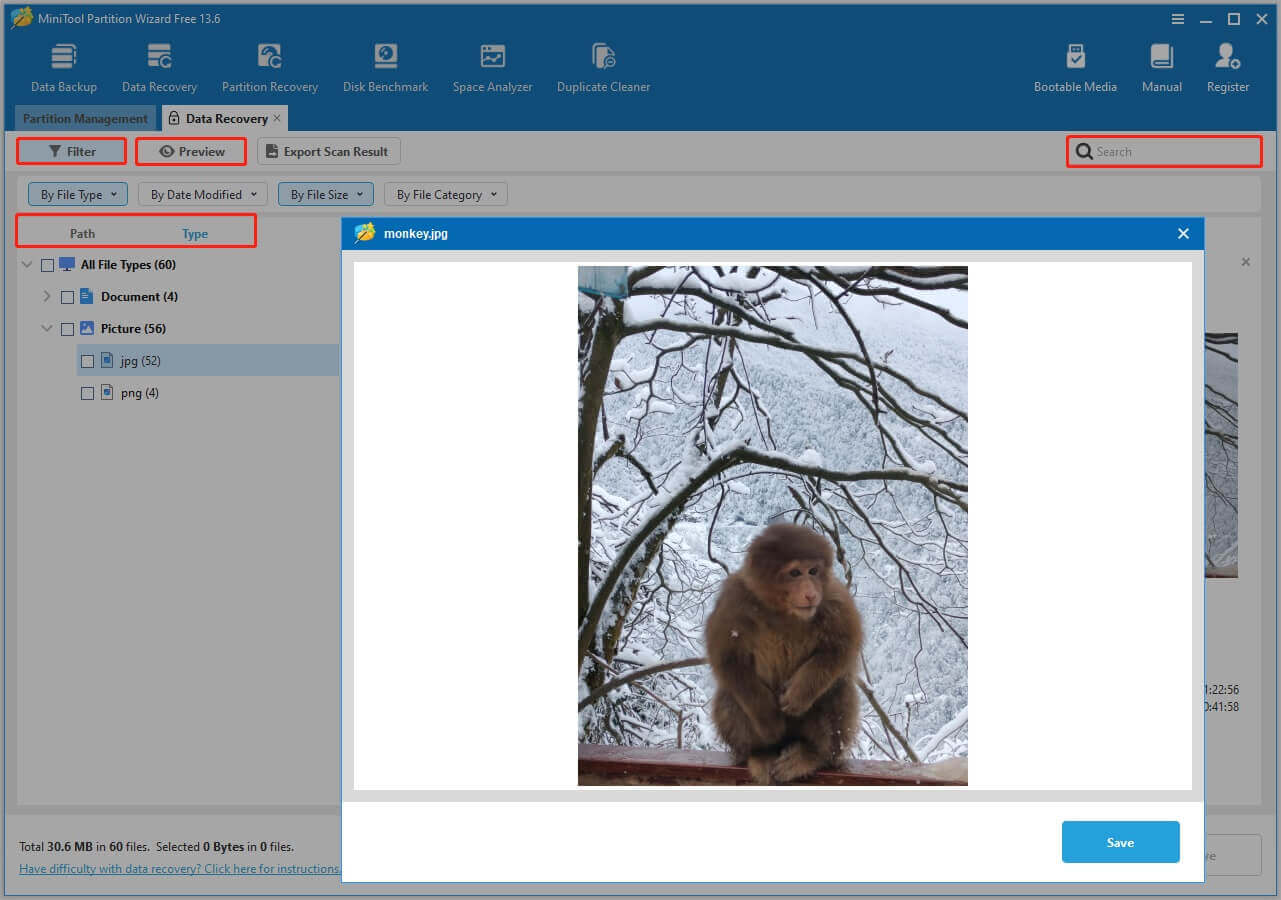
Step 2. Find and preview found files.
On the scan results page, there are two file view options:
- Path: Lists files according to their original folder structure, making it suitable for recovering entire folders along with their files.
- Type: Organizes items by file type, making it suitable for recovering specific types of files.
In addition, you can use the following two features to find the target files faster:
- Filter: Filters files by type, date modified, size, and category.
- Search: Searches for a certain file by a partial or full file name.
Once you find a file you want to recover, select it and click the Preview button to verify its content.
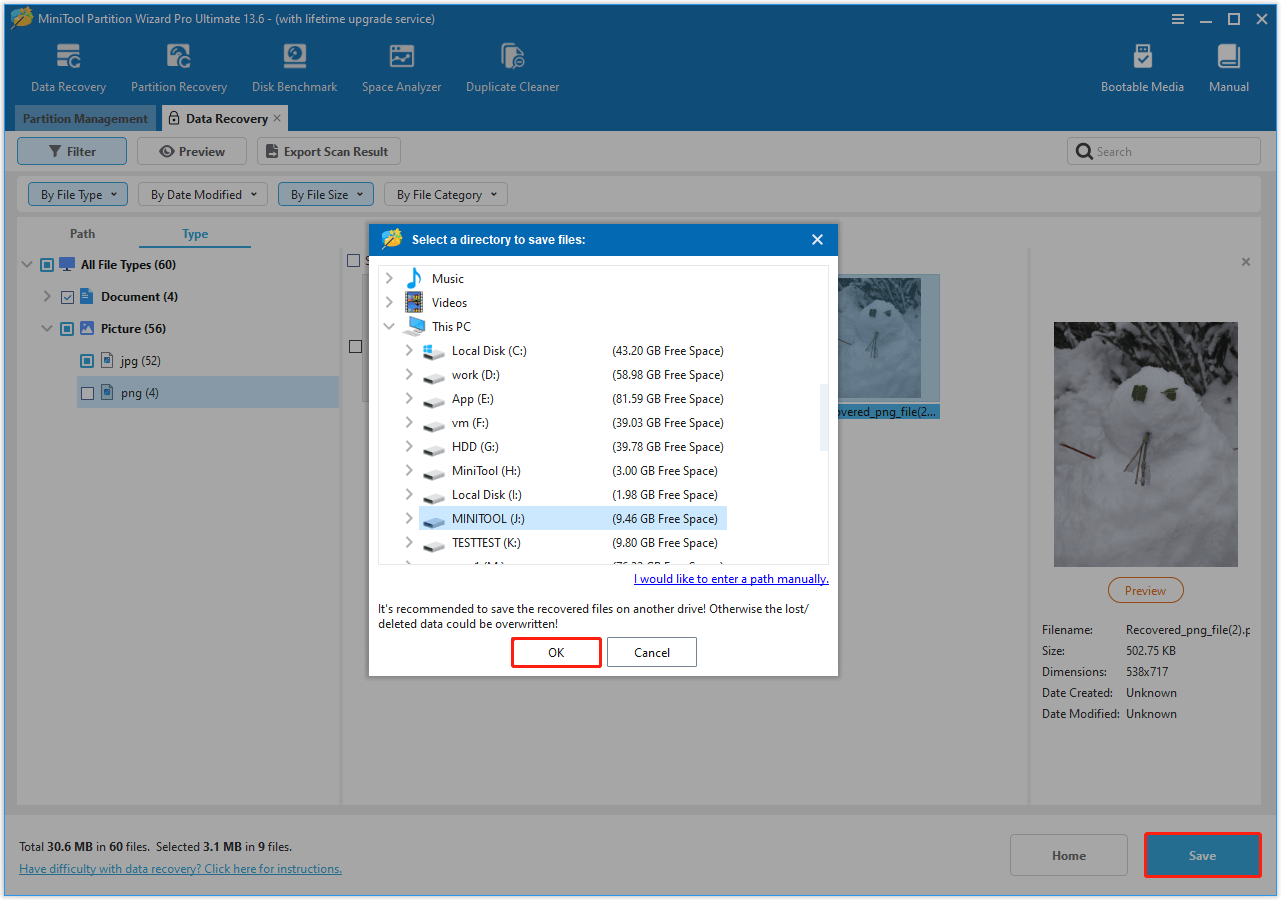
Step 3. Save the required files.
Select all the files you need to recover and click the Save button. In the new window, select a safe location to store the files and click OK.
Once your files have been recovered, proceed to format or clean the disk. Alternatively, you can dispose of the hard drive and replace it with a new one.
HDD VS SSD Health Monitoring
Due to their different architectures, HDDs and SSDs have different failure mechanisms.
HDD health is largely affected by mechanical wear, while SSD health is limited by the total amount of data written to it. This is known for Total Bytes Written (TBW).
For mechanical hard drives, SMART attributes such as the Reallocated Sectors Count and the Uncorrectable Sector Count are most important.
For solid-state drives, you should focus on flash lifespan and write usage, as SSD’s longevity depends on the TBW, which varies by flash type.
The following are key health metrics specific to SSDs:
| Attribute name | Description | Expected |
| Wear Leveling Count | Maximum erase count among all memory blocks. | High (a decreasing value indicates wear) |
| SSD Wear Indicator | Remaining write endurance, displayed as percentage. | High (a decreasing value indicates reduced lifespan) |
| Max Erase Count | Maximum number of program/erase (P/E) cycles applied to a single NAND flash block. | Low (a high value indicates heavy wear on specific blocks) |
| Average Erase Count | Average number of times NAND flash memory blocks have been erased. | Low |
In addition to CrystalDiskInfo, many storage device manufacturers provide dedicated SSD health monitoring tools, such as Samsung Magician Software.
For file system checks, it is not recommended to frequently run CHKDSK with the /r parameter on SSDs. Repeated use of /r may increase write/erase cycles and reduce the SSD’s lifespan.
Why Does Disk Health Decline
No matter how reputable a disk brand is, how high the quality of the disk, or how carefully you use it, a hard drive will wear out over time. This wear causes the disk’s health values or health percentage to decline.
First, we should examine how long a hard drive typically lasts under normal conditions.
How Long Do Hard Drives Last
The lifespan of a mechanical hard drive is not as easy to measure as that of a solid-state drive. However, it can be roughly estimated based on the warranty periods offered by major manufacturers such as Seagate, Toshiba, and Western Digital.
These warranties typically range from 2 to 5 years, indicating that disk manufacturers expect their drives to operate reliably for at least this period. Therefore, this range is often considered the baseline lifespan of a hard drive.
What Is the Actual Lifespan
In practice, hard drives tend to last significantly longer. Backblaze studied data from over 200,000 hard drives and found that about 90% of the drives are still functioning properly after 4 years, and around 65% last more than 6 years.
Based on internal data from our company, many drives have been in use for more than 10 years and are still working well.
This suggests that the commonly cited lifespan of 2 to 5 years may be conservative.
However, this does not mean that every drive will last more than 5 years. Hard disk lifespan estimates depend heavily on factors such as workload, operating environment, and usage patterns.
In general, drives used in high-intensity enterprise environments may wear out more quickly, while those used less frequently tend to last longer.
Read More: How Long Do SSDs Last
The lifespan of an SSD primarily depends on the total amount of data written to its NAND flash memory (TBW). Generally, higher-capacity SSDs have a larger TBW.
Therefore, compared to HDDs, SSD lifespan is easier to estimate and can be calculated using this formula:
Estimated Lifespan (years) = TBW ÷ (Daily Write Amount (TB) × 365)
For example, for a KINGSTON SA400S37480GB SSD, the manufacturer specifies a total TBW of 400 TB. If the daily write amount is 20 GB (0.02 TB), the estimated lifespan is:
Estimated Lifespan = 400 ÷ (0.02 × 365) ≈ 54.8 years
To calculate the theoretical remaining lifespan of an SSD:
Remaining Lifespan (years) = (TBW − Total Host Writes) ÷ (Daily Write Amount (TB) × 365)
For example, if the TBW is 400 TB and CrystalDiskInfo reports the total host writes of 14 TB, with the same daily write of 20 GB (0.02 TB), the remaining lifespan is:
Remaining Lifespan = (400 − 14) ÷ (0.02 × 365) ≈ 52.9 years
Note that this is only the estimated lifespan based on theoretical calculations. The actual lifespan of a disk depends on various factors. The following are common factors that may cause disk health to decline.
Physical factors:
Physical issues can lead to damage of the disk, including:
- Wear and tear on mechanical components.
- Physical shocks or drops.
- Exposure to extreme environments, such as high temperatures, water damage, or dust accumulation.
- Manufacturer defects.
Logical factors:
Logical issues can also affect disk health, such as:
- File system corruption.
- Malware or virus attacks.
- Improper system shutdowns or power failures.
- Partition table corruption.
- Bad sectors on the disk.
- Firmware failures.
Since many factors can cause hard drive failure, regular health checks are necessary.
![[Solved] Is SSD Good for Long Term Storage: Past VS Now](https://images.minitool.com/partitionwizard.com/images/uploads/2020/07/is-ssd-good-for-long-term-storage-thumbnail.jpg)
How Often Should You Check Hard Drive Health
There is no strict standard for how often hard drive health should be checked. For better data security and disk performance, it is recommended to install monitoring tools, such as CrystalDiskInfo, on your computer.
As a result, you can check the SMART status of key values on a regular basis, for example, once a month, or at intervals suitable for your usage.
In special cases, such as after power failures or if the disk has slow performance, it is advisable to perform a health check immediately.
How to Maintain Hard Drive Health
During daily disk usage, follow the strategies below to maintain disk health and prolong its lifespan.
1. Free Up Disk Space
Keep approximately 10% of the disk capacity free.
- For HDDs, this helps prevent excessive fragmentation and allow defragmentation to perform effectively.
- For SSDs, sufficient free space supports better wear leveling, helping to reduce rapid wear of flash memory.
2. Use the Drive Properly
Avoid unexpected power outages to the disk, especially during file transfers and data writes.
Handle your drives carefully to prevent drops, impacts, or other physical damage, especially for external hard drives.
3. Optimize the Hard Drive
Disk defragmentation reorganizes fragmented file pieces, storing them contiguously to improve file access speed and overall disk performance.
- For HDDs, Windows performs defragmentation automatically weekly by default. It is not recommended to disable this feature.
- For SSDs, you should not perform any defragmentation, as it may increase wear on the flash memory and shorten the disk lifespan.
Conclusion
In summary, hard drive health checks are necessary regardless of whether the drive is showing signs of failure or appears to be functioning normally.
Many tools are available for monitoring the SMART health status of a disk, such as the WMIC command or Performance Monitor software.
To verify file system integrity, you can run CHKDSK, the error-checking tool, or third-party utilities like MiniTool Partition Wizard.
Furthermore, it is also important to create regular data backups and follow proper disk usage practices.
Should you have any questions when using MiniTool products, please send an email to the support team at [email protected].
Hard Drive Health Check FAQ
However, TBW is only one factor. Over time, the controller may age, and the NAND cells may become damaged, causing the drive to fail.
Overall, a 10-year-old SSD has a higher risk of failure compared to a newer drive. Even if it is functioning normally, it is strongly recommended to back up important files and be prepared to replace the drive.
Logical corruption, such as file system errors or partition table issues, can usually be repaired by running CHKDSK or repartitioning the drive.
Physical damage, such as failed mechanical components in HDDs or damaged NAND chips in SSDs, is difficult to repair, even for professional disk repair services.
User Comments :