This post from Partition Magic will explore all aspects of Garmin Dash Cam SD card format, including an overview of Garmin Dash Cams, the right SD card for Garmin Dash Cam, why you need to format it, a step-by-step guide to formatting in Windows, and how to troubleshoot common SD card issues.
Overview of Garmin Dash Cam
In the modern life of road safety and security, the Garmin Dash Cam has become a trusted partner for drivers. The device records images, sounds, and other information while the vehicle is in motion, providing key evidence for traffic accidents, disputes, or road emergencies.
Garmin Dash Cams come in multiple models. Here are some common models and their features:
- Garmin Dash Cam Live: With 1440p HD video recording capabilities, equipped with a 140-degree wide-angle lens, it can achieve real-time video viewing, location tracking, theft alerts, and other functions through LTE connectivity, and can also provide driving safety reminders such as vehicles in front approaching too close and lane departure.
- Garmin Dash Cam Mini 3: Ultra-compact, with 1080p HD video recording and Garmin Clarity HDR optical technology, 140-degree field of view, built-in polarizer enhancement function to reduce windshield glare, and convenient viewing and sharing of video clips through the Garmin Drive app.
- Garmin Dash Cam X Series: It includes X110, X210, and X310 models, providing 1080p, 1440p, and 4K video resolutions, respectively. All have Clarity Polarizer, automatic recording, event detection, lane departure alert, and other functions.
- Garmin Dash Cam Tandem: It has a dual-lens design that can record both inside and outside the car. The inside camera has a 180-degree ultra-wide-angle field of view and uses NightGlo night vision technology. The outside camera records 1440p video, has automatic event detection and voice control functions, and is suitable for ride-sharing drivers.
In addition, there are Garmin Dash Cam 47, 57, 67W, and other models. Among them, 47 is entry-level, with 1080p recording, Garmin Clarity HDR optical technology, etc. 57 and 67W are higher-end models, providing 1440p video resolution, and 67W has a field of view of 180 degrees.
![5 Ways to Format SD Card for Camera [on Camera & Windows]](https://images.minitool.com/partitionwizard.com/images/uploads/2022/03/how-to-format-sd-card-for-camera-thumbnail.png)
How to Choose an SD Card for Garmin Dash Cam
One of the core components of a Garmin Dash Cam is the SD card, which stores all recorded video footage. Choosing the right SD card for your Garmin Dash Cam is crucial to its smooth operation, then. Here are the factors to consider:
#1. Capacity
Garmin Dash Cams typically support SD cards ranging from 8 GB to 512GB. For occasional use or limited storage needs, an 8-16GB card may be sufficient. But if you frequently record long trips or need to save a lot of footage, a 64GB, 128GB, or even 512GB card is more suitable. Note that the larger the capacity, the more expensive the card usually is.
#2. Speed Class
To ensure optimal performance, it is recommended to choose an SD card with a speed class of Class 10 or higher. Cards with higher speed classes can handle the continuous writing of video data more efficiently, reducing the risk of dropped frames or recording errors.
For example, UHS-I Class 10 cards have a minimum write speed of 10MB/s, which is suitable for most Garmin Dash Cams.
#3. Card Types
Compatible card types include microSD, microSDHC, and microSDXC. Make sure the card you choose is physically compatible with your Dash Cam’s SD card slot. Some models may only support certain types, so check your device’s specifications.
#4. Reliability and Durability
Since Dash Cams are constantly recording, SD cards must be reliable and durable. It is recommended to choose cards that are waterproof, heat-resistant, and shock-resistant. Brands such as Samsung, Sandisk, and Transcend offer high-quality microSD cards with good durability.
Also read: How to Choose the Best Micro SD Card for Your Dash Cam
Why Need to Format Garmin Dash Cam SD Card
There are several reasons to format your Garmin Dash Cam SD card:
#1. Initial Setup
When you purchase a new SD card for your Garmin Dash Cam, you need to format the new card to FAT32 to make it compatible with your Dash Cam and start recording directly. Otherwise, the device may not recognize its format and may not work properly.
#2. Improve Performance
Over time, SD cards may become fragmented as they record and overwrite video footage, resulting in slower read and write speeds. Formatting removes fragmentation and improves the overall performance of the card, ensuring that your Dash Cam can record and access video files smoothly.
#3. Fix SD Card Errors
If your SD card has file system errors, such as corrupted files or bad sectors, formatting can often fix these problems.
#4. Manage Data
Formatting is also a way to manage your SD card’s data. If you need to completely delete all data on the card, formatting provides a quick and effective way to do so. It is useful if you need to start over or if the card is full and you don’t need to keep old data.
Garmin Dash Cam SD Card Format in Windows
You can format the SD card in the Garmin Dash Cam. Simply connect the camera to power and then select Settings > Camera > Format Card. Keep the camera connected to a power source until the formatting is complete.
However, some users have reported that formatting the SD card in the Garmin Dash Cam takes too long or freezes. Generally speaking, formatting the card only takes seconds, not minutes. To do this, you can format the SD card on your computer.
The supported file system in the Garmin Dash Cam is FAT32. If your SD card is larger than 32GB, you can use third-party software like MiniTool Partition Wizard. That’s because Windows built-in tools don’t allow you to format an SD card to FAT32 when it is larger than 32GB.
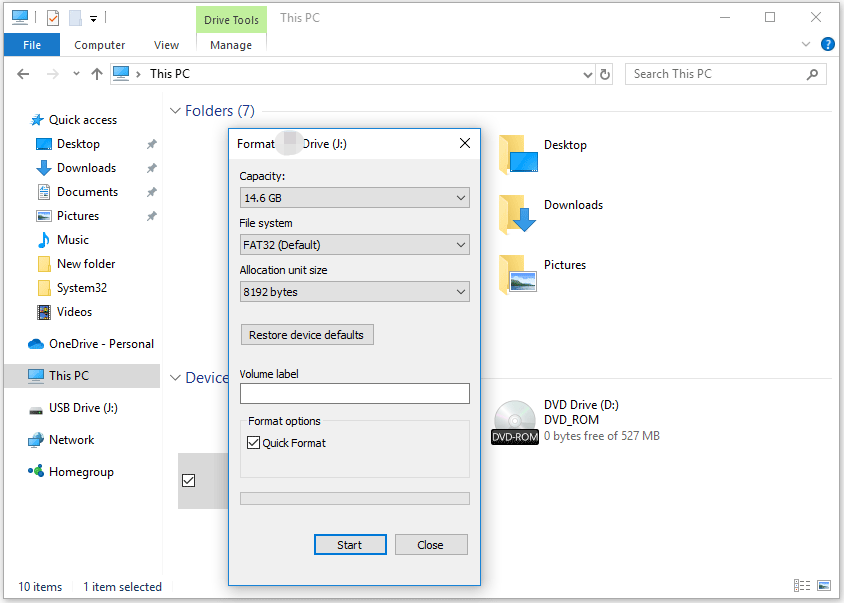
Way 1. Use File Explorer
File Explorer is a file manager application that is included in the Microsoft Windows operating system. It is also a commonly used formatting tool, and it is very easy to use. Here is the guide:
- Connect the SD card to your computer via an SD card reader.
- Press the Win + E key to open File Explorer.
- Click This PC on the navigation bar.
- On the right panel, right-click the SD card and then choose the Format option.
- On the pop-up window, select FAT32 file system and then click Start.
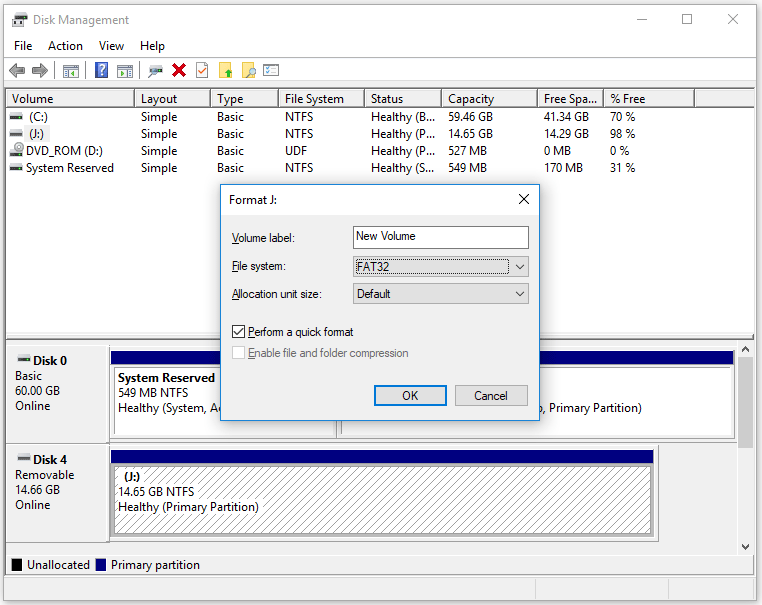
Way 2. Use Disk Management
Disk Management is another formatting tool to help you format Garmin Dash Cam SD card. The steps are as follows:
- Connect the SD card to your computer via an SD card reader.
- Press the Win + X key and then select Disk Management to open it.
- Right-click on the partition on the SD card and click Format.
- Choose the FAT32 file system and keep other parameters as the default. Then, click the OK button.
- Once a warning window pops up, read and click OK.
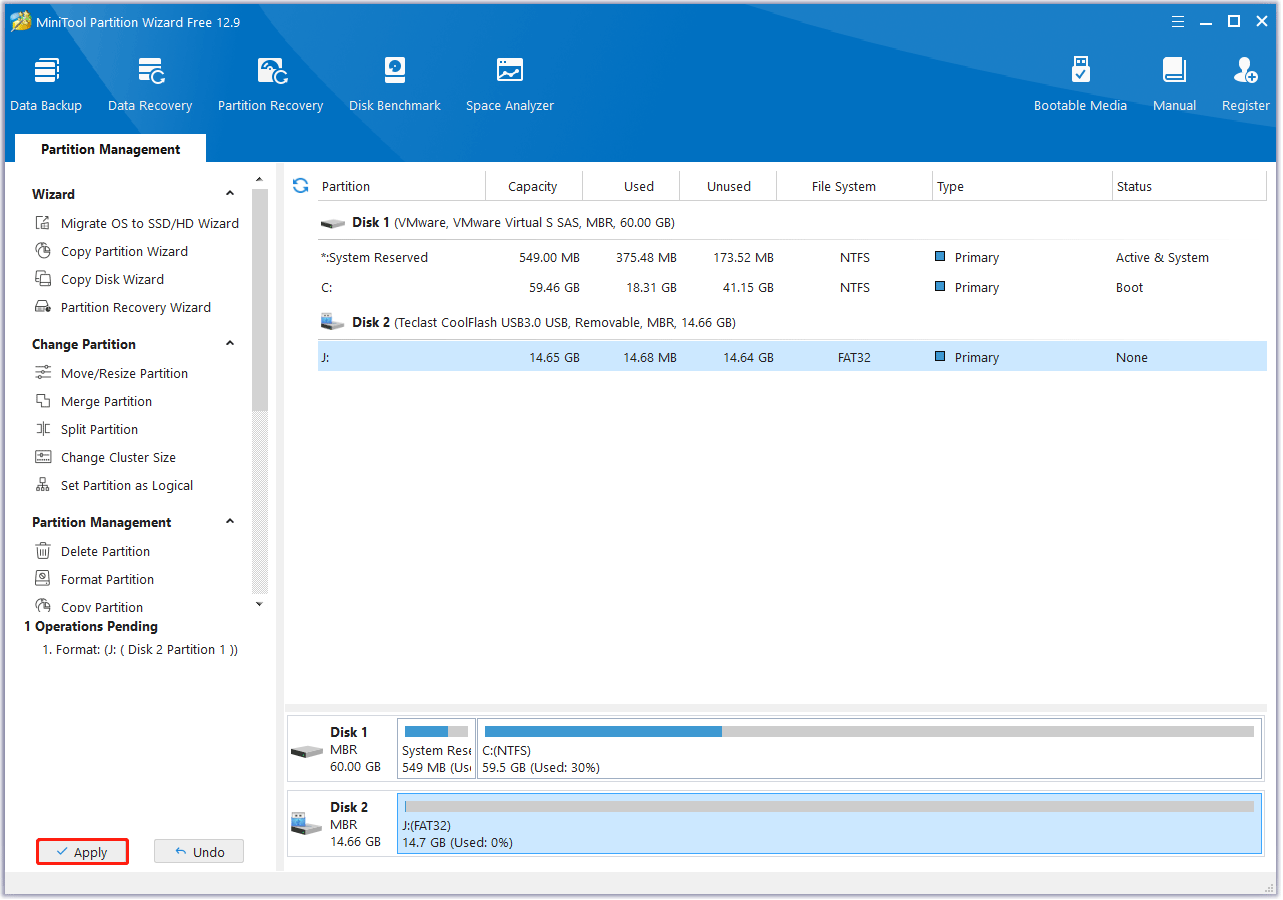
Way 3. Use MiniTool Partition Wizard
Compared with the above built-in Windows tools, the biggest advantage of MiniTool Partition Wizard is that it can format SD cards larger than 32GB (up to 2TB) as FAT32. This software is a free FAT32 formatter for hard drives, SD cards, and USB drives.
Besides, it’s a professional and reliable partition manager that offers a wide range of features related to disk/partition management. It can help you create/format/resize/delete partitions, copy/wipe disks, partition a hard drive, convert disks between MBR and GPT, recover data from hard drives, etc.
MiniTool Partition Wizard FreeClick to Download100%Clean & Safe
Now, follow the steps below to format Garmin Dash Cam SD card via MiniTool Partition Wizard.
Step 1: Connect the SD card to your computer via an SD card reader.
Step 2: Launch MiniTool Partition Wizard to enter its main interface. Right-click on the partition on the SD card, and then choose Format from the context menu.
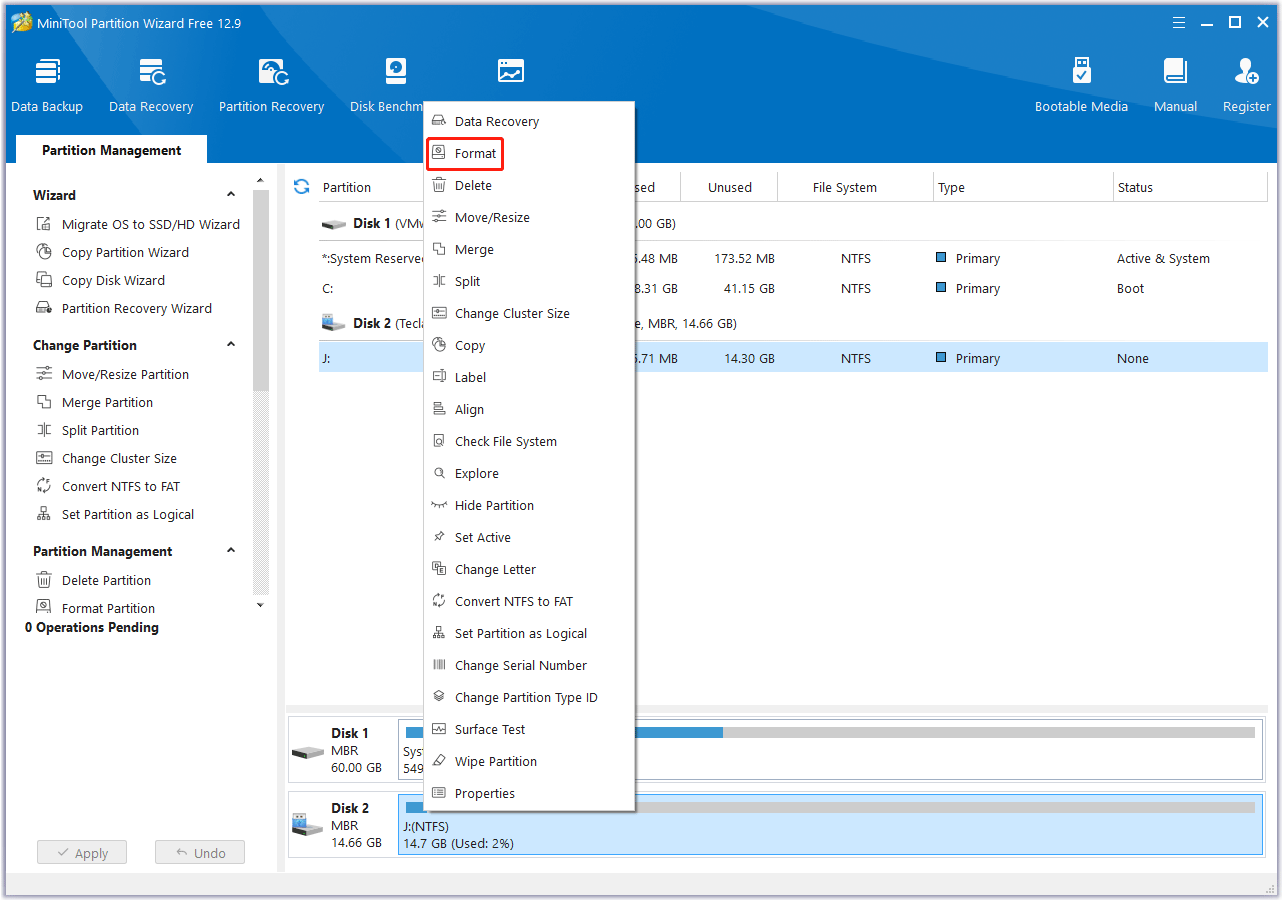
Step 3: On the pop-up window, choose FAT32 next to File System and click on the OK button.
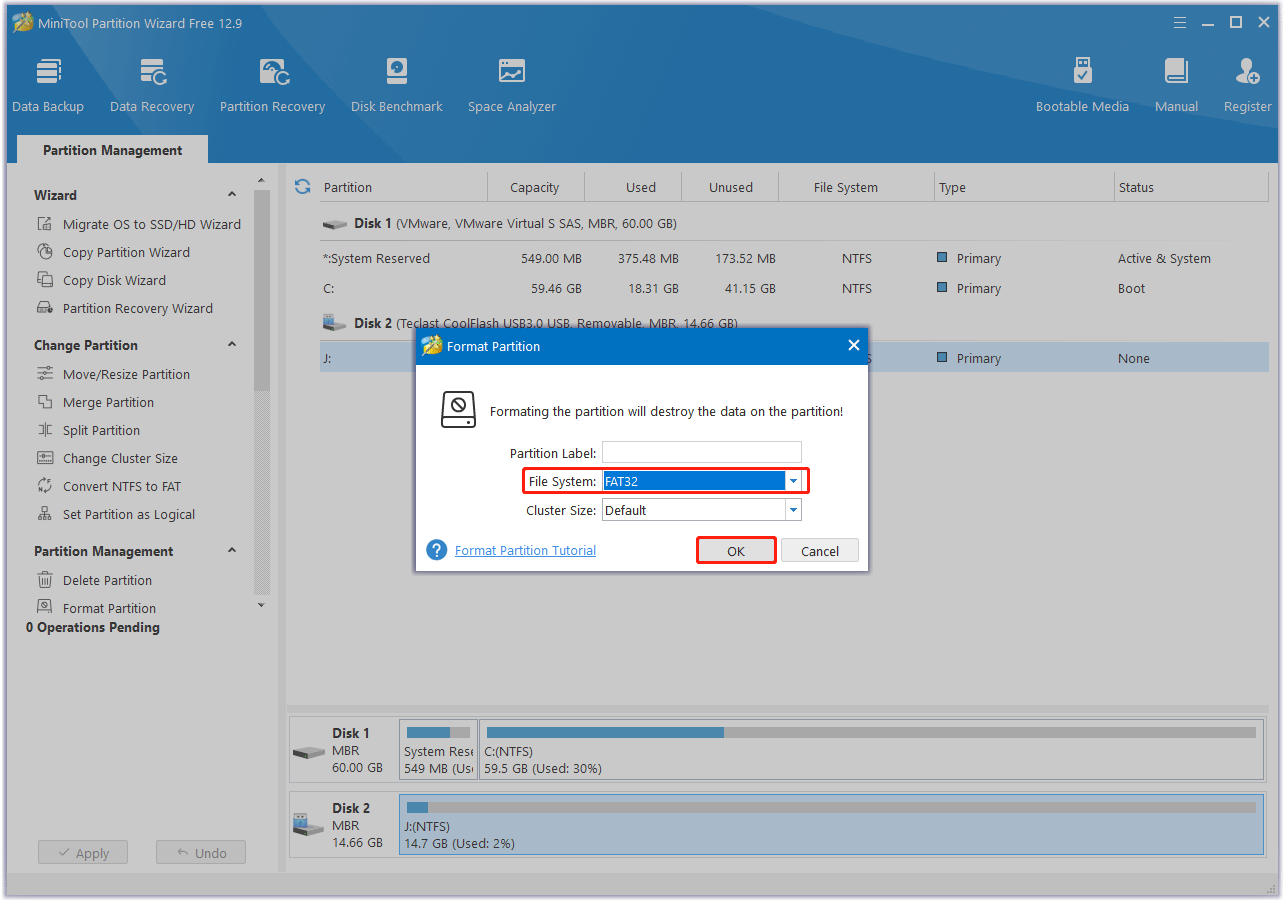
Step 4: Finally, click on the Apply button to execute the formatting operation.
How to Solve Garmin Dash Cam SD Card Issues
Sometimes, you may encounter some Garmin Dash Cam SD card issues. Here are common problems and solutions:
#1. SD card not recognized
If the Dash Cam cannot recognize the SD card, first check whether the card is inserted correctly and re-insert it to ensure good contact. If the problem persists, try using another SD card. If the device recognizes the new card, the original card may be damaged. You can format the original card on the computer and reinsert it into the device.
#2. Recording issues
If the SD card is formatted but the Dash Cam still cannot record properly, check that the device settings are correct, such as video resolution, frame rate, and recording mode. Also, you should make sure the SD card has enough storage space. If the card is full, delete old videos or format it to free up space.
#3. Video corruption
If the recorded video is corrupted, it may be caused by a card failure, a power outage during recording, or a device software problem.
#4. Yellow light flashing
A flashing yellow/yellow or yellow/green light indicates that there is an error related to the memory card or that the memory card is not installed. In this case, make sure that the memory card is fully inserted. If it is inserted normally, you can also verify that you are using a compatible memory card. If that does not work, try formatting the SD card.
Bottom Line
In the end, this post gives a full guide on the Garmin Dash Cam SD card format. By understanding the different models of Garmin Dash Cams, choosing the right SD card, understanding the reasons and methods for formatting, and mastering the troubleshooting tips for common problems, you can ensure that your Dash Cam reliably records high-quality video.
If you have any questions or suggestions on how to use MiniTool Partition Wizard, please do not hesitate to contact us via [email protected].
Garmin Dash Cam SD Card Format FAQ
2. Press and hold the microphone button for eight seconds. The LED indicator on the bottom of the camera will turn green
3. Once formatting is complete, the LED on the base of the camera will turn red, and the device will begin recording.
Garmin Dash Cam Mini 3/2 cannot format the SD card in Parking Guard Mode. Garmin Dash Cam Mini cannot format the SD card in Parking Mode.
2. Touch the Settings Gear icon in the top right.
3. Select the Garmin Dash Cam from within the Vehicle.
4. Touch Format SD Card.
5. Touch Format SD Card again to confirm.
About The Author

Position: Columnist
Vega enjoys helping people with computer problems, including disk management, data recovery, data backup, and more. She is constantly expanding her knowledge in related fields. And she will continue to bring more easy-to-understand professional articles to help people solve various problems on the PC.
User Comments :