About Volume Label
A volume label is a special name assigned to a storage device, such as a hard drive, USB flash drive, disc, and so on. It’s not a necessity on Windows PC. But it’s always helpful to identify a hard drive with a volume label. Usually, a volume label will be given when the drive is first created or formatted. You can also change it at any time according to your needs.
There are some limits you need to know when setting a volume label for your hard drive. In general, the volume label should be no more than 32 characters for an NTFS drive. While for a FAT drive, the volume label can be set up to 11 characters without special symbols like *, +, =, and more.
To get the details about NTFS vs. FAT32 vs. exFAT, you can read this post.
What Does “Enter Current Volume Label for Drive” Mean?
As mentioned earlier, a volume label is not necessary for the hard drive on your PC. However, sometimes, it might be required when you execute certain operations in Command Prompt. For instance, a message saying “enter current volume label for drive #” may appear when you are trying to format a hard drive from FAT32 to NTFS.
The above message may happen not only when you perform a format but also when you do any other changes to your hard drive. Once the “enter current volume label for drive #” message appears, it means that you should input the current volume label of the specific hard drive to execute the change you plan to make.
If there is no volume label assigned for the hard drive, you can just leave it blank and then press Enter. If the hard drive has a volume label, you need to know what the volume label is first before you enter the current volume label for drive. You can learn how to check the volume label from the following content.
How to Check Volume Label for Your Drive
How can you find out the volume label for the specific hard drive? Here, we summarize 2 ways that may help. Just keep reading.
Way 1: Via Command Prompt
Command Prompt, the Windows built-in utility, enables you to check the volume label for a hard drive. To do this, follow the steps below.
Step 1: Press Windows + R to open the Run dialog.
Step 2: Type cmd in the text box and then press Enter or click OK to open Command Prompt.
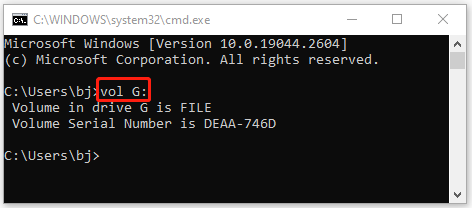
Step 3: In Command Prompt, type vol #: and then press Enter. After that, you can see the volume label and volume serial number listed in the panel.
Replace # with the drive letter of the hard drive you want to modify.
Way 2: Via File Explorer
File Explorer shows the volume label for each hard drive on the PC clearly. Just follow these steps to view the volume label with ease.
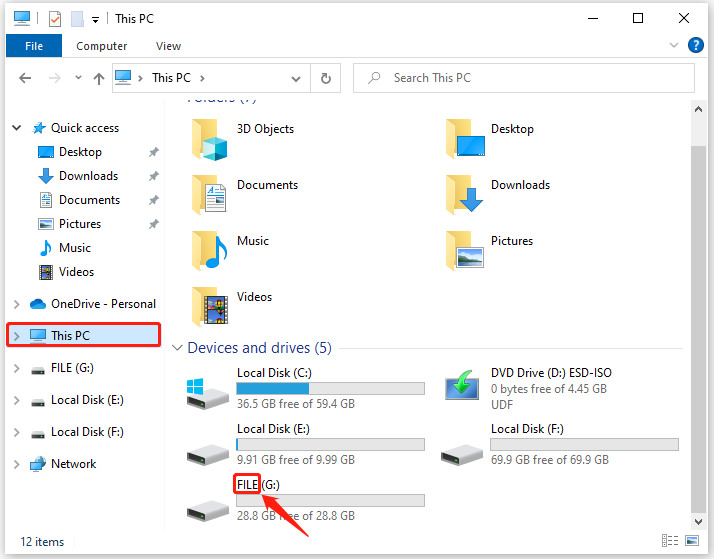
Step 1: Press Windows + E to open File Explorer.
Step 2: Go to This PC and then locate Devices and drives on the right side. Find the target hard drive and you will see the volume label next to the drive letter.
After knowing the volume label of the specific hard drive, you can enter it when seeing the enter current volume label for drive Command Prompt message. Then the formatting or other changes will finish successfully.
Complete the FAT32 to NTFS Conversion Without Entering the Volume Label
As you can know from above, the enter current volume label for drive Command Prompt message always shows up when you do a format. Usually, the message will disappear and the formatting process will succeed eventually after you enter the volume label.
But in some cases, the “an incorrect volume label was entered for this drive” issue may occur to prevent you from completing the formatting.
What if you run into the “an incorrect volume label was entered for this drive” issue? Well, to bypass this issue, it’s recommended that you format or convert the FAT32 hard drive to NTFS in other ways that don’t require you to enter a volume label. Here’re several possible ways available. You can pick one according to your needs.
Format will delete all the data on your hard drive. Therefore, you’d better make a backup in advance in case of data loss.
Way 1: Using File Explorer
It’s simple and quick to execute the formatting process via File Explorer with the following steps.
Step 1: Open File Explorer and go to This PC.
Step 2: Right-click the hard drive you want to format and then select Format.
Step 3: In the prompted window, select NTFS in the File system section. Then check the Quick Format option.
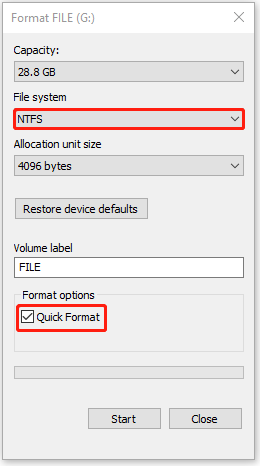
Step 4: Finally, click Start to begin the formatting process.
Also read: How Do I Fix “Windows Was Unable to Complete the Format” Error
Way 2: Using Disk Management
Disk Management allows you to perform a format as well. To carry out the operation, you should follow the given steps below.
Step 1: Right-click the Start icon and select Disk Management.
Step 2: After you enter Disk Management, right-click the target partition and then select Format. Click Yes to continue when a warning dialog box pops up.
Step 3: In the Format window, select NTFS as the file system from the drop-down menu. Then tick the checkbox next to the Perform a quick format option.
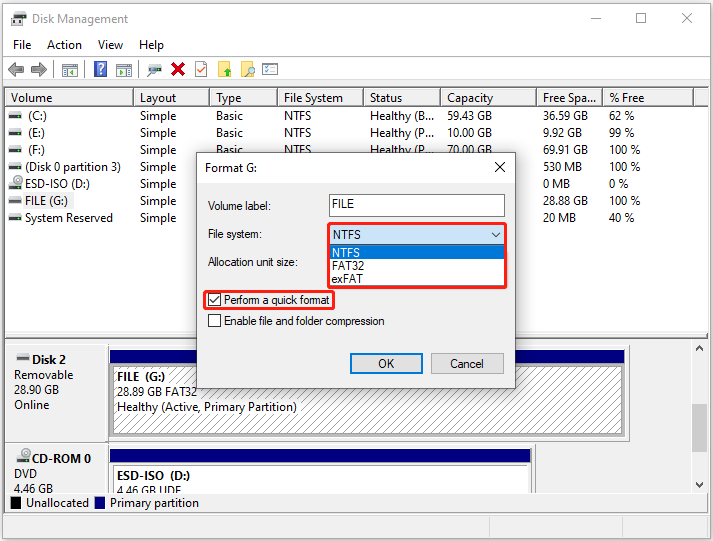
Step 4: After that, click OK to confirm the format.
5 Ways To Format A Hard Drive On Your Windows 11 PC
Way 3: Using MiniTool Partition Wizard
Both the above Windows built-in utilities – File Explorer and Disk Management – can help you finish the format simply. However, they sometimes may bother you with unexpected issues, like File Explorer not responding or Disk Management Format option greyed out. To avoid them, you can try using a third-party partition formatter. MiniTool Partition Wizard is one great choice.
It’s an all-in-one partition manager that enables you to manage your partitions and disks with a wide range of features. With this program, you are able to create/format/resize/delete partitions, copy/wipe disks, migrate OS to SSD/HDD, etc. To complete FAT32 to NTFS conversion, MiniTool Partition Wizard offers two options for you.
Option 1: Format FAT32 to NTFS
Like Disk Management and File Explorer, this program allows you to change the file system of a partition from FAT32 to NTFS through formatting.
Step 1: Download and install MiniTool Partition Wizard on your PC. Then launch this program to enter its main interface.
MiniTool Partition Wizard FreeClick to Download100%Clean & Safe
Step 2: Highlight the partition to format and then select Format Partition from the left action panel. Alternatively, you can also right-click the target partition and select Format.
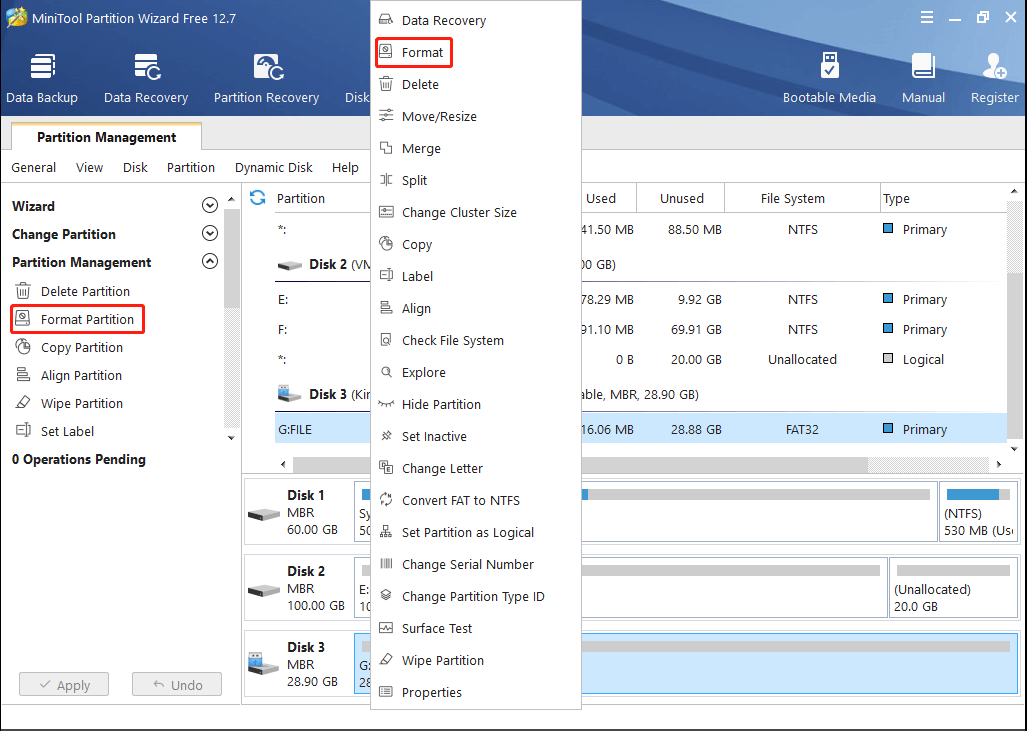
Step 3: In the File System section, choose NTFS from the drop-down menu.
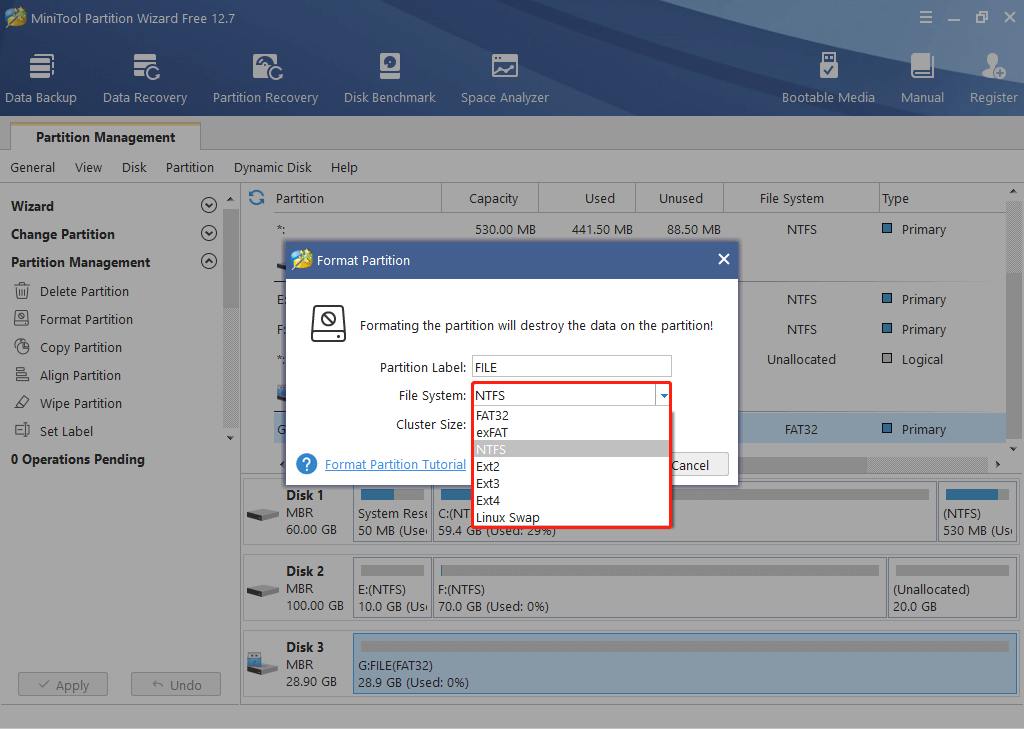
Step 4: After that, click OK > Apply to save the pending changes.
Option 2: Convert FAT32 to NTFS
In this way, you can finish converting FAT32 to NTFS without any data loss.
Step 1: Get MiniTool Partition Wizard installed on your computer and then launch this program.
Step 2: Right-click the target partition and select Convert FAT to NTFS.

Step 3: In the pop-up window, click Start. Then the FAT32 to NTFS conversion will automatically begin.
Step 4: After the conversion ends, you should click the Close button.
Bonus Tip: How to Set/Change Partition Label with MiniTool Partition Wizard
As is known before, setting a label for your hard drive can help you identify a drive easily, especially when there are many hard drives in your system. Hence, if you want to make every hard drive unique, you’d better set a label for each. And if the current partition label is not matched with the stored data, you should change it. How can you perform this operation?
In fact, Microsoft allows you to set or change the volume label of your hard drive with its embedded tools, such as Disk Management, File Explorer, Command Prompt, and so on. What matters to you is that you are unable to set a label over 32 characters for an NTFS drive, which is referred to at the beginning of this post.
What can you do if the label you want to set for your NTFS hard drive is more than 32 characters? Here, we highly recommend you use MiniTool Partition Wizard. It breaks the limit of the label for an NTFS drive. To be specific, you can set an NTFS partition label with over 32 characters by using MiniTool Partition Wizard.
The following is a detailed guide on how to set/change the partition label with MiniTool Partition Wizard.
The label of a FAT drive can only be set with no more than 11 characters. Additionally, if you want to label a volume on the dynamic disk, you should upgrade this program to the Pro or higher editions for the Change Volume Label feature.
Step 1: To begin with, you should have MiniTool Partition Wizard installed on your PC.
MiniTool Partition Wizard FreeClick to Download100%Clean & Safe
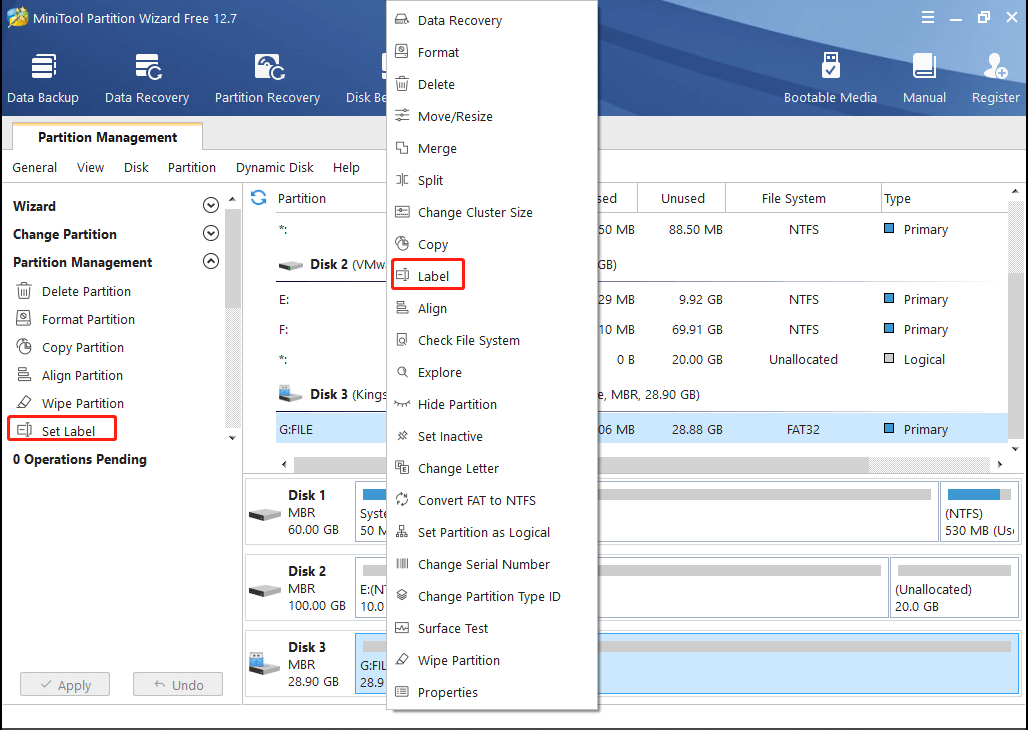
Step 2: Launch this program. Then highlight the target partition and select Set Label from the left action panel. Or, you can right-click the specific partition and select Label.
Step 3: In the Change Partition Label dialog box, enter the desired label and then click OK.
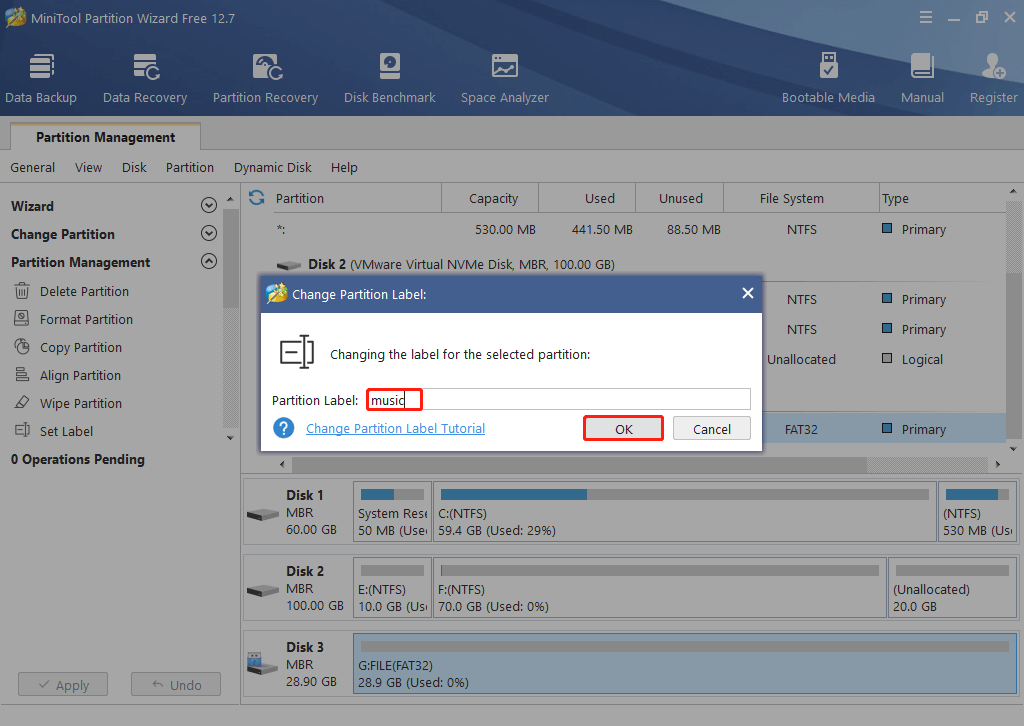
Step 4: Finally, click Apply to save the change.
Bottom Line
This post focuses on the volume label, including the meaning of the “enter current volume label for drive” message, solutions after receiving this message, methods for checking the label of your hard drive as well as partition label setting/changing tutorial. If you are one of those who get this message, you can pay attention to this post.
For any problems with the volume label, you can leave a message in our comment area below. If you meet certain issues while using MiniTool Partition Wizard, you can send us an email via [email protected] to get a quick reply.

User Comments :