A lot of users don’t know how to convert a bootable USB drive to normal on Windows 10/11. If you are also trying to figure it out, this post from MiniTool is worth reading. It shares 4 simple ways to format bootable USB to normal.
A bootable USB/pendrive contains instructions for a computer’s bootloader to load up various resources to run an operating system. So, it’s often used to boot an unbootable computer and reinstall OS. However, many users are confused about how to format a bootable USB to normal with full capacity. Here’s a user report from the answers.microsoft.com forum:
How to convert bootable USB back to normal with full capacity? I didn’t pay attention to the disclaimer telling me that my USB data would be deleted when installing Windows install media tool. My USB was converted into a bootable USB. But now I want to convert a bootable USB drive to normal with its full capacity.https://answers.microsoft.com/en-us/windows/forum/all/how-to-convert-bootable-usb-back-to-normal-with/a1f991fb-7169-4f5c-931f-b07edd2dc31c
Can I Convert a Bootable USB Drive to Normal
Can I format bootable USB to normal? Of course, the answer is yes! There are many tools to help convert bootable USB drive to normal on Windows 10/11 PCs. You can use Windows built-in tools, like Disk Management, DiskPart, or File Explorer. Alternatively, you can use a professional USB formatter like MiniTool Partition Wizard. Let’s keep reading the following part to know more details.
How to Convert a Bootable USB Drive to Normal on Windows 11/10
How to format a bootable USB to normal on Windows PCs? There are 4 simple ways to do that easily. You can choose one from them according to your needs.
Way 1. Convert Bootable USB Drive to Normal via MiniTool Partition Wizard
MiniTool Partition Wizard is a multifunctional partition manager that breaks through many limitations of Windows tools. It can easily format a USB drive larger than 32GB to FAT32 and format it to NTFS/exFAT/Ext. Moreover, it can convert FAT to NTFS without data loss, change cluster size, extend/resize/copy/wipe partitions, recover data, check drive performance, and more.
Here’s how to format bootable USB using the MiniTool software.
Step 1. Insert your USB drive into the computer properly and launch MiniTool Partition Wizard to enter its main interface.
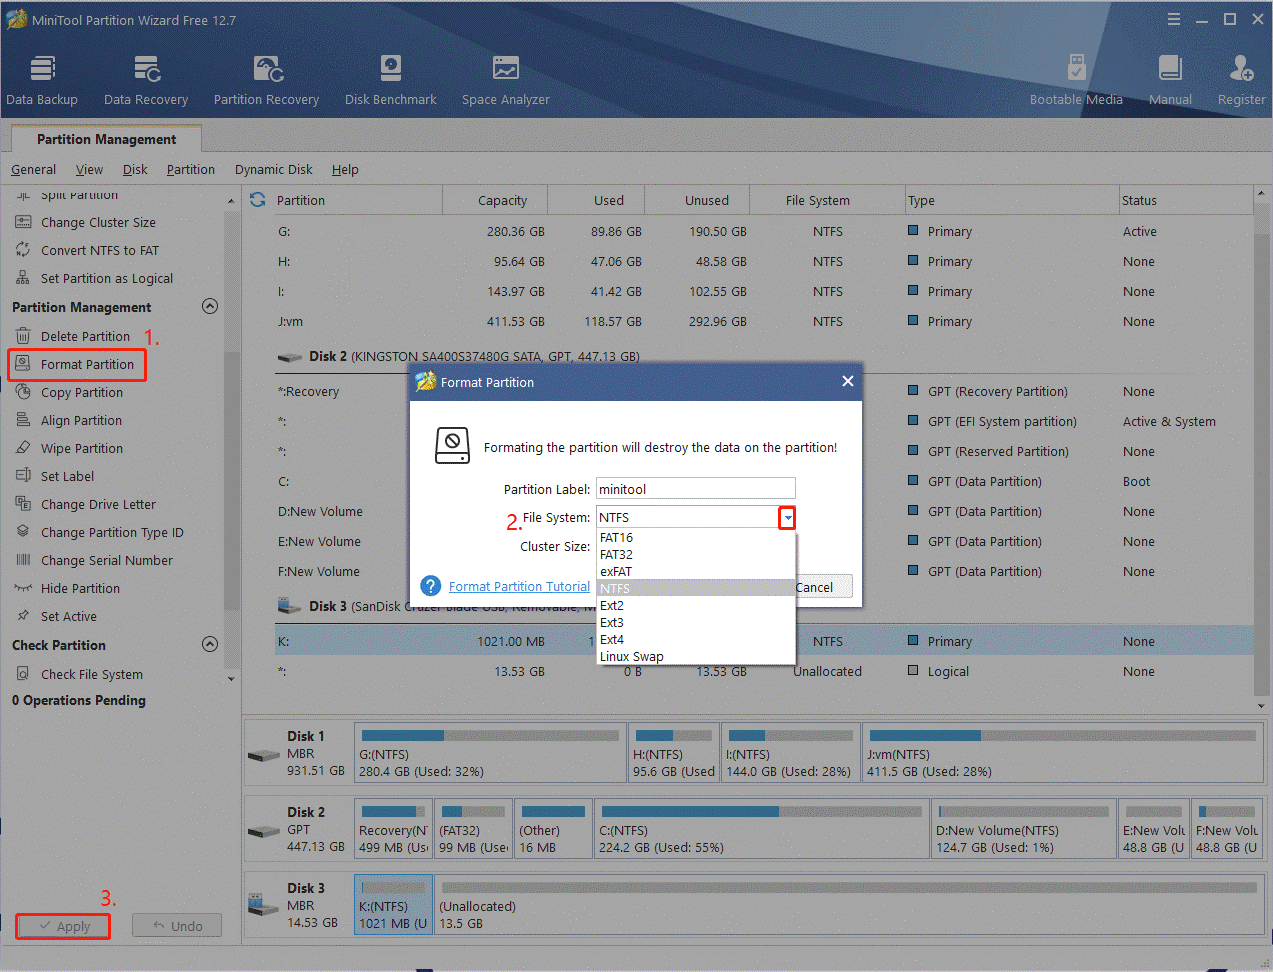
Step 2. Select the USB drive from the disk map and click on Format Partition from the left action panel.
Step 3. Select your desired File System from the drop-down menu and click OK to save the change. Also, you can change cluster size or partition label from here if you need.
Step 4. Click on Apply to execute the pending operation.
Way 2. Format Bootable USB to Normal Using Disk Management
Disk Management is one of the most common USB formatters that can format bootable pendrive to normal on Windows. Here’s how to use it.
Step 1. Press Win + X keys and select Disk Management from the right context menu.
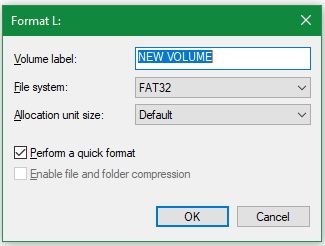
Step 2. Right-click the USB bootable drive and select Format.

Step 3. Set the File system, Volume label, and Allocation unit size according to your needs. Then click on OK and further confirm the formatting.
Way 3. Format Bootable USB to Normal Using DiskPart
DiskPart is a widely used command-line partition manager that also can format/clean/wipe a USB drive to its normal on Windows. To convert bootable pendrive to normal using DiskPart, follow the guide below:
Step 1. Press Win + R keys to open the Run dialog box, and then type diskpart in the box and press Enter.
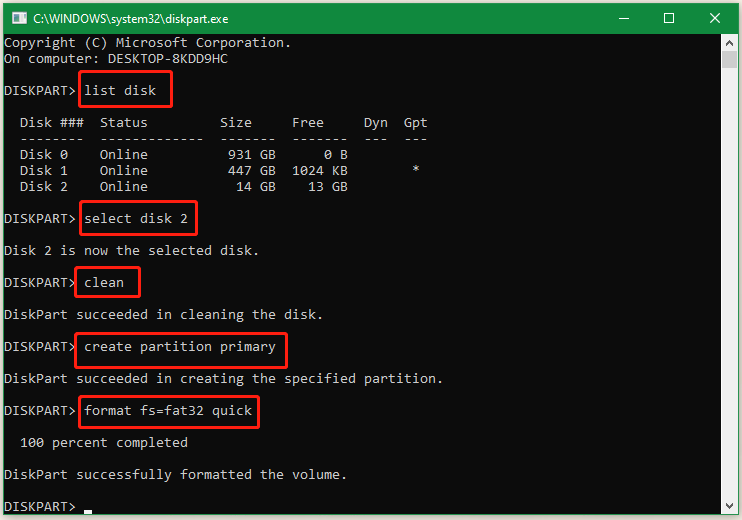
Step 2. In the pop-up window, type the following commands in order and hit Enter after each one to format bootable pendrive to its normal.
- list disk
- select disk * (* refers to the disk number of the bootable USB drive)
- clean
- create partition primary
- format fs=fat32 quick (you can type format fs=ntfs quick or format fs=exfat quick)
- exit
Way 4. Format Bootable USB to Normal Using File Explorer
In addition, you can convert bootable pendrive to normal via File Explorer. Here’s how to do that:
Step 1. Press Win + E keys to open the File Explorer, find and right-click the bootable USB drive, and select Format from the context menu.
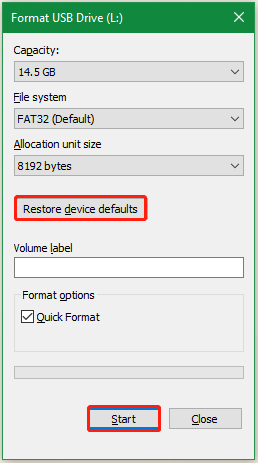
Step 2. Select a File System from the drop-down menu and set the Allocation unit size/Volume label. Here you can click Restore device defaults to restore the USB to its default settings.
Step 3. Click on Start to format bootable pendrive to its normal state.
We Need Your Feedback
Now, here comes the end of this post. The top 4 methods on how to convert a bootable USB drive to normal have been illustrated. Have you any other opinions about the topic? Please share them with us in the following comment area.
In addition, if you have encountered any questions about MiniTool Partition Wizard, don’t hesitate to contact us via [email protected] and we will help you as soon as possible.
User Comments :