Nowadays, more and more users would like to create a bootable USB drive in case of any problems that make computer unbootable. If you want to make a bootable USB by yourself, what can you do? Here, MiniTool Partition Wizard develops a guide to provide further information about bootable USB drive and the methods to make it.
What is Bootable USB Drive
As the name implies, bootable USB drive/pendrive is a USB flash drive/pendrive that is used to boot your computer. More professionally speaking, bootable USB drive/pendrive is a kind of removable digital data storage media from which a computer can load and run an operating system or utility program.
The bootable USB contains instructions for a computer’s bootloader to load up various assets to run an operating system. It can help you access the saved data and information on your computer when the device is unbootable, bypassing the installed operating system.
Apart from USB drive, users can also choose to make a bootable CD/DVD for OS or a certain program. But nowadays, an increasing number of users make bootable USB drive their first choice due to its security and portability, with USB drive almost replacing other media.
Why Do You Need to Make A Bootable USB?
The bootable USB is of great help in your tech life and you may make use of it for various reasons. Commonly, it is used to boot a computer that is unable to start itself due to virus attacks, system corruption, hard drive failure, or other factors. With this tool, you are able to reboot your computer to perform repairs and even reinstall operating system.
Of course, there are some other reasons for the use of a bootable USB drive. Generally speaking, you might need to make a bootable USB when you are trying to do the following things:
- Save an image of your operating system just in case.
- Upgrade an older operating system to a newer one.
- Clean reinstall your Windows.
- Fix the corrupted hard drive.
- Recover data or transfer files from a broken computer.
- Make some risky operations for the system drive, like extending
- Diagnose and resolve errors when your operating system crashes.
- Create a portal operating system to use it on a foreign computer.
If you are going to perform any operation mentioned above, it’s high time to make a bootable pendrive/USB. It is not complicated and you can make it on your own. Here is a guide on how to make a bootable USB Windows 10 and you can check out the provided methods below one by one.
How to Make a Bootable USB/Pendrive
As mentioned before, you can create bootable pendrive/USB for either a certain operating system or a program. And according to your own needs, you can choose different methods to make bootable USB/pendrive you want and several commonly used methods are listed. No matter which one you use, you have to confirm the following things in advance:
- You have gotten the ISO file of the desired operating system or program (if needed).
- The prepared USB drive has enough capacity (4 GB at least for 32-bit OS, 8 GB at least for 64-bit OS, and capacity requirement for different ISO file).
- There’s no important data on the USB drive.
Once the preparation work is done, keep on your reading to check how to create a bootable USB with these tools respectively.
Option 1. Use Windows Media Creation Tool
If you just want to make a Windows 10 bootable USB drive, the official utility Windows Media Creation Tool is recommended. With this tool, you can create Windows bootable USB drive within several clicks, without the need to format the USB drive. You can follow the steps below:
Step 1: Download the software from Microsoft’s official website and launch it as administrator. Connect your prepared USB drive to the computer.
Step 2: Click Accept and then choose to Create installation media (USB flash drive, DVD, or ISO file) for another PC. Click Next.

Step 3: Choose Language, Windows Edition, and Architecture as your needs and click Next to continue.
Step 4: Choose USB flash drive option and click Next button. Select you USB drive and follow the onscreen instructions to complete the operation.
Now, the image of the Windows has been burned to the USB drive and you can use it to boot your computer.
Option 2. Use Command Prompt
If you want to make bootable USB/pendrive with a given ISO file instead of any software, then the built-in Command Prompt utility should be your best choice. But keep in mind that you should type the involved commands correctly, or your computer might run into certain problems.
Here’s how to create a bootable pendrive CMD:
Step 1: Connect the prepared USB drive to your computer. Press Windows + R, type cmd and press Ctrl + Shift + Enter to run Command Prompt as administrator.
Step 2: To make a bootable pendrive CMD, type diskpart and press Enter to invoke DiskPart utility.
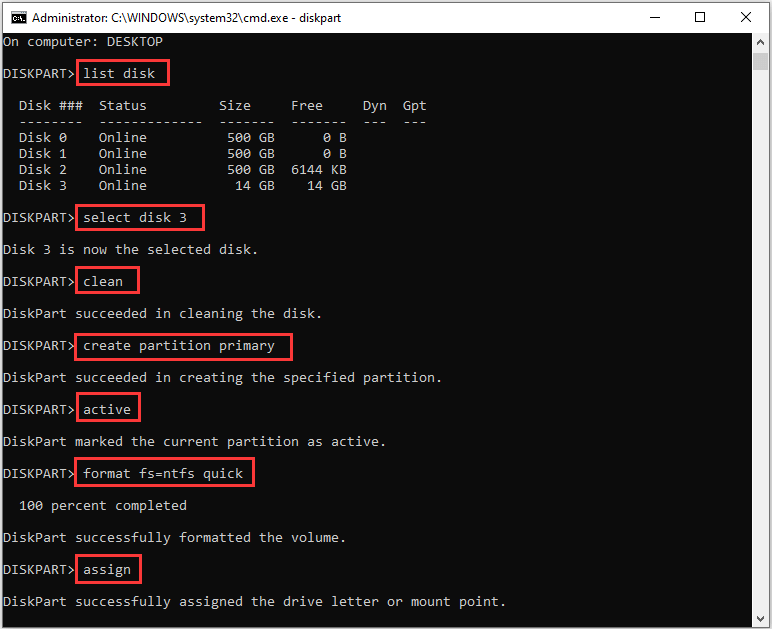
Step 3: Input the following command in order and press Enter after each to make the USB drive bootable:
- list disk
- select disk * (* refers to the USB drive)
- clean (to erase the USB drive to make it unallocated and not initialized)
- create partition primary
- active (to make the created USB partition active)
- format fs=ntfs quick (if you are using UEFI firmware, please replace ntfs with fat32)
- assign (to assign a drive letter for the USB drive automatically)
- exit (to close diskpart utility but stay in cmd.exe)
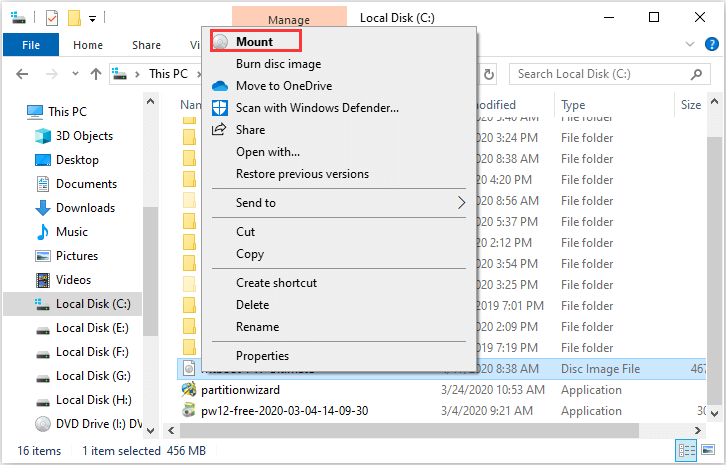
Step 4: Locate your ISO file, right-click it and choose Mount to mount it as a virtual drive which has a drive letter.
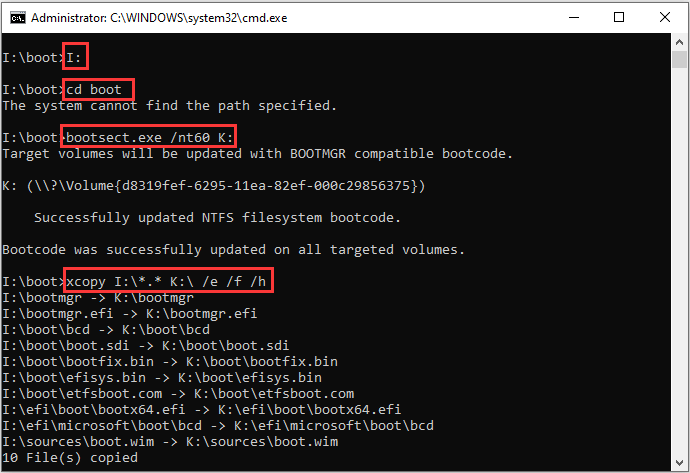
Step 5: Go back to Command Prompt and execute the following commands to copy the installation files to the bootable USB. Don’t forget to press Enter after each command.
- I: (replace the drive letter with that of the mounted ISO in your case)
- cd boot
- exe /nt60 K: (replace K: with the newly assigned drive letter of the bootable USB)
- xcopy I:*.* K: /e /f /h (replace I: and K: respectively)
- exit
This bootable pendrive CMD method is applicable to various ISO files, not limited to the Windows operating system. And you don’t need to download any assistant software.
3. Use Free Third-party Software
If using Command Prompt is too complicated for you and you don’t want to remember the commands, you’d better use a professional third-party program which is much easier than the above 2 methods. Some popular USB bootable programs are displayed here and you can use them to burn any ISO to the USB with ease. Let’s check them out one by one.
Rufus
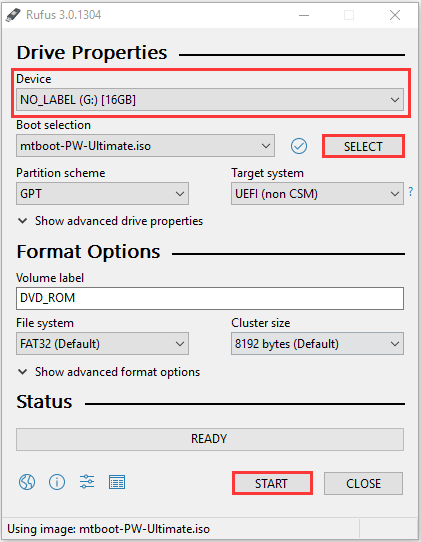
Rufus should be one of the best software to create bootable USB for most users. It is a small executable of hundreds KB. You don’t need to install it as you can launch it from the portable file directly. Compared with other similar programs, Rufus takes quite less time to create bootable USB.
After launching it, just choose the USB drive, select the ISO files, click Start button, and then wait the process to complete. This tool can detect the selected ISO settings and fill in the optimal settings for you automatically. If needed, you can also choose other available options, such as bad sector check.
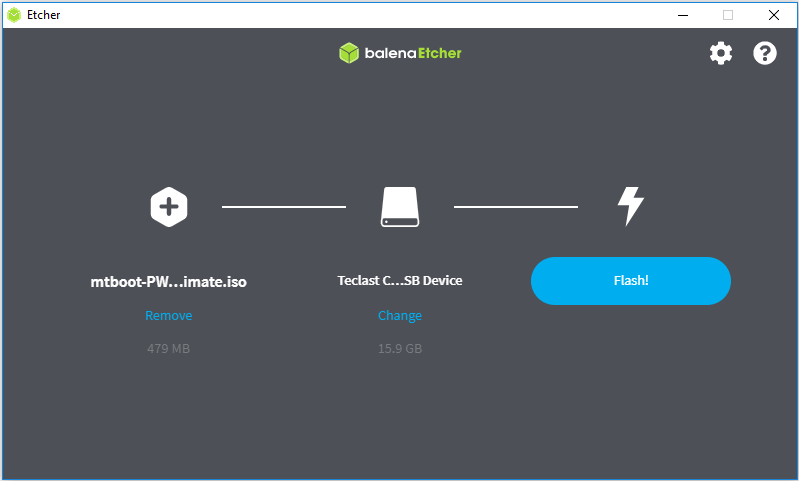
Etcher
Etcher is a reliable and easy-to-operate program which is very suitable for users who don’t want to make additional settings for the burning process. This program supports multiple operating systems.
To use this tool, you should download and install it on your computer. After you launch it, add the image file, select the target USB drive and click Flash to convert the USB drive to a bootable device. You don’t bother to configure multiple options and settings during the process.
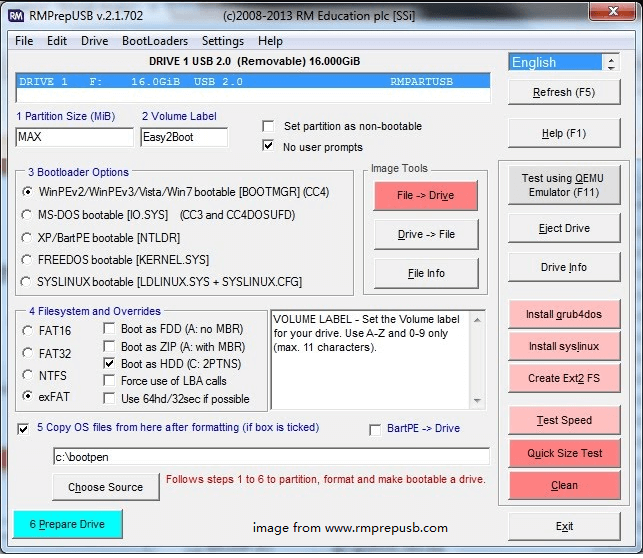
RMPrepUSB
RMPrepUSB is a quite complete USB bootable software which is mainly designed for advanced users and might be not so easy for ordinary ones to use. It is high customizable and provides rich features, and you can create various types of bootable USB with it.
Especially, here is a feature named Test using QEMU Emulator which can help you boot into the created bootable USB drive quickly without rebooting. It is very useful when you want to verify if the media has been created properly.
How to Use A Bootable USB to Store Data
After learning about how to make a USB bootable with different methods, you can choose any method to create a such media as your needs. However, what can you do if you don’t need the bootable media anymore and want to use the USB to store data again?
Actually, you just need to format the drive. To do that, you can go to File Explorer or Disk Management. Besides, a third-party application MiniTool Partition Wizard is also recommended for you. This reliable software provides multiple features to help you manage your drives and disks, and some features are not available in Windows built-in tools.
So, you can feel free to download this program to have a try, and here is how to format your bootable USB to a common storage device with it.
MiniTool Partition Wizard FreeClick to Download100%Clean & Safe
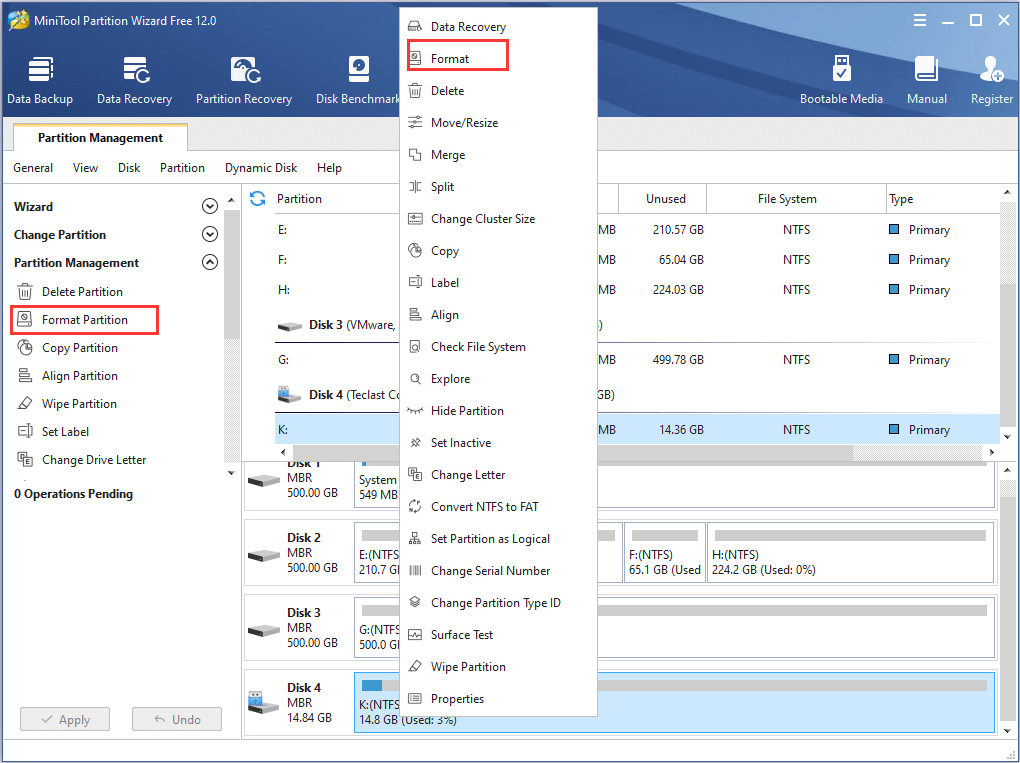
Step 1: Keep the bootable USB on your computer and launch MiniTool Partition Wizard.
Step 2: In the main interface, right-click the USB partition and choose Format. You can also select Format Partition feature in the left pane after highlight the partition.
Step 3: Choose a file system for the USB drive according to your needs and click OK button.
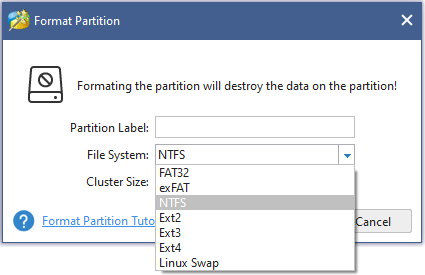
Step 4: Click Apply button to execute the pending operations.
After that, you can use the USB drive as a new storage device to save your data.
Bottom Line
This article has introduced how to make a bootable USB Windows 10 in different ways. Have you successfully created such a media using above methods? Or do you have any better methods on how to make a USB bootable?
Please leave your experience or ideas in the following comment zone. You can also contact us via [email protected] if you have any problem in using MiniTool Partition Wizard.
User Comments :