A great many people complain that they can't transfer ISO file to USB. Why can’t put ISO file on USB drive? How to fix the problem on Windows 10/11? Now, this post from MiniTool Partition Wizard discusses these questions together with you in detail.
As it’s well known to us all, USB flash drives are widely used as removable storage media in our daily work. People use it to burn ISO files, store videos, create bootable installation media, and more. At the same time, lots of issues also appear while using USB drives, such as “USB drive greyed out”, “USB flash drive unable to play videos”, and “can’t burn ISO file to USB”.
Here’s a heatedly discussed topic about “can’t put ISO file on USB drive” from the answers.microsoft.com forum:
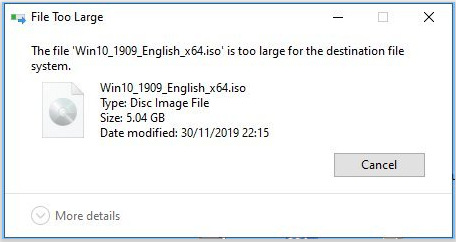
Can't put ISO file on USB drive. I downloaded a Win10_20H2_English_x32.iso file and it's 4.4GB. The drive on which I want to store it is a Fujifilm USB is 128GB and formerly a PNY flash drive with 16 GB. But when I put the ISO in both of the drives, I get a message that says that "it's too large for the volume's format. It's only 4.4 GB but it can't fit in a 16 and 32 GB flash drive? This makes no sense at all.https://answers.microsoft.com/en-us/windows/forum/all/cant-put-iso-file-on-usb-drive/b5c64413-63cb-4bf6-8671-78c52ef371a2
Why You Can’t Transfer ISO File to USB
According to user reports, the problem often occurs when putting an ISO file, like Windows 10/11 and Ubuntu into a USB flash drive. Why can’t copy ISO file to USB drives? According to a survey, there are several possible reasons for ISO file not copied to USB:
- The ISO file is too big for the file system of the USB drive: If your USB drive is formatted to FAT32, an ISO file larger than 4GB cannot be copied to the drive due to the FAT32 partition size limit.
- The transferring process is interrupted: If the process of copying is interrupted by a power outage or other factors, the ISO file could be corrupted, and you can’t burn ISO file to USB.
- Insufficient space on the USB drive: The flash drive itself is not big enough to hold the ISO file.
- Lack of a professional ISO burn tool: If you want to create a bootable installation USB using ISO, you can’t burn ISO file to USB without a burning tool like Windows Media Creation Tool or Rufus.
- The ISO file structure is not compatible with the USB: If you want to create a Windows bootable drive using the ISO file, the USB drive must be formatted as FAT32. Otherwise, you can’t copy ISO file to USB.
Now, you should have an overall understanding of the ISO file not copied to USB issue. Let’s keep reading to see how to solve it.
How to Fix It If You Can’t Transfer ISO File to USB on Windows 11/10
How to fix it if you can’t move ISO file to USB on Windows 11/10? Here we summarize 5 simple troubleshooting methods after analyzing extensive user reports from different forums and communities. You can try them in order until the problem gets solved.
# 1. Re-download the ISO File Properly
First of all, you can try re-downloading the correct version of the ISO file from its official website and make sure that the transferring process is not interrupted by any factors. Here we take the Windows 11 ISO file for example.
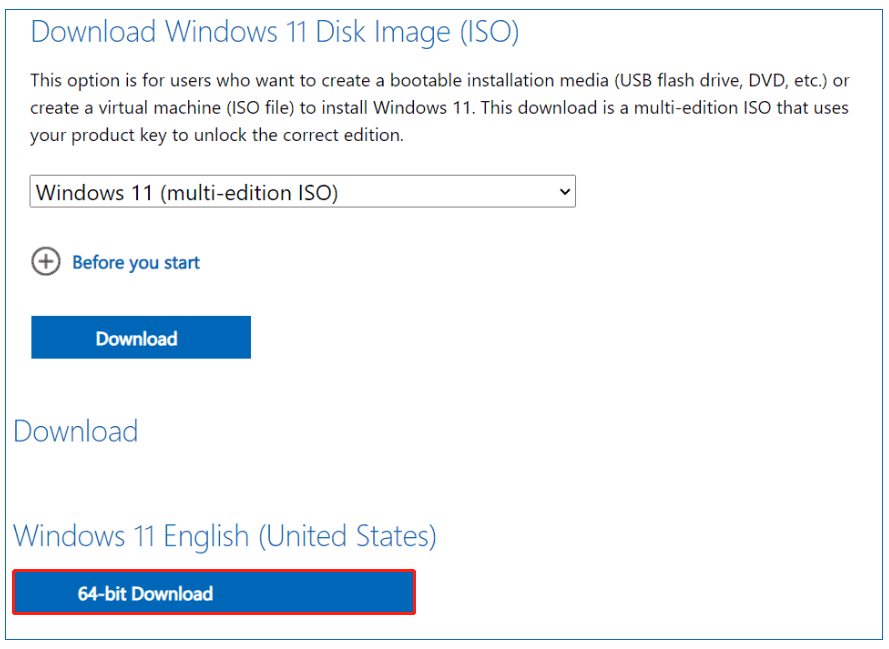
Step 1. Visit the official Microsoft website and scroll down to the Download Windows 11 Disk Image (ISO) section.
Step 2. Select Windows 11 (multi-edition ISO) > Download, select a language, confirm these options, and tap on 64-bit Download.
Step 3. This process may take you some time to complete. So, wait patiently. Once downloaded, you can copy or burn the ISO file to the USB drive.
# 2. Reformat the USB Drive
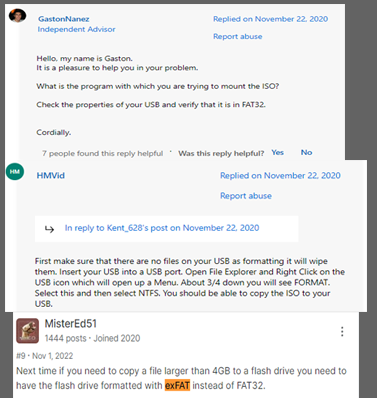
A lot of users from the Microsoft forum reported that the “can’t copy ISO to USB” issue can be solved by reformatting the USB to a compatible file system. If the ISO file is larger than 4GB, you need to format the drive to NTFS or exFAT (some people found that the ISO file can be put on an exFAT USB drive). However, if you are creating a Windows bootable media, the USB must be formatted as FAT32.
How to format a USB flash drive on Windows 11/10? You can use the Windows built-in tool – Disk Management, or use a free USB drive formatter – MiniTool Partition Wizard. Choose one according to your situation.
Way 1. Format the USB Using Disk Management:
If your USB flash drive is smaller than 32GB, you can use the Windows tool to format the drive to FAT32/NTFS/exFAT according to your ISO file. Here’s a tutorial for you:
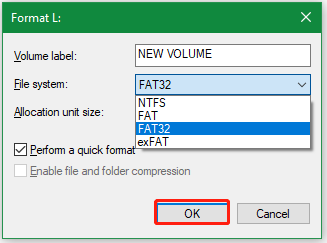
Step 1. Press the Win + R keys to open the Run dialog box, and then type diskmgmt.msc in the box and hit Enter to open the Disk Management window.
Step 2. Right-click the USB drive and select Format.
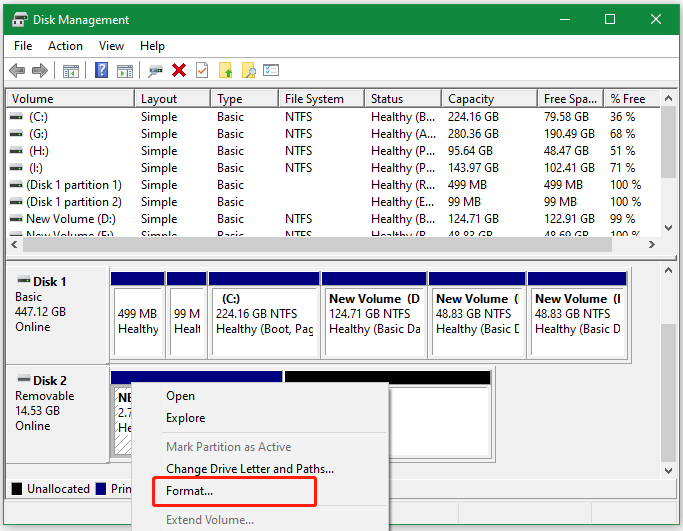
Step 3. In the pop-up window, select a compatible file system from the drop-down menu and click on OK to confirm the change. Note that if the ISO file is larger than 4GB, you should select NTFS or exFAT.
Way 2. Format the USB Using MiniTool Partition Wizard:
However, the Windows tool has limitations when formatting a USB larger than 32GB to FAT32 or exFAT. Sometimes you may encounter some issues, like “all options are greyed out in Disk Management”. So, we strongly recommend you use a professional exFAT and FAT32 formatter – MiniTool Partition Wizard.
Besides, it is a feature-rich and free partition manager that can extend/resize/move/copy/align partitions, convert FAT32 to NTFS, change serial number, check drive performance, recover lost data/partitions, migrate OS, and more.
MiniTool Partition Wizard FreeClick to Download100%Clean & Safe
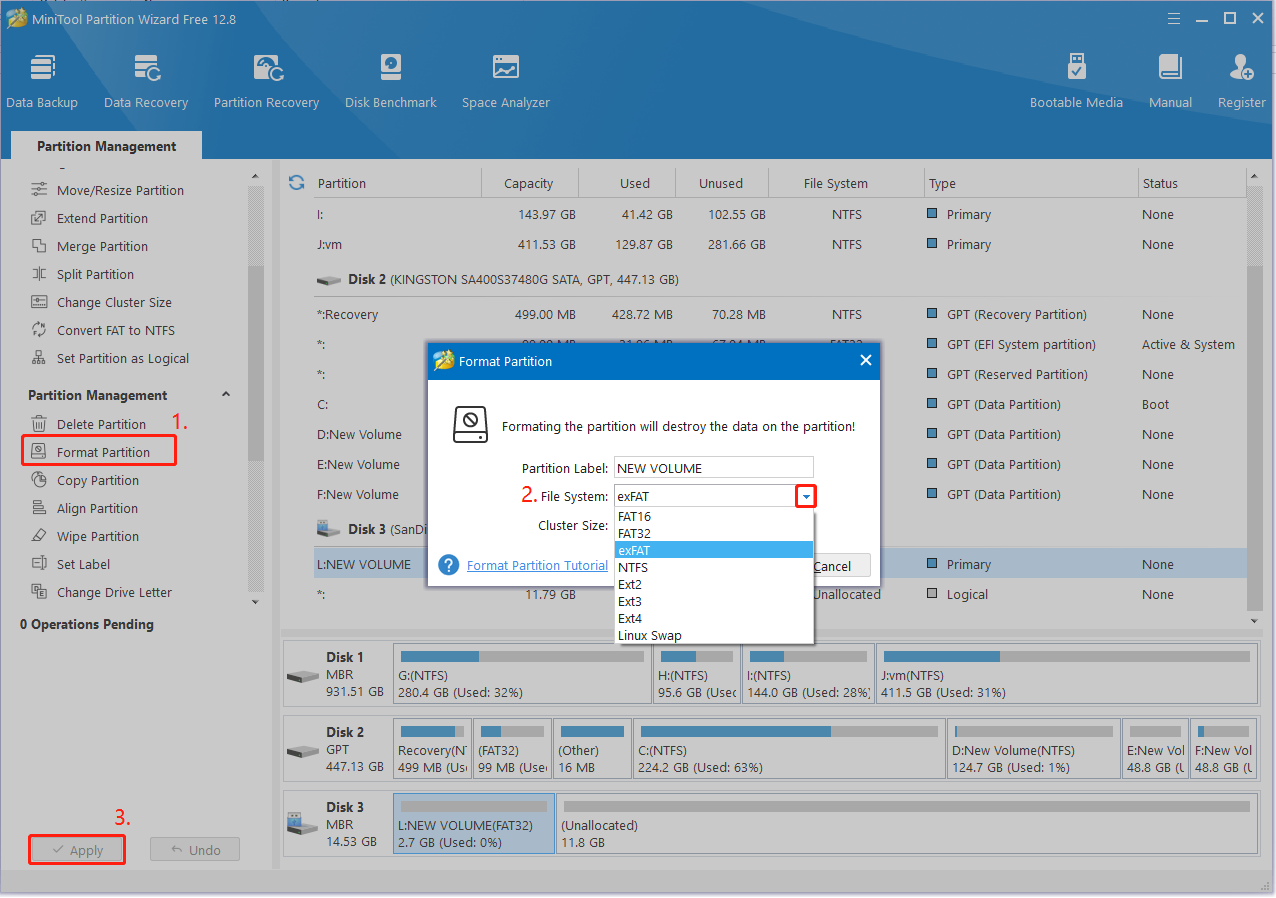
Step 1. Launch the MiniTool software to enter its main interface, and then select the USB drive from the disk map and click on Format Partition from the left panel.
Step 2. Select FAT32 or exFAT from the File System drop-down menu according to your ISO file and click on OK. Besides, you can change the cluster size and partition label from here according to your needs.
Step 3. Click on Apply to execute the formatting process.
# 3. Convert the File System of USB to NTFS
Some users from the techguy community reported that the “can’t transfer ISO file to USB” issue can be solved by converting FAT32 to NTFS. This is because FAT32 doesn’t support a single file larger than 4GB. How to convert FAT32 to NTFS without data loss? MiniTool Partition Wizard can help you do that easily. For that:

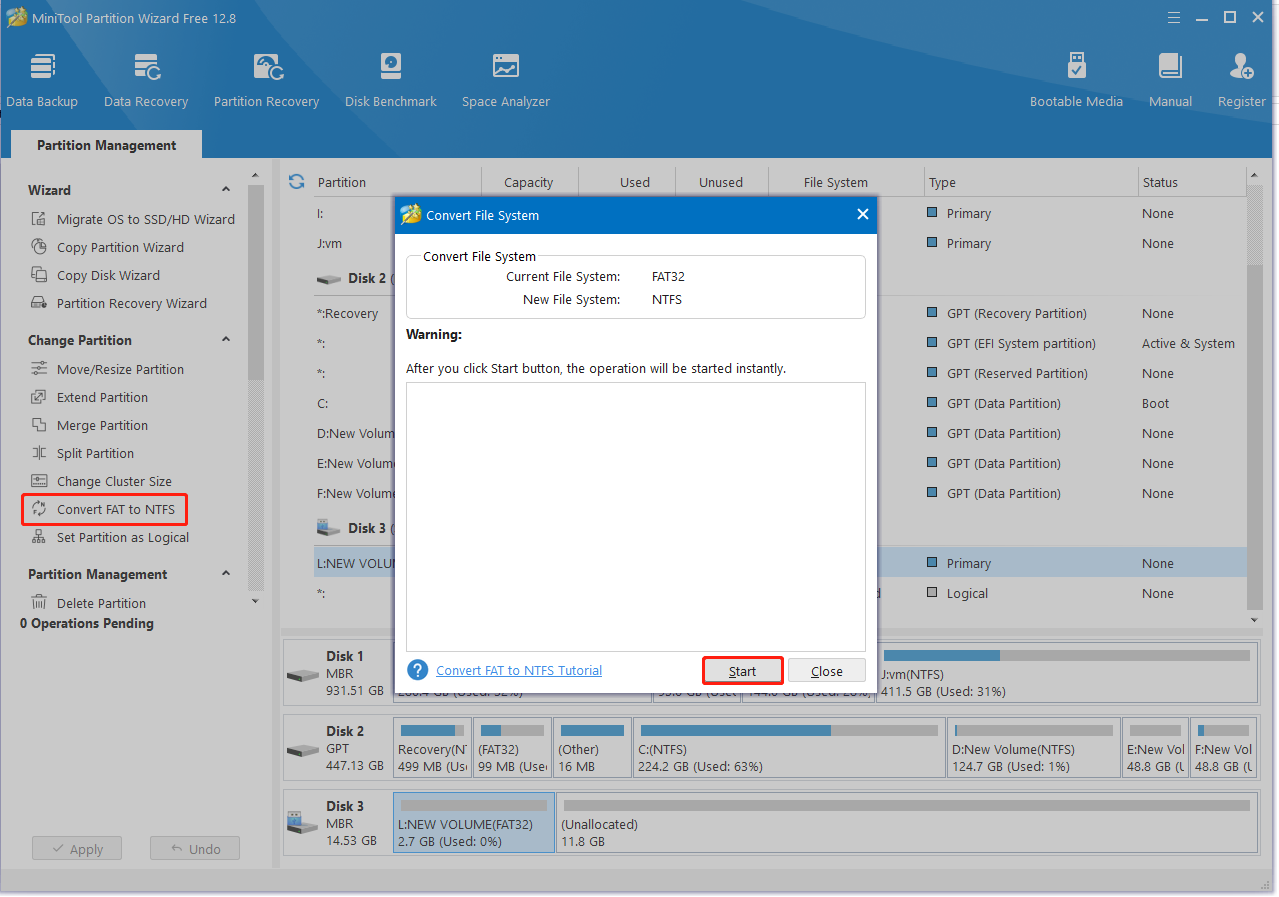
Step 1. In the main interface, select the USB from the disk map and click on Convert FAT to NTFS from the left action panel. Also, you can right-click the USB and select the conversion.
Step 2. Click on Start and wait for the process to finish. Once done, click on Close, and you should find the USB partition has been converted to NTFS without data loss.
# 4. Burn the ISO File Using a Professional Tool
If you can’t copy ISO to USB directly, you can try using a professional ISO burning tool like Rufus. It is an open-source program that can help you create a bootable USB drive by burning the ISO file into the drive. Here’s how to use the tool:
Step 1. Download the Windows ISO file from Microsoft properly as we showed in the first solution.
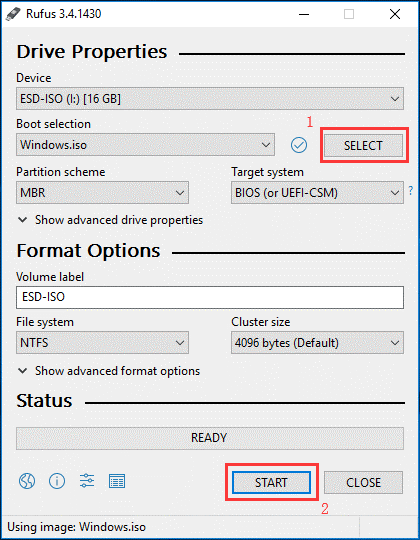
Step 2. Click here to get Rufus on your PC and run the program to enter its main interface. It will automatically detect the USB flash drive.
Step 3. Click on the Select button under the Boot selection tab, and then select the Windows ISO file from its directory.
Step 4. Then you can specify other parameters, including Partition scheme, Target system, File system, and Cluster size according to your needs.
Step 5. Click on the START button to begin burning the ISO file into USB. When the process is complete, click Close.
# 5. Check the USB Drive for Errors
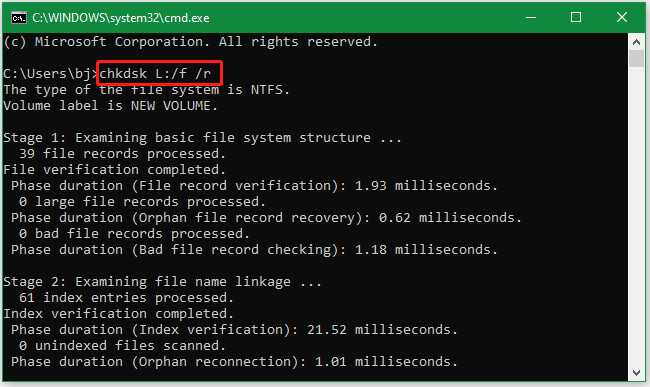
If you still can’t move ISO file to USB after trying all the above methods, it may indicate that the flash drive has been damaged. In this case, you should check if there are bad sectors or file system corruption on the USB. Here’s how to check them using CHKDSK.
Step 1. Type cmd in the search box, and then right-click Command Prompt and select the Run as administrator option. Then click on Yes to further confirm it.
Step 2. Type the following command and press Enter. Here you need to replace L with the drive letter of your USB. Once repaired, reconnect the USB and see if it can copy the ISO smoothly.
chkdsk L:/f /r
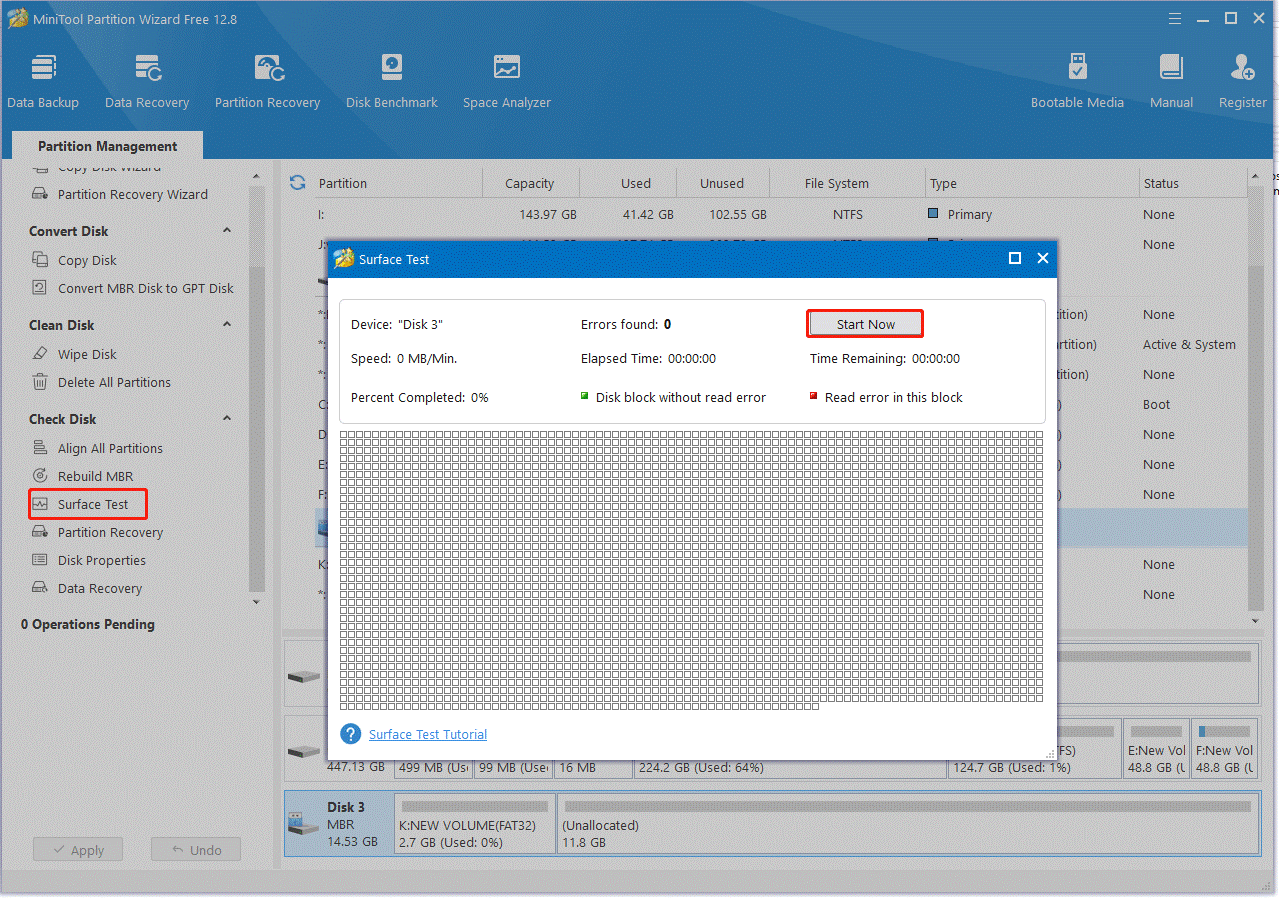
Sometimes, the CHKDSK tool may get stuck into different errors, such as CHKDSK write protected, CHKDSK taking forever, etc. Under these situations, MiniTool Partition Wizard is a better alternative. It cannot only check bad sections but also repair file system corruption on Windows easily.
MiniTool Partition Wizard FreeClick to Download100%Clean & Safe
What’s Your Opinion
Here comes the end of this post. It provides 5 effective ways to fix the “can’t transfer ISO file to USB” issue on Windows 10/11. Have you any other opinions about the problem? We are glad to see them in the following comment area.
In addition, you can contact us via [email protected] if you have any questions about MiniTool Partition Wizard. We will reply to you as soon as possible.
User Comments :