Many Windows users have a question: Can Windows 11 run on MBR? If you have a similar question in mind, read this post to find the answer. MiniTool Partition Wizard will show you how to perform Windows 11 MBR installation and offer some useful suggestions.
Windows 11 is a new version of Windows that has been released for several months. As a new system, it brings a new UI design, features, and improvements, so many people want to install Windows 11.
Can Windows 11 run on MBR? Lots of people are confused about these questions. If you also have the same questions, you can follow the effective tips below to know the details.
Can Windows 11 Run on MBR
Can Windows 11 run MBR? Since the release of Windows 11, there are many users who use MBR disks who want to know whether they can install Windows 11 on MBR partitions. You can run Windows 11 on MBR, but only as a second disk. This means you cannot use MBR as a primary disk in Windows 11.
Therefore, if you have an MBR disk and want to install Windows 11 on MBR, you need to convert it to GPT as the operating system disk type.
How to install Windows 11 on MBR? You can follow the tutorial below to learn the detailed steps.
Before You Do a Windows 11 MBR Installation
Windows 11 MBR installation is a relatively complex and time-consuming process. Here are some important things you should prepare before doing so.
#1. Make Sure Your PC Meets Windows 11 Minimum System Requirements
The first important thing to do before installing Windows 11 is to check that your computer meets the basic system requirements. If you don’t know how to check your system specifications, see this guide. Here are the minimum system requirements for Windows 11:
- Processor: 1 GHz or faster with 2 or more cores on a compatible 64-bit processor or system on a chip (SoC)
- RAM: 4GB
- Storage: 64GB or larger storage device
- System firmware: UEFI, Secure Boot capable
- TPM: TPM version 2.0
- Graphics Card: DirectX 12 or higher compatible with WDDM 2.0 driver or higher
- Display: HD 720p display, >9 inches diagonal, 8 bits per color channel
If your computer doesn’t meet the hardware or software requirements of Windows 11, you can refer to the following posts to upgrade them:
- How to Upgrade to Larger Hard Drive Without Data Loss
- How to Add RAM to a Laptop? See the Simple Guide Now!
- How to Upgrade Motherboard and CPU without Reinstalling Windows
- How to Install a Graphics Card on Your Computer? See a Guide!
#2. Convert Disk from MBR to GPT
Microsoft’s restrictions on MBR are something you can’t avoid when installing Windows 11. In this case, you can convert an MBR disk to GPT to install Windows 11. To finish this conversion, you can use the DiskPart utility or a third-party tool called MiniTool Partition Wizard.
Way 1. Convert MBR to GPT Using DiskPart
Here is the tutorial on converting MBR to GPT using DiskPart.
Step 1: Press the Win + R key to open the Run dialog box. In the Run box, type diskpart and press Enter to open the DiskPart window.
Step 2: After getting a newly popping-up window, please input the following commands in order, and then press the Enter key on the keyboard after inputting each command. Please make sure your selected disk is an MBR disk. Here I take Disk 1 as an example to complete this conversion.
- list disk
- select disk * (* stands for the MBR disk you want to convert to GPT)
- clean
- convert gpt
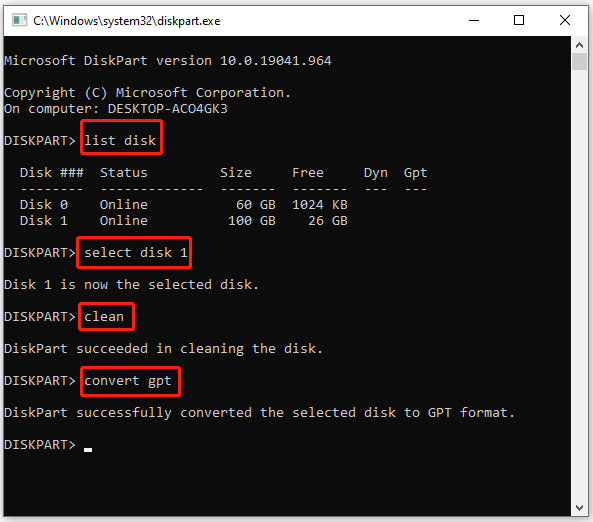
When you see “DiskPart successfully converted the selected disk to GPT format”, the conversion completes.
As you see, this method can help you convert MBR to GPT with few steps. But it can also clean your data stored in the selected disk. If you don’t want to lose any data after the conversion, you can move to the following method.
Way 2. Convert MBR to GPT Using MiniTool Partition Wizard
As you can see, if you convert MBR to GPT using DiskPart, you need to delete all partitions on the disk first. This will destroy the data on the disk. Is there a way to convert MBR to GPT without deleting the partition? Right here. MiniTool Partition Wizard can help you do this.
What’s more, MiniTool Partition Wizard offers lots of helpful features for partition/disk management such as partition hard drive, clone a hard drive, recover data from hard drive, and more.
MiniTool Partition Wizard DemoClick to Download100%Clean & Safe
How to convert MBR to GPT by MiniTool Partition Wizard? Here’s the guide.
Step 1: Download and install MiniTool Partition Wizard on your PC. Then launch it to get its main interface.
Step 2: Click on the target MBR disk, and then select Convert MBR Disk to GPT Disk from the left action panel.
Step 3: Click on the OK button to confirm that you’ve already known you need to change the boot order after converting MBR to GPT. Then this interface becomes the preview of the conversion result and click on Apply to execute the change.
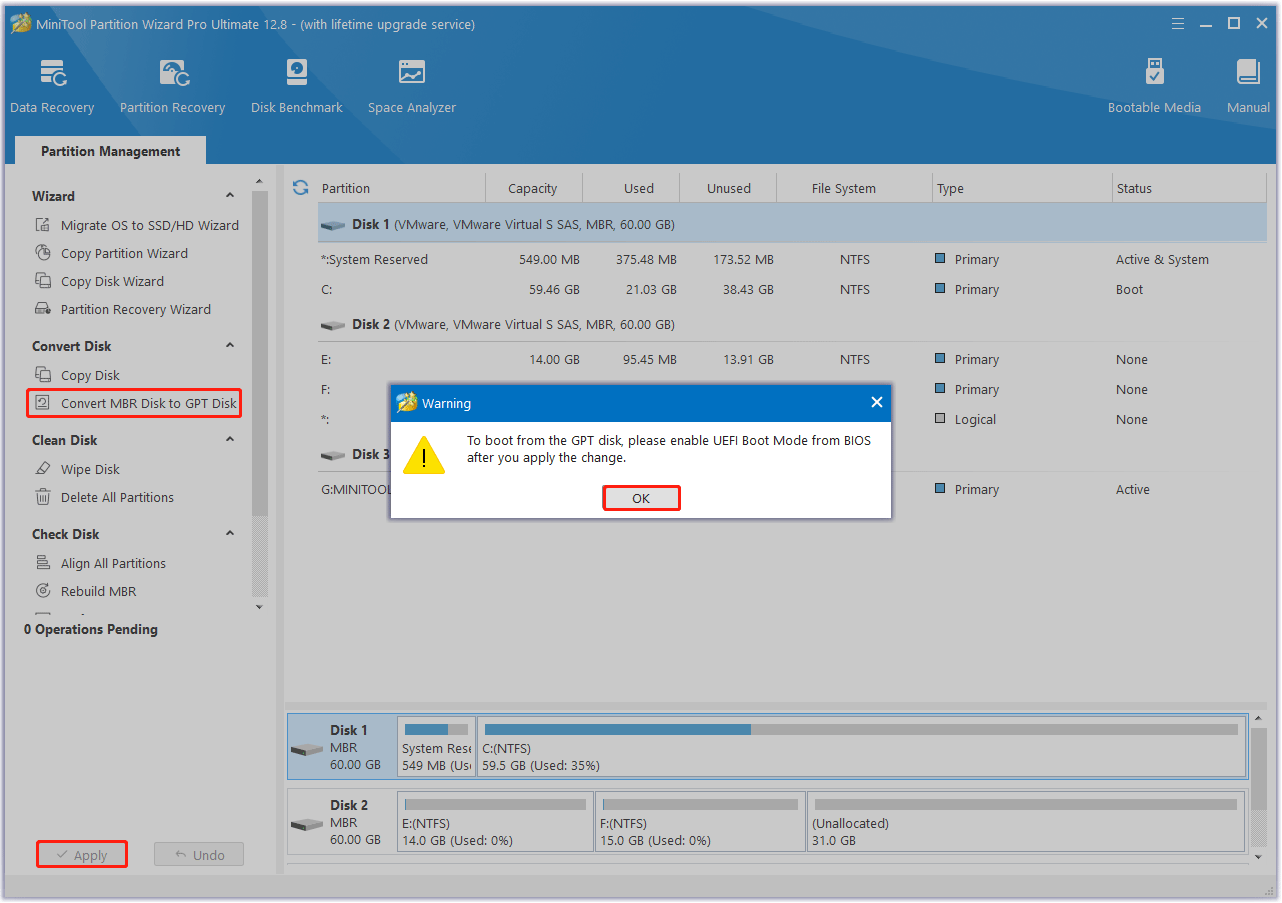
Step 3: Tap the Yes button to confirm the conversion. Wait for the completion of disk conversion. Then click on the OK button finally.
#3. Enable Secure Boot and TPM 2.0
Before installation, a more important step is to make sure you enable TPM 2.0 and Secure Boot in BIOS. Here are the steps:
Step 1: Restart your computer and enter the BIOS menu.
Step 2: Under the Security interface, look for TPM and check if it’s enabled. If it is not, enable it.
Step 3: Go to Boot > Advanced Mode > Secure Boot and enable this option.
Once done, you can install Windows on MBR without any concerns.
How to Perform Windows 11 MBR Installation
Now you’re ready to go. Follow the steps below to download and install Windows 11 from a USB flash drive. If you don’t have a USB flash drive, you can install Windows 11 using an ISO file.
Step 1: Get the ISO File of Windows 11
It is easy to download the ISO file of Windows 11 through the official website. See how to do this:
- Visit the Download Windows 11 page from Microsoft.
- Scroll down to the Download Windows 11 Disk Image (ISO) for x64 devices section.
- Select Windows 11 (Multi-version ISO for x64 devices), click on Download, select a product language such as English (US), click on Confirm, and then click on the 64-bit Download button.
The downloading process of the ISO file may take some time. Alternatively, you can download the Windows 11 Media Creation Tool from the Microsoft website and run it to get a Windows 11 ISO file.
Step 2: Create a Windows 11 Bootable USB Drive
After getting the ISO file of Windows 11, now you should make a Windows 11 bootable USB drive.
- Download Rufus and launch it on your PC.
- Insert your USB flash drive and select the Windows 11 ISO file you obtained. Make some settings on the drive.
- Click on START to start burning the ISO file to the USB flash drive.
Step 3: Install Windows 11 from USB
With everything ready, it’s time to start installing Windows 11. Please follow these instructions:
- Make sure your USB flash drive is connected to your computer.
- Restart your computer and press specific keys to enter the BIOS menu.
- Navigate to the Boot tab and use the arrow keys to select the USB flash drive as the first boot order. The operations vary depending on the computer.
- Save the changes and boot the PC from the bootable USB drive.
- Later, you will enter the Windows installation interface. Just specify the language, time and currency format, and keyboard method.
- Click on Install Now to continue.
- Select I don’t have a product key to continue.
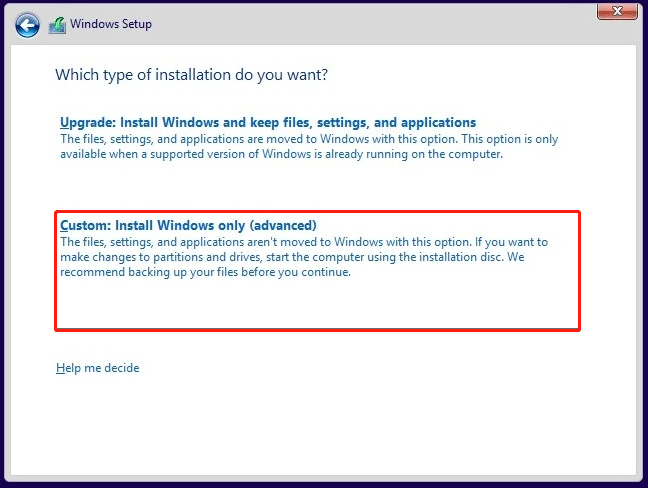
- Select the Custom: Install Windows only option and select the partition where you want to install Windows 11 and start the installation.
The installation process takes some time, so please be patient. Once the installation is complete, you should make some settings for your new operating system.
Bottom Line
Can Windows 11 run on MBR? This post has answered to you. Due to the system requirements for Windows 11 system installation, only UEFI mode installation is supported. So, you have to convert MBR disk to GPT disk. You can convert MBR to GPT in just a few clicks with the help of MiniTool Partition Wizard.
For any other opinions about this topic, you can leave a message in our comment area below. If you encounter certain issues while using MiniTool Partition Wizard, you can send us an email via [email protected] to get a quick reply.
Can Windows 11 Run on MBR FAQ
About The Author

Position: Columnist
Vega enjoys helping people with computer problems, including disk management, data recovery, data backup, and more. She is constantly expanding her knowledge in related fields. And she will continue to bring more easy-to-understand professional articles to help people solve various problems on the PC.
User Comments :