Some users reported that they ran into BUGCODE_USB_DRIVER blue screen normally once per day. This blue screen error code is rather irritating. But please do not worry. In this post, MiniTool guides you in the right direction to get rid of blue screen code.
BUGCODE_USB_DRIVER
Most users prefer connecting USB to their computers when they need to transfer files between these two devices. However, some users reported that they ran into BUGCODE_USB_DRIVER accompanied by 0x000000FE after connecting USB to the computer. What’s worse, their computer crashed many times with this error code.
Why does BUGCODE_USB_DRIVER happen? The reason for this blue screen error is various. The following content will explain the most possible reasons one by one and shows you the corresponding solutions.
How to Fix BUGCODE_USB_DRIVER
To fix BUGCODE_USB_DRIVER blue screen, you can try the following ways.
- update USB driver.
- update your Windows 10 to the latest version.
- remove improper software and services.
- modify power settings.
- scan your PC thoroughly.
- check your hard drive health and repair the found issues.
- check your RAM.
- update BIOS.
Way 1: Update USB Driver
Have you noticed one message on the blue screen when BUGCODE_USB_DRIVER occurs? The message is: The problem seems to be caused by the following file: usbhub.sys. Apart from this file, usbport.sys and winusb.sys also appear with the blue screen code.
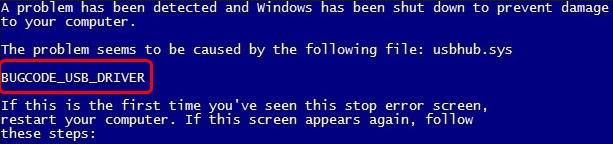
The three files are system driver files. When you run into the BUGCODE_USB_DRIVER error code and one of the three files is listed in the error message, this indicates that the USB driver goes wrong, being old or corrupted.
In this situation, you need to update the USB driver to solve BUGCODE_USB_DRIVER. This way is most successful from users’ feedback.
How to update the problematic USB driver? The tutorial is below.
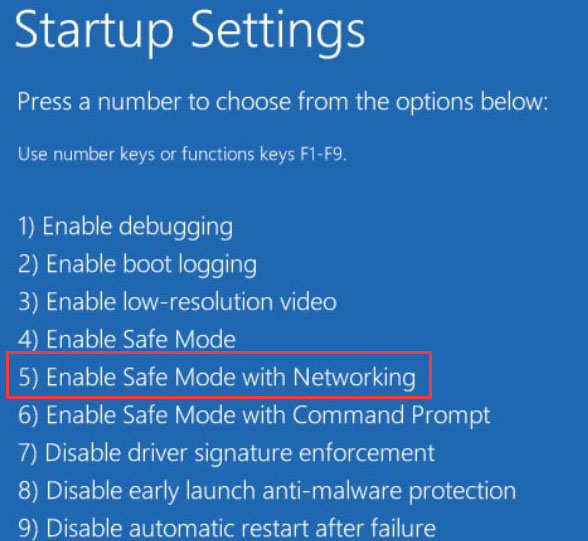
Step 1: Boot into Safe Mode if your computer cannot reboot.
- Shut down your computer and then turn on it. Repeat that until the Preparing Automatic Repair message appears on your computer screen.
- When Windows finishes diagnosing your computer, please click Advanced options > Troubleshoot > Advanced options > Startup settings > Restart.
- Hit 5 on the keyboard to enable the Safe Mode with Networking
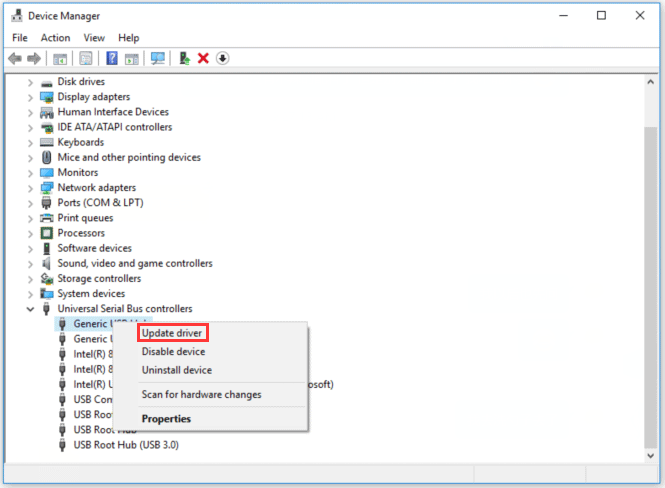
Step 2: Open Device Manager.
- Press Windows + R to call out the Run
- On the Run window, type msc and then click OK.
Step 3: On the Device Manager window, find Universal Serial Bus controllers and then double-click it. Right-click all the drivers related to USB and then click Update driver.
Step 4: Once you finish updating all USB-related drivers, please restart your computer to see if BUGCODE_USB_DRIVER blue screen appears again.
Way 2: Update Your Windows 10 to the Latest Version
As we know, Windows update always includes bug fixes and adds new features. Updating Windows 10 to the latest version can be helpful to get rid of BUGCODE_USB_DRIVER Windows 10.
To update Windows OS to the latest version, please refer to the following tutorial.
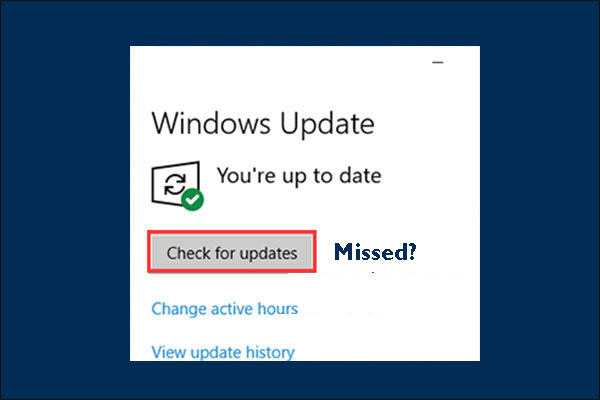
Step 1: Open Settings and then click Update & security.
Step 2: On the Update & security page, highlight the Windows Update section on the left pane and then click the Check for updates buttons from the right pane.
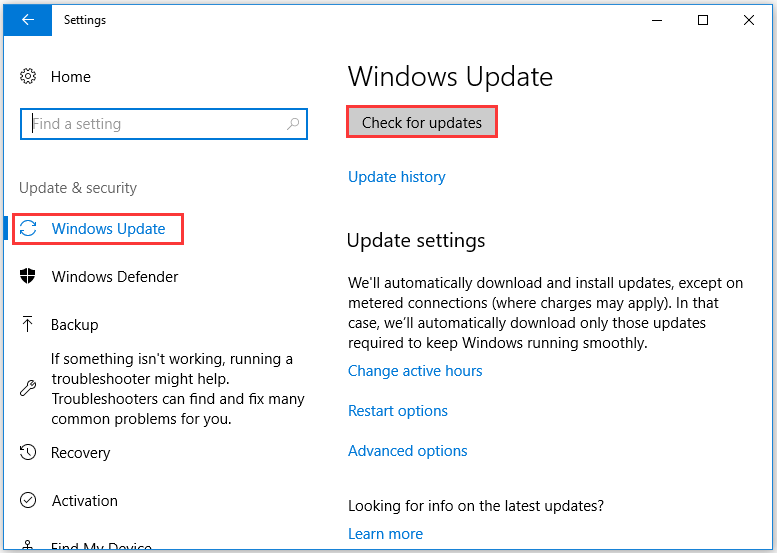
After clicking the Check for updates button, your Windows will start checking for the available Windows 10 updates and then download them automatically. If the checking result says that your PC is up to date, you should try the following ways to get rid of BUGCODE_USB_DRIVER.
Way 3: Remove Improper Software and Services
The BUGCODE_USB_DRIVER error can be also ascribed to the improper software that you have installed recently. The possible software and services include VMWare, Virtual Box, and Hyper-V Virtualization services.
If that is in the case, you need to uninstall the software that you have installed recently to see if the error is eradicated.
Way 4: Modify Power Settings
Apart from the improper software and service, the improper power settings can also lead to BUGCODE_USB_DRIVER blue screen.
To adjust the improper power settings, please follow the steps below.
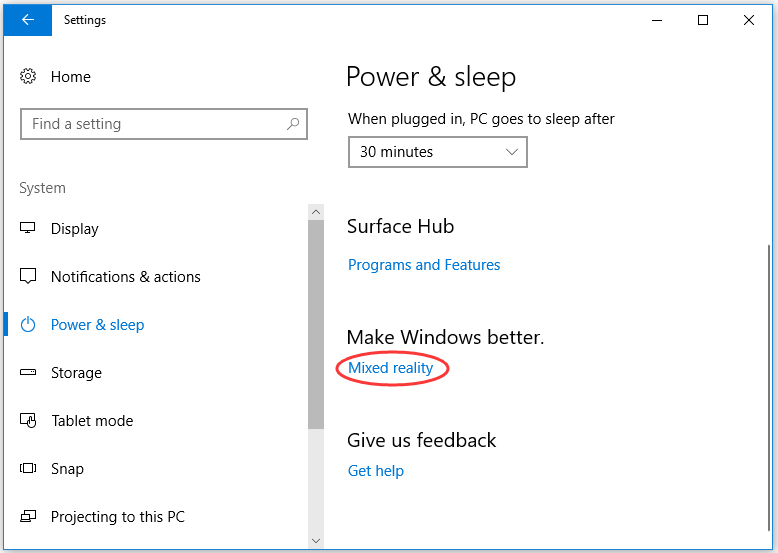
Step 1: Open Settings again and then select System.
Step 2: On the System window, please highlight the Power & sleep section and then find Mixed reality or Additional power settings on the right pane.
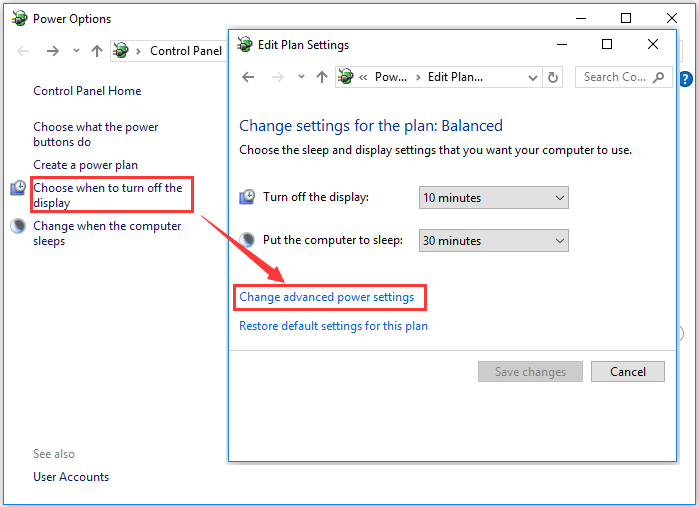
Step 3: On the newly popping-up window, please click Choose when to turn off the display on the left pane and then click Change advanced power settings on another window.
Step 4: On the new window, double-click USB settings > USB selective suspend setting. Then modify the setting of USB selective setting by choose Disable from the drop-down menu and click Apply > OK to save this change.
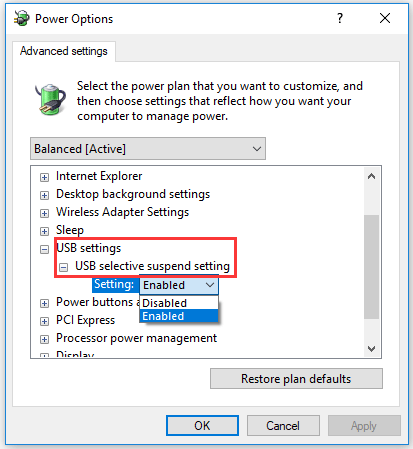
After changing the setting of USB selective suspend setting, restart you PC to see if the blue screen error related to usbhub.sys has been removed.
Way 5: Scan Your PC Thoroughly
This winusb.sys blue error can be also caused by the malware attacks that corrupt the Window files. Therefore, try scanning your PC via some antivirus programs (such as Avast and Avira) that will remove the malicious bugs affecting the system files.

Way 6: Check Hard Drive Health and Repair Found Issues
Damaged or corrupted hard drive is also one of the factors of 0x000000FE. To check whether the hard drive is responsible for the BSOD error, please go on reading.
Windows allows its users to use the chkdsk /f command to check the hard drive health. Apart from running this command, you can also try the third-party program MiniTool Partition Wizard to diagnose your hard drive health.
The tutorials on checking hard drive health via the CHKDSK command and MiniTool Partition Wizard are both displayed below.
# 1: Run CHKDSK Command
Step 1: Run Command Prompt as administrator.
- Type cmd on the Cortana’s search bar.
- Right-click the best-matched result to select Run as administrator.
Step 2: Type chkdsk /f /r on the new window and then hit the Enter key to run this command.
# Way 2: Utilize MiniTool Partition Wizard
MiniTool Partition Wizard offers you two features to check the hard drive health and they are Check File System and Surface Test. The Check File System feature helps to check the integrity of your files and the other feature helps you to intuitively see the bad sectors on your hard drive.
Let’s see how to use MiniTool Partition Wizard to check whether there is something wrong on your hard drive when you ran into BUGCODE_USB_DRIVER blue screen.
Step 1: Download MiniTool Partition Wizard by clicking the following downloadable button. After that, install this program and launch it to get its main interface.
MiniTool Partition Wizard FreeClick to Download100%Clean & Safe
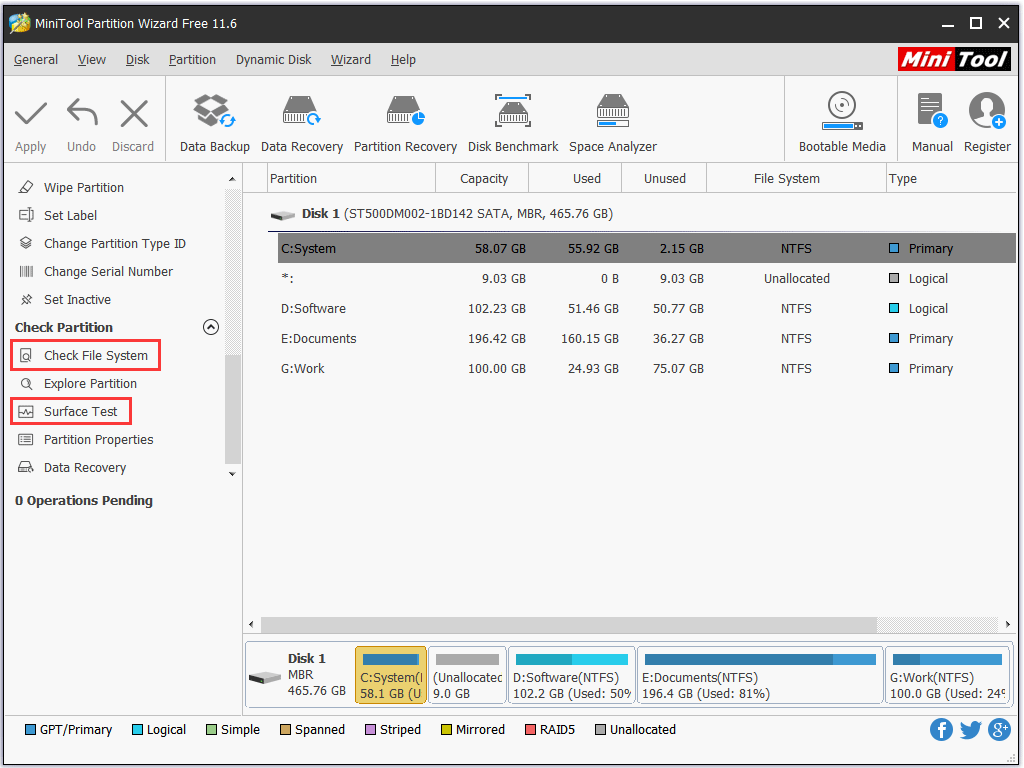
Step 2: Check the integrity of system partition.
- Highlight the system partition on the Disk Map and then choose Check File System from the left pane.
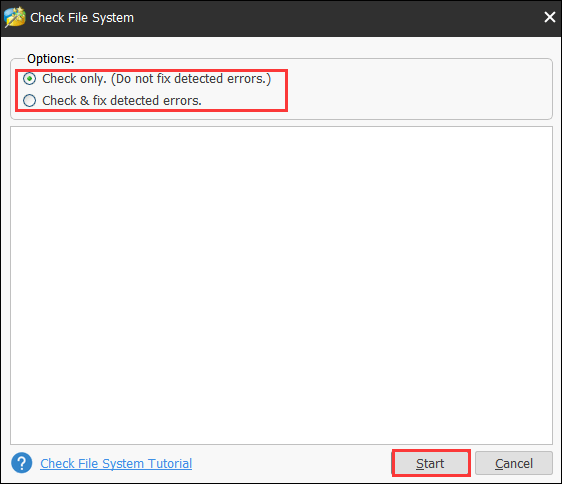
- On the new window, select Check only or Check & fix the detected errors (recommended) and then click the Start button. This feature starts to detect the errors on your hard drive.
- View the information on the window when the checking process comes to an end.
Step 3: Check if there are bad sectors on your system partition.
- Highlight the system partition again (to check the whole hard drive, just highlight the disk) and then select Surface Test from the left pane.
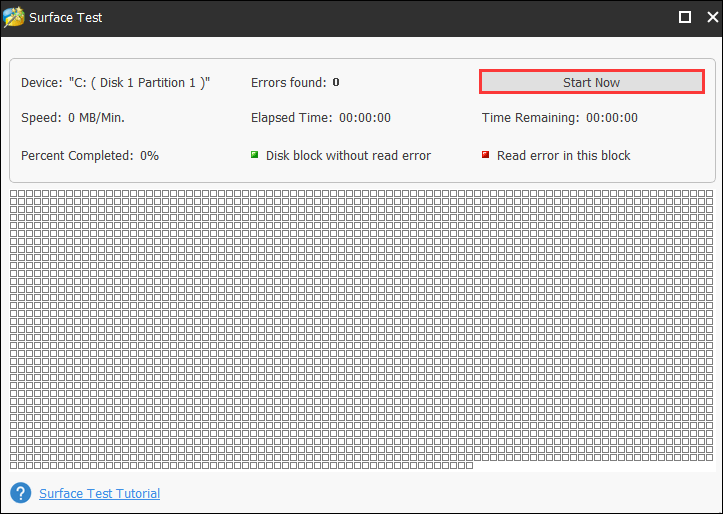
- Click the Start Now The Surface Test starts detecting the bad sectors.
- View the checking result. Red squares represent the bad sectors and green hard drive means sectors on hard drive are healthy.
If there are too many errors, you might need to replace the problematic hard disk with a good one.

Way 7: Check Your RAM
Another hardware issue that can cause BUGCODE_USB_DRIVER is the corrupted RAM. If that is the case, please try to check whether your RAM has gone wrong.
To test your RAM, please read the post Here Are Free RAM Test Programs to Check Your Computer’s RAM. From this post, you can know how to conduct RAM test with different 4 ways.
Way 8: Update BIOS
BUGCODE_USB_DRIVER blue screen can be due to the fault in your motherboard. If that is in the case, you can try updating BIOS to correct the fault as updating BIOS unlocks new features of the motherboard and it allows the motherboard to work with different hardware.
Here is the tutorial on updating BIOS. Carry out the steps below carefully.
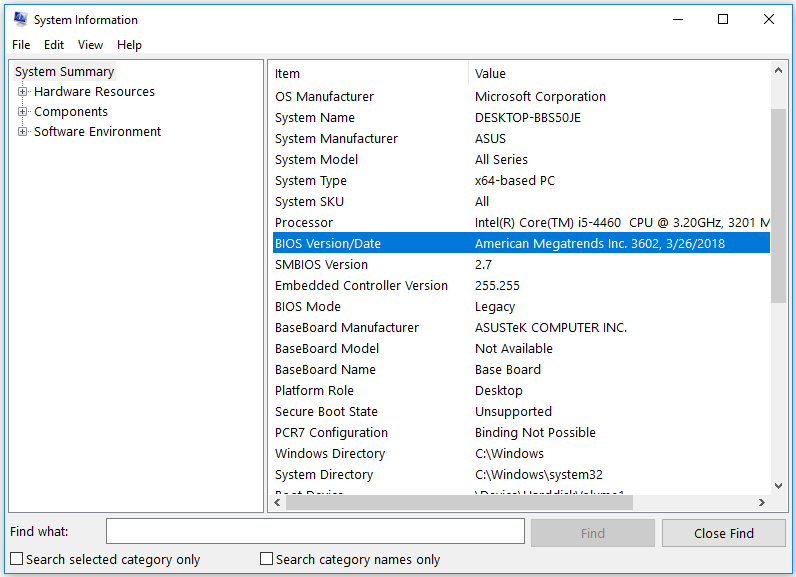
Step 1: Check your BIOS version.
- Press Windows + R to call out the Run window.
- Type msinfo32 on the Run window and click OK.
- On the new window, find BIOS Version/Date to check your BIOS version.
Step 2: Download the BIOS files.
- Head to the motherboard manufacturer’s website and find the Downloads or Support page for your specific model of motherboard. A list of available BIOS should be displayed here.
- Download the BIOS version to which you want to update from the list, normally the newest one.
- After downloading, unzip the BIOS update file and then transfer the file onto a blank USB flash drive.
Step 3: Update BIOS.
- Restart your computer into the UEFI control panel.
- Launch the UEFI firmware update tool or the flashing tool and back up your PC’s existing firmware to your flash drive.
- Use the same firmware update utility to select the BIOS update files you have saved on the flash drive (warning: do not shun off your PC during the process).
- When the flashing process finishes, restart your computer. Your updated PC BIOS is ready to rock.
We Want Your Voice
This article comes to an end. Have the mentioned ways successfully helped you get rid of ‘BUGCODE_USB_DRIVER Windows 10’?
If you have any doubts about the mentioned ways, please leave a comment in the following comment zone or you can also contact us directly via [email protected]. We will reply to you as soon as possible.
User Comments :