Firestick is an amazing and convenient streaming device. But if you like to install software on it, its memory space is not enough for use. In this post, MiniTool Partition Wizard will show you how to add storage to Fire Stick.
What Is Fire TV Stick?
Fire TV Stick is the smaller dongle version of the Fire TV that is plugged into an HDMI port. With this device, you can stream media output to your TV.
The Fire TV Stick is very small and it has only 2 ports:
- A micro-USB port. It is designed for power only. But in this post, we will use it to add storage to the Fire Stick.
- An HDMI plug. It is used to output the audios and videos to TV. With this plug, you can insert the Fire Stick into your TV or an HDMI extender.
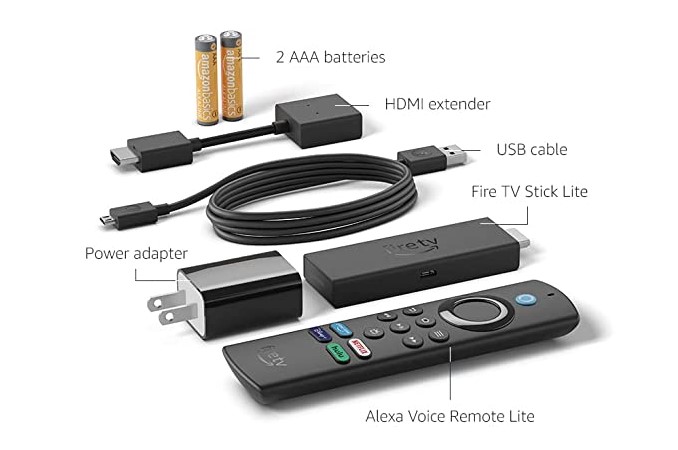
If you buy a Fire TV Stick from Amazon, you will get other components like one HDMI extender, one Power adapter, one USB cable, and one Remote.
- Power adapter and USB cable: You need to plug the USB end of the USB cable into the power adapter, and then plug the Micro USB end into the micro-USB port on the Fire Stick.
- HDMI extender: If you don’t have enough room to fit your Fire TV Stick behind your TV, you need this device. One end is plugged into an HDMI port on your TV while the other end is used to accommodate the Fire Stick HDMI plug.
- Remote: If the original remote is not compatible with the Fire TV Stick, you need to use this remote.
Fire TV, Fire TV Cube, and Fire TV Stick are different product lines. They have different shapes and part of their features may be different. In this post, I mainly focus on how to add storage to Fire TV Stick.
Why Do You Need to Add Storage to the Fire Stick?
All Fire TV Stick models only have 8GB of inner storage space. After installing the pre-installed app, only around 5.5GB of usable space will be left for you.
This is not enough if you want to install more apps on the Fire Stick. So, you may need to expand the storage on the Fire Stick.
You can find that the internal storage device of the Fire Stick can’t be changed because it is soldered in the Fire Stick, so the best way to increase the storage space on the Fire Stick is to add a USB drive.
Preparatory Work
Before adding space to the Fire Stick, you need to do some preparations.
# 1. Prepare a USB Drive
To add storage to Fire Stick via a USB drive, you need to purchase a proper USB drive first. The USB drive needs to meet the following conditions:
- Storage: No more than 2TB. Amazon officially recommends 128GB.
- Port: USB 3.0 or 2.0, but USB 3.0 is better.
# 2. Format the USB Flash Drive to FAT32
The Fire Stick only supports the FAT 32 file system. So, you need to format the USB flash drive to FAT32 before connecting it to your Fire Stick.
To format your USB flash drive, you can use MiniTool Partition Wizard to help you to finish it. MiniTool Partition Wizard is a useful tool for formatting a USB flash drive or hard disk and so on.
You need to download it on your computer before formatting the USB flash drive. You can follow the steps to format your USB flash drive.
MiniTool Partition Wizard FreeClick to Download100%Clean & Safe
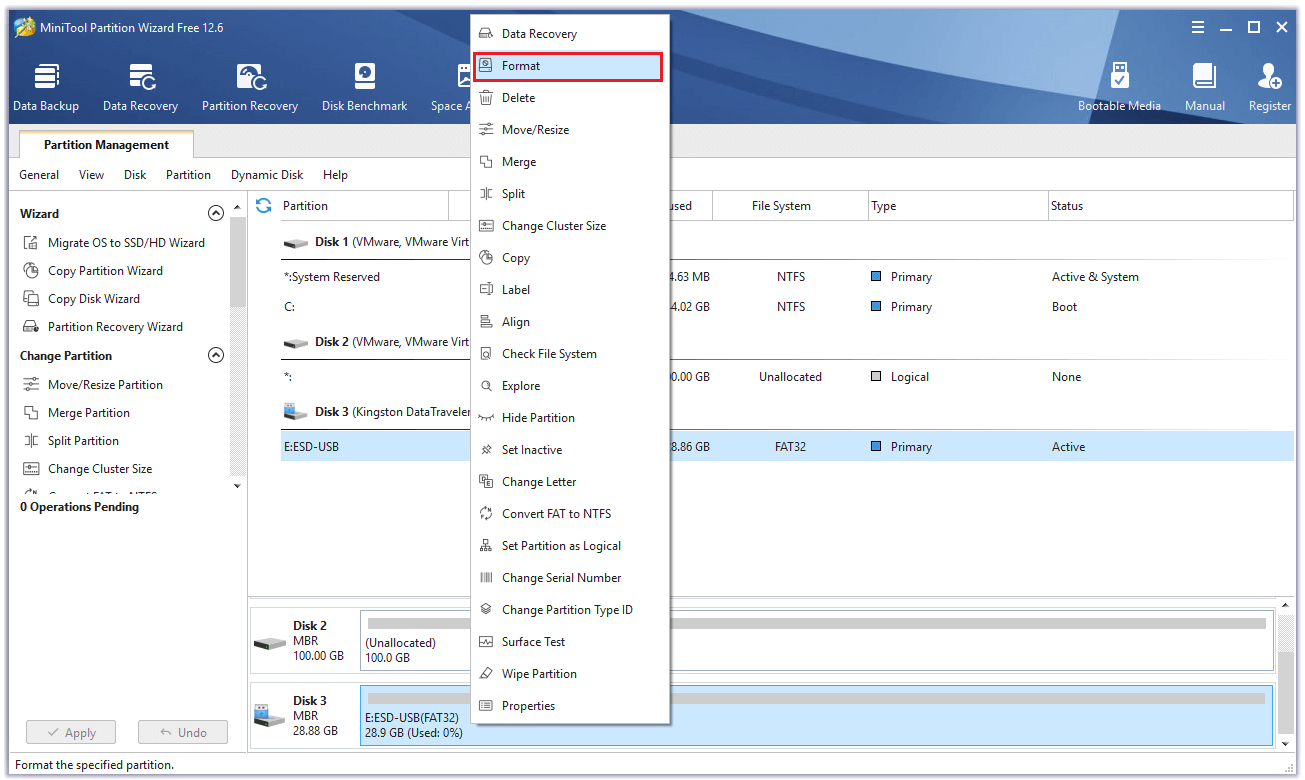
Step 1. Plug your USB flash drive into your computer, and open the MiniTool Partition Wizard.
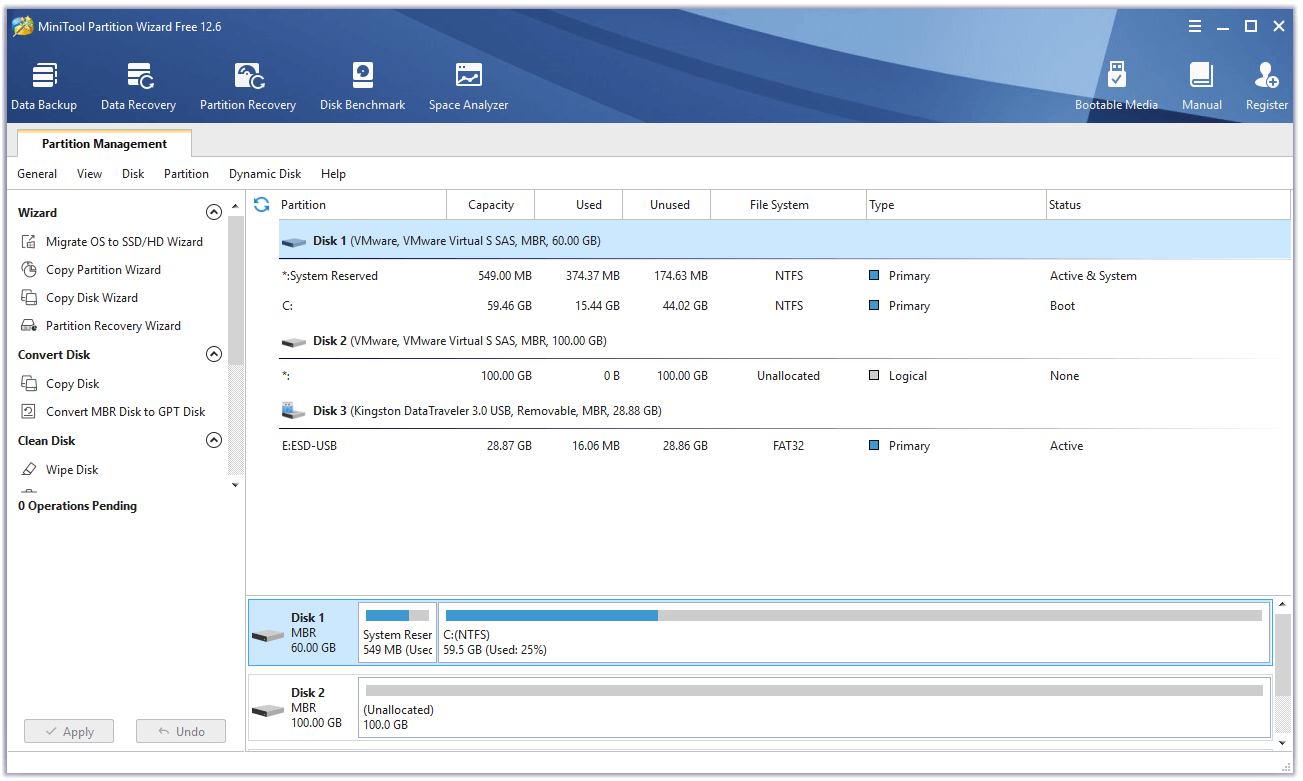
Step 2. Scroll down to find your USB flash drive. Right-click it and select Format from the menu.
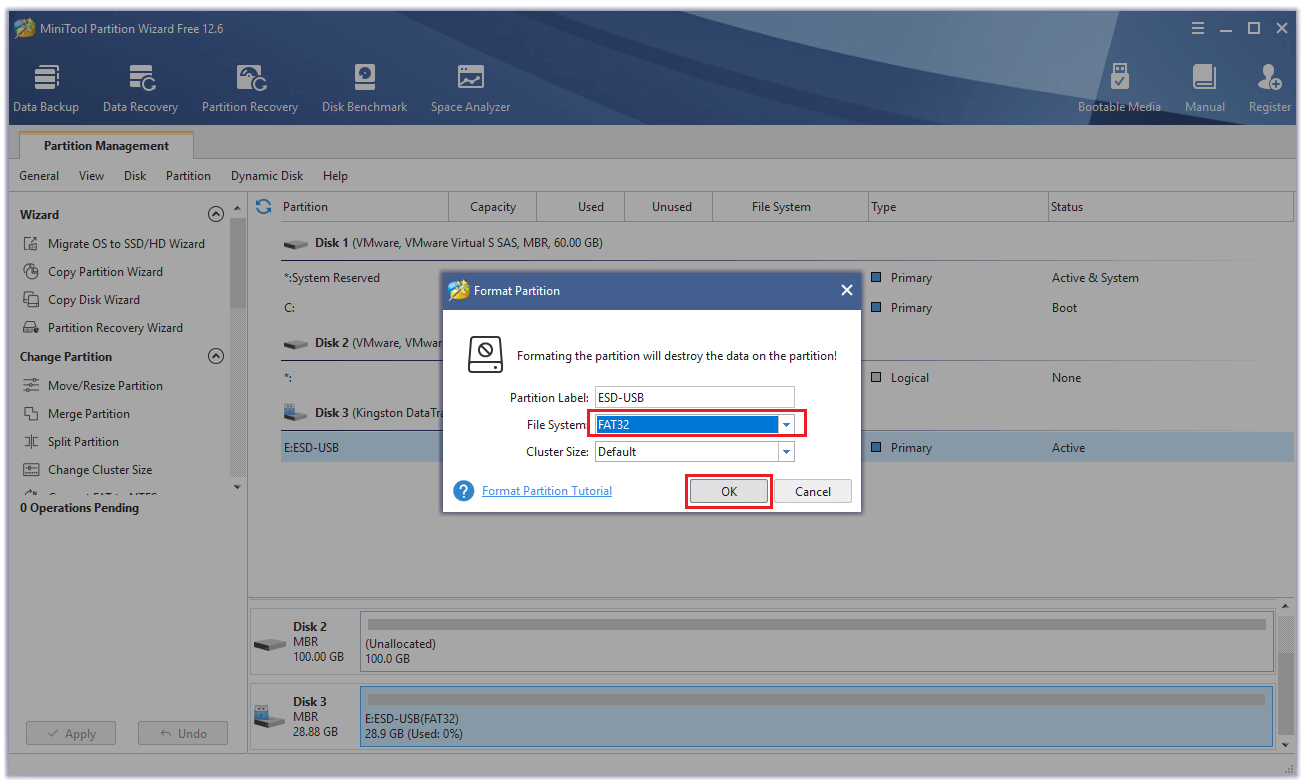
Step 3. Select the FAT32 file system from the drop-down menu of File System. Then click Ok.
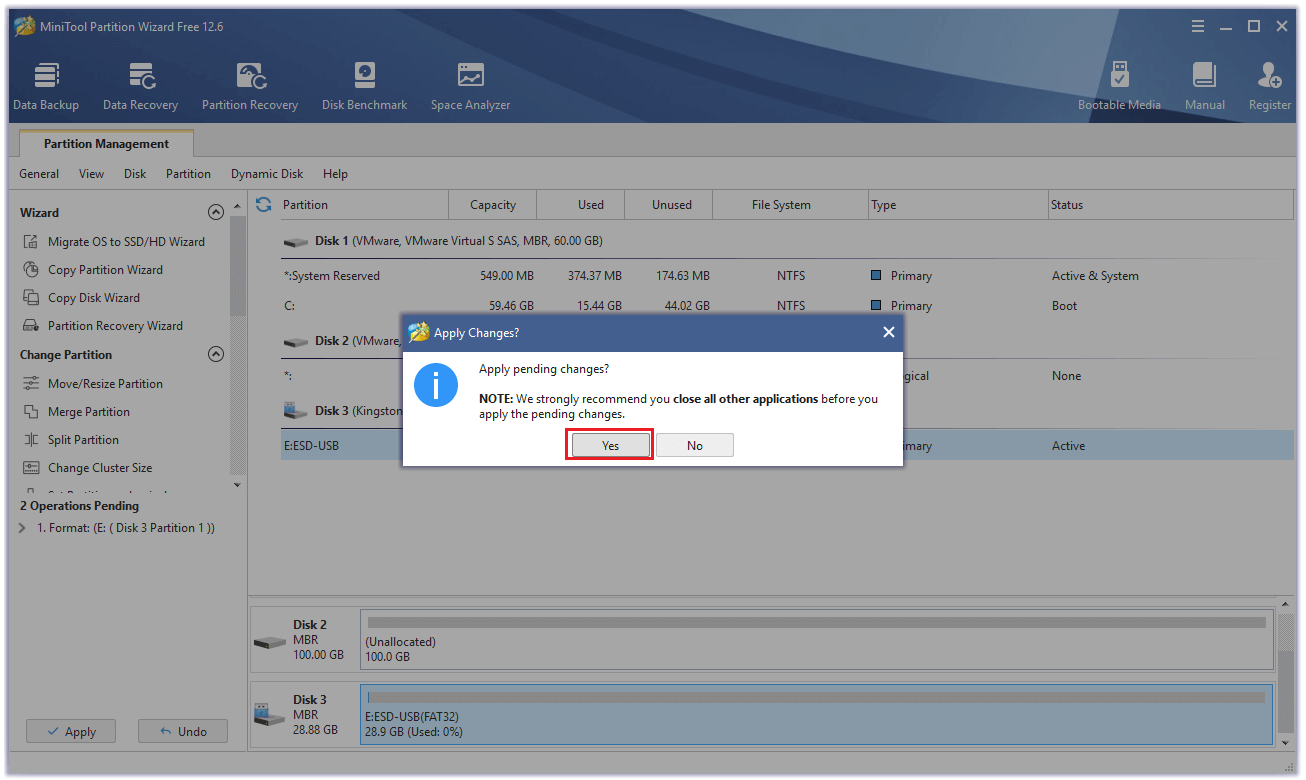
Step 4. You need to check the changes under the Operation Pending section. Then click Apply to execute the changes you want.

Step 5. Click Yes to confirm and execute the change.
# 3. Connect the USB Drive to the Fire TV Stick via an OTG Cable
The Fire Stick has only two interfaces. The HDMI plug is used to connect the TV for picture output. Only the micro-USB port can be used to connect both the power and the USB drive. Therefore, a three-port OTG is required.
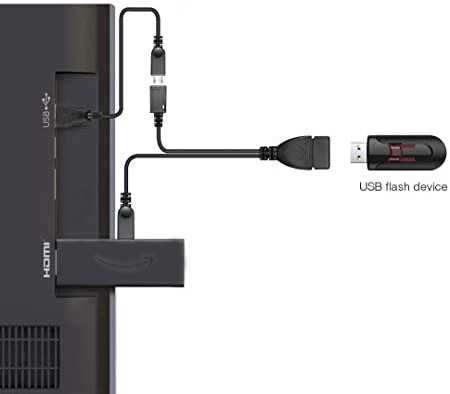
How to connect the USB drive to the Fire TV Stick with the OTG cable? Here is the way:
- Insert the USB flash drive into the USB port of the OTG cable.
- Then connect the Micro USB end of the OTG cable to the Fire Stick’s micro-USB port.
- Finally, connect the last port of the OTG cable to the power adapter.
How to Add Internal Storage to Fire Stick
After the USB drive is connected to the Fire TV Stick, the Fire TV Stick models will detect the USB drive automatically and use the USB drive as external storage. Then, the Fire TV Stick can use the USB drive to store data such as movies, files, music etc.
However, if you want to install apps on the USB drive, you need to use the USB drive as internal storage. This requires you to perform more steps according to your Fire TV Stick mode.
So far, Amazon has released 7 Fire TV Stick models in total. The specific models are as follows:
- Fire TV Stick – 1st Gen (2014, Fire OS 5)
- Fire TV Stick – Basic Edition (2017, Fire OS 5)
- Fire TV Stick 4K – 1st Gen (2018, Fire OS 6)
- Fire TV Stick – 2nd Gen (2016-2019, Fire OS 5)
- Fire TV Stick Lite – 1st Gen (2020, Fire OS 7)
- Fire TV Stick – 3rd Gen (2020, Fire OS 7)
- Fire TV Stick 4K Max – 1st Gen (2021, Fire OS 7)
The Fire TV Stick 1st Gen doesn’t support the storage expansion feature (neither internal nor external).
The Fire TV Stick 2nd Gen, the Fire TV Stick Basic Edition, and the Fire TV Stick 4K 1st Gen only support using the USB drive as external storage.
The Fire TV Stick 3rd Gen, the Fire TV Stick Lite 1st Gen, and the Fire TV Stick 4K Max 1st Gen offer the full storage expansion feature. They allow you to use the USB drive as internal or external storage easily.
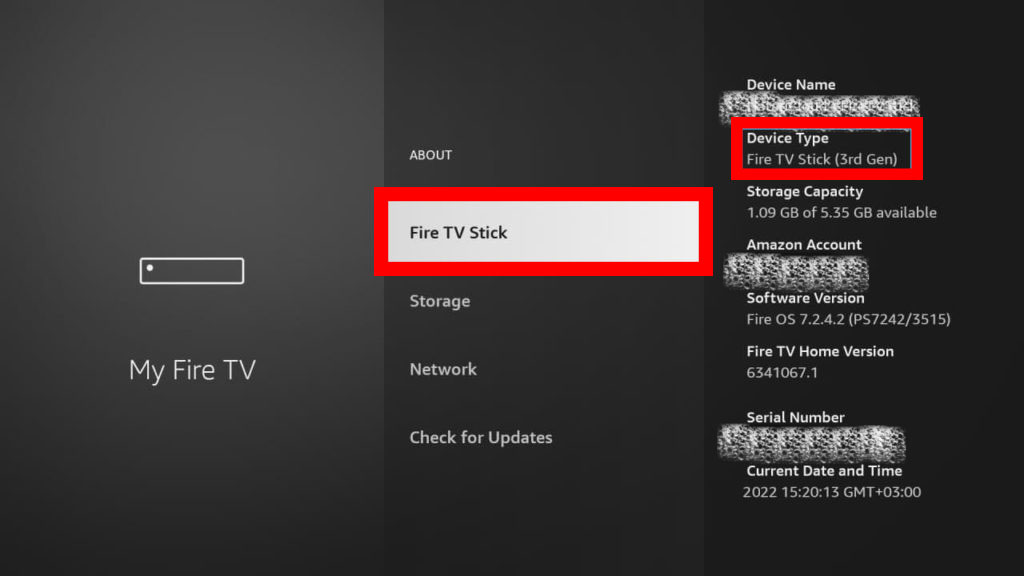
What Fire Stick model are you using? You can check that in Settings. Here’s the way:
- Click on the Settings icon.
- Select My Fire TV.
- Go to About.
- Then select the Fire TV Stick.
- After that, you can see the Device Type and other information in the right of the screen.
How to Add Internal Storage to Fire OS 7
This way works for Fire TV Stick models with Fire OS 7 installed.
- Select the Settings icon and then click My Fire TV after connecting your OTG adapter to a USB flash drive and a Fire TV Stick.
- Click USB Drive. Then you can see two options: Eject USB Drive and Format to Internal Storage.
- Click Format to Internal Storage. Once done, click OK. After that, you can move apps to the USB drive.
How to Add Internal Storage to Fire OS 6/5
For those Fire TV Stick models running Fire OS 6/5, they don’t offer the internal storage expansion feature. Fortunately, there is another way for them to add internal storage, but the Remote ADB app is required.
This method doesn’t work for the Fire TV Stick 1st Gen because it doesn’t recognize the USB drive at all.
The ADB (Android Debug Bridge) is designed for Android developers/tester. With this tool, you can make Fire OS, which is based on Android OS, to do what it cannot do usually. Here is the guide:
Step 1. Prepare the Fire TV Stick to install the Remote ADB app.
- Turn on the TV and Fire Stick. When the TV and the Fire Stick are on, you will see the Fire Stick home screen. Then you need to click the gear icon in the right corner of the screen to open Settings.
- Click My Fire TV on the left-bottom of the page.
- Select Developer options on the new page.
- Then you will see two options on the screen. One is ADB debugging and the other is Apps from Unknown Sources. Enable the two options.
- Back to the My Fire TV page and click the About button.
- Then you need to find the Network and write down the IP Address on the right of the screen.
Step 2. Install the Remote ADB app on your Fire Stick. You can’t find the Remote ADB app directly on the App Store. So, you need to install it from a third-party app store like Downloader. Here’re the ways:
- You need go back to the Fire Stick home page at first.
- Click the Find option on this page.
- Then click the Search option and type “Downloader“.
- Select the Downloader app to download and install.
- Open the Downloader app and grant all the permissions the app needs.
- Skip the Quick Tour Guide and find the input text field for a URL. Use the URL “https://tinyurl.com/2p837f7b” or “com/radb” to get the Remote ADB app and click the Go button.
- Next, click INSTALL to install the ADB app.
Step 3: Grant the control of the Fire TV Stick to the ADB app.
- Launch the Remote ADB app and click OK.
- After that, the Remote ADB app will remind the user of a New Pair Key Generated.
- Click OK and input the IP address that you write down before.
- Click Next to input “5555” below the IP address.
- Then click Next again.
- Click CONNECT in the last.
- Once done, the application will push out two messages on the screen. You should click OK for both the two messages.
Step 4: Check the disk information of the Fire TV Stick.
- The Fire Stick screen should show a Command Prompt and a Select button.
- Click the button to open the keyboard.
- Type “sm list-disks” on the Command Prompt page and click Run to return the “ID” of the disk.
- Then, you will see the disk name. Write down it.
Step 5. Then you need to decide how to format the USB flash drive. The following 2 schemes are recommended.
- Format the entire USB drive to internal storage. You need to type the command “sm partition disk:* private“.
- Format the USB drive for both internal and external storage use. You need to type the command “sm partition disk:* mixed 50“. This command will divide the USB drive into 2 equal partitions. One is for internal storage and the other is for external storage. If you want to change the ratio, you just need to change the 50 to a different number.
The "*" is the name of the disk. You should replace it accordingly.
Step 6. After the formatting process is completed, type “df -h” and click the Run button. It will return you the partition information including the layout and size. You can check whether the disk partition scheme is what you want.

How to Move Apps to the USB Drive
After formatting the USB drive to internal storage, you can then move apps to the USB drive. How to do that? You can follow ways below.
On Fire OS 7
- Go to Settings > My Fire TV and click USB Drive. Then you will have two options. One is Format to External Storage, and the other is Manage Installed Applications. Click Manage Installed Applications.
- Click Show on the new page, then click All Applications. After that, you will now see a list of all the applications installed on your Fire Stick.
- You can select your applications, such as Kodi. Then you will see the option “Move to USB Storage.”
Further Reading:
There are some applications that you can’t move to USB storage using the above way, such as Netflix. In this case, you need to use X-Plore File Manager to move these apps to the USB drive. Here is the guide:
- Download and install X-Plore File Manager from the Amazon App Store.
- Launch X-Plore File Manager and then scroll down to select App Manager.
- You will find a sub-menu below the App Manager. You need to scroll down to select Installed.
- Find Netflix and press the Select button for a few seconds. Click Copy to clipboard.
- Scroll up to select the Internal shared storage. Click Download and hold down the OK Then select Paste. After that, you can see Netflix’s installation file. But please don’t click it currently.
- Then you need to go back to the My Fire TV and go to the Applications. Click on the option that allows the user to manage the installed applications. Click Netflix here and click Uninstall on the new page.
- Next, you need to back to the My Fire TV page again and go to the Developer Then select Install Unknown Apps and you will see many apps here. Find the X-Plore File Manager app and turn the option to ON.
- Back to the home screen to launch the X-Plore File Manager and click the Netflix APK file in it to install the Netflix.
- After that, you will see the Netflix on your external USB flash drive.
On Fire OS 6/5
- Launch the Remote ADB Shell App and type df -h to get the partition ID where you want to move the application.
- Write down or take a screenshot of the partition ID, for example, b364d821-f0b7-4f6f-8c67-eeb62f364ae1.
- Use the command pm list packages to list all the package names installed on the device.
- Write down the package name of the app you want to move, for example, com.amazon.venezia.
- You can use commands to move the application. The command formula is pm move-package + Android package name + partition ID. For example, pm move-package com.amazon.venezia b364d821-f0b7-4f6f-8c67-eeb62f364ae1.
- If the process is completed properly, you will see a success message. Then, on the Manage Installed Applications menu, you will see a USB icon appears beside the app.
Bottom Line
After reading this post, you can know how to add storage to Fire Stick. If you have any problems that you can’t solve by yourself, you can leave comments to discuss below. If you have any problem with MiniTool Partition Wizard, please send us an email via [email protected].
About The Author

Position: Columnist
Charlotte is a technology columnist with a strong focus on the Windows operating system, specializing in disk management, backup, and data recovery. She is passionate about analyzing computer errors, identifying root causes, and delivering practical solutions. In her free time, she stays updated on the latest developments in computer systems and hardware while continuously learning new technologies to broaden her expertise. Her writing style is clear and easy to understand, making complex technical topics accessible even to users with limited computer knowledge.
User Comments :